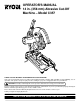
a OPERATOR'S MANUAL 14 in. (356 mm) Abrasive Cut-Off Machine – Model C357 a 0 1 5 THANK YOU FOR BUYING A RYOBI ABRASIVE CUT-OFF MACHINE. Your new cut-off machine has been engineered and manufactured to Ryobi's high standards for dependability, ease of operation, and operator safety. Properly cared for, it will give you years of rugged, trouble-free performance. CAUTION: Carefully read through this entire operator's manual before using your new machine.
TABLE OF CONTENTS ■ Table of Contents ........................................................................................................................................ 2 ■ Rules for Safe Operation ......................................................................................................................... 3-6 ■ Electrical ......................................................................................................................................................
RULES FOR SAFE OPERATION The purpose of safety symbols is to attract your attention to possible dangers. The safety symbols, and the explanations with them, deserve your careful attention and understanding. The safety warnings do not by themselves eliminate any danger. The instructions or warnings they give are not substitutes for proper accident prevention measures. SYMBOL MEANING SAFETY ALERT SYMBOL: Indicates danger, warning, or caution. May be used in conjunction with other symbols or pictographs.
RULES FOR SAFE OPERATION Safe operation of this power tool requires that you read and understand this operator's manual and all labels affixed to the tool. Safety is a combination of common sense, staying alert, and knowing how your cut-off machine works. READ ALL INSTRUCTIONS ■ KNOW YOUR POWER TOOL. Read the operator's manual carefully. Learn the cut-off machine's applications and limitations as well as the specific potential hazards related to this tool.
RULES FOR SAFE OPERATION WARNING: Wheel coasts after turn off. ■ NEVER USE IN AN EXPLOSIVE ATMOSPHERE. Normal sparking of the motor or sparking from cutting metal could ignite fumes. ■ INSPECT TOOL CORDS PERIODICALLY and if damaged, have repaired at your nearest Ryobi Authorized Service Center. Stay constantly aware of cord location and keep it well away from the rotating wheel. ■ USE OUTDOOR EXTENSION CORDS.
RULES FOR SAFE OPERATION WARNING: Some dust created by power sanding, sawing, grinding, drilling, and other construction activities contains chemicals known to cause cancer, birth defects or other reproductive harm. Some examples of these chemicals are: • lead from lead-based paints, • crystalline silica from bricks and cement and other masonry products, and • arsenic and chromium from chemically-treated lumber. Your risk from these exposures varies, depending on how often you do this type of work.
UNPACKING AND LOOSE PARTS Your abrasive cut-off machine has been shipped completely assembled. ■ Remove all loose parts from the carton. ■ Remove the packing materials from around your machine. ■ Carefully lift the cut-off machine from the carton and place it on a level work surface. This is a heavy tool. To avoid back injury, get help when needed.
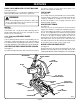
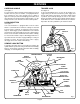
a FEATURES KNOW YOUR ABRASIVE CUT-OFF MACHINE See Figures 2 and 3. Before attempting to use your machine, familiarize yourself with all operating features and safety requirements. WARNING: Do not allow familiarity with your machine to make you careless. Remember that a careless fraction of a second is sufficient to inflict severe injury. the wheel. It retracts over the upper wheel guard as the wheel is lowered into the workpiece. VISE CLAMP See Figure 2.
a a FEATURES CARRYING HANDLE TRIGGER LOCK See Figure 3. For convenience when carrying or transporting your cut-off machine from one place to another, a carrying handle has been provided on top of the machine arm as shown in figure 3. To transport, turn off and unplug your machine, then lower machine arm and lock it in the down position. Use the transport chain to lock machine arm in the down position. LOCK-ON BUTTON See Figure 4.
ADJUSTMENTS a INNER WASHER WARNING: To prevent accidental starting that could cause possible serious personal injury, assemble all parts to your cut-off machine before connecting it to power supply. Machine should never be connected to power supply when you are assembling parts, making adjustments, installing or removing wheels, or when not in use. BL AD E R O TA T I0 N WHEEL ARBOR 14 in.
aa aa ADJUSTMENTS ADJUSTABLE FENCE See Figure 6. The adjustable fence is located at the rear of your cut-off machine. As mentioned previously, it is used along with the vise clamp to provide a clamp for holding your workpiece securely when making cuts. It also makes your cut-off machine more versatile. SCALE INDICATOR The fence can be rotated to obtain cutting angles from 0° to 45°.
a aa ADJUSTMENTS ■ Using the 8 mm hex key supplied, securely tighten socket head bolts. Return hex key to its storage area in base. ■ This position is good for cutting thin and wide pieces of stock, such as flat or angled stock. ■ To increase the height of cut of your cut-off machine, follow the above procedure except place the rear socket head bolt in the middle threaded hole and the front socket head bolt in the front threaded hole. ■ Check and adjust fence to desired cutting angle.
a ADJUSTMENTS a DEPTH STOP The depth stop limits the wheel's downward travel. It allows the wheel to go below the machine base enough to maintain full cutting capacities. The adjustable depth stop is a bolt threaded into the base of the machine at the rear. To adjust the depth stop use the 8 mm hex key supplied to raise or lower the depth stop bolt. The depth stop is factory set to provide maximum cutting capacity for the 14 in. (356 mm) abrasive wheel provided with your cut-off machine.
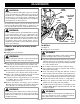
aa a a OPERATION POWER SUPPLY SWITCH SWITCH TRIGGER MACHINE ARM (HANDLE) LOCK-ON BUTTON aa Before operating your cut-off machine, check your power supply and make sure it meets the requirements listed on the tool’s data plate. A substantial voltage drop will cause a loss of power and machine overheating. Common causes of power loss and machine overheating are insufficient extension cord size and multiple tools operating from the same power source.
aa a a OPERATION CUT-OFF MACHINE ARM (HANDLE) See Figures 14 and 15. aa A cut-off is made by cutting across the width of the workpiece. A straight crosscut is made with the adjustable fence set at the zero degree position. Angled cut-offs are made with the adjustable fence set at some angle other than zero. SWITCH TRIGGER ADJUSTABLE FENCE To cut with your cut-off machine: ■ Firmly secure the material to be cut using the machine’s vise (adjustable fence and vise clamp).
MAINTENANCE EXTENSION CORDS WARNING: When servicing, use only identical Ryobi replacement parts. Use of any other part may create a hazard or cause product damage. GENERAL Avoid using solvents when cleaning plastic parts. Most plastics are susceptible to damage from various types of commercial solvents and may be damaged by their use. Use a clean cloth to remove dirt, carbon dust, etc. The use of any extension cord will cause some loss of power.
MAINTENANCE WARNING: To ensure safety and reliability, all repairs — with the exception of the externally accessible brushes — should be performed by a Ryobi Authorized Service Center. BRUSH CAP BRUSH ASSEMBLY BRUSH REPLACEMENT a a See Figure 16. Your cut-off machine has externally accessible brush assemblies that should be periodically checked for wear. Proceed as follows when replacement is required: BRUSH ASSEMBLY ■ Unplug your cut-off machine.
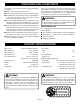
TROUBLESHOOTING PROBLEM CAUSE SOLUTION Motor does not reach full speed or power. 1. Voltage from power source is low. 1. Request a voltage check from the power company. 2. Test on a different circuit or without anything else on circuit. 3. Have tool serviced and request a voltage check from the power company. 4. Have an electrician replace with a 15 amp fuse or circuit breaker. 5. Use a shorter extension cord. 6. Have the switch replaced at your nearest authorized service center. 2.
NOTES Page 19
OPERATOR'S MANUAL 14 in. (356 mm) Abrasive Cut-Off Model C357 EXTENSION CORD CAUTION When using a power tool at a considerable distance from a power source, be sure to use an extension cord that has the capacity to handle the current the tool will draw. An undersized cord will cause a drop in line voltage, resulting in overheating and loss of power. Use the chart to determine the minimum wire size required in an extension cord. Only round jacketed cords should be used.