
Operating instructions


9
Sabine SWM4000 Smart Spectrum
®
Wireless
LIT-SWM4000-OG-EN-100205.indd
© 2010 Sabine, Inc.
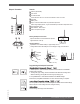
Setting up your Wireless Systems
1. Plug the PSU power supply into the wall socket and receiver.
2. (SW40-RH) Push the MENU button until the words Auto Select appear in the LCD. (SW40-RF) Push the MENU button until the words
scan appear in the LCD.
3. Push the SET button. The SW40-RH or SW-40-RF will set itself to a clear channel and display the channel on the receiver LCD.
4. Turn on a transmitter (leave the other transmitters turned off). Aim the transmitter’s IR sensor about 8 inches from the receiver’s IR
scanner and press the receiver’s S.O. (SYNC) button for several seconds while the receiver programs the transmitter. When the group
and channel numbers on the transmitter matches the receiver, the system is ready to operate. When you are standing close, the RF
LED ladder on the SW40-RH should be fully lit or, on the SW40-RF, the RF LED bar will be lit.
5. Speak, sing or play into the transmitter to adjust the volume control so that the A.F. LEDs generally light under normal performance
conditions. The volume should be adjusted so that the top A.F. LED only lights momentarily with the loudest inputs. You will hear a
harsh clipping sound if the top LED stays lit under normal levels.
6. Adjusting the squelch. The squelch controls the maximum distance between the transmitter and receiver. It is set to maximum range
at the factory and should be kept there in most cases.
For Multiple Systems
• Repeat steps 1 – 6 if you wish to add more systems. IMPORTANT: Make sure to keep the transmitters that have been set up
turned on so that new receivers will know those channel are busy.
• See Appendix A (pg.10) for manually selecting the frequencies of your system.
• Be sure that only one transmitter’s IR port is exposed when setting up a system.
Expose the IR port to the receiver (within 8 inches), press S.O. (SYNC)
SW40-T
SW40-R
SW40-RH