
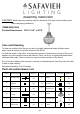
Owner Manual

Installation
Step 1
Unpack all parts from cartons carefully.
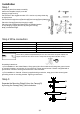
Attach the Closable Link(G1) onto the
Hanging Loop(E and H)
Put the wire in the ring(like number 3/7/11 and so on) every three rings
as right picture.
Put the wire through the nut(F)and loop(E)and canopy(D)and plate(A)
Place the Canopy(D)onto the Hanging Loop(E)
Place the tube of Mounting Plate(A)into the theaded portion
of the Hanging Loop(E) and fix it by turing the Canopy
Nut(F) clockwise till tight.
Step 2 Wire connection
Connect,Hot,Black or Red outlet Supply Wire to: Connect,Neutral,White Outlet Supply Wire to:
Black White
*Parallel Cord(round&smooth) *Parallel Cord(square&ridged)
Clear,Brown,Gold or Black without Tracer(colored stripes
)
Clear,Brwn,Gold or Black without Tracer(colored stripes)
Insulated Wire(not green)with silver metal conductor Insulated Wire(not green)with Silver metal conductor
*Note: When parallel wire(SPTI&SPTII)is used. The neutral wire is square shaped and
ridged and the hot wire will be round in shape and smooth.(See illustration on left)
Grounding Instructions:
a) For installation in the United States: Wrap ground wire from outlet box around green ground screw
on mounting bracket, no less than 2" from wire end. Tighten ground screw. If fixture is supplied with a
ground wire, connect to outlet ground wire with a wire connector.
b) For installation in Canada: If fixture is supplied with ground wire, wrap ground wire around green
grounding screw on mounting bracket. Tighten ground screw.
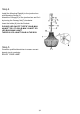
Step 3
Seperate the Mounting Plate(A) from the Canopy(D)
by turning the Canopy Nut(F) anti-clockwise.
D
F
E
A
2/3