the Fast Slow Pro™ Instruction Book - BPR700
Contents 2 Sage Recommends Safety First 8 Components 10 Important Safety Information for your Fast Slow Pro™ 14 Functions 26 Care & Cleaning 28 Troubleshooting SAGE RECOMMENDS SAFETY FIRST At Sage‰ by Heston Blumenthal‰ we are very safety conscious. We design and manufacture consumer products with the safety of you, our valued customer, foremost in mind. In addition we ask that you exercise a degree of care when using any electrical appliance and adhere to the following precautions.
• Never use your pressure cooker without adding water, this would seriously damage it. • Do not fill the cooker beyond M of its capacity. When cooking foodstuffs which expand during cooking, such as rice or dehydrated vegetables, do not fill the cooker to more than half of its capacity. • The heating source necessary for cooking is included in the appliance. • After cooking meat with a skin (e.g.
• As the colours of the wire may not correspond with the coloured markings which identify the terminals in your plug, please refer to the following: −The − Blue wire must be connected to the terminal which is marked ‘N’. −The − Brown wire must be connected to the terminal which is marked with the letter ‘L’. −The − Green & Yellow wire must be connected to the terminal which is marked with the letter E or the earth symbol . • Please note that if a 13 amp plug is used, a 13 amp fuse should be used.
• Do not place this appliance on or near a hot gas or electric burner, or where it could touch a heated oven. • Do not operate the appliance on a sink drain board. • Do not place the cooker on a stone bench top when it’s cooking. This is due to bench tops being sensitive to uneven heat and may crack if heated locally. If you would like to cook with the slow cooker on the bench top, place a chopping board or heat proof mat underneath the cooker.
IMPORTANT SAFEGUARDS FOR ALL ELECTRICAL APPLIANCES • Unwind the power cord fully before use. • Do not let the power cord hang over the edge of a bench or table, touch hot surfaces or become knotted. • Connect only to a 230V or 240V power outlet. • To protect against electric shock, do not immerse the power cord, power plug or appliance in water or any other liquid.
• The use of attachments not sold or recommended by Sage may cause fire, electric shock or injury. • This appliance is for household use only. Do not use this appliance for other than its intended use. Do not use in moving vehicles or boats. Do not use outdoors. Misuse may cause injury. • The appliance is not intended to be operated by means of an external timer or separate remote control system.
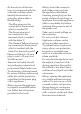
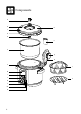
Components A B O C D E P F Q R G S H I J K L M N 8 T
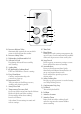
H J I L N K A. Pressure Release Valve Automatically controls the rate at which steam is released from the cooker. B. Pressure Safety Valve C. Dishwasher Safe Removable Lid D. Silicone Lid Seal Easy fitting for hassle free assembly and cleaning. E. Sealing Nut F. 6L Removable Cooking Bowl PTFE and PFOA free ceramic coating. G. Easy Clean Moat Catches condensation drips for a mess-free clean up. H. Interactive LCD Tells you when it’s building pressure, cooking and releasing steam. I. Start/Select Dial J.
IMPORTANT SAFETY INFORMATION FOR YOUR FAST SLOW PRO™ This appliance cooks under pressure and must be operated and maintained as described in this book. The trapped air pressure inside the pressure cooker may cause a hazardous situation if not operated and maintained as described in this manual. COOKING BOWL CAPACITY • Always ensure proper liquid/food level in the removable cooking bowl. • 'MAX' level – Do not exceed the maximum fill level.
• Always ensure the safety locking pin is properly aligned within the opening of the lid arm and is not restricted in any way. ALIGN PIN BEFORE START AUTOMATIC HANDS-FREE STEAM RELEASE The cooker features automatic hands-free steam release that will occasionally release steam as the cooker pressurises as well as automatically start the steam release cycle after cooking. • Never place your hands, arms or face over the pressure release valve.
PREPARING THE FAST SLOW PRO™ 1. Remove and safety discard any packaging material, promotional labels and tape from the cooker. 2. Open the lid by turning the lid knob counter clockwise and lifting the lid up and off the appliance until it is in the hinged open position. Unscrew and remove the sealing nut from the centre of the lid and pull the lid away to remove from the lid arm. 3. Wash the lid, removable cooking bowl and silicone lid seal in hot, soapy water, then rinse and dry thoroughly.
6. Clean and dry the underside of the removable cooking bowl and the temperature sensor, making sure there are no unwanted materials on the surface. The removable cooking bowl must sit flat on the temperature sensor to ensure proper contact. 8. Insert the connector end of the power cord into the cooker base, ensuring it is completely dry. Insert the power plug in to a 230/240 volt (grounded) power outlet. 9. The cooker alert will sound and the LCD will illuminate.
Functions SMART SETTINGS The Fast Slow Pro™ features 6 Smart Settings; Pressure Cook, Slow Cook, Reduce, Sear, Sauté and Steam. Pressure and slow cook settings have a list of commonly used food types with pre-determined cook times and temperatures/ pressure levels to give the best results, however we suggest experimenting with these depending on the recipe, amount of food and your personal taste.
ALTITUDE ADJUST Pressure builds and increases when the temperature inside the cooking vessel exceeds boiling point. As altitude increases, the temperature at which water boils decreases as a result of the drop in air pressure. This creates very different conditions for cooking when using a pressure cooker. In order to maintain consistent cooking results at various altitudes, the Fast Slow Pro™ has an Altitude Adjust feature that adjusts the settings based on the altitude of your current location. 1.
COOKER SETTINGS OVERVIEW SETTING MENU PRESETS SUITABLE FOR RANGE PRESSURE COOK RICE 50 kPa 10 MINS AUTO PULSE Brown Rice White Rice Quinoa & Ancient Grains 20 kPa – 80 kPa Up to 2:00 HRS RISOTTO 40 kPa 7 MINS AUTO QUICK Aborio Rice Carnaroli Rice Vialone Rice 20 kPa – 80 kPa Up to 2:00 HRS POTATOES 60 kPa 10 MINS AUTO PULSE Whole & Cut Peeled & Unpeeled 20 kPa – 80 kPa Up to 2:00 HRS STOCK 80 kPa 1:00 HR NATURAL Beef Stock Chicken Stock Vegetable Stock 20 kPa – 80 kPa Up to 2:00 HRS SO
SETTING MENU PRESETS SUITABLE FOR RANGE SLOW COOK STOCK HI 4:00 HRS Beef Stock Chicken Stock Vegetable Stock HI, 2:00 – 12:00 HRS LO, 2:00 – 12:00 HRS KEEP WARM up to 2:00 HRS SOUP HI 4:00 HRS KEEP WARM Vegetable Soup Meat Soup HI, 2:00 – 12:00 HRS LO, 2:00 – 12:00 HRS KEEP WARM up to 2:00 HRS LEGUMES HI 6:00 HRS Chickpeas Cannelini Beans Red Kidney Beans Green & Brown Lentils HI, 2:00 – 12:00 HRS LO, 2:00 – 12:00 HRS KEEP WARM up to 2:00 HRS CASSEROLE HI 4:00 HRS KEEP WARM All Stewing m
PRESSURE COOK The PRESSURE COOK setting is a great option for cooking succulent roasts, flavoursome casseroles, delicious soups and even desserts in a fraction of the time and energy they take by conventional methods. Pressure Cooking is a method of cooking food in a small amount of liquid with a sealed lid that retains steam inside and builds pressure.
8. Ensure the pressure release valve is placed on the lid, is properly seated in position and facing the lid knob. 9. Press the START/SELECT dial to commence cooking. The STOP/CANCEL button backlight will illuminate red, the LCD screen will illuminate orange, ’PREHEATING’ will appear and the pressure bar on the left will climb to indicate the cooker is building pressure. NOTE It is normal for the cooker to release small bursts of steam as it stabilises its internal pressure. 10.
SLOW COOK The SLOW COOK setting has cooking profiles designed for long cook times at low temperatures. It is ideal for breaking down tough cuts of meat and developing deep flavours. 1. Turn the START/SELECT dial until the indicator reaches the SLOW COOK setting. Press the START/SELECT dial to confirm. 2. Turn the START/SELECT dial until the indicator on the right hand side of the LCD reaches the desired setting. 3. The top figure on the LCD screen indicates the preset temperature for the selected setting.
TIPS FOR PRESSURE & SLOW COOKING Rice • The PRESSURE COOK RICE setting is designed to cook rice so the rice grains remain separate and tender. • The rice setting is suitable for all types of rice such as long grain rice, jasmine, basmati and brown rice. • Weigh dry rice accurately and wash well with cold water until water runs clear. Drain well and place into the removable cooking bowl. • Add corresponding water amount. Water to rice ratio is based on 1.5 parts water to 1 part rice.
• For best results, do not overfill the cooking bowl. The total volume of water, bones and/or aromatics should not exceed the MAX level marking inside the removable cooking bowl. Soup • The PRESSURE & SLOW COOK SOUP setting is suitable to cook a variety of soups from light broths to hearty minestrone and pureed vegetable soups. • Use SAUTÉ setting to begin caramelising aromatics and softening vegetables, or SEAR setting to brown meats, bacon or chicken.
• Choose lamb shanks that will fit easily into the removable cooking bowl or ask your butcher to trim shanks. • For best results, use SEAR setting to brown meat prior to cooking. • Unlike traditional stewing or braising, pressure and slow cooking have almost no evaporation. To develop thick and rich flavoured dishes, use only enough stock and liquids to just cover ingredients; approx. 1 – ½ cups in total. • Do not overfill the cooking bowl.
5. Press the START/SELECT dial to commence cooking. The STOP/CANCEL button backlight will illuminate red, the LCD screen will illuminate orange and indicate ‘PREHEATING’. 6. Keep the lid open in the hinged position. If the lid has not been opened the cooker alert will sound and ‘OPEN LID’ will appear on the LCD screen. 7. Once the cooker has reached temperature, ‘PREHEATING’ will go out. Place liquid to be reduced into the removable cooking bowl. 8. The timer will start counting down.
6. The timer will start counting up. The cycle can be paused at any time by pressing the STOP/CANCEL button. To end the cycle press and hold STOP/CANCEL for 2 seconds. 7. At the end of the sauté cycle, the cooker alert will sound, the STOP/CANCEL button backlight will go out and the LCD screen will illuminate blue. 8. After 5 minutes of inactivity, standby mode will be activated. The button backlight will go out and the LCD will no longer illuminate.
Care & Cleaning The cooker bowl, outer body, lid and accessories should be thoroughly cleaned before every use. Before cleaning, ensure the cooker is turned off by pressing and holding the STOP/CANCEL button on the control panel. The cooker is off when the button backlight is no longer illuminated. Remove the power plug from the power outlet and remove the connector end of the power cord from the cooker base. Allow the cooker and all accessories to cool completely before disassembling and cleaning.
CLEANING THE STEAMING TRAY AND TRIVET c) Pressure safety valve is clean and free of food or liquid. To clean, push the valve from inside so the valve sits open on the lid and remove any oil or food residue. Ensure the valve moves in and out smoothly after cleaning. 1. Wash all accessories in warm soapy water with a soft sponge or soft plastic scouring pad. Rinse and dry thoroughly.
Troubleshooting PROBLEM EASY SOLUTION The lid cannot be opened at the end of the cooking cycle • Press the STEAM RELEASE button until all internal pressure is released and the cooker can be opened. • Once all internal pressure has been released using the STEAM RELEASE button, turn the pressure release valve to the open position, facing away from the lid knob. • If this occurs frequently, the cooker may need to be adjusted to suit your current altitude. Follow “Altitude Adjust” instructions on page 15.
Notes 29
Notes 30
Sage by Heston Blumenthal ® ® Freephone (UK Landline): 0808 178 1650 Mobile Calls (National Rate): 0333 0142 970 www.sageappliances.co.uk customerservice@sageappliances.co.uk Register your product and get more from your purchase Product registration takes only a few minutes and ensures a record of your purchase. Registration also makes it easier to get support and advice on any questions or issues that you might have in the future.