
Owner manual


9
TM
Instruction Manual
Direct Drive & 5:1 Gear Reduction
Under Tailgate Spreaders
UNDER TAILGATE SPREADER WARRANTY
This warranty replaces all previous warranties and no employee
of this company is authorized to extend any additional warran-
ties, or agreements, or implications not explicitly covered herein.
Buyers Products Company warrants all parts of the product to
be free from defects in material and workmanship for a period of
(1) one year from the date of original installation. Parts must be
properly installed and used under normal conditions. Normal wear
is excluded.
Any part which has been altered, including modification, misuse,
accident, or lack of maintenance will not be considered under this
warranty. Hydraulic units are not to be disassembled without
the express written permission from Buyers Products Company.
The sole responsibility of Buyers Products Company under this
warranty is limited to repairing or replacing any part(s) which
are returned, prepaid, 30 days after such defect is discovered,
and returned part(s) are found to be defective by Buyers Products
Company.
Authorization from Buyers Products Company must be obtained
before returning any part. The following information must accom-
pany defective parts returned to Buyers Products Company: RMA#,
spreader model, serial number, date installed, and distributor from
whom it was purchased. Buyers Products Company shall not be
liable for damage arising out of failure of any unit to operate prop-
erly, or failure, or delay in work, or for any consequential damages.
No charges for transportation or labor performed on any part will
be allowed under this warranty.
NOTE: This manual applies to spreaders starting
with Serial No. 8000
Table of Contents
Warranty Information ............................................... 1
Spreader Installation Instructions ........................ 1,2
Spreader Installation Drawing ................................. 2
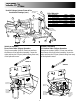
Spinner Assembly Instructions ..............................3,4
Spinner Assembly Drawing ...................................3,4
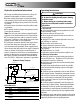
Hydraulics Installation ............................................. 5
Operating Instructions ...........................................5,6
Recommended Maintenance .................................... 6
Parts list: Spreader Assembly .................................. 7
Spreader Parts Drawing ........................................... 7
Parts List: Hardware Box ......................................... 8
Spinner Components Drawing ................................. 8
Auger Replacement Kit ............................................. 8
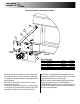
Installation Instructions
NOTE: The left and right end plates may, on
occasion, get bent through improper handling
during shipment or storage. If this should hap-
pen, square and true the left and right end plates
before installation.
1. Aligning the spreader:
A. Position the spreader with the truck such that
the auger drive is located on the right side of the
truck (passenger side).
B. Lift the spreader up and under the dump body
tailgate, positioning the spreader forward as close
as possible to the dump body. The tailgate of the
dump body should lay down horizontally over the
spreader.
C. Support the spreader solidly and securely when
positioning for mounting.
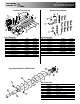
2. Attach mounting brackets (See hardware
installation drawing on page 2.)
A. Attach a quick detach plate, (Item 1) to both
sides of the spreader frame using hinge pins (Item
2) and a hairpin cotter pins (Item 5).
B. Position the (2) quick detach plates over the
dump body rub rails and flush with rear edge of
dump body.
C. Weld the (2) quick detach plates to the dump
body rub rails. Weld the plates continuously around
(3) sides of each plate. Do not weld along the edge
of the plates next to the attachment pin.
—continued inside
9049 Tyler Blvd. • Mentor, Ohio 44060
Phone (440) 974-8888 • Fax (440) 974-0165
Toll-Free Fax 800-841-8003 • saltdogg.com