
Installation Instructons (21000+ Serial Number)


2
Safety Precautions
WARNING
Observe the following Safety Precautions before, during and
after operating this spreader. By following these precautions and
common sense, possible injury to persons and potential damage
to this machine may be avoided.
1. Read this entire Owners Manual before operating this
spreader.
2. Read all safety decals on the spreader before operating.
3. Check to make sure all safety guards are securely
mounted into place before operating this spreader.
4. Verify that all personnel are clear of the spreader
spray area before starting or operating this spreader.
5. Do not over-load your vehicle beyond payload limits.
If there are any questions, contact the vehicle manufacturer.
6. Do not adjust, clean, lubricate or unclog material
jambs without first turning off the spreader.
7. Do not climb on or in the spreader during operation.
Do not ride on the spreader while the vehicle is in motion.
8. Make sure the spreader is securely fastened to the vehicle in
accordance with this manual.
9. Do not operate a spreader that is in need of maintenance or
repairs.
10. Always disconnect the battery before removing or replacing
electrical components.
Installation Instructions
1. Mounting the Spreader onto the Vehicle:
A. Remove the tailgate from the vehicle.
B. Check truck’s bed for all kinds of sharp debris
or foreign objects. They can cut and seriously damage
poly hopper.
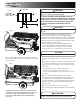
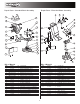
C. Lift spreader using tie downs (fig. 1), or using fork lift.
D. Lower spreader into the truck bed.
E. Center the spreader from side to side on the vehicle.
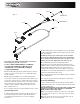
F. Attach the Chute Assembly to the spreader. First, hook the
Chute to the spreader by openings in the Chute’s handle.
Fig. 1
Then rotate the Chute into operating position and lock using
two spring latches.
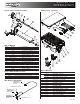
G. Slide spreader towards front of the truck leaving adequate
space between chute and truck (2-3 inches). Measure
the distance from the front of the truck bed to front of the
hopper’s front legs. Fabricate spacer to fit between front of
the spreader and front of the bed per Fig. 4 and Fig. 5
USE ALL TIE-DOWNS
TO LIFT SPREADER
Fig. 2
LOCK CHUTE IN PLACE
USING LATCHES ON BOTH SIDES
LATCH #B2598SSC
Fig. 3