
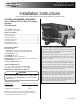
Installation Instructons (21000+ Serial Number)

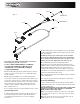


5
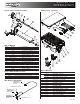
LOOSE WING NUTS
TO ROTATE SHIELD
HOLES FOR MOIST,
HEAVIER MATERIALS.
HOLES FOR DRY,
LIGHTER MATERIALS.
Material Flow Adjustments
Always use screen during spreader operation! Various
materials have different moisture absorption rate, some
materials may not perform as desired. Therefore, the
substitution of the alternate material may be necessary for
optimum performance.
SHPE2000 equipped with adjustable deflector located above
auger opening. To reduce gear motor load and amount of
material going in auger opening lover deflector. When using
more abrasive materials or materials with higher moisture
content raise deflector to allow easier access to auger opening.
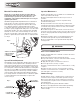
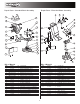
Discharge opening equipped with sliding door. Close door when
transporting spreader, open door completely when spreading
materials. To access door, unlock and swing out chute. Undo
wing nuts on both sides of the trough, slide door in necessary
position, re-tighten wing nuts. Return chute on original position.
See Fig 8.
Spreader Maintenance
1. Wash spreader after every use. Make sure no material is left
under auger and/or inside trough.
2. Inspect and retighten fasteners after every 5-7 hours of
operation.
3. Lubricate bearing every 7-10 hours of operation using
general automotive grease.
4. Inspect terminals/connectors every time you disconnect
spreader from wire harness. Apply thin layer of dielectric grease
on terminals. If any tarnish/corrosion is found, clean terminals
and apply dielectric grease.
5. Use dielectric grease on all electrical connectors before an
electrical connection is made or after connector is disconnected
6. Grease and spray with lubricant Auger bearing after every 20
hours of use.
7. Empty the spreader of all ice control materials when not in
use. Wash out the spreader to prevent material builds up.
8. It is recommended to cover spreader with the tarp during
storage periods.
WARNING
Never remove spreader with material in hopper.
End of Season Maintenance
1.
Wash spreader. Make sure no material or residue is left in and
outside the hopper.
2.
Lubricate bearing using general automotive grease.
3.
Inspect wire harness, connectors for broken insulation, missing
components. Replace if necessary.
4.
Apply dielectric grease on all electrical connectors.
5.
Store hopper indoors, in a dry, cool place.
6.
Remove controller from truck. Store controller indoors, in a dry,
cool place.
7. Inspect wire near connectors. Check for broken or missing
insulation. Check for tarnished or corroded wires. Trim corroded
wires and replace connectors if necessary.
Summer Storage
1.
Apply dielectric grease or similar protective compound on all
electrical connectors & protect them with caps before storage.
2. Disconnect and remove speed controller from vehicle and
store it in dry and cool place. Protect controller from excessive
heat and moisture.
3. Clean hopper and trough from all kinds of debris.
4. Remove, thoroughly lubricate and reinstall trough bearing.
5. Protect hopper from excessive temperatures during
summer storage.
Spread Pattern Adjustment.
Spread pattern can be adjusted by changing spinner disc speed
on controller by turning Spinner knob to desired speed level
from 1 (low) to 9 (high). Direction of material spread can also be
adjusted by rotating shield on chute assembly. To rotate shield
lose 2 wing nuts, rotate shield in desired direction, and retighten
wing nuts. See Fig.9. Make sure that after adjustment, bracket
stays inside shield groove located on top of shield. In addition,
chute assembly can be adjusted to lighter (drier) and heavier
(more moist) materials. Use different holes on bracket for lighter
or heavier materials to have material drop on spinner disc
center. See Fig. 9.
WING NUT
SLIDING DOOR COMPLETELY
OPEN FOR SPREADING.
COMPLETLY CLOSE
FOR TRANSPORT.
Fig. 8
Fig. 9