
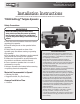
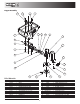
Replacement Part List


5
Spreader Operation.
1. Due to the rate at which materials absorb moisture
differently, some materials may not perform as desired.
Therefore, the substitution of an alternative material
may be necessary for optimum performance.
2. When filling hopper use only screened material.
Prevent large chunks of material and debris from get-
ting into hopper and cause operational problem or
damage.
3. Material must never be left in the hopper for extend-
ed period of time. Material will absorb moisture, bind,
harden and may prevent spreader from proper operation
or may damage the spreader.
4. To start spreader make sure that truck engine is run-
ning. Flip POWER switch in ON position. Switch will
illuminate. Spreader motor will accelerate to full speed
and then it will slow down to previously dialed speed.
5. To adjust material flow rate and spreading distance,
simply rotate speed knob to desired speed. Spreader
can be put in full speed mode for short time by pressing
and holding BLAST button.
6. To activate and deactivate vibrator (optional) press
VIBRATOR button, if equipped.
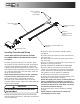
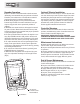
7. Material flow and pattern can be adjusted by open-
ing/ close adjustable discharge on the trough bottom.
(Fig.6)
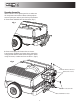
Optional Vibrator Installation.
Even if material stored in bags, it can still absorb mois-
ture thru microscopic holes in plastic bags. Thus some
materials may have high moisture content right from
the bag. This condition may prevent material free flow-
ing and may easily clog spreader. In order to improve
material flow, install optional vibrator kit #3028195.
Follow supplied installation instructions.
Controller Warnings.
Check controller instruction sheet for latest controller
updates, troubleshooting codes. Controller instruction
sheet is inside controller shipping box.
IMPORTANT! INSTALLER, DO NOT DISCARD
CONTROLLER INSTRUCTION SHEET. STAPLE SHEET
TO SPREADER MANUAL AND GIVE TO END USER!
Maintenance Instructions.
1. Wash spreader after every use. Make sure no mate-
rial left under auger and/or inside trough.
2. Inspect and retighten fasteners after every 5-7 hours
of operation.
3. Inspect terminals/ connectors every time you discon-
nect spreader from wire harness. Apply thin layer of
dielectric grease on terminals. If any tarnish/corrosion
found, clean terminals and apply dielectric grease.
End of Season Maintenance.
1. Wash spreader. Make sure no material or residue left
in and outside hopper.
2. Inspect wire harness, connectors for broken insula
-
tion, missing components. Replace if necessary.
3. Apply dielectric grease on all electrical connectors.
4. Store hopper indoors, in dry, cool place.
5. Inspect, clean and repaint frame.
6. Remove controller from truck. Store controller
indoors, in dry, cool place.
LOOSEN WING NUT
SLIDE FEED GATE
TO DESIRED LOCATION.
RETIGHTEN WING NUT
Fig. 6