
Instructions / Assembly


3
TM
WARNING
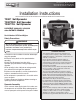
SPREADER CANNOT BE SUPPORTED BY FRAME ONLY!
SPREADER HOPPER MUST REST ON BUMPER OR SIMILAR
STRUCTURE ATTACHED TO TRUCK FRAME.
Fig. 3
Fig. 6
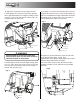
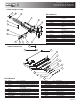
3. Align holes in rear portion of the hopper with slots
in frame uprights. Use slots which will position spreader
with a slight upward tilt. Secure hopper assembly to frame
using ½-13 x 3.0 screws, flat washers and nuts. Fig.3. Do
not tighten fasteners at this time.
4. Slide hopper and frame towards tailgate leaving about
3/8” to ½” space. Align closest holes in hitch receiver with
holes in frame. Secure frame in hitch receiver using 5/8
hitch pin and cotter pin. Fig.4.
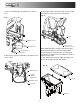
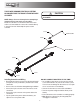
5. Assembly ½-13 x 6.0 screws with flat washers and ½-13
flanged nuts and nylock nuts as shown in Fig.5. Make sure
that nuts located between hopper side brackets and frame
positioned exactly as shown. These nuts must not be in
contact with brackets and frame at this time.
6. Tighten nuts located under frame evenly on both sides
of the spreader (10-15 ft-lb’s. torque). Then
tighten bolts in frame uprights. Finally tighten nuts located
between hopper side brackets and frame.
They must look as shown in Fig.6. After this procedure
spreader should be securely attached to trucks bumper
and frame.
1/2-13 X 3.0 SCREW
1/2 FLAT WASHER
1/2-13 NYLOCK NUT
SCREW 1/2-13 X 6.0
NUT 1/2-13 FLANGED
WASHER 1/2 FLAT
NYLOCK NUT 1/2-13
HITCH PIN
COTTER PIN
Fig. 4
Fig. 5