
Instructions / Assembly


5
TM
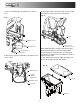
Installing Controller and Wiring
• Route both wire harnesses into truck cab through firewall
(it maybe necessary to drill holes). Insulate hole to avoid
water leaks.
• Insure no wires are nicked or damaged during installation.
• Connect the 4-pin connecter on the wire harness to the
control box.
• Connect the 2-pin connector on the power cable to the
control box.
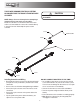
• Lay out a path for the power cable to the battery, use
quick ties to secure power cable.
DO NOT CONNECT TO BATTERY AT THIS TIME!
• Lay out path for wire harness to the rear of the vehicle.
It is recommended to stay clear of the exhaust system.
Excess heat can damage the wire harnesses. Use quick
ties to secure harness to underbody.
• Connect the wire harness to the motor and vibrator.
• Connect the power and ground cables directly to the
battery.
• Insure all functions of the controller are working properly.
• Note: direction of spinner may be changed by inter
-
changing the motor leads.
THIS IS WIRE GROUND ELECTRICAL SYSTEM!
NO CONNECTIONS TO TRUCK’S FRAME OR BODY
ALLOWED!
NOTE: Always disconnect battery before attempting to
install electrical components on your vehicle.
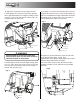
Mount the controller in a convenient location in the truck
cab. It is recommended not to mount the controller directly
in front of heat vents. Allow ample air space around
controller.
CAUTION
DO NOT MOUNT CONTROLLER IN THE WAY OF AIR BAG
DEPLOYMENT!
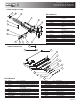
3011864
3008620
3035934
CB50PB
3001379
BATTERY POSITIVE
BATTERY NEGATIVE