
Product Manual

Quality since 1946
4
9049 Tyler Blvd. • Mentor, Ohio 44060
Phone (440) 974-8888 • Fax (440) 974-0165
Toll-Free Fax 800-841-8003 • buyersproducts.com
3007549 Rev. A
EXCLUSIONS
Manufacturer shall not be liable for special, incidental, or conse-
quential damages, or for damages resulting from lack of necessary
maintenance, from misuse, abuse, acts of God, or alteration of the
product. Some states do not allow the exclusion or limitation of
incidental or consequential damages, so the above limitation or
exclusion may not apply to you.
FULL ONE YEAR WARRANTY
Manufacturer will repair, or at manufacturer’s discretion will
replace any part of this salt spreader which proves to be defective
in workmanship or material under normal use for a period of one
year from the date of delivery to the original purchaser. Any cost
incurred in returning the product to the supplier is the responsibil-
ity of the consumer.
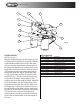
OPERATION
Install unit on vehicle by sliding into receiver hitch.
Be sure to install receiver safety pin. Plug wire
harness (22) into the aux. power outlet. The aux.
power outlet of the vehicle should be rated at 20
amps – check the vehicles owners manual. Wire
harness comes equipped wit ha 15 amp fuse. DO
NOT USE FUSES RATED FOR MORE THAN 20
AMPS IN THE SPREADER WIRING HARNESS
PLUG.
VARIOUS MATERIALS HAVE DIFFERENT
MOISTURE ABSORPTION RATE, SOME
MATERIALS MAY NOT PERFORM AS DESIRED.
THEREFORE, THE SUBSTITUTION OF THE
ALTERNATE MATERIAL MAY BE NECESSARY
FOR OPTIMUM PERFORMANCE.
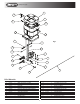
ADJUSTMENT
See Fig.2 on pg. 3
Adjust flow gate (9) to achieve desired material
flow. To move flow gate easily adjust rubber springs
(11) by loosing ¼-20 screws and nuts (10, 12);
retighten after gate is in desired position. Fill hopper
with just enough material to use it completely.
CAUTION: WHEN FILLING HOPPER, MAKE
CERTAIN THERE ARE NO LARGE OBJECTS
CONTAINED IN THE MATERIAL, WHICH CAN
CAUSE SPREADER TO CLOG OR SPINNER TO
STOP AND BLOW THE FUSE. NEVER LEAVE
MATERIAL IN THE HOPPER FOR EXTENDED
PERIODS OF TIME.
MAINTENANCE
1. Periodically inspect and retighten, if necessary,
loose nuts and bolts.
2. Inspect electrical components for damaged
insulation. Replace any electrical component if the
insulation is damaged or broken.
3. Empty hopper after each use and hose the
spreader off.
DO NOT ATTEMPT TO TILT SPREADER
WITH MATERIAL IN THE HOPPER OR WHILE
VEHICLE IS MOVING.