
User Manual


Mark 1
Mark 2
Mark 1
Figure A
4A
Individually
taped ends
4B
4C
PAGE 2 OF 3
SamsonRope.com | Email CustServ@SamsonRope.com | Tel +1.360.384.4669
8x3-Strand Class II Eye Splice
SAMSON SPLICING INSTRUCTIONS
4
step
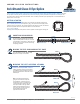
TAPING THE ENDS AND UNLAYING THE ROPE
4a
4B
4C
Tape the ends of each of the 8
strands individually.
Unlay the strand pairs all the way back
to the tape at Mark 1. Keep the pairs of
strands together while unbraiding.
When unlayed, the strands in a pair will
be twisted around each other. Untwist
each strand pair so the 2 strands
lie parallel to each other rather than
twisting around each other. Tape the
ends of each pair together.
Arrange the strand pairs as shown in
Fig. A. One set of the marked (gray)
strands is on the top; and the other
marked (gray) strands are on the
bottom. The unmarked (white) pair
will be on the left and right.
5
step
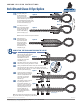
POSITIONING THE STRANDS
FORMING THE EYE
ROUTING THE STRAND PAIRS & THE 1ST TUCK
6
step
7a
7B
Physically form the eye, making certain
there is no twist in the rope. Place
the (white) pair that is closest to the
standing part of the rope over the
rope, at Mark 2, as shown in Fig. B.
Be careful not to add twist to the rope.
Beginning with the left
rotating marked (gray)
pair of strands on top,
make your rst tuck
under the right rotating
(white) pair of strands closest to Mark 2. Pull
the strands completely through, making sure
that the strands don’t twist (Fig. C).
Turn the eye over and
tuck the other marked
(gray) pair of strands
under the (white) pair
of strands directly
opposite the previous
tuck (Fig. D).
7
step
Note: If necessary, use a d or marlinspike to
loosen the strands. The left rotating (gray)
strands will be tucked under the right rotating
(white) strands, and vice versa.
Mark 2
Mark 1
Mark 2
Mark 1
Mark 2
Mark 1
Figure B
Turn rope
over
Figure C
Figure D