
Operation Manual


QuickStart
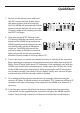
7. Now to set the channel, press and hold
the EDIT control until the display shows
the group number with three asterisks.
Next, the AR300 will automatically find the
clearest channel and you will see it in the
Channel number of the display just before
the IR SET will begin.
8. Once you see the IR SET flashing in the
LCD display, hold the transmitter, with the
bottom of the AX300 facing towards the
AR300, approximately 6 inches away from
the receiver and turn the AX300 power
switch on. The AR300 will transmit the
channel number to AX300 over infrared
light and you will see the corresponding
absolute channel number in the transmitter LCD.
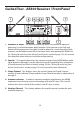
8. Turn on the mixer, or unmute the channel, but keep its volume all the way down.
Begin speaking or singing at a normal performance level while observing the AF
Meter. If the AF Meter reads above “0” (indicating a Peak condition) even with the
AR300 Level control fully counterclockwise, slowly adjust the GAIN on the inside
of the AX300 to the point where the AF Meter occasionally reads “0” during the
very loudest passages, then back it off just slightly. Finally, raise the level of your
connected mixer until the desired volume is reached
9. Do a walkaround through the intended area of coverage while observing the
receiver’s RF Meter; it should continue to read about “75%”, indicating sufficient RF
reception in all areas of coverage. If not, reposition the AR300 or its antennas as
necessary.
10. If you hear any spurious noise from the receiver output when the transmitter
is turned off, use the supplied plastic screwdriver to adjust the AR300 Squelch
control, slowly turning it clockwise to the point at which the noise disappears.
9