
Instruction Manual


PAGE 2 OF 4
SamsonRope.com | Email CustServ@SamsonRope.com | Tel +1.360.384.4669
Double Braid Class I Eye Splice
SAMSON SPLICING INSTRUCTIONS
4
step
MARKING THE COVER FOR TAPERING
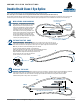
Insert the d into the core at Mark 2. Slide
it through and out at Mark 3. Add extra tape
to the cover end then jam it tightly into the
hollow end of the d (see diagram). Hold core
lightly at Mark 3, place pusher joint into taped
end and push d and cover through at Mark 2
and out at Mark 3. (With a wire d, rst press
prongs into cover, then tape over. Then, after
d is on, milk braid over d while pulling d
through from Mark 2 to Mark 3.)
Take the d off the cover and continue
pulling cover tail through the core until Point
R on the cover emerges from Mark 3. Then
remove the tape from the end of the cover.
Note the nature of the cover braid. It is made up of strands with either
1, 2 or 3 ends. By inspection you can see half the strands revolve to the
right around the rope and half revolve to the left.Beginning at Point R
and working toward the taped end of the cover, count 8
consecutive strands (single or pairs) which revolve to
the right (or left). Mark the 8th strand. This is Mark
T. Make Mark T go completely around the
cover. Starting at Mark T and working
toward the taped cover end, count
and mark every 5th right and left
strand until you reach the end of
the cover. For ropes with 20 cover
strands, mark every 5th and 4th
right and left strand until you reach
the end of the cover.
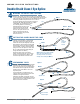
5
step
PUTTING THE COVER INSIDE THE CORE
PERFORMING TAPER
6
step
Start with the last marked pair of cover strands
toward the end, pull one pair completely out
(Fig. A). Cut and remove next marked strands
and continue with each right and left marked
strands until you reach Mark T. Do not cut
beyond this point.
The result should be a gradual taper. Very
carefully pull the cover back through the core
until Mark T emerges from Mark 2.
With Mark T and Mark 2 held tightly, smooth
the core from Mark 2 toward Mark 3. Leave the
tapered cover tail out. Tightly tape Mark T and
Mark 2 to secure the crossover.
cover
Mark 3
core
X
Mark T
R
Mark 2 Mark 1
Mark 3
Mark 2
Mark 1
X
cover
core
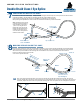
Pinch
taped end
to insert
into fid.
Note: If splicing an eye with a thimble
with “ears”, insert thimble prior to
inserting cover into core. Put core
through ears and slide past Mark 3.
cover
Mark 2
Mark 3
Mark 1
Refer to marks
made in Step 4.
Mark X
Figure A
Figure B
Mark X
Mark T
R
R
cover
Mark 2
Mark 3
Mark 1
Tapered cover
Mark
T
core
core
core
core