Copyright 2010, Samson Technologies Corp. v1.1 Samson Technologies Corp. 45 Gilpin Avenue Hauppauge, New York 11788-8816 Phone: 1-800-3-SAMSON (1-800-372-6766) Fax: 631-784-2201 www.samsontech.
Important Safety Information AVIS RISQUE DE CHOC ÉLECTRONIQUE NE PAS OUVRIR CAUTION: TO REDUCE THE RISK OF ELECTRIC SHOCK, DO NOT REMOVE COVER (OR BACK). NO USER-SERVICEABLE PARTS INSIDE. REFER SERVICING TO QUALIFIED SERVICE PERSONNEL. This lightning flash with arrowhead symbol within an equilateral triangle is intended to alert the user to the presence of non-insulated “dangerous voltage” within the product’s enclosure that may be of sufficient magnitude to constitute a risk of electric shock.
Important Safety Information 1. Read these instructions. 2. Keep these instructions. 3. Heed all warnings. 4. Follow all instructions. 5. This apparatus shall not be exposed to dripping or splashing liquid and no object filled with liquid, such as a vase, should be placed on the apparatus. 6. Clean only with a dry cloth. 7. Do not block any of the ventilation openings. Install in accordance with the manufacturer's instructions. 8. 9.
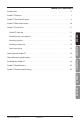
Table of Contents Introduction . . . . . . . . . . . . . . . . . . . . . . . . . . . . . . . . . . . . . . . . . . . . . . . 6 Studio GT Features . . . . . . . . . . . . . . . . . . . . . . . . . . . . . . . . . . . . . . . . . . . 7 Studio GT Front Panel Layout . . . . . . . . . . . . . . . . . . . . . . . . . . . . . . . . . . . . 8 Studio GT Rear Panel Layout . . . . . . .
Introduction Thank you for purchasing the Samson Studio GT studio monitors with integrated USB audio interface. The Samson Studio GT provides accurate monitoring thanks to its 4.25-inch copolymer woofer and its 1-inch silk dome high frequency driver powered by 2 x 20 watts of internal power.
FRANÇAIS DEUTSCHE Two-way, active studio reference monitor with ported tuned enclosure providing extremely accurate monitoring for recording studio, post-production, video gaming and multi-media applications. • Integrated two-channel USB audio interface provides the ability to connect a microphone, line, or instrument signal to record directly onto your digital audio workstation. • Onboard high quality 16-bit 44.1kHz/48kHz D-to-A (digital-to-analog) and A-to-D (analog-to-digital) converters.
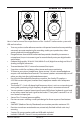
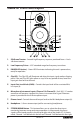
Studio GT Front Panel Layout 1 2 3 4 4 5 5 6 6 7 8 9 10 11 12 1. Silk Dome Tweeter - Smooth high frequency response produced from a 1-inch silk dome tweeter. 2. Low Frequency Driver - 4.25” extended range low frequency transducer. 3. POWER LED (active) - Green LED illuminates indicating the unit is powered on, ready for operation. 4. Clip LED - The Clip LED will illuminate red when the input signal reaches clipping point.
Studio GT Front Panel Layout 10. MIX Control - The MIX control is used to balance the audio mix of the input signals and the audio coming from the computer. When turned fully counterclockwise, only the signals connected to the Studio GT inputs are heard. When turned fully clockwise, only the output signal from your computer is heard at the speaker and headphone outputs. Any adjustment between the two endpoints will result in a proportional mix of both the Studio GT inputs and computer audio. 11.
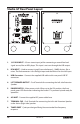
Studio GT Rear Panel Layout 1 2 3 7 4 6 5 8 1. 1/8” AUX INPUT – 3.5mm stereo input jack for connecting a second line level signal source, like an MP3 player. This input is not sent through the USB output. 2. RCA INPUT – Used to connect signals from unbalanced, –10dBV devices, like a mixer. The Red connector is for the Right input and the White is for the Left input. 3. USB Connector – Connect the supplied USB cable to this rear panel USB “B” connector. 4.
Studio GT Quick Start Studio GT Quick Start 2. Set the Studio GT monitors in place near your computer or multi media center. The active speaker (the one with the front panel controls and jacks) is the right side speaker and the passive speaker (no knobs and jacks) is the left-side speaker. 3. Connect the left and right speaker using the included speaker cable. 4. Plug the included power cable into the AC IN jack. 5.
Studio GT Quick Start Recording with a microphone 1. Turn the GAIN knob fully counter-clockwise. 2. Connect a microphone to the CHANNEL 1 XLR INPUT on the front panel using an XLR cable. 3. While singing or playing into the microphone, slowly turn the GAIN knob clockwise until the CLIP indicator turns on. Then turn the knob counter-clockwise until the clip indicator no longer illuminates. 4. Now raise the LEVEL control knob until you reach a comfortable listening level. 5.
Studio GT Quick Start 2. Connect a guitar to the ¼” INPUT on the front panel using a standard ¼” instrument cable. Note: The ¼” INPUT can accept either a high impedance or low impedance source. 3. While playing guitar at its loudest level, slowly turn the GAIN knob clockwise until the CLIP indicator turns on. Then turn the knob counter-clockwise until the clip indicator no longer illuminates. 4. Now raise the LEVEL control knob until you reach a comfortable listening level. 5.
Studio GT Quick Start Recording a keyboard 1. Turn the CHANNEL 1 and CHANNEL 2 GAIN knobs fully counter-clockwise. 2. Connect a keyboard to the CHANNEL 1 and CHANNEL 2 ¼” INPUTS on the front panel using standard ¼” instrument cables. 3. While playing the keyboard at its loudest levels, slowly turn up the GAIN knobs clockwise until the CLIP indicators turn on. Then turn the knobs counter-clockwise until the clip indicators no longer illuminate. 4.
Studio GT Quick Start To send a mono mix from the CHANNEL 1 and CHANNEL 2 inputs to the Studio GT speakers and headphone outputs, set the MONO/STEREO button to the up, MONO position. 2. To separate the mix from the CHANNEL 1 and CHANNEL 2 inputs to the Studio GT speakers and headphone outputs, set the MONO/STEREO button to the down STEREO position. CHANNEL 1 will be heard in the LEFT speaker and CHANNEL 2 will be heard in the RIGHT speaker. 3.
Setting Up the Studio GT Background on the Studio GT Active Monitors with Studio Interface The Studio GT are near field reference monitors featuring a custom designed, 4-inch copolymer, low frequency driver and a 25mm silk dome tweeters, employing a ferrofluid cooled voice coil and neodymium magnet. The monitors’ crossover has been carefully designed with high quality components ensuring a linear frequency and phase response.
Direct Monitoring and Latency Using the Direct Monitor The Studio GT has a simple, yet sophisticated direct monitor system, which provides zero latency monitoring. When the MONO mode is selected, you hear the two mono input signals. For example guitar and mic, directly from the Studio GT’s input circuitry, with the input signals in mixed mono. This way you hear both of the input signals, with no delay, in both sides of the monitors or headphones.
Installing the Studio GT Installing the Studio GT is a simple procedure that takes just a few minutes. Since the Studio GT is USB compliant, you can use most any PC, connect the included USB cable and plug and play. You will be able to control your Studio GT using the standard audio interface controls in the MAC or Windows operating system. You will find detailed instructions on setting up Windows 7 & Vista in the following sections of this manual.
level can be shown in either percent or dB, by right-clicking on it (Figure 4). Installing the Studio GT 7. Select the "Playback" tab, then select the "Level" tab to set the computer’s Master Volume to 100% (Figure 5), and use the Studio GT’s front panel Level knob to control the overall output from the speakers and headphones. Figure 4 FRANÇAIS ENGLISH Note: Even setting the “Input” volume at 0 dB, the audio signal is still passing through the Windows volume control and is not bit-perfect.
Installing the Studio GT Windows XP The Studio GT does not require any special drivers or software. Just plug in the Studio GT into a USB port on your computer and everything is installed automatically. 1. The first time you plug the Studio GT into a USB port, Windows XP will install the universal drivers for that port. A balloon tip will pop up, telling you it has found the Samson StudioGT (Figure 6). 2.
Installing the Studio GT Macintosh OSX The following example is for setting up the Studio GT in MAC OS X . Figure 10 ENGLISH 1. P lug in the Studio GT into an available USB port on your MAC using the supplied USB cable. The MAC will recognize the USB audio device and automatically install a universal driver. 2. To select the Studio GT as the computer’s audio input, open the System Preferences from the dock or the main Apple Menu (Figure 10). 4.
Studio GT Specifications Transducers Woofer . . . . . . . . . . . . . . . 4” polypropylene with santoprene surround, Tweeter . . . . . . . . . . . . . . 1-inch silkdome ferro fluid neodymium tweeter Frequency response . . . . . . 65Hz - 22kHz Amplifier Power . . . . . . . . . 2 x 18 Watts RMS Crossover Frequency . . . . . . HPF: 4kHz, 6 dB/oct Butterworth; LPF: 1400Hz, 12 dB/oct Linkwitz-Riley Inputs MIC Input Connector . . . . . . . . . . . . .
FRANÇAIS 9” 226mm ITALIANO ESPAÑOL DEUTSCHE 6.6” 168mm ENGLISH 9.
ITALIANO ESPAÑOL DEUTSCHE Le symbole du point d'exclamation prévient l'utilisateur de la présence d'instructions importantes sur le fonctionnement et la maintenance de ce produit dans le mode d'emploi fourni. FRANÇAIS MISE EN GARDE - RISQUE D'ÉLECTROCUTION NE PAS OUVRIR ATTENTION : POUR RÉDUIRE LES RISQUES D'ÉLECTROCUTION, VEILLEZ À NE PAS OUVRIR LE BOÎTIER. CONFIEZ LES RÉPARATIONS UNIQUEMENT À UN TECHNICIEN QUALIFIÉ.
Consignes de sécurité importantes 1. Veuillez lire toutes les instructions. 2. Conservez ces instructions. 3. Respectez les mises en garde. 4. Suivez les instructions. 5. L'appareil ne doit pas être exposé aux projections liquides. Ne placez aucun objet contenant un liquide sur l'appareil (vase, verre, etc.). 6. Nettoyez avec un tissu sec. 7. Veillez à ne pas obstruer les fentes de ventilation. Installez l’appareil selon les instructions du fabricant. 8.
Table des matières Introduction . . . . . . . . . . . . . . . . . . . . . . . . . . . . . . . . . . . . . . . . . . . . . . 28 Studio GT — Généralités . . . . . . . . . . . . . . . . . . . . . . . . . . . . . . . . . . . . . . 29 Studio GT — Face Avant . . . . . . . . . . . . . . . . . . . . . . . . . . . . . . . . . . . . . . . 30 Studio GT — Face Arrière . . . . . . . . . .
Introduction Merci d'avoir choisi les écoutes Samson Studio GT avec interface USB audio intégrée. Les Samson Studio GT vous offrent une écoute précise grâce au Woofer de 11 cm à membrane en copolymère et au Tweeter à dôme en soie de 1 pouce alimentés par un amplificateur interne de 2 x 20 Watts.
• • • • • • • • • • • • • Mode d'emploi Studio GT 29 DEUTSCHE • Écoutes de studio actives à 2 voies avec baffle Bass Reflex accordé pour une reproduction extrêmement fidèle pour vos applications de studio, postproduction, jeux vidéo et multimédia. Interface audio USB deux canaux intégrée permettant la connexion d'un signal micro, ligne, ou instrument que vous pouvez enregistrer directement dans votre application audio. Convertisseurs A/N et N/A de haute qualité en 16 bits à 44,1 kHz/48 kHz.
Studio GT — Face Avant 1 2 3 4 4 5 5 6 6 7 8 9 10 11 12 1. Tweeter à dôme en soie - Réponse douce dans les aigus grâce au Tweeter à dôme en soie de 1 pouce. 2. Woofer - Woofer à réponse étendue dans les basses de 11 cm. 3. Led POWER (active) - La Led verte s'allume lorsque les écoutes sont sous tension. 4. Led Clip - La Led Clip s'allume lorsque le niveau du signal d'entrée atteint l'écrêtage.
Studio GT — Face Avant 10. Bouton MIX - Le bouton MIX vous permet de mixer les entrées avec le signal audio en provenance de l'ordinateur. En position minimum, vous entendez uniquement les signaux connectés aux entrées du Studio GT. En position maximum, vous entendez uniquement (dans les enceintes et les sorties casque) les signaux en provenance de l'ordinateur. Utilisez les positions intermédiaires pour régler le mixage souhaité entre les entrées des Studio GT et le signal audio de l'ordinateur. 11.
Studio GT — Face Arrière 1 2 3 7 4 6 5 8 1. Entrée AUX – Entrée stéréo en mini-Jack 3,5 mm permettant la connexion d'une deuxième source d'entrée à niveau ligne, comme un lecteur de MP3. Cette entrée ne passe pas par la sortie USB. 2. Entrées RCA – Permet la connexion de signaux asymétriques à –10 dBV, comme ceux en provenance d'une console de mixage, par exemple. L'embase rouge correspond au signal droit, la blanche au signal gauche. 3.
Studio GT — Mise en œuvre Studio GT — Mise en œuvre Déballez les éléments du système d'écoute Studio GT, ainsi que les câbles. Conservez les emballages au cas où vous devriez déménager ou faire réparer les écoutes. 2. Placez les écoutes Studio GT près de votre ordinateur ou de votre station multimédia. L'enceinte avec l'électronique (avec les réglages et les connecteurs) se place à droite, et l'enceinte passive (sans boutons et entrées) à gauche. 3.
Studio GT — Mise en œuvre Enregistrement avec un micro 1. Réglez le bouton de GAIN au minimum. 2. Connectez un micro à l'entrée XLR CHANNEL 1 de la face avant à l'aide d'un câble XLR. 3. Tout en chantant ou en jouant devant le micro, montez progressivement le bouton de GAIN jusqu'à ce que le témoin CLIP s'allume. Tournez alors le bouton en arrière, jusqu'à ce que le témoin d'écrêtage s'éteigne. 4. Montez le bouton LEVEL jusqu'à obtenir un niveau d'écoute confortable. 5.
Studio GT — Mise en œuvre Réglez le bouton de GAIN au minimum. 2. Connectez une guitare à l'entrée Jack 6,35 mm centrale CHANNEL 1 de la face avant avec un cordon guitare en Jacks 6,35 mm standard. Remarque : L'entrée Jack 6,35 mm accepte les sources à basse ou haute impédance. 3. Tout en jouant de la guitare avec son volume au maximum, montez progressivement le bouton de GAIN jusqu'à ce que le témoin CLIP s'allume. Tournez alors le bouton en arrière, jusqu'à ce que le témoin d'écrêtage s'éteigne. 4.
Studio GT — Mise en œuvre Enregistrer un clavier 1. Réglez les boutons de GAIN de canaux CHANNEL 1 et CHANNEL 2 au minimum. 2. Connectez un clavier stéréo aux entrées Jack 6,35 mm CHANNEL 1 et CHANNEL 2 de la face avant avec des câbles instrument standards. 3. Tout en jouant du clavier avec son volume au maximum, montez progressivement les deux boutons de GAIN jusqu'à ce que les témoins CLIP s'allument. Tournez alors les boutons en arrière, jusqu'à ce que les témoins d'écrêtage s'éteignent. 4.
Studio GT — Mise en œuvre Pour transmettre un mixage mono des entrées CHANNEL 1 et CHANNEL 2 aux enceintes et aux sorties casque du système Studio GT, placez la touche MONO/ STEREO en position supérieure (position MONO). 2. Pour séparer le mixage des entrées CHANNEL 1 et CHANNEL 2 vers les enceintes et les sorties casque du système Studio GT, enfoncez la touche MONO/STEREO en position basse (position STEREO).
Studio GT — Mise en œuvre Discussion sur les écoutes actives Studio GT avec interface studio Les Studio GT sont des écoutes de proximité, avec un Woofer de conception spéciale de 11 cm à membrane en copolymère, et un Tweeter à dôme en soie de 25 mm, à bobine refroidie par Ferro-fluide et avec un aimant au néodyme. Le filtre a été conçu avec soin et fait appel à des composants de haute qualité pour vous garantir une réponse en fréquence et en phase d'une linéarité exceptionnelle.
Écoute Directe et Latence Utilisation de l'écoute directe Le Studio GT vous offre un système d'écoute directe simple, mais sophistiquée, exempte de toute latence (retard dans l'écoute). Mode STÉRÉO Lorsque vous sélectionnez la position STEREO, vous écoutez les entrées en conservant l'image stéréo. Cette situation est parfaite pour enregistrer un clavier ou une boîte à rythmes : vous entendez (au casque ou dans les enceintes) les signaux d'entrée sans retard, et avec leur position dans le champ stéréo.
Installation des Studio GT L'installation du système Studio GT est une procédure simple qui ne prend que quelques minutes. Étant donné que le système Studio GT est compatible USB, vous pouvez l'utiliser avec quasiment n'importe quel ordinateur, connectez le cordon USB fourni et connectez-vous. Vous pouvez gérer le StudioDock avec l'interface audio standard de votre MAC ou de Windows (voir infos sur Windows 7 & Vista plus bas). Windows 7 et Windows Vista Le Studio GT ne nécessite aucun pilote spécial.
Installation des Studio GT 7. Sélectionnez l'onglet "Lecture", puis sélectionnez l'onglet "Niveau" pour régler le niveau général de l'ordinateur sur 100 % (Figure 5), et utilisez le bouton Level en face avant des Studio GT pour régler le niveau d'écoute dans les enceintes et le casque. Figure 4 ENGLISH volume d'“Entrée” peut être affiché en pourcentage ou en dB, en cliquant avec le bouton droit de la souris (Figure 4).
Installation des Studio GT Windows XP Le Studio GT ne nécessite aucun pilote spécial. Connectez le Studio GT dans un port USB de l'ordinateur et tout s'installe automatiquement. 1. 2. La première fois que vous connectez le Studio GT à un port USB, Windows XP installent les pilotes universels. Une bulle s'affiche, et vous indique que le codec audio USB a été trouvé (Figure 6).
Installation des Studio GT Macintosh OSX Voici comment installer le système Studio GT avec MAC OS X : 2. Pour sélectionner le Studio GT comme entrée audio de l'ordinateur, ouvrez les préférences système depuis le Dock ou dans le menu Apple (Figure 10). Figure 10 ENGLISH 1. R eliez le système Studio GT dans un port USB de votre MAC avec le câble USB fourni. Le MAC reconnaît le périphérique USB et installe automatiquement un pilote universel. 4.
Studio GT — Caractéristiques Techniques Haut-parleurs Woofer . . . . . . . . . . . . . . . 11 cm, en polypropylène avec suspension en santoprène Tweeter . . . . . . . . . . . . . . 25 mm à dôme en soie, aimant au néodyme refroidi par Ferrofluide Réponse en fréquence . . . . . 65 Hz - 22 kHz Amplificateur de puissance . . 2 x 18 Watts efficace Fréquence de coupure . . . . . Passe-haut : 4 kHz, 6 dB/oct., filtre Butterworth Passe-bas : 1,4 kHz, 12 dB/oct.
226 mm ITALIANO ESPAÑOL DEUTSCHE 168 mm FRANÇAIS ENGLISH 232 mm Studio GT — Dimensions Mode d'emploi Studio GT 45
Wichtige Sicherheitsinformationen Der Blitz mit Pfeilspitze im gleichseitigen Dreieck soll den Anwender vor nichtisolierter "gefährlicher Spannung" im Geräteinnern warnen. Diese Spannung kann so hoch sein, dass die Gefahr eines Stromschlags besteht. IfEntsorgen you want dispose thisnicht product, do not Hausmüll. mix it with household waste.
Wichtige Sicherheitsinformationen 1. 2. 3. 4. 5. 6. 7. 8. 9. 10. 11. 12. 13. Lesen Sie diese Anleitungen. Bewahren Sie diese Anleitungen auf. Beachten Sie alle Warnungen. Befolgen Sie alle Anweisungen. Setzen Sie dieses Gerät keinen tropf enden oder spritzenden Flüssigkei ten aus und stellen Sie keine mit Flüssigkeit gefüllten Objekte, z. B. Vasen, auf das Gerät. Reinigen Sie das Gerät nur mit einem trockenen Tuch. Blockieren Sie keine Belüftungsöffnungen.
Inhalt Einleitung . . . . . . . . . . . . . . . . . . . . . . . . . . . . . . . . . . . . . . . . . . . . . . . . 50 Studio GT Features . . . . . . . . . . . . . . . . . . . . . . . . . . . . . . . . . . . . . . . . . . 51 Studio GT Vorderseite . . . . . . . . . . . . . . . . . . . . . . . . . . . . . . . . . . . . . . . . 52 Studio GT Rückseite . . . . . . . . . . . .
Einleitung Herzlichen Dank für den Kauf der Studiomonitore Samson Studio GT mit integriertem USB-Audiointerface. Dank seines 4,25" Copolymer-Woofers und seines 1" Silk Dome Höhentreibers sowie des integrierten 2 x 20 Watt Verstärkers bietet Ihnen der Samson Studio GT präzises Monitoring der Spitzenklasse.
• • • • • • • • • • • • • Bedienungshandbuch Studio GT 51 FRANÇAIS DEUTSCHE • Aktiver 2-Weg Studioreferenzmonitor mit abgestimmtem Gehäuse und Luftkanal ermöglicht extrem präzises Monitoring für Aufnahmestudios, Nachbearbeitungen, Videospiele und Multimedia-Anwendungen. Integriertes 2-Kanal USB-Audiointerface zum Anschließen eines Mikrofon-, Line- oder Instrumentensignals und direkten Aufnehmen mit Ihrer Digital Audio Workstation.
Studio GT Vorderseite 1 2 3 4 4 5 5 6 6 7 8 9 10 11 12 1. 1" Silk Dome Tweeter - erzeugt einen ausgewogenen Höhen-Frequenzgang. 2. Basstreiber - Hoch belastbarer 4,25” Basstreiber mit erweitertem Frequenz bereich. 3. POWER LED (aktiv) - Wenn die grüne LED leuchtet, ist das Gerät eingeschaltet und betriebsbereit. 4. Clip LED - Wenn die Clip LED rot leuchtet, hat das Eingangssignal die ClippingGrenze erreicht.
Studio GT Vorderseite 10. MIX-Regler - mischt die Eingangs- und Computersignale stufenlos mitein ander. Bei völliger Linksdrehung des Reglers sind nur die an den Studio GT-Ein gängen anliegenden Signale hörbar. Bei völliger Rechtsdrehung sind nur die Ausgangssignale des Computers über Lautsprecher und Kopfhörerhörbar. Zwischen diesen beiden Extremen können Sie eine proportionale Mischung aus Studio GT-Eingängen und Computer-Audio herstellen. 11.
Studio GT Rückseite 1 2 3 7 4 6 5 8 1. 1/8” AUX INPUT – 3,5 mm Stereo-Eingang für ein zweites Line-Pegel-Signal, z. B. MP3 Player. Dieser Eingang wird nicht über den USB-Ausgang weitergeleitet. 2. CINCH-EINGÄNGE – für die Signale von asymmetrischen –10dBV Geräten, z. B. Mischer. Rot markiert den rechten Eingang, Weiß den linken Eingang. 3. USB-Anschluss – Verbinden Sie das mitgelieferte USB-Kabel mit diesem rückseiti gen USB “B” Port. 4.
Studio GT Schnellstart Studio GT Schnellstart 2. Stellen Sie die Studio GT Monitore neben Ihrem Computer oder MultimediaCenter auf. Die aktive Box verfügt über vorderseitige Regler und Buchsen. Dies ist der Monitor für die rechte Seite. Die passive Box (ohne Regler und Buchsen) ist der Monitor für die linke Seite. 3. Verbinden Sie die linke und rechte Box über das mitgelieferte Boxenkabel. 4. Verbinden Sie das mitgelieferte Netzkabel mit dem Netzanschluss. 5.
Studio GT Schnellstart Mit mikrofon aufnehmen 1. Drehen Sie den GAIN-Regler ganz nach links. 2. Verbinden Sie das Mikrofon über ein XLR-Kabel mit dem vorderseitigen CHANNEL 1 XLR-EINGANG. 3. Singen oder spielen Sie ein Instrument vor dem Mikrofon und drehen Sie den GAIN-Regler langsam nach rechts, bis die CLIP-Anzeige aufleuchtet. Drehen Sie dann den Regler etwas zurück, bis die Clip-Anzeige nicht mehr leuchtet. 4. Stellen Sie jetzt den LEVEL-Regler auf einen angenehmen Abhörpegel ein. 5.
Studio GT Schnellstart Drehen Sie den GAIN-Regler ganz nach links. 2. Verbinden Sie eine Gitarre über ein standard ¼” Instrumentenkabel mit dem vorderseitigen ¼” EINGANG. Hinweis: Der ¼” EINGANG akzeptiert hoch- und niederohmige Signalquellen. 3. Spielen Sie die Gitarre mit ihrem lautesten Pegel und drehen Sie den GAIN-Regler langsam nach rechts, bis die CLIP-Anzeige leuchtet. Drehen Sie den Regler dann nach links, bis die Clip-Anzeige nicht mehr leuchtet. 4.
Studio GT Schnellstart Keyboard aufnehmen 1. Drehen Sie die GAIN-Regler von CHANNEL 1 und CHANNEL 2 ganz nach links. 2. Schließen Sie ein Keyboard über standard ¼” Instrumentenkabel an die vorderseitigen ¼” EINGÄNGE von CHANNEL 1 und CHANNEL 2 an. 3. Spielen Sie das Keyboard mit seinem lautesten Pegel und drehen Sie die GAINRegler langsam nach rechts, bis die CLIP-Anzeigen leuchten. Drehen Sie die Regler dann nach links, bis die Clip-Anzeigen nicht mehr leuchten. 4.
Studio GT Schnellstart 2. Um die Mischung der CHANNEL 1- und CHANNEL 2-Eingänge in den Studio GTLautsprechern und Kopfhörern zu trennen, stellen Sie die MONO/STEREO-Taste auf STEREO ein (Taste gedrückt). CHANNEL 1 erklingt über Monitor LEFT und CHANNEL 2 über Monitor RIGHT. 3. Die Eingangssignale werden mit dem Ausgangssignal Ihrer DAW gemischt. Die MONO/STEREO-Taste wirkt nicht auf die Eingänge Ihrer Audiosoftware. 4.
Studio GT Einrichten Hintergrundinformationen zu den Studio GT Aktivmonitoren mit Studiointerface Die Studio GT Nahfeld-Referenzmonitore verfügen über speziell entwickelte 4" Copolymer Basstreiber und 1" Silk Dome Tweeter mit ferrofluid-gekühlten Schwing spulen und Neodym-Magneten. Die Crossover der Monitore bestehen aus hochwer tigen Komponenten und garantieren einen linearen Frequenz- und Phasengang.
Direktmonitoring anwenden Direktmonitoring und Latenz Der Studio GT verfügt über ein einfaches, aber raffiniertes Direktmonitoringsystem für latenzfreies Abhören. Bei gewähltem MONO-Modus hört man die beiden Mono- Eingangssignale, z. B. Gitarre und Mikrofon, direkt über die Eingangsschaltung des Studio GT, wobei die Eingangssignale in Mono gemischt sind. So erklingen beide Eingangssignale ohne Verzögerung auf beiden Seiten der Monitore oder Kopfhörer.
Studio GT Installieren Der Studio GT lässt sich mühelos in wenigen Minuten installieren. Da er USB-konform ist, kann man das mitgelieferte USB-Kabel an fast jeden PC anschließen und wie bei Plug & Play üblich sofort loslegen. Sie können Ihr StudioDock mit den standard Audio Interface-Reglern des MAC- oder Windows-Betriebssystems steuern. Detaillierte Anleitungen zum Einrichten von Windows 7 & Vista finden Sie in den folgenden Abschnitten.
7. Wählen Sie das Register "Wiedergabe" und dann das Register "Lautstärke", um die Gesamtlautstärke des Computers auf 100% zu setzen (Abb. 5). Steuern Sie dann mit dem vorderseitigen Level-Regler des Studio GT den Gesamtausgangspegel der Lautsprecher und Kopfhörer. Studio GT Installieren Abb. 4 ENGLISH reich zu erzielen (Abb. 3). Bei höheren Pegeleinstellungen verstärkt sich das Rauschen unnötigerweise. Der Lautstärkepegel kann durch einen Rechtsklick entweder in Prozent oder dB angezeigt werden (Abb.
Studio GT Installieren Windows XP Der Studio GT benötigt weder spezielle Treiber noch Software. Sobald Sie den Studio GT an einen USB-Port Ihres Computers anschließen, wird alles automatisch installiert. 1. Beim ersten Anschließen des Studio GT an einen USB-Port installiert Windows XP die Universaltreiber für diesen Anschluss. Es erscheint eine Sprechblase mit der Meldung, dass der Samson Studio GT gefunden wurde (Abb. 6). Abb. 6 2.
Studio GT Installieren Macintosh OSX Das folgende Beispiel beschreibt das Einrichten des Studio GT für MAC OS X. 2. Um den Studio GT als Audioeingang des Computers zu wählen, öffnen Sie die Systemeinstellung mit dem Dock oder Apple-Hauptmenü (Abb. 10). Abb. 10 ENGLISH 1. V erbinden Sie den Studio GT über das mitgelieferte Kabel mit einem freien USB-Port Ihres MAC. Der MAC erkennt das USB-Audiogerät und installiert automatisch einen Universaltreiber. 4.
Studio GT Technische Daten Wandler Woofer . . . . . . . . . . . . . . . 4” Polypropylen mit Santoprene-Rahmen Tweeter . . . . . . . . . . . . . . 1" Silk Dome Ferrofluid Neodym-Tweeter Frequenzgang . . . . . . . . . . 65 Hz - 22 kHz Ausgangsleistung . . . . . . . . 2 x 18 Watt RMS Crossover-Frequenz . . . . . . HPF: 4 kHz, 6 dB/Okt. Butterworth; LPF: 1400 Hz, 12 dB/Okt. Linkwitz-Riley Eingänge MIC-Eingang Anschluss . . . . . . . . . . . . .
FRANÇAIS 9” 226mm ITALIANO ESPAÑOL DEUTSCHE 6.6” 168mm ENGLISH 9.
A la hora de deshacerse de este aparato, no lo elimine junto con la basura orgánica. Existe un procedimiento de eliminación de aparatos electrónicos usados que cumple con la legislación actual sobre tratamiento, recuperación y reciclaje de elementos electrónicos.
Instrucciones importantes de seguridad 1. Lea estas instrucciones. 2. Conserve estas instrucciones. 3. Preste atención a todos los avisos. 4. Siga todo lo indicado en las instrucciones. 5. No exponga este aparato a salpicaduras ni coloque encima de él objetos que contengan líquidos. 6. Limpie este aparato solo con un trapo seco. 7. No bloquee ninguna de las aberturas de ventilación. Instale este aparato de acuerdo con las instrucciones del fabricante. 8.
Indice Introduccion . . . . . . . . . . . . . . . . . . . . . . . . . . . . . . . . . . . . . . . . . . . . . . 72 Caracteristicas del Studio GT . . . . . . . . . . . . . . . . . . . . . . . . . . . . . . . . . . . . 73 Panel frontal del Studio GT . . . . . . . . . . . . . . . . . . . . . . . . . . . . . . . . . . . . . 74 Panel trasero del Studio GT . . . . . . . . . . . . . .
Introduccion Felicidades y gracias por su compra de los monitores de estudio con interface audio USB integrado Samson Studio GT. Los Samson Studio GT le ofrecen una monitorización precisa gracias a su woofer de 4,25 pulgadas fabricado en copolímero y su cabezal de agudos de 1 pulgada y tipo silkdome con etapa de potencia interna de 2 x 20 watios.
• • • • • • • • • • • • • FRANÇAIS DEUTSCHE • Monitor de referencia de estudio activo y de dos vías con recinto acústico afinado y con tobera que le ofrece una monitorización extremadamente precisa para estudios de grabación, post-producción, videojuegos y aplicaciones multimedia. Interface audio USB de dos canales integrado que le ofrece la posibilidad de conectar una señal de micrófono, línea o instrumento para grabar directamente en su workstation de audio digital (DAW).
Panel frontal del Studio GT 1 2 3 4 4 5 5 6 6 7 8 9 10 11 12 1. Tweeter silkdome - Una suave respuesta en agudos gracias a este tweeter convexo de 1 pulgada. 2. Cabezal de bajas frecuencias - Un transductor de graves de 4,25" con rango ampliado y alto rendimiento. 3. Piloto POWER (activo) - Piloto verde que se ilumina para indicar que la unidad está encendida y lista para funcionar. 4. Piloto Clip - Se encenderá en rojo cuando la señal de entrada llegue al punto de saturación.
Panel frontal del Studio GT escucharán por igual en los lados izquierdo y derecho del Studio GT. En el modo Stereo, en la izquierda escuchará el canal 1 y el canal 2 en la derecha. 11. Auriculares - Clavija de salida stereo de 3.5 mm para auriculares. Los monitores quedarán automáticamente desactivados en cuanto conecte una clavija en esta toma derecha. ITALIANO ESPAÑOL DEUTSCHE FRANÇAIS 12.
Panel trasero del Studio GT 1 2 3 7 4 6 5 8 1. ENTRADA AUX – Toma de entrada stereo de 3.5 mm para la conexión de una segunda fuente de señal de nivel de línea, como un reproductor de MP3. Esta entrada no es emitida a través de la salida USB. 2. ENTRADA RCA – Se usa para la conexión de señales procedentes de dispositivos no balanceados de –10 dBV, como mesas de mezclas. El conector rojo es para la entrada derecha y el blanco para la entrada izquierda. 3.
Puesta en marcha del Studio GT Puesta en marcha del Studio GT 2. Coloque los monitores Studio GT en la ubicación que vayan a tener, cerca de su ordenador o equipo multimedia. El recinto activo (el que tiene los controles en el panel frontal y conectores) es el altavoz del lado derecho y el recinto pasivo (sin controles) es el altavoz izquierdo. 3. Conecte entre si los recintos izquierdo y derecho por medio del cable de altavoz incluido. 4. Conecte el cable de alimentación incluido en la toma AC IN.
Puesta en marcha del Studio GT Grabacion con un microfono 1. Gire el mando GAIN hasta su tope izquierdo. 2. Conecte un micrófono a la entrada XLR CHANNEL 1 del panel frontal por medio de un cable con clavija XLR. 3. A la vez que canta o habla en el micro, gire lentamente hacia la derecha el mando GAIN hasta que el indicador CLIP se ilumine. En ese momento, gire el mando hacia la izquierda hasta el punto en el que dicho indicador se apague. 4.
Puesta en marcha del Studio GT 2. Conecte la guitarra a la entrada de 6,3 mm del panel frontal usando un cable de instrumento con clavija de 6,3 mm. Nota: La entrada de 6,3 mm puede aceptar fuentes tanto de alta como de baja impedancia. 3. Mientras toca la guitarra al nivel máximo, gire lentamente hacia la derecha el mando GAIN hasta que el indicador CLIP se ilumine. En ese momento, gire el mando hacia la izquierda hasta el punto en el que dicho indicador se apague. 4.
Puesta en marcha del Studio GT Grabacion de un teclado 1. Gire los mandos GAIN CHANNEL 1 y CHANNEL 2 a su tope izquierdo. 2. Conecte un teclado a las entradas de 6,3 mm CHANNEL 1 y CHANNEL 2 del panel frontal por medio de cables de instrumento standard con clavijas de 6,3 mm. 3. Mientras toca el teclado al nivel máximo, gire lentamente hacia la derecha el mando GAIN hasta que el indicador CLIP se ilumine.
Puesta en marcha del Studio GT Para enviar una mezcla mono desde las entradas CHANNEL 1 y CHANNEL 2 a las salidas de altavoz y auriculares del Studio GT, coloque el botón MONO/STEREO en la posición de "no pulsado" o MONO. 2. Para separar la mezcla de las entradas CHANNEL 1 y CHANNEL 2 a las salidas de altavoz y auriculares del Studio GT, coloque el interruptor MONO/STEREO en la posición de "pulsado" o STEREO. CHANNEL 1 se escuchará en el altavoz IZQUIERDO y CHANNEL 2 en el altavoz DERECHO. 3.
Configuracion del Studio GT Información de base de los monitores activos con interface audio USB Studio GT Los Studio GT son monitores de referencia de campo cercano con un cabezal de bajas frecuencias de 4 pulgadas de diseño exclusivo fabricado en copolímero y un tweeter de 25 pulgadas de tipo silkdome, que emplea una bobina de voz refrigerada por fluido ferroso y un imán de neodimio.
Monitorizacion directa y Latencia Uso de la monitorización directa El Studio GT dispone de un simple, pero a la vez sofisticado, sistema de monitorización directa que le ofrece monitorización con latencia cero. Cuando elija este modo MONO escuchará las dos señales de entrada mono, por ejemplo micro y guitarra, directamente desde la circuitería de entrada del Studio GT mezcladas en mono. De esta forma escuchará ambas señales, sin retardo, en ambos lados de los monitores o auriculares.
Instalacion del Studio GT La instalación del Studio GT implica un proceso muy sencillo que solo le llevará un par de minutos. Dado que el Studio GT cumple con el protocolo USB, podrá usar casi cualquier PC, conectar el cable USB incluido y ya estará todo. Podrá controlar su Studio GT usando los controles del interface audio standard del sistema operativo MAC o Windows.
Instalacion del Studio GT 7. En la pestaña "Reproducción" vaya a la pestaña "Nivel" para ajustar el volumen master del ordenador al 100% (Figura 5), y use después el mando de nivel del panel frontal del Studio GT para controlar la salida global de los altavoces y auriculares. Figura 4 ENGLISH El nivel de volumen “Entrada” puede aparecer como un porcentaje o en dB, pudiendo elegirlo haciendo clic derecho sobre él (Figura 4). DEUTSCHE Para usar esa herramienta siga estos pasos: Vaya a http://www.
Instalacion del Studio GT Windows XP El Studio GT no requiere ningún driver o software especial. Simplemente conéctelo en un puerto USB de su ordenador y todo será instalado de forma automática. 1. La primera vez que conecte el Studio GT en un puerto USB, Windows XP instalará los drivers universales en ese puerto. Aparecerá un mensaje que le advertirá que el Samson StudioGT ha sido detectado (Figura 6). Figura 6 2.
Instalacion del Studio GT Macintosh OSX El siguiente ejemplo le enseña la configuración del Studio GT en MAC OS X . 2. Para elegir el Studio GT como la entrada audio del ordenador, acceda a las preferencias del sistema en el dock o en el menú Apple principal (Figura 10). Figura 10 ENGLISH 1. C onecte el Studio GT en un puerto USB disponible de su MAC por medio del cable USB incluido. El MAC reconocerá el dispositivo audio USB e instalará de forma automática el driver universal. 4.
Especificaciones del Studio GT Transductores Woofer . . . . . . . . . . . . . . . 4”, polipropileno con recubrimiento de santoprene, Tweeter ������������������������������������������ tweeter de 1 pulgada silkdome refrigerado por fluido ferroso y con imán de neodimio Respuesta de frecuencia . . . . 65 Hz - 22 kHz Potencia de amplificador . . . 2 x 18 watios RMS Frecuencia de crossover . . . .
226 mm ITALIANO ESPAÑOL DEUTSCHE 168 mm FRANÇAIS ENGLISH 232 mm Dimensiones del Studio GT Manual de instrucciones Studio GT 89
ENGLISH FRANÇAIS DEUTSCHE ESPAÑOL ITALIANO Se desideri smaltire questo prodotto, occorre separarlo dai normali rifiuti domestici. In conformità alla legislazione, esiste un sistema di raccolta separato per i prodotti elettronici usati, il quale prevede particolari procedure di trattamento, stoccaggio e riciclo.
Istruzioni di Sicurezza 1. Leggete le presenti istruzioni. l’apparecchio. Se usate un carrello, fate attenzione quando spostate il carrello e l’apparecchio insieme, in modo da evitare danni causati dalla caduta dell’apparecchio e/o del carrello. 2. Conservate le presenti istruzioni. 3. Rispettare tutte le avvertenze. 4. Seguite tutte le istruzioni. 5. L'apparecchio non va esposto a sgocciolii o schizzi di liquido e bisogna evitare di sovrapporgli vasi o altri oggetti pieni di liquido.
Contenuti Introduzione . . . . . . . . . . . . . . . . . . . . . . . . . . . . . . . . . . . . . . . . . . . . . . 94 Studio GT - Caratteristiche . . . . . . . . . . . . . . . . . . . . . . . . . . . . . . . . . . . . . 95 Studio GT - Il pannello frontale . . . . . . . . . . . . . . . . . . . . . . . . . . . . . . . . . . 96 Studio GT - Il pannello posteriore . . . . . . . . . . . .
Introduzione Grazie per l'acquisto degli Studio GT Samson, monitor da studio con interfaccia audio USB integrata. Gli Studio GT Samson forniscono una monitorizzazione accurata, grazie ai woofer da 4,25” in copolimero e ai tweeter per le frequenze acute da 1” a cupola di seta, alimentati con una potenza interna da 2 x 20 watt.
Manuale d'Uso Studio GT 95 FRANÇAIS DEUTSCHE ESPAÑOL ITALIANO Ecco alcune tra le loro caratteristiche principali. • Monitor di riferimento da studio attivi, a due vie, con mobile ad apertura accordata, in grado di fornire una monitorizzazione estremamente accurata per la registrazione in studio, la post-produzione e le applicazioni nei videogiochi e multimediali.
Studio GT - Il pannello frontale 1 2 3 4 4 5 5 6 6 7 8 9 10 11 12 1. Tweeter a Cupola di Seta - la risposta prodotta dal tweeter a cupola di seta da 1” è dolce e omogenea. 2. Altoparlante per le Frequenze Basse - trasduttore per le frequenze basse “heavy duty” da 4,25” ad intervallo esteso. 3. LED di Accensione (attività) - LED verde che, se acceso, indica che l'unità è alimentata ed è pronta per l'uso. 4.
Studio GT - Il pannello frontale 10. Controllo di MIX - lo si usa per bilanciare il missaggio audio tra i segnali in ingresso e l'audio in arrivo dal computer. Quando lo si ruota del tutto in senso antiorario, si ascoltano solo i segnali collegati in ingresso agli Studio GT. Quando lo si ruota completamente in senso orario, dagli altoparlanti e dalle uscite per cuffia si ascolta solo il segnale in uscita dal computer.
Studio GT - Il pannello posteriore 1 2 3 7 4 6 5 8 1. INGRESSO AUX DA 1/8” – presa di ingresso stereo da 3,5mm per il collegamento di una seconda sorgente di segnale a livello di linea come un lettore MP3. Questo ingresso non viene inviato alla uscita USB. 2. INGRESSO RCA – permette il collegamento di segnali da dispositivi sbilanciati a -10dBV come un mixer. Il connettore Rosso è per l'ingresso di Destra ed il Bianco per l'ingresso di Sinistra. 3.
Studio GT - Uso immediato Studio GT - Uso immediato 2. Posizionate i monitor dello Studio GT vicino al computer o al sistema multimediale. La cassa acustica attiva (quella con i controlli e le prese sul pannello frontale) va a destra e la cassa acustica passiva (senza prese né controlli) va a sinistra. 3. Con il cavo per cassa acustica in dotazione, collegate la cassa acustica di sinistra a quella di destra. 4. Collegate il cavo di alimentazione incluso in una presa in CA. 5.
Studio GT - Uso immediato Come registrare da un microfono 1. Ruotate completamente in senso antiorario il controllo di GUADAGNO. 2. Usando un cavo XLR, collegate il microfono all'INGRESSO XLR del CANALE 1 sul pannello frontale. 3. Mentre cantate o suonate nel microfono, alzate lentamente il controllo di GUADAGNO ruotandolo in senso orario, fino a far accendere l'indicatore di CLIP, per poi riabbassarlo fino al livello in cui l'indicatore rimane spento. 4.
Studio GT - Uso immediato 2. Usando un cavo standard per strumenti da ¼”, collegate la chitarra all'INGRESSO da ¼” del pannello frontale. Nota: l'ingresso da ¼” è in grado di accettare sorgenti sia a bassa impedenza che ad alta impedenza. 3. Mentre suonate lo strumento, alzate lentamente il controllo di GUADAGNO ruotan- dolo in senso orario, fino a far accendere l'indicatore di CLIP, per poi riabbassarlo fino al livello in cui l'indicatore rimane spento.
Studio GT - Uso immediato Come registrare una tastiera 1. Ruotate completamente in senso antiorario i controlli di GUADAGNO del CANALE 1 e del CANALE 2. 2. Usando cavi standard per strumenti da ¼”, collegate la tastiera agli INGRESSI da ¼” del CANALE 1 e del CANALE 2 del pannello frontale. 3.
Studio GT - Uso immediato 2. Per separare il mix dagli ingressi del CANALE 1 e del CANALE 2 alle uscite per cuffia e per le casse acustiche degli Studio GT, regolate il commutatore MONO/STEREO nella posizione in giù, in STEREO. Sentirete il CANALE 1 nella cassa acustica di SINISTRA ed il CANALE 2 nella cassa acustica di DESTRA. 3. I segnali in ingresso vengono miscelati al segnale in uscita dal software di registrazione digitale.
La configurazione degli Studio GT Informazioni di base sui Monitor Attivi Studio GT con Interfaccia Audio da Studio Gli Studio GT sono monitor di riferimento in campo ravvicinato (near field) che dispongono di altoparlanti per le basse frequenze di progettazione specifica, in copolimero, da 4” e di tweeter da 25mm a cupola di seta che sfruttano una bobina voce raffreddata al ferro fluido e magnete al neodimio.
Monitorizzazione diretta e Latenza L'Uso del “Direct Monitor” Gli Studio GT dispongono di un sistema di monitorizzazione diretta (appunto, “Direct Monitor”) semplice ma sofisticato, in grado di fornire monitorizzazione a latenza zero. Modo STEREO Quando si commuta la Monitorizzazione Diretta su STEREO, si ascoltano gli ingressi mantenendone l'immagine stereo. È la condizione perfetta per la registrazione di una tastiera o di una batteria elettronica.
Come installare gli Studio GT L'installazione degli Studio GT è una procedura semplice che richiede solo pochi minuti. Dato che gli Studio GT rispettano lo standard USB, potete usare sia un Mac che un PC, collegare il cavo USB in dotazione ed usarli subito, in perfetto stile “plug and play”. Potrete controllare gli Studio GT usando i controlli standard di interfaccia audio del sistema operativo Mac o Windows.
Come installare gli Studio GT possibile a 0 dB, per ottenere il miglior intervallo dinamico (figura 3). Se il livello è più elevato, il rumore sarà inutilmente troppo elevato. Il livello di volume in “Ingresso” può essere mostrato sia in percentuale che in dB, cliccandoci sopra col tasto destro (figura 4). FRANÇAIS Nota: anche se regolate il volume in “Ingresso” a 0 dB, i segnali audio passano comunque attraverso il controllo di volume di Windows, che non è perfetto al bit.
Come installare gli Studio GT Windows XP Gli Studio GT non necessitano di alcun driver o software particolare. Basta collegarli in una delle porte USB del computer e tutto quanto serve verrà installato automaticamente. 1. La prima volta che collegate gli Studio GT un una delle porte USB, Windows XP installerà i driver universali per quella specifica porta. Vedrete comparire un fumetto che vi segnala che sono stati trovati gli Studio GT (figura 6). Figura 6 2.
Macintosh OSX Come installare gli Studio GT L'esempio che segue riguarda la regolazione degli Studio GT con Mac OS X. Aprite le preferenze del “Suono” (figura 11). 4. A questo punto, cliccate sull'etichetta “Ingresso” e scegliete “Samson StudioGT” (figura 12). 5. Poi, cliccate sull'etichetta “Uscita” e scegliete “Samson StudioGT”. Noterete che lo slider del Volume si regola al massimo.
Studio GT - Specifiche Trasduttori Woofer . . . . . . . . . . . . . . . . Tweeter . . . . . . . . . . . . . . . . Risposta in Frequenza . . . . . . Potenza di Amplificazione . . . . Frequenza di Crossover . . . . . . . . . . . . . . . . . . . . . . . . . . . Ingressi Ingresso MIC Connettore . . . . . . . . . . . . . Impedenza in Ingresso . . . . . . Livello di Ingresso . . . . . . . . . guad.) Livello di Rumore Equivalente .
226 mm ITALIANO ESPAÑOL DEUTSCHE 168 mm FRANÇAIS ENGLISH 232 mm Studio GT - Dimensioni Manuale d'Uso Studio GT 111
45 Gilpin Avenue Hauppauge, New York 11788-8816 Phone: 1-800-3-SAMSON (1-800-372-6766) Fax: 631-784-2201 www.samsontech.