SyncMaster 151MP / 171MP
English > Main > Index Main Page Safety Instructions Notational Adjusting Your LCD Monitor User Controls Power User control buttons Installation Cleaning Direct-Access Features On-Screen Display Other OSD Functions Introduction Screen Adjustment Animation Clips Unpacking Troubleshooting Front Check before Calling for Service Rear Problems and Solutions Remote Control Setup Q&A Specifications Connecting Your Monitor Connecting to a Computer Connecting to Other Devices Installing the Monitor
English > Main > Safety Instructions > Notational Notational Power Installation Cleaning Other Failure to follow directions noted by this symbol could result in bodily harm or damage to equipment.
English > Main > Safety Instructions > Power When not used for extended periods of time, set your PC to DPMS. If using a screen saver, set it to the active screen mode. Notational Power Do not use a damaged or loose plug. Installation Cleaning z This may cause an electric shock or fire. Other Do not pull the plug out by the wire nor touch the plug with wet hands. z This may cause an electric shock or fire. Use only a properly grounded plug and receptacle.
English > Main > Safety Instructions > Installation Do not cover the vents on the monitor cabinet. z Bad ventilation may cause a breakdown or fire. Notational Power Installation Cleaning Put your monitor in a location with low humidity and a minimum of dust. Other z An electric shock or fire could result inside the monitor. Do not drop the monitor when moving it. z This may cause damage to the product or human body. Place the monitor on a flat and stable surface.
English > Main > Safety Instructions > Cleaning When cleaning the monitor case or the surface of the TFT-LCD, wipe with a slightly moistened, soft fabric. Notational Power Installation Do not spray detergent directly on the monitor. Cleaning Other Use the recommended detergent with a smooth cloth. If the connector between the plug and the pin is dusty or dirty, clean it properly with a dry cloth. z A dirty connector can cause an electric shock or fire.
English > Main > Safety Instructions > Ohter Do not remove cover(or back). No user serviceable parts inside. z z This may cause an electric shock or a fire. Refer servicing to qualified service personnel. Notational Power Installation Cleaning Other If your monitor does not operate normally - in particular, if there are any unusual sounds or smells coming from it - unplug it immediately and contact an authorized dealer or service. z This may cause an electric shock or fire.
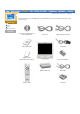
English > Main > Introduction > Unpacking Please make sure the following items are included with your monitor. If any items are missing, contact your dealer.
English > Main > Introduction > Front For detail information concerning the monitor functions, refer to User Controls under Adjusting Your Monitor. The monitor's front configuration may vary slightly depending on the monitor model.
English > Main > Introduction > Rear For detailed information concerning cable connections, refer to Connecting Cables under Setup. The monitor's rear configuration may vary slightly depending on the monitor model.
English > Main > Introduction > Remote Control For detailed information of the Remote Control Unit functions, refer to Adjusting Your Monitor > User Controls > User Control Buttons > Remote Control buttons. The remote control's configuration may vary slightly depending on the monitor model. Unpacking Front Rear The Remote control may function within a range of 0.23 to 33 feet (7cm to 10m) and 30 degrees to the left and right of the monitor's Remote Control Reception sensor.
English > Main > Setup > Connecting Your Monitor > Connecting to a Computer Connecting to a Computer Connecting to other devices Connecting Your Monitor Installing the Monitor Driver Installing a VESA base Turn on your computer and monitor. If your monitor displays an image, installation is complete. 1. Connecting to a Computer 1. Connect the power cord to the DC adapter and connect the adapter jack to the DC12V power port on the back of your monitor. 2.
English > Main > Setup > Connecting Your Monitor > Connecting to other devices Connecting to a Computer Connecting to other devices Connecting Your Monitor Installing the Monitor Driver Installing a VESA base AV input devices like DVDs, VCRs or Camcorders as well as your computer may be connected to the monitor. For detailed information on connecting AV input devices, refer to User Controls under Adjusting Your Monitor.
1. Connect the antenna or the cable box to the TV tuner box (not included) using the "ANTENNA" terminal on the tuner box. 2. Remove the TV Tuner Box cover from the rear of the monitor. 3. Insert the connected tuner box into the slot and firmly tighten the two screws using a coin to lock the box in place. (Loose screws may cause a blank screen or picture noise) 4. Replace the TV Tuner Box cover. 5. Turn on the monitor. 6. Select TV using Source button among the external signal adjustment buttons. 7.
4. Connecting Headphone You may connect your headphones to the monitor. 1. Connect your headphones to the Headphone-out port.
English > Main > Setup > Installing the Monitor Driver > Automatic Automatic Manual Connecting Your Monitor Installing the Monitor Driver Installing a VESA base When prompted by the operating system for the monitor driver, insert the CD-ROM included with this monitor. Driver installation is slightly different from one operating system to another. Follow the directions as appropriate for the operating system you have.
1. Insert CD into the CD-ROM driver. 2. Click "Windows XP/2000 Driver". 3. Choose your monitor model in the model list, then click the "OK" button. 4. Click the "Install" button in the "Warning" window. 5. If you can see following Message window, then click the "Continue Anyway" button. Then click "OK" button. This monitor driver is under certifying MS logo,and this installation don't damage your system. The certified driver will be posted on Samsung Monitor Homepage http://www.samsung-monitor.com/ 6.
English > Main > Setup > Installing the Monitor Driver > Manual Automatic Manual Connecting Your Monitor Installing the Monitor Driver Installing a VESA base When prompted by the operating system for the monitor driver, insert the CD-ROM included with this monitor. Driver installation is slightly different from one operating system to another. Follow the directions as appropriate for the operating system you have.
5. Click "Update Driver.." and select "Install from a list or.." then click "Next" button. 6. Select "Don't search ,I will.." then click "Next" and then click "Have disk". 7. Click the "Browse" button then choose A:(D:\Driver) and choose your monitor model in the model list and click the "Next" button. 8. If you can see following "Message" window, then click the "Continue Anyway" button. Then click "OK" button.
10. Monitor driver installation is completed. 2. Microsoft® Windows® 2000 Operating System * When you can see "Digital Signature Not Found" on your monitor, follow these steps. 1. Choose "OK" button on the "Insert disk" window. 2. Click the "Browse" button on the "File Needed" window. 3. Choose A:(D:\Driver) then click the "Open" button and then click "OK" button. * How to install 1. 2. 3. 4. 5. 6. 7. 8. 9. 10. Click "Start" , "Setting" , "Control Panel". Double click the "Display" Icon.
4. Microsoft® Windows® NT 4.0 Operating System 1. 2. 3. 4. Click Start, Settings, Control Panel, and then double-click Display icon. In Display Registration Information window, click Settings Tab and then click All Display Modes. Select a mode that you wish to use (Resolution, Number of colors and Vertical frequency) and then click OK. Click Apply button if you see the screen working normally after clicking Test.
English > Main > Setup > Installing a VESA base > Folding or removing the base Folding or removing the base Installing a VESA base Connecting Your Monitor Installing the Monitor Driver Installing a VESA base This monitor supports various types of VESA-standard bases. You need to either fold or remove the base in use in order to install a VESA base. Folding the base | Removing the base 1. Folding the base The monitor may be reclined from 0 to 90 degrees.
1. 2. 3. 4. Lay the LCD monitor face-down on a flat surface with a cushion beneath it to protect the screen. Disconnect the monitor cables. Remove the four bolts that fasten the base to the monitor. Reconnect the monitor cables. You may install a VESA base when the monitor base is separated.
English > Main > Setup > Installing a VESA base > Installing VESA base Folding or removing the base Installing a VESA base Connecting Your Monitor Installing the Monitor Driver Installing a VESA base The monitor supports VESA mounting standard for use with various VESA mounting devices. This monitor accepts a 75mm x 75mm VESA-compliant mounting interface pad. You need to fold the monitor base before installing a VESA base.
English > Main > Adjusting Your Monitor > User Controls > User control buttons User control buttons Direct-Access Features The control button configuration may vary slightly depending on the monitor model. User Controls On-Screen Display Source Buttons | Control Buttons | Remote Control Buttons | Source Buttons | 1. PC mode button Switches from Video mode to PC mode. 2. PIP mode button In PC Mode, turns on Video or TV screens in PIP mode.
| Control Buttons | For more information on the screen adjustment functions, refer to On-Screen Display. 5. Power button / Power indicator Use this button to turn the monitor on and off. Power Indicator shows PowerSaver mode by green blinking. Refer to Specifications > PowerSaver. 6. + CH / - CH button Moves from one menu item to another vertically or adjusts selected menu values. In TV mode, selects TV channels. For more information, refer to Direct-Access Features > Channel. 7.
1 Power button Use this button to turn the monitor on and off. 2-5 Source Button See the Source Buttons above. 6 PIP Position button Adjusts the location of Video image in PIP mode. Press VOL adjust the location up and down or left and right. / VOL + , + CH / - CH buttons to 7 PIP Size button Adjusts the PIP image size in PIP mode. Use the VOL enlarge the PIP screen. / VOL + buttons to exit PIP mode, or reduce or 8-11 Control Buttons See the Control Buttons above.
English > Main > Adjusting Your Monitor > User Controls > Direct-Access Features User control buttons Direct-Access Features User Controls On-Screen Display Direct-Access Features let you display Monitor Adjustment Menu by simply pressing Auto button once. Or they are used to adjust monitor functions. You need to activate functions other than Auto Adjustment only when AutoAccess Features are off. Automatic Save | OSD Lock/Unlock | Volume | Channel 1.
4. Channel When OSD is not on the screen, push the channel number. 1. Push the 2. Push the + CH / - CH button to select button to decrease the channel number. button to increase the channel number. This function is available in TV or PC + TV (PIP) mode only. You need to connect a TV tuner box (not included) to make PC+TV mode appear in TV mode or PIP mode.
English > Main > Adjusting Your Monitor > On-Screen Display > OSD Functions OSD Functions Screen Adjustment Animation Clips User Controls On-Screen Display Characters and icons become highlighted in blue during adjustment for each menu. PC Screen | Video Screen | TV Screen | OSD Control 1. PC Screen For detailed information on Screen Adjustment in the PC mode, refer to PC Screen Adjustment Animation Clips. Contrast Adjust Contrast. Brightness Adjust Brightness.
Image being displayed can be made softer or sharper. Position This adjusts the screen location horizontally and vertically. Sound The monitor has a built-in high fidelity stereo audio amplifier. 1) Bass: Emphasize low frequency audio. 2) Treble: Emphasize high frequency audio. 3) Surround: Turns the surround sound feature on/off. PIP When external A/V devices such as VCR or DVD are connected to the monitor, PIP allows you to watch video from such devices in a small window super-imposed on pc video signal.
Upon selecting a channel system, you will be asked if you want to perform "Channel auto program". Select "OK" to perform the "Channel auto program" or select "Cancel" to select different channel system. : Beligie, Deutschland, Espania, France, Italia, Nederland, Schweiz, Sverige, UK, East Europe.
English > Main > Troubleshooting > Check before calling for service Check the following items yourself before calling for service. Contact the service center for problems that you cannot solve by yourself. Self-Test Feature Check | Video mode not supported | Display Adapter Driver | For Better Display | Check before calling for service Problems and Solutions Q&A Dot Acceptable | Maintenance and Cleaning | Symptoms & Recommended Actions 1.
1. Checking Adapter Driver Click Start --> Settings --> Control Panel --> Display --> Settings --> Advanced --> Adapter. If "Default" or a wrong product model is indicated, it means that the adapter driver is not properly installed. Install the adapter driver again according to the information provided by the computer or video card manufacturers. 2. Installing Adapter Driver The instructions given below are for general circumstances.
1. Maintaining the Monitor Case Clean with a soft cloth after disconnecting the power cord. z z Do not use benzene, thinner or other flammable substances, or a wet cloth. We recommend a Samsung cleansing agent is used to prevent damage to the screen. 2. Maintaining the Flat Panel Display Screen Clean with a soft cloth (cotton flannel) smoothly. z z Never use acetone, benzene or thinner. (They may cause flaws or deformation of the screen surface.
English > Main > Troubleshooting > Problems and Solutions The following table lists possible problems and their solutions. Before calling for service, check the information in this section to see if you can remedy any problems yourself. If you do need assistance, please call the phone number on the warranty card, the phone number on the Information section or contact your dealer. Check before calling for service Problems and Solutions Q&A Installation | Screen | Audio | Remote Control 1.
z Check if the resolution and frequency set for the computer video card falls in the range supported by the monitor. If not, reset them referring to the current Information under the monitor menu and Preset Timing Modes. The image is too light or too dark z Adjust the Brightness and Contrast. (Refer to the Brightness, Contrast) Screen color is inconsistent. z Adjust color using User Mode under OSD Color Adjustment menu. Power Indicator blinks green.
English > Main > Troubleshooting > Q & A Frequently asked questions are summarized here for your reference. Question Check before calling for service Problems and Solutions Q&A How can I change the frequency? Answer Frequency can be changed by reconfiguring the video card. Note that video card support can vary, depending on the version of the driver used. (Refer to the computer or the video card manual for details.
English > Main > Specifications > General Specifications Design and specifications are subject to change without prior notice. General General PowerSaver Preset Timing Modes Model Name SyncMaster 151MP LCD Panel Size 15.0 inch (Diagonal) Display area 304.1 (H) x 228.1 (V) Pixel Pitch 0.297 (H) x 0.297 (V) Type a-si TFT active matrix Viewing Angle 70/70/60/60 (L/R/U/D) (Depending on the panel manufacturer, the viewing angle may be different from this spec.
VESA Mounting Interface 75mm x 75mm (for use with Specialty(Arm) Mounting hardware.) Environmental considerations Operating Temperature : 50°F ~ 104°F(10°C ~ 40°C) Humidity : 10% ~ 80%, non-condensing Storage Temperature : -13°F ~113°F (-25°C ~ 45°C) Humidity : 5% ~ 95%, non-condensing Audio Characteristics Audio Input 1 RCA Jack Red(R) White(L), 0.5Vrms (-9dB) Audio Input 2 3.5ø Stereo Jack, 0.5Vrms (-9dB) Headphone out Max. 10mW Output (3.
English > Main > Specifications > General Specifications Design and specifications are subject to change without prior notice. General General PowerSaver Preset Timing Modes Model Name SyncMaster 171MP LCD Panel Size 17.0 inch (Diagonal) Display area 338 (H) x 270 (V) Pixel Pitch 0.264 (H) x 0.264 (V) Type a-si TFT active matrix Viewing Angle 80/80/80/80 (L/R/U/D) (Depending on the panel manufacturer, the viewing angle may be different from this spec.
VESA Mounting Interface 100mm x 100mm (for use with Specialty(Arm) Mounting hardware.) Environmental considerations Operating Temperature : 50°F ~ 104°F(10°C ~ 40°C) Humidity : 10% ~ 80%, non-condensing Storage Temperature : -13°F ~113°F (-25°C ~ 45°C) Humidity : 5% ~ 95%, non-condensing Audio Characteristics Audio Input 1 RCA Jack Red(R) White(L), 0.5Vrms (-9dB) Audio Input 2 3.5ø Stereo Jack, 0.5Vrms (-9dB) Headphone out Max. 10mW Output (3.
English > Main > Specifications > PowerSaver General PowerSaver Preset Timing Modes This monitor has a built-in power management system called PowerSaver. This system saves energy by switching your monitor into a low-power mode when it has not been used for a certain amount of time. The monitor automatically returns to normal operation when you move the computer's mouse or press a key on the keyboard.
English > Main > Specifications > Preset Timing Modes If the signal transferred from the computer is the same as the following Preset Timing Modes, the screen will be adjusted automatically. However, if the signal differs, the screen may go blank while the power LED is on. Refer to the video card manual and adjust the screen as follows. General Table 1.
Table 2.
English > Main > Information > Service Center Service Center Terms Regulatory Natural Color Authority U.S.A. : Samsung Computer Products Customer Service 400 Valley Road, Suite 201, Mt. Arlington, NJ 07856 Tel. : (973)601-6000, 1-800-SAMSUNG (1-800-726-7864) Fax. : (973)601-6001 http://www.samsungusa.com/monitor/ BRAZIL : Samsung Eletronica da Amazonia Ltda. R. Prof. Manoelito de Ornellas, 303, Terro B Chacara Sto. Antonio, CEP : 04719-040 Sao Paulo, SP SAC : 0800 124 421 http://www.samsung.com.
Fax. : (0208) 397 9949 < European Service Center & National Service > Stafford Park 12 Telford, Shropshire, TF3 3BJ Tel. : (0870) 242 0303 Fax. : (01952) 292 033 http://samsungservice.co.uk/ THAILAND : HAI SAMSUNG SERVICE CENTER MPA COMPLEX BUILDING,1st-2nd Floor 175 SOI SUEKSA VIDHAYA SATHON SOI 12 SILOM ROAD ,SILOM,BANGRAK BANGKOK 10500 TEL : 0-2635-2567 FAX : 0-2635-2556 SOUTH AFRICA : Samsung Electronics,5 Libertas Road, Somerset Office Park, Bryanston Ext 16.
IMPORTADO POR: SAMSUNG ELECTRONICS MEXICO S.A. DE C.V. SATURNO 44 COL. NVA. INDUSTRIAL VALLEJO DEL. GUSTAVO A. MADERO C.P. 07700 MEXICO D.F. TEL. 5747-5100 RFC: SEM950215S98 EXPORTADO POR: SAMSUNG ELECTRONICS CO.,LTD. JOONG-ANG DAILY NEWS BLDG. 7 SOON-WHA-DONG CHUNG-KU, C.P.
English > Main > Information > Terms Sync Signal Sync (Synchronized) Signals refer to the standard signals that are required to display desired colors on the monitor. They are divided into Vertical and Horizontal Sync Signals. These signals display normal color images by the set resolution and frequency. Service Center Terms Regulatory Natural Color Authority Types of Sync Signals Separate This is a scheme of transmitting individual vertical sync signals to the monitor.
English > Main > Information > Regulatory FCC Information | IC Compliance Notice | MPR II Compliance | European Notice (Europe only) | PCT Notice | VCCI | TCO'95-Ecological requirements for personal computers (TCO applied model only) TCO'99-Ecological requirements for personal computers (TCO applied model only) Service Center Terms Regulatory Natural Color Authority FCC Information User Instructions The Federal Communications Commission Radio Frequency Interference Statement includes the following warning:
Products with the CE Marking comply with both the EMC Directive (89/336/EEC), (92/31/EEC), (93/68/EEC) and the Low Voltage Directive (73/23/EEC) issued by the Commission of the European Community. Compliance with these directives implies conformity to the following European Norms: z EN55022:1998 - Radio Frequency Interference z EN55024:1998 - Electromagnetic Immunity z EN61000-3-2:1995+A1+A2 - Power Line Harmonics z EN61000-3-3:1995 - Voltage Fluctuations z EN60950 - Product Safety.
reasonable for the user. Labelled products must meet strict environmental demands, for example in respect of the reduction of electric and magnetic fields, along with physical and visual ergonomics and good usability. TCO Development Unit 1996-11-29 On the page this folder you will find a brief summary of the environmental requirements met by this product.
Why do we have environmentally labelled computers? In many countries, environmental labelling has become an established method for encouraging the adaptation of goods and services to the environment. The main problem, as far as computers and other electronics equipment are concerned, is that environmentally harmful substances are used both in the products and during their manufacture.
TCO'03-Ecological requirements for personal computers (TCO'03 applied model only) Congratulations! The display you have just purchased carries the TCO03 Displays label. This means that your display is designed, manufactured and tested according to some of the strictest quality and environmental requirements in the world. This makes for a high performance product, designed with the user in focus that also minimizes the impact on our natural environment.
English > Main > Information > Natural Color Natural Color Software Program Service Center Terms Regulatory Natural Color Authority One of the recent problems in using a computer is that the color of the images printed out by a printer or other images scanned by a scanner or a digital camera are not the same as those shown on the monitor. The Natural Color S/W is the very solution for this problem.
English > Main > Information > Authority Information in this document is subject to change without notice. © 2003 Samsung Electronics Co., Ltd. All rights reserved. Service Center Terms Regulatory Natural Color Authority Reproduction in any manner whatsoever without the written permission of Samsung Electronics Co., Ltd. is strictly forbidden. Samsung Electronics Co., Ltd.
http://www.samsung-monitor.com/ (Worldwide) http://www.samsungusa.com/monitor/ (USA) http://www.sec.co.kr/monitor/ (Korea) http://www.samsungmonitor.com.