
Product specifications

3-2
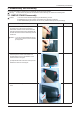
3. Disassembly and Assembly
Description Photo Screws
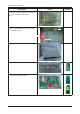
4.
Remove the SHIELD-LAMP using the provided JIG.
Caution: The SHIELD-LAMP is sharp.
5. Remove the LVDS, LAMP wire, FUNCTION
cable, and SPEAKER cable, and then remove
the SHIELD-COVER.
LAMP
WIRE
LVDS
FUNCTION
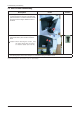
6.
Remove the LCD panel..
7.
Remove the four (4) screws shown in the gure.
8. Remove the four (4) screws shown in the gure
and remove the Bracket support.