
Product specifications

3-4
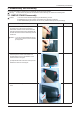
3. Disassembly and Assembly
3-2. HAS STAND Disassembly
Description Photo Screws
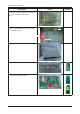
1. If the Stopper PIN at the back of the stand is
not removed, place a soft cloth on the table and
place the monitor on it, and then hold the monitor
set and remove the Stopper PIN at the back of
the stand.
2.
Turn the monitor over. Remove the two (2) screws
that hold the stand in place and then remove the
stand.
Caution: When removing the screws, hold
the stand body with one hand
so that the stand does not fall.
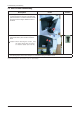
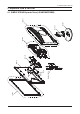
3. The following steps are the same as steps 2 to 9 for disassembling the SIMPLE stand.
The assembly is in the reverse order of disassembly.※