BD-P1600 BD-P1650 Blu-ray Disc Player user manual imagine the possibilities Thank you for purchasing this Samsung product. To receive a more complete service, please register your product at www.samsung.com/register 01789N-BD-P1600,1650-EDC-ENG.
key features of your blu-ray disc player Player Features Supports a Variety of Disc Types • Blu-ray (BD-ROM, BD-RE, BD-R), DVD Video, DVD-RW/-R (V mode and finalized only) discs and Audio CD. • CD-RW/CD-R, DVD-RW/-R and USB storage device content such as MP3, JPEG and DivX files. HDMI (High Definition Multimedia Interface) HDMI reduces picture noise by allowing a pure digital video/audio signal path from the player to your TV. DivX ABOUT DIVX VIDEO: DivX® is a digital video format created by DivX, Inc.
graphic planes Two individual, full HD resolution (1920x1080) video layers are available on top of the HD video layer. One layer is assigned to video-related graphics (like subtitles), and the other layer is assigned to interactive elements, such as buttons or menus. Various wipes, fades and scroll effects may be available on both layers.
safety information Warning TO REDUCE THE RISK OF ELECTRIC SHOCK, DO NOT REMOVE THE COVER(OR BACK). NO USER-SERVICEABLE PARTS ARE INSIDE. REFER SERVICING TO QUALIFIED SERVICE PERSONNEL. CAUTION RISK OF ELECTRIC SHOCK DO NOT OPEN This symbol indicates “dangerous CAUTION: TO REDUCE THE RISK OF ELECTRIC voltage” inside the product that presents SHOCK, DO NOT REMOVE COVER (OR BACK) NO a risk of electric shock or personal injury. USER SERVICEABLE PARTS INSIDE. REFER SERVICING TO QUALIFIED SERVICE PERSONNEL.
The product unit accompanying this user manual is licenced under certain intellectual property rights of certain third parties. This licence is limited to private non-commercial use by end-user consumers for licenced contents. No rights are granted for commercial use.
safety information Handling Cautions • Before connecting other components to this Blu-ray Disc Player, be sure to turn them all off. • Do not move the Blu-ray Disc Player while a disc is being played as the disc may be scratched or broken, or the Blu-ray Disc Player’s internal parts may be damaged. • Do not put a flower vase filled with water or any small metal objects on the Blu-ray Disc Player. • Be careful not to put your hand into the disc tray.
contents 3 What’s included safety information 4 5 Warning Precautions getting started 10 11 14 Before Using the User’s Manual Disc Type and Characteristics Disc Storage & Management description 16 17 18 Front Panel Front Panel Display Rear Panel remote control 19 20 20 21 Tour of the Remote Control Setting the Remote Control Regarding the Battery Controllable TV Codes connections 22 Connecting to a TV with an HDMI Cable (BEST QUALITY) Connecting to a TV with DVI Cable (BEST QUALITY) Connecti
contents basic functions of your blu-ray disc player 32 33 33 34 35 35 Before Playing On-Screen Menu Navigation Playing a Disc setting the sound Using the Search and Skip Functions Slow Motion Play/Step Motion Play system setup 36 Setting the Clock language setup 37 Setting up the Language Options audio setup 38 Setting up the Audio Options display setup 40 Setting up the display Options HDMI setup 44 Setting up the HDMI setup options parental setup 47 Setting up the Parental Lock netwo
54 54 System Device Management DivX(R) Registration system upgrade 55 57 57 Firmware Upgrade System Information Firmware upgrade notification watching a movie 58 59 60 61 61 62 63 63 Using the Display Function Using the Disc Menu & Popup/Title Menu Repeat Play Selecting the Audio Language Selecting the Subtitle Language Changing the Camera Angle BONUSVIEW Settings BD-LIVE™ listening to music 64 64 65 Buttons on the Remote Control used for Audio CD (CD-DA)/MP3 playback Repeat Audio CD(CD-DA)/MP3 Pl
getting started Before Using the User’s Manual Make sure to check the following terms before using the user’s manual. Icons that will be used in this manual Icon h g f Z C V Term BD-ROM This involves a function available on a BD-ROM. BD-RE This involves a function available on the BD-RE. BD-R This involves a function available on the BD-R.
Disc Type and Characteristics Disc types that can be played Disc Types Disc Logo BD-ROM BD-RE/BD-R Disc Shape Max. Playing minute AUDIO + VIDEO Single sided Playing time depends on the Title AUDIO + VIDEO Single sided (12 cm) 240 Double sided (12 cm) 480 Single sided (8 cm) 80 Double sided (8 cm) 160 DVD-RW (V mode and finalized only) AUDIO + VIDEO 12 cm (4.7GB) 480 (EX : Extended Play) DVD-R (V mode and finalized only) AUDIO + VIDEO 12 cm (4.
getting started [Note] • Some commercial discs and DVD discs purchased outside your region may not be playable with this product. When these discs are played, either “This disc can not be played.” or “Please check the regional code of the disc.” will be displayed. • If a DVD-R/-RW disc has not been recorded properly in DVD video format, it will not be playable. Region code Both the Blu-ray Disc Player and the discs are coded by region. These regional codes must match in order to play the disc.
Disc Types ❖ BD-ROM This Blu-ray disc can be played back. A BD-ROM disc contains pre-recorded data. Although a BDROM may contain any form of data, most BD-ROM discs will contain movies in High Definition format for playback on Blu-ray Disc Player's. This unit can play back pre-recorded commercial BD-ROM discs. ❖ BD-RE/BD-R ❖ DVD-Video • A digital versatile disc (DVD) can contain up to 135-minutes of images, 8 audio languages and 32 subtitle languages.
getting started Disc Format ❖ DVD-RW/-R (V) • This is a format that is used for recording data on a DVD-RW or DVD-R disc. The disc can be played by this Blu-ray Disc Player once it has been finalized. ❖ DivX • • • • • • CD-R/-RW, DVD-R Video File with following extensions can be played. : .avi, .divx, .AVI, .DIVX DivX Video (Codec) Format : DivX 3.11 DivX 4.x DivX 5.x (without QPEL and GMC) DivX Audio (Codec) Format : MP3, MPEG1 Audio Layer 2, AC3, DTS Supported subtitle file formats: .smi, .srt, .sub, .
❖ DVD-RW and DVD-R • Clean with an optional PD disc cleaner (LF-K200DCA1 where available). Do not use cleaners or cloths for CDs to clean DVD-RW/-R discs. ❖ DVD-Video, Audio-CD • Wipe off dirt or contamination on the disc with a soft cloth. ❖ Cautions on handling discs ● GETTING STARTED • Do not write on the printed side with a ball-point pen or pencil. • Do not use record cleaning sprays or antistatic. Also, do not use volatile chemicals, such as benzene or thinner.
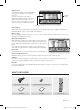
description Front Panel M DISC TRAY Opens to accept a disc. DISPLAY Displays the playing status, time, etc. Remote Control Sensor Detects signals from the remote control. OPEN/CLOSE BUTTON Opens and closes the disc tray. PLAY/PAUSE BUTTON Plays a disc or pauses playback. POWER BUTTON Turns the Blu-ray Disc Player on and off. STOP BUTTON Stops disc playback. SEARCH/SKIP BUTTONS Goes to the next title/chapter/track or goes back to the previous title/chapter/track.
Front Panel Display ● DESCRIPTION In Disc Indicator Lights when a disc is in the tray. Disc Type Indicators Lights to indicate the disc type in the tray. USB Indicator Lights to indicate when USB is connected. HDMI Indicator Lights to indicate when HDMI is connected. HD Indicator Indicates the display output is HD (High Definition). 24F Indicator Indicates the current mode is 24Fs (24 frames per second). STATUS Indicator Playing time/current status indicator.
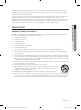
description Rear Panel Fan The fan always revolves when the power is on. Ensure a minimum of 10 cm of clear space on all sides of the fan when installing the product. M USB HOST A USB storage device can be connected here and used as storage when connected to BD-LIVE. It can also be used for firmware upgrades and MP3/JPEG/DivX playback, as well as for connecting to BD-Live with a wireless LAN adapter. LAN Can be used for connection to BD-LIVE. It can be also used for firmware upgrades.
remote control Tour of the Remote Control Installing batteries in the Remote Control Lift the cover at the back of the remote control 2. upward as shown. Install two AAA size batteries. Make sure to match the “+” and “–” ends of the batteries with the diagram inside the compartment. OPEN/CLOSE Button To open and close the disc tray. POWER TV POWER OPEN/CLOSE TV POWER Button POWER Button SUBTITLE Button Press this to switch the Blu-ray Disc/DVD’s subtitle language.
remote control SETTIng THE rEMOTE COnTrOL You can control certain functions of your TV with this remote control. Control function buttons include : TV POWEr, TV CH ,/., TV VOL +/–, TV MUTE, TV SOUrCE button. To determine whether your television is compatible, follow the instructions below. 1. Switch your television on. 2. Point the remote control towards the television. 3.
Controllable TV Codes Brand Code TV POWER+01, +02, +03, +04, +05, +06, +07, +08, +09 TV POWER+82 TV POWER+10, +11, +12, +13, +14, +15, +16, +17, +18 TV POWER+57 TV POWER+71 TV POWER+73 TV POWER+57 TV POWER+52 TV POWER+75 TV POWER+19, +20, +23, +24, +25, +26, +27, +28, +29, +30, +31, +32, +33, +34 TV POWER+64 TV POWER+73 TV POWER+06, +49, +57 TV POWER+57 TV POWER+84 TV POWER+70 TV POWER+49, +52, +71 TV POWER+60, +72, +73, +75 TV POWER+52 TV POWER+61, +79 TV POWER+06, +19, +20, +21, +22, +78 TV POWER+06, +69
connections This section involves various methods of connecting the Blu-ray Disc Player to other external components such as a TV. Connecting to a TV with an HDMI Cable (BEST QUALITY) 1. Using an HDMI cable (not included) connect the HDMI OUT terminal on the rear of the Blu-ray Disc Player to the HDMI IN terminal of your TV. 2. Press the input selector on your TV remote control until the HDMI signal from the Blu-ray Disc Player appears on your TV screen.
HDMI Auto Detection Function The player's video output will automatically change to HDMI output resolution when connecting an HDMI cable while power is on (see page 42). M Depending on your TV, certain HDMI output resolutions may not work. Please refer to the user's manual of your TV. If an HDMI cable is connected from the player to a TV, the Blu-ray Disc Player’s output is set to HDMI output resolution automatically within 10 seconds.
connections COnnECTIng TO a TV WITH DVI CaBLE (BEST QUaLITY) 1. Using an HDMI-DVI cable (not included), connect the HDMI OUT terminal on the rear of the Blu-ray Disc Player to the DVI In terminal of your TV. 2. Using the audio cables, connect the aUDIO (red and white) OUT terminals on the rear of the Blu-ray Disc Player to the aUDIO (red and white) In terminals of your TV. Turn on the Blu-ray Disc Player and TV. 3.
COnnECTIng TO a TV (COMPOnEnT) (BETTEr QUaLITY) - Connecting to your TV using Component video cables. - You will enjoy high quality images with accurate colour reproduction. Component video separates the picture element into black and white(Y), blue(PB) and red(PR) signals to present clear and clean images. (Audio signals are delivered through the audio output.) 1.
connections COnnECTIng TO a TV (VIDEO) (gOOD QUaLITY) 1. Using video/audio cables, connect the VIDEO (yellow) / aUDIO (red and white) OUT terminals on the rear of the Blu-ray Disc Player to the VIDEO (yellow) / aUDIO (red and white) In terminals of your TV. 2. Turn on the Blu-ray Disc Player and TV. 3. Press the input selector on your TV remote control until the Video signal from the Blu-ray Disc Player appears on the TV screen.
COnnECTIng TO an aUDIO SYSTEM (2 CHannEL aMPLIFIEr) 1. Using the audio cables, connect the aUDIO (red and white) OUT terminals on the rear of the Blu-ray Disc Player to the aUDIO (red and white) In terminals of your Amplifier. 2. Using the video signal cable(s), connect the HDMI, COMPOnEnT or VIDEO OUT terminals on the rear of the Blu-ray Disc Player to the HDMI, COMPOnEnT or VIDEO In terminal of your TV. (See pages 22~26) 3. Turn on the Blu-ray Disc Player, TV and Amplifier. 4.
connections Connecting to an Audio System (Dolby Digital, DTS Amplifier) 1. U sing an optical cable (not included), connect the DIGITAL AUDIO OUT (OPTICAL) terminal on the rear of the Blu-ray Disc Player to the DIGITAL AUDIO IN (OPTICAL) terminal of your Amplifier. 2. Using the video signal cable(s), connect the HDMI, COMPONENT or VIDEO OUT terminals on the rear of the Blu-ray Disc Player to the HDMI, COMPONENT or VIDEO IN terminals of your TV. (see pages 22~26) 3.
Connecting to an Audio System (HDMI supported Amplifier) 1. Using an HDMI cable (not included), connect the HDMI OUT terminal on the rear of the Blu-ray Disc Player to the HDMI IN terminal of your Amplifier. 2. Using the HDMI cable, connect the HDMI OUT terminal of the Amplifier to the HDMI IN terminal of your TV. 3. Turn on the Blu-ray Disc Player, TV, and Amplifier. M ● CONNECTIONS 4.
connections Connecting to THE NETWORK To access network service or upgrade the current firmware, you must make one of the following connections. By connecting to a network, you can access the BD-LIVE services and software upgrades from Samsung’s update server. Case 1 : Connecting a Direct LAN Cable to your Modem 1. Using a direct LAN Cable (UTP cable, not included), connect the LAN terminal of the Blu-ray Disc Player to the LAN terminal of your modem.
Case 2 : Connecting to a Wireless IP sharer You can connect to network with a Wireless IP sharer. See page 50 for Wireless Network Setup. Wireless IP sharer ● COnnECTIOnS Modem Port Wireless LAN Adapter (not included) Modem Cable M This unit is compatible with only Samsung Wireless LAN Adapter. (not included) (Model name: WIS09ABGN). - The Samsung Wireless LAN Adapter is sold separately. - Contact a Samsung Electronics agent or service centre for purchasing.
basic functions of your blu-ray disc player This section introduces basic playback functions and playback by disc type. BEFOrE PLaYIng • Turn on your TV and set it to the correct Video Input (the input the Blu-ray Disc Player is connected to). • If you connected an external Audio System, turn on your Audio System and set it to the correct Audio Input. After plugging in the player, the first time you press the POWEr button, this screen comes up: If you want to select a language, press a nUMBEr button.
On-Screen Menu Navigation System Setup Language Setup Video Music Audio Setup Display Setup TV Aspect Movie Frame (24 Fs) Resolution Progressive Mode Still Mode Screen Message Front Display HDMI Setup Network Setup Network Selection Cable Network Wireless Network Proxy NTP Server Network Connection Test BD-LIVE Internet Connection Parental Setup Digital Output PCM Down Sampling Dynamic Compression ● BASIC FUNCTIONS Photo Setup Audio Subtitle DivX Subtitle Disc Menu Menu System Information Time Zo
basic functions of your blu-ray disc player SETTIng THE SOUnD Setting the Power On / Off Melody Sound A Melody sound can be set so it is heard each time you turn the player on or off. 1. With the unit in Stop mode, press the MEnU button. . Press the $% buttons to select Setup, then press the EnTEr or + button. System Information Music Time Zone Photo No Disc Setup 3. Press the $% buttons to select System Setup, then press the EnTEr or + button. .
Using the Search and Skip Functions During play, you can search quickly through a chapter or track, and use the skip function to jump to the next selection. Searching through a Chapter or Track During playback, press the SEARCH ( Each time you press the SEARCH ( DivX ) button. ) button, the playback speed will change as follows. ) X 2 ) X 4 ) X 8 ) X 16 ) X 32 ) X 128 ( X 2 ( X 4 ( X 8 ( X 16 ( X 32 ( X 128 )X2)X4)X8 ~ You can scan the programme in reverse.
system setup For your convenience, you can set this player’s features for the best use in your home environment. SETTIng THE CLOCK Choose your time zone 1. With the unit in Stop mode, press the MEnU button. . Press the ▲▼ buttons to select Setup, then press the EnTEr or + button. Music Photo No Disc Setup 3. Press the ▲▼ buttons to select System Setup, then press the EnTEr or + button. . Press the ▲▼ buttons to select Time Zone, then press the EnTEr or + button. .
language setup SETTIng UP THE LangUagE OPTIOnS Once you set the audio, subtitle, disc menu and player menu language options, they will be applied automatically every time you watch a movie. If you want to choose a different audio and subtitle language while playing a disc, you can also use the disc ● LangUagE SETUP M menu to make the selection. 1. With the unit in Stop mode, press the MEnU button. . Press the ▲▼ buttons to select Setup, then press the EnTEr or + button.
audio setup SETTIng UP THE aUDIO OPTIOnS Allows you to set up the Audio device and sound status depending on the audio system being used with the player. 1. With the unit in Stop mode, press the MEnU button. Music . Press the ▲▼ buttons to select Setup, then press the EnTEr or + button. Setup Language Setup ◄ Audio Setup ► Display Setup 3. Press the ▲▼ buttons to select audio Setup, then press the EnTEr or + button. HDMI Setup Network Setup Parental Setup .
M Be sure to select the correct Digital Output or you will hear no sound or a loud noise. If the HDMI device (Receiver, TV) is not compatible with compressed formats (Dolby digital, DTS), the audio signal outputs as PCM. Secondary and Effect audio will not be heard with regular DVDs. Some Blu-ray Discs do not have Secondary and Effect audio. This Digital Output setup does not effect the analog (L/R) audio or HDMI audio output to your TV.
display setup SETTIng UP THE DISPLaY OPTIOnS This function allows you to setup the TV screen settings. This function depends on the disc or TV type. It may not work with some discs or TVs. 1. With the unit in Stop mode, press the MEnU button. System Setup Music Language Setup Photo No Disc Setup Audio Setup _ Display Setup ► HDMI Setup . Press the ▲▼ buttons to select Setup, then press the EnTEr or + button. Network Setup Parental Setup 3.
Movie Frame (24 Fs) Movies are usually filmed at 24 frames per second. Some Blu-ray Discs have the capability of playing back at this frame rate. Setting the Movie Frame (24Fs) feature to ON allows you to adjust the Blu-ray Disc Player's HDMI output to 24 frames per second for improved picture quality.
display setup ❖ resolution according to the output mode • Blu-ray Disc playback Output HDMI Component (HDMI&Comp. connected / Comp.
Frame & Field bar Still Mode Music Photo No Disc Setup System Setup Movie Frame (24 Fs) Language Setup Resolution : 1080p Audio Setup Progressive Mode : Off : Auto Still Mode : PCM ✓ Auto HDMI Setup Screen Message Network Setup Front Display : On Field Frame : Bright Display Setup ◄ ► Parental Setup ● DISPLaY SETUP Set the Auto, Field or Frame setting for the best possible still picture (pause mode) from a DVD.
HDMI setup SETTIng UP THE HDMI SETUP OPTIOnS 1. With the unit in Stop mode, press the MEnU button. . Press the ▲▼ buttons to select Setup, then press the EnTEr or + button. Language Setup Music Audio Setup Photo No Disc Setup 3. Press the ▲▼ buttons to select HDMI Setup, then press the EnTEr or + button. HDMI setup menu will be displayed. Display Setup ◄ HDMI Setup ► Network Setup Parental Setup . Press the ▲▼ buttons to select the desired display option, then press the EnTEr or + button.
M ● HDMI SETUP TV anynet+ Menu When you press the Anynet+ button on your Samsung TV's n remote control, the following On-Screen Display (OSD) will BD Player be shown.
HDMI setup BD Wise (Samsung products only) BD Wise is Samsung's latest inter-connectivity feature. When you connect Samsung products with BD-Wise to each other via HDMI, the optimum resolution will be set automatically. • On : The original resolution of the BD/DVD disc will be Language Setup Music output to the TV directly.
parental setup SETTIng UP THE ParEnTaL LOCK The Parental Lock function works in conjunction with Blu-ray Disc/DVDs that have been assigned a rating which helps you control the types of Blu-ray Disc/DVDs that your family watches. There are up to 8 rating levels on a disc. 1. With the unit in Stop mode, press the MEnU button. . Press the ▲▼ buttons to select Setup, then press the EnTEr or + button. 3. Press the ▲▼ buttons to select Parental Setup, then press the EnTEr or + button.
parental setup If you forgot your password 1. Remove the disc. . Press and hold the SKIP (]) button on the front panel for 5 seconds or more. • All settings will revert to the factory settings. M When the factory default settings are restored, all the user data stored in the BD Data will be deleted. Setting the rating Level 1. Press the ▲▼ buttons to select rating Level, then press the EnTEr or + button. . Press the ▲▼ buttons to select the rating level you want, then press the EnTEr button.
network setup SETTIng UP THE nETWOrK SETUP OPTIOnS To obtain information on the proper settings, check the network settings on your computer or contact your Internet provider. To set the network of your Blu-ray Disc player, follow the steps below. . Press the ▲▼ buttons to select Setup, then press the EnTEr or + button. Audio Setup Music Display Setup Photo No Disc Setup ● nETWOrK SETUP 1. With the unit in Stop mode/No Disc mode, press the MEnU button.
network setup . Press the ▲▼ buttons to select a desired item, then press the EnTEr button. • If DHCP is set to Off and, DNS to Manual, enter your IP Address, Subnet Mask, Gateway and Primary DNS settings (Secondary DNS is optional). Music Photo No Disc Setup Audio Setup Cable Network Display Setup Network Selection : DHCPSetup : Off HDMI _ IP Address : 0 Cable . 0 .Network 0 . 0 Network Setup : 255Wireless Subnet Mask . 255 . 255 . 0 Network ◄ Gateway : 0 Proxy . 0 . 0 .
. Press the $% buttons to select DHCP, then press the EnTEr button. M If DHCP is set to On, you can't select IP Address, Subnet Audio Setup Music Wireless Network Display Setup Photo No Disc Network Selection : Not Selected HDMI Setup Access Point Setup Mask or Gateway. DHCP Setup Network : ◄ OnCable Network IP Address Parental Setup Subnet Mask : DNS DNS Server DNS. ► : 255Proxy . 255 . 255 . 0 : 0 . 0 . 0 . 0 NTP Server : Off : Auto Network Connection Test : 0 . 0 . 0 .
network setup • If DHCP is set to On and, DNS to Manual, enter your DNS Server. Music Photo No Disc Setup Audio Setup Wireless Network Display Setup Network Selection Access Point : Not Selected HDMI Setup _ DHCP : On Cable Network Network Setup : 0 Wireless IP Address . 0 . 0Network . 0 ◄ Subnet Mask : 255 . 255 . 255 . 0 Proxy GatewaySetup : 0 . 0 . 0 . 0 Parental NTP Server DNS : Manual DNS Server Save • If DHCP is set to On and, DNS to Auto, you don’t need further or additional settings.
nTP Server (Used to retrieve Time Information from nTP Server) To setup, follow steps 1~3 on page 49. . Press the ▲▼ buttons to select nTP Server, then press the EnTEr or + button. • On : The player automatically connects to the Internet server in order to adjust the time setting. • Off : The player does not connect to the Internet server to adjust the time setting.
BD data management BD Data (stored in external USB flash memory) is Blu-ray Disc content such as trailers and other special features downloaded from the BD-LIVE service or Blu-ray Discs. * You must have a minimum 1GB USB Memory device inserted in one of the USB slots in order to download content from BD-LIVE. SYSTEM DEVICE ManagEMEnT You can manage user data stored in BD Data. 1. With the unit in Stop mode, press the MEnU button. . Press the ▲▼ buttons to select Setup, then press the EnTEr or + button.
system upgrade Samsung may offer upgrades to your Blu-ray Disc Player's firmware in the future. To upgrade this firmware you must : 1. Go to samsung.com and refer to the ‘SUPPORT’ page to download the latest firmware. You can use a CD-R or a USB flash drive to perform the firmware upgrade. (Firmware upgrade using a USB storage is available only when no disc is in the unit.) For more information, see “Upgrade Manual” at the website mentioned above. ● SYSTEM UPgraDE or 2.
system upgrade • If there is a disc in the player : "Please maintain "No Disc" state for network update." This indicates that you must remove all discs from the unit to perform the update. • If the server service is not available : “ Update Server is under maintenance. Please try again later.” . To perform the system upgrade, press the _ + buttons to select Start and then press the EnTEr button.
You must use a USB Flash Drive to do software upgrades using the USB Host jack. Other USB devices(ex. MP3 player) are not guaranteed to work. There should be only one firmware upgrade file in USB flash drive for the player to properly perform an upgrade. Oversized USB drives may not be able to be inserted when a LAN or HDMI cable is connected. SYSTEM InFOrMaTIOn 1. With the unit in Stop mode/No Disc mode, press the MEnU button. .
watching a movie USIng THE DISPLaY FUnCTIOn hgfZCV 1. During playback, press the InFO button on the remote control. • If the Blu-ray Disc has the BONUSVIEW feature, press the InFO button in the BONUSVIEW section to display BONUSVIEW-related information. BD Info Title : 000/034 Chapter : 000/002 Playing Time : 00:00:06 Audio : 1/1 ENG Multi CH . Press the ▲▼ buttons to select the desired item. Subtitle : Off Angle : 01/01 3.
USIng THE DISC MEnU & POPUP/TITLE MEnU hZ Using the Disc Menu 1. During playback, press the DISC MEnU button on the remote control. PLAY MOVIE LANGUAGES SCENE SELECTIONS PREVIEWS % 3 M 4 5 6 7 8 9 10 11 12 13 14 15 Depending on the disc, the Disc Menu may not be available. ● WaTCHIng a MOVIE . Press the ▲▼_ + buttons to make the desired selection, then press the + or EnTEr button. • The Disc menu setup items may vary from disc to disc. Z Using the Title Menu 1.
watching a movie h Using the Popup Menu 1. During playback, press the POPUP MEnU button on the remote control. MAIN MENU AUDIO SET UP . Press the ▲▼_ + buttons or EnTEr button to select the desired menu. • The Popup menu setup options may vary from disc to disc. SCENE SELECTIONS % 3 M SUBTITLES 4 5 6 7 8 9 10 11 12 13 14 15 Depending on the disc, the Popup Menu may not be available. rEPEaT PLaY Repeat the current chapter or title. hgfZCV repeat playback 1.
SELECTIng THE aUDIO LangUagE hgfZD You can select a desired audio language quickly and easily with the aUDIO button. Using the aUDIO button 1. Press the aUDIO button during playback. The Audio changes when the button is pressed repeatedly. • The audio languages are represented by abbreviations. Audio 1/4 ENG Dolby Digital Multi CH ● WaTCHIng a MOVIE . To remove the audio bar, press the CanCEL or rETUrn button. Using the InFO button 1. During playback, press the InFO button on the remote control. 2.
watching a movie Using the InFO button 1. During playback, press the InFO button on the remote control. 2. Press the ▲▼ buttons to select Subtitle. 3. Press the _ + buttons on the remote control to select the desired subtitle language. M Depending on the Blu-ray Disc / DVD, you may be able to change the desired subtitle in the Disc Menu. Press the DISC MENU button. This function depends on what subtitles are encoded on the disc and may not be available on all Blu-ray Discs/DVDs.
BOnUSVIEW SETTIngS The BONUSVIEW feature allows you to view additional content (such as commentaries) in a small screen window while the movie is playing. h Using the BOnUSVIEW button ● WaTCHIng a MOVIE 1. If the current Blu-ray Disc features the BONUSVIEW function, you can use the BOnUSVIEW button to turn BONUSVIEW On or Off. . Each time you press the BOnUSVIEW button, you can toggle between BONUSVIEW On and BONUSVIEW Off.
listening to music You can select the data source by pressing the _ button in the menu screen. (CD/DVD/USB storage device). Buttons on the Remote Control used for Audio CD (CD-DA)/MP3 playback 1. PAUSE button : Pauses playback. 0 2. SKIP ( ) button : During playback, moves to the next page in the Music List or moves to the next track in the Playlist. BONUSVIEW PAUSE STOP 3. PLAY button : Plays the currently selected track. PLAY 4. ▲▼ buttons : Selects a track(song) in the Music List or Playlist. 5.
AF PLaYIng an aUDIO CD(CD-Da)/MP3 ► TRACK 001 1/18 00:02:24 / 00:05:57 CD a Play Mode . To move to the Music List, press the STOP or rETUrn button. The Music List screen is displayed on your TV. 3. Press the ▲▼ buttons to select the track you want to play, and then press the EnTEr button.
listening to music AF Playlist You can create a playlist with up to 99 tracks. 1. Insert an Audio CD(CD-DA) or an MP3 Disc into the disc tray. • For an Audio CD, the first track will be played automatically. • For an MP3 disc, press the ▲▼ buttons to select Music, then press the EnTEr button.
. Press the YELLOW(C) button to play the selected tracks. When the track is finished, the next track will automatically play. ► TRACK 001 CD 1/3 00:02:17 / 00:05:57 a Play Mode . To go to the Music List, press the rETUrn button. MP3 & JPEg Simultaneous playback AG ● LISTEnIng TO MUSIC . To edit the Playlist, press the STOP or rETUrn button. You can enjoy listening to MP3 files while you simultaneously view JPEG files. 1. When you play MP3 file, press the BLUE(D) button.
playing back a picture GF PLaYIng a JPEg DISC 1. Insert a JPEG disc into the disc tray. (You can watch the jpeg files using a USB storage device) Video Music CD Photo _ + Setup . Press the ▲▼ buttons to select the Photo, and then press the EnTEr or + button. Video Music Photo CD _ Setup 3. Press the ▲▼ buttons to select the folder you want to play, and then press the EnTEr button. .. + 640 jpg 03 JUL 2000 full jpg 03 JUL 2000 Video Music Photo CD _ Setup .. + gun001.
appendix troubleshooting Before requesting service, please check the following. PROBLEM • Check the batteries in the remote control. They may need replacing. • Operate the remote control at a distance of no more than 6.1m. • R emove batteries and hold down one or more buttons for several minutes to drain the microprocessor inside the remote control to reset it. Reinstall batteries and try to operate the remote control again. Disc does not play.
appendix PROBLEM If you experience other problems. SOLUTION • G o to the contents and find the section of the instruction manual that contains the explanations regarding the current problem, and follow the procedure once again. • I f the problem still cannot be solved, please contact your nearest Samsung authorized service centre. The picture is noisy or distorted • Make sure that the disc is not dirty or scratched. • Clean the disc. No HDMI output.
Specifications General AC 110~240V, 50/60Hz Power Consumption 30 W Weight 2.2kg Dimensions 430(W) × 209(D) × 54 (H) mm Operating Temperature Range +5°C to +35°C Operating Humidity Range 10 % to 75 % BD (Blu-ray Disc) Reading Speed : 4.917m/sec DVD (Digital Versatile Disc) Disc CD : 12 cm (COMPACT DISC) CD : 8 cm (COMPACT DISC) Composite Video ● APPENDIX Power Requirements Reading Speed : 3.49 ~ 4.06 m/sec. Approx. Play Time (Single Sided, Single Layer Disc) : 135 min. Reading Speed : 4.
appendix COPY PROTECTION • Because AACS (Advanced Access Content System) is approved as content protection system for Blu-ray Disc format, similar to use of CSS (Content Scramble System) for DVD format, certain restrictions are imposed on playback, analog signal output, etc., of AACS protected contents. The operation of this product and restrictions on this product may vary depending on your time of purchase as those restrictions may be adopted and/or changed by AACS after the production of this product.
Contact SAMSUNG WORLD WIDE If you have any questions or comments relating to Samsung products, please contact the SAMSUNG customer care centre.
Correct disposal of batteries in this product (Applicable in the European Union and other European countries with separate battery return systems.) This marking on the battery, manual or packaging indicates that the batteries in this product should not be disposed of with other household waste at the end of their working life. Where marked, the chemical symbols Hg, Cd or Pb indicate that the battery contains mercury, cadmium or lead above the reference levels in EC Directive 2006/66.