
User Manual
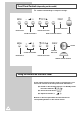
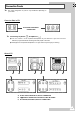
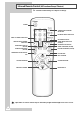
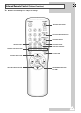
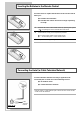
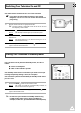
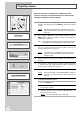
Table Of Contents
- Contents
- Front Panel Controls
- Using the Buttons on the Front Panel
- Connection Panels
- nfrared Remote Control
- Inserting the Batteries in the Remote Control
- Connecting the Aerial (or Cable Television Network)
- Switching Your Television On and Off
- Placing Your Television in Standby mode
- Plug & Play Feature
- Choosing Your Language
- Storing the Channels Automatically
- Selecting a Channel Numbered Ten or Over
- Storing the Channels Manually
- Skipping Unwanted Channels
- Fine tuning Channel Reception
- Sorting the Stored Channels
- Changing the Picture Standard
- Selecting the Picture Format
- Adjusting the Picture Settings
- Changing the Sound Standard
- Adjusting the Sound Settings
- Adjusting the Volume
- Extra Sound Settings
- Selecting the Sound Mode
- Switching the Sound Off Temporarily
- Setting the Sleep Timer
- Setting and Displaying the Current Time
- Switching the Television On and Off Automaticaly
- Activating the Child Lock
- Setting the Blue Screen Mode
- Teletext Decoder
- Displaying Teletext Information
- Selecting a Specific Teletext Page
- Using FLOF to Select a Teletext Page
- Storing Teletext Pages
- Viewing Pictures From External Sources
- Connecting to the Audio/Video Input/Outputs
- Automatic Degaussing to Remove Color Patches
- Troubleshooting: Before Contacting Service Personnel

10
Plug & Play Feature
When the television is initially powered ON, three basic
customer settings proceed automatically and subsequently:
setting the language, channel and clock.
1 If the television is in Standby mode (red light visible on the
television front panel), press the POWER button on the remote
control.
Result: The message Plug & Play is displayed. It flickers for a
little while and then the Language menu is automatically
displayed.
2 Press the s or t button to select required language. Press the
MENU button to enter the language, and then the message Ant.
Input Check is displayed.
â
If any language is not selected on the Language menu, the
Language menu will be displayed about 30 seconds later.
3 Make sure that the antenna is connected to the TV. And then press
the + or button to store the channels (refer to Storing the
Channels Automatically on page 12).
Result: The horizontal bar is displayed, and then channels are
stored in an order which reflects their positions in the
frequency range.
4 When searching and storing is complete, the Time menu is
displayed.
5 Press the + or button to move to the hour or minute. Set the hour
or minute by pressing the s or t button (refer to Setting and
Displaying the Current Time on page 23).
6 When you have finished, press the MENU button.
Result: The message ENJOY YOUR WATCHING is displayed,
and then the channel which has been stored will be
activated.
7 If you want to reset this feature...
1 Press the MENU button.
2 Press the s or t button to select the Function, and then
press the + or button.
3 Select the Plug & Play by pressing the s or t button, and
then press the + or button.
Result:
The message Plug & Play is displayed.
Function
Language : English
Plug & Play
E
Blue Screen : Off
Child Lock
E
Plug & Play
ENJOY YOUR WATCHING
Ant. Input Check
P 1
471 MHz 48 %
Time
Clock 11 : 35