Dishwasher Use & Care 6918977 A Guide
Installer: Please leave this manual with this appliance. Consumer: Please read and keep this manual for future reference. Keep sales receipt and/or cancelled check as proof of purchase.
Jr| Before You Start Adding a Forgotten item * Don't prerinse. Simply scrape off any hones or large food particles. For best cleaning, the forgotten early in the cycle. * If connected to a food waste disposer, make certain the disposer is empty before starting the dishwasher. 1. Grasp door handle and unlatch door without opening completely. All lights will flash to indicate that the cycle is suspended. * Scrape off tomato-based 2.
10 Place Setting Load Upper Rack The edge of the Folding Shelf is designed to hold stemware in place. Taller stemware will fit better on the right side as the upper rack is deeper on this side. The Folding Tines (select models} located in the 3 breadand butterplates areloadedon therackunder Lower Rack front right corner provide convenient loading space for large, bulky items like pots and pans or mixing bowls.
LOAD= Lower Rack Utensil A variety of items such as dinner plates, mixing bowls, pots and pans and baking dishes can be loaded in this rack. Removable (select Silverware Basket models) For best cleaning results, prevent items from nesting together by placing some items in the basket with handles up and some with handles down. Load knives, Tall items such as bakeware and large platters can be placed on the left side.
LOADING Removing the Upper Rack To remove rack with pulJ tab rack stops [select models): The rack can be removed when tall or oversized items need to be loaded into the lower rack. Unload the 1. Roll the rack '_ to '/2of the way out. rack before removing it from the dishwasher. = To remove each plastic pull tab rack stop from the end of each track, locate two-prong tab on inside of the rail and pull tab out toward rack. The rack stop can then be easily removed by pulling it straight out.
DISHWASHER USE Hot Water For optimal cleaning Add recommended amount of detergent to either side of the Main Wash compartment as shown and close and drying results, hot water is necessary. The incoming water temperature should be 120 ° F (49 ° C) to properly activate the detergent and melt greasy food soils. the detergent lid. To check the incoming water temperature, turn on the hot water faucet nearest the dishwasher and let it run into a glass in the sink.
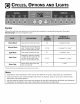
CYCLES, OPTIONS AND LIGHTS Cycles Choose the cycle that best describes your dishload Operating Tips, for how to begin the cycle). Heavy Wash by pressing the corresponding Long cycle for heavy food soils. 131 Medium cycle for average food soils. Precision Clean Turbidity sensor is active with this cycle. 97-118 Light Wash Short cycle for light food soils. 82 Auto Clean Designed to select the number of water fills best suited for the soil level of each load.
CYCLES, OPTIONS AND LIGHTS Cycle Options In addition to choosing High Temp Sanitize Extra Rinse Heated Dry a cycle from page 7, choose as many available options as are needed Select when washing loads with hard-to-remove food soils. Depending on which cycle is being used, this option adds heat and/or wash time to the wash cycle. Sanitizes dishware. When cycle monitor recognizes that the proper conditions have been met, SANITIZED light will activate at the end of the cycle.
CYCLES LIGHTS Lights/Display Control Lock Option Delay The control touchpads can be locked to prevent unwanted use. If this feature is activated between The Delay option can be used to automatically start the cycle at a later time to reduce daytime heat buildup in the home or to take advantage of reduced energy costs if available in your area. This option is also useful for conserving hot water at times of high household usage (showers, laundry). cycles, the dishwasher controls are unlocked.
CYCLES, OPTIONS AND LIGHTS Lights/Display (selectmodels) TIME REMAINING Shows approximate minutes remaining in a cycle. The symbol "2H" will appear when cycle time is greater than 99 minutes. Cycle times shown in the numerical display (select models) will increase or decrease, based on each load's soil level, water temperature and selected options. Display CLEAN Light Illuminates at the end of the cycle and remains lit until the door has been open for 30 seconds continuously.
CARE AND CLEANING General Recommendations * The color from some tomato-based food soils may occasionally adhere to various components of the dishwasher interior, causing temporary discoloration. The dishwasher interior is normally self-cleaning. Periodically check the bottom of the dishwasher tub to see if any large particles remain. To minimize • Remove excess tomato-based Wipe the edge of the inner door liner to remove any food soil splashes which occurred during loading.
TROUBLESHOOTING CHECK THESE POINTS TO HELP SAVE YOU TiME AND MONEY. B .... Dishwasher will not fill • Press the START/Cancel pad to start the dishwasher. • Be sure door is latched securely. • Be sure tile water is turned on. • Check that the pad is properly selected for a cycle. • Check your home's circuit breaker or fuse box. • Check inlet [lose for a kink. • Check water valve inlet for sediment and clean if necessary.
TROUBLESHOOTING i Display time suddenly drops or increases by several minutes (select models) • This is normal when the Auto Clean (select models) or Normal Wash cycle is selected and the dishwasher decides to skip or add a drain and refill. Indicator • The countdown display (select models) flashes after a cycle is selected until the START/Cancel pad is pressed. • The countdown display (select models) and the delay indicator flash after a delay is selected until the START/Cancel pad is pressed.
I[ROUBLESHOOTING II! i,i i,i i!i!i!i!i!i ,i! Items not properly dried/ moisture is present on the dishwasher interior after the dry cycle • Be sure Heated Dry is selected. • Water droplets may form on the inner door as part of the drying process. • Use a rinse aid separate from the detergent like Jet Dry* or Cascade Rinse Aid* regularly, to improve drying. Turn the rinse aid selector toward the MAX setting. • Check water temperature (pg. 6). • Select Sanitize.
WARRANTY AND SERVICE SAIVISU N G DISHWASHER This SAMSUNG brand product, as supplied and distributed by SAMSUNG ELECTRONICS AMERICA, INC.