DV218AE* DV218AG* DV229AE* DV229AG* Gas and Electric Dryer user manual This manual is made with 100% recycled paper. imagine the possibilities Thank you for purchasing this Samsung product. To receive more complete service, please register your product at www.samsung.com/register DV218AEW-02568B-06_EN.
features 1. Extra Large Capacity Ultra drying capabilities are at your fingertips! Now you can dry extra-large loads. Our ultralarge 7.3 cu.ft. capacity dryer circulates more air through your clothes drying them faster, for a wrinkle-free result. 2. Various Drying Cycles & Fuzzy Logic Algorithm Simply turn the Jog Dial to select one of the 7 automatic drying cycles, including normal and heavy duty, or let the Fuzzy Logic Control measure the degree of dampness and automatically set the drying time.
safety instructions Congratulations on your new Samsung Dryer. This manual contains valuable information on the installation, use, and care of your appliance. Please take the time to read this manual to take full advantage of your dryer’s many benefits and features. WARNING - Risk of Fire • Clothes dryer installation must be performed by a qualified installer. • Install the clothes dryer according to the manufacturer’s instructions and local codes.
safety instructions WARNING WARNING: To reduce the risk of fire, electric shock, or injury to persons when using your appliance, follow basic precautions, including the following: 1. Read all instructions before using this appliance. 2. Do not dry articles that have been previously cleaned in, washed in, soaked in, or spotted with gasoline, dry-cleaning solvents, or other flammable or explosive substances, as they give off vapors that could ignite or explode. 3.
WHAT TO DO IF YOU SMELL GAS: • • • • • • Do not try to light any appliance. Do not turn on the appliance. Do not touch any electrical switch. Do not use any phone in your building. Clear the room, building or area of all occupants. Immediately call your gas supplier from a neighbor’s phone. Follow the gas supplier’s instructions. • If you cannot reach your gas supplier, call the fire department. Installation and service must be performed by a qualified installer, service agency, or the gas supplier.
safety instructions This appliance must be properly grounded. Never plug the power cord into a receptacle that is not grounded adequately and in accordance with local and national codes. See installation instructions for grounding this appliance. Do not sit on top of the dryer. Because of continuing product improvements, Samsung reserves the right to change specifications without notice.
contents 8 8 9 10 10 10 11 11 12 13 13 14 15 15 17 18 19 Tools needed for installation See Exhaust Requirements Ducting requirements Important to installer Location considerations Alcove or closet installation Mobile home installation Exhausting Gas requirements Electrical requirements Grounding Electrical connections Replacement parts and accessories Installation Final installation checklist Dryer Exhaust Tips Door Reversal 20 22 23 24 24 24 Overview of the control panel Child lock Rack Dry Clean the li
installing your dryer TOOLS NEEDED FOR INSTALLATION Hire a professional to install this dryer properly. If there is a service call performed as a result of poor setup, adjustment, and connection, it is considered the responsibility of the installer. If you install the dryer you are responsible. Make sure you have everything necessary for proper installation. 1. A GROUNDED ELECTRICAL OUTLET is required. See Electrical Requirements. See page 13. 2. A POWER CORD for electric dryers (except Canada).
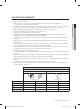
DUCTING REQUIREMENTS • • • • • • • • • • • • • • • • • 01 installing your dryer • Use a 4-inch (10.2 cm) diameter rigid aluminum or rigid galvanized steel duct. Do not use a smaller duct. Ducts larger than 4 inches (10.2 cm) in diameter can result in increased lint accumulation. Lint accumulation should be cleaned regularly. If a flexible metal duct must be used, use the type with a stiff sheet metal wall. Do not use a flexible duct with a thin foil wall.
installing your dryer If the new Dryer is installed into an existing exhaust system you must make sure: • The exhaust system meets all local, state, and national codes. • That a flexible plastic duct is not used. • To Inspect and clean all lint buildup from inside the existing duct. • The duct is not kinked or crushed. • The exhaust hood damper opens and closes freely. The static pressure in any exhaust system must not exceed 0.83 inches of water column, or be less than 0.
MOBILE HOME INSTALLATION 01 installing your dryer The installation of the Dryer in mobile homes must conform to the Manufactured Home Construction and Safety Standard Title 24 CFR, Part 32-80 {formerly the Federal Standard for Mobile Home Construction and Safety, Title 24, HUD (Part 280), 1975} for the United States) or CSA Standards Z240 (for Canada). When installing a Dryer in a mobile home, provisions for anchoring the Dryer to the floor must be made. Locate an area that has adequate fresh air.
installing your dryer GAS REQUIREMENTS Use only natural or LP (liquid propane) gases. THE INSTALLATION MUST CONFORM WITH LOCAL CODES, OR IN THE ABSENCE OF LOCAL CODES, WITH THE NATIONAL FUEL GAS CODE ANSI/Z223.1, LATEST REVISION (FOR THE UNITED STATES), OR WITH THE CAN/CGA-B149 INSTALLATION CODES (FOR CANADA). Gas dryers are equipped with a burner vent for use with natural gas.
ELECTRICAL REQUIREMENTS A Wiring diagram is located on the plate below the control panel. • • • Improper connection of the equipment grounding conductor can result in a risk of electric shock. Check with a qualified electrician or serviceman if you are in doubt as to whether your Dryer is properly grounded. Do not modify the plug provided with your Dryer – if it doesn’t fit the outlet, have a proper outlet installed by a qualified electrician.
installing your dryer ELECTRICAL CONNECTIONS Before operating or testing, follow all grounding instructions in the Grounding section. An individual branch (or separate) circuit serving only your Dryer is recommended. DO NOT USE AN EXTENSION CORD. Gas models – U.S. and Canada A 120 volt, 60 Hz AC approved electrical service, with a 15-amp fuse or circuit breaker is required. Electric models – U.S. only Most U.S. dryers require a 120/240 volt, 60 Hz AC approved electrical service.
REPLACEMENT PARTS AND ACCESSORIES If your dryer requires replacement parts or accessories, contact the dealer from whom you purchased your dryer or the SAMSUNG customer care center at 1-800-SAMSUNG (726-7864). Tools and Parts Cutting knife Pipe wrench (gas only) Nut drivers Level Phillips Screwdriver Duct tape Wrench 01 installing your dryer Pliers INSTALLATION Gather the required tools and parts before starting the installation.
installing your dryer 4. Review the Exhausting section before installing the exhaust system. Install the ductwork from your dryer to the exhaust hood. The crimped end of the duct sections must point away from your dryer. DO NOT use sheet metal screws when assembling ducting. These joints should be taped. Never use plastic flexible exhaust material. Tip for tight installations: install a section of exhaust system to your dryer before putting it in place.
3-WIRE system connections WARNING If converting from a 4-wire electrical system to a 3-wire, the ground strap must be reconnected to the terminal block support to ground the Dryer frame to the neutral conductor. 01 installing your dryer 1. Loosen or remove the center terminal block screw. 2. Connect the neutral wire (white or center wire) of the power cord to the center, silver-colored terminal screw of the terminal block. Tighten screw. 3. Connect the other wires to outer terminal block screws.
installing your dryer DRYER EXHAUST TIPS Plastic or non-metal flexible duct presents a potential fire hazard. WARNING 1. Make sure you dryer is installed properly so it exhausts air easily. 2. Use a 4” diameter rigid metal duct. Tape all joints, including at the dryer. Never use lint-trapping screws. 3. Keep ducts as straight as possible. 4. Clean all old ducts before installing your new Dryer. Be sure the vent flap opens and closes freely. Inspect and clean the exhaust system annually.
DOOR REVERSAL 8. Reinsert the screw in the other hole. 4. Remove a screw on the Frame Front 9. Reinsert the screw (Step 4) on the Frame Front 5. Remove the two screws on the opposite side of the door hinge. 10. Place the door on the other side and reattach it to the dryer. 6. Remove two screws from the holder lever. 11. Reattach the holder lever. 7. Remove a screw from the door hinge. 12. Reattach the screws in the remaing holes. 01 installing your dryer 1. Unplug the power cord. 2.
operating Instructions, tips OVERVIEW OF THE CONTROL PANEL 1 1 Cycle Selector 2 Digital Graphic Display 2 3 4 5 6 7 8 9 10 To select a cycle, rotate the Cycle Selector dial to the desired cycle. The indicator light by the cycle name will illuminate. The Normal, Heavy Duty, Towels, Perm Press and Delicates cycles are Sensor Dry cycles. Sensor Dry automatically senses the moisture in the load and shuts the dryer off when the selected dryness level (very dry to damp dry) is reached.
3 Dry Level Selection Button 4 Temp Selection Button 5 Time Selection Button 6 Signal Selection Button 7 Wrinkle Prevent Selection Button 8 Adjust Time 9 Start/Pause selection button Press to pause and restart programs. 10 Power button Press once to turn your Dryer on, press again to turn it off. If your dryer is left on for more than 10 minutes without any buttons being touched, the power automatically turns off.
operating Instructions, tips CHILD LOCK A function to prevent children from playing with your dryer. Setting/Releasing If you want to set or release the Child Lock, press both the Time and Signal buttons simultaneously for 3 seconds. How to Set: 1. It can be set while your dryer is running. 2. Once you set the Child Lock function, no button, except for the Power button, will respond until you release the Child Lock function. 3. The Child Lock indicator will be lit. 1.
RACK DRY Installing the drying rack SUGGESTED ITEMS SUGGESTED TEMP. SETTINGS Washable sweaters (block to shape and lay flat on rack) Low or Extra Low Stuffed toys (cotton or polyester fiberfilled) Low or Extra Low Stuffed toys (foam or rubber-filled) Air Fluff Foam rubber pillows Air Fluff Sneakers Air Fluff or Heat (Extra Low) WARNING 02 operating Instructions, Tips 1. Open the Dryer door. 2.
operating Instructions, tips CLEAN THE LINT FILTER • • • After each load. To shorten drying time. To operate more energy efficiently. Do not operate your Dryer without the lint filter in place. LOAD THE DRYER PROPERLY • • • • Place only one washload in your Dryer at a time. Mixed loads of heavy and lightweight fabrics will dry differently, which may result in lightweight fabrics being dry while heavy fabrics remain damp at the end of a drying cycle.
care and cleaning CONTROL PANEL TUMBLER Remove any stains such as crayon, ink, or fabric dye (from new items such as towels or jeans) with an allpurpose cleaner. Tumble old towels or rags to remove any excess stain or cleaning substance. Once these steps are followed, stains may still be visible, but should not transfer to subsequent loads. 03 care and cleaning Clean with a soft, damp cloth. Do not use abrasive substances. Do not spray cleaners directly on the panel.
special laundry tips SPECIAL LAUNDRY TIPS Please follow the care label or manufacturer’s instructions for drying special items. If care label instructions are not available, use the following information as a guide. Bedspreads & Comforters • • • Blankets • • Curtains & Draperies • • Follow the care label instructions or dry on the Normal cycle and High temperature. Make sure the item is thoroughly dry before using or storing. May require repositioning to ensure even drying.
troubleshooting CHECK THESE POINTS IF YOUR DRYER… SOLUTION Doesn’t run. • • • • Be sure the door is latched shut. Be sure the power cord is plugged into a live electrical outlet. Check the home’s circuit breaker and fuses. Press the Start/Pause button again if the door is opened during the cycle. Doesn’t heat. • • • • • Check the home’s circuit breaker and fuses. Select a heat setting other than Air Fluff. On a gas dryer, check that the gas supply is on. Clean the lint filter and exhaust duct.
troubleshooting INFORMATION CODES Information codes may be displayed to help you better understand what is occurring with your Dryer. ERROR DISPLAY tS MEANING SOLUTION tO Clogged Lint Screen Vent is restricted Clean the screen or vent. If the problem continues call for service. dO Running the dryer with door open Close the door and then restart. If the problem continues call for service. dF Door is not closing properly Call for service.
appendix FABRIC CARE CHART Wash Cycle Special Instructions Warning Symbols for Laundering Normal Line Dry/ Hang to Dry Do Not Wash Permanent Press / Wrinkle Resistant / Wrinkle Control Drip Dry Do Not Wring Gentle/Delicates Dry Flat Do Not Bleach Hand Wash Heat Setting Do Not Tumble Dry High No Steam (added to iron) Hot Medium Do Not Iron Warm Low Cold Any Heat Dry Clean No Heat/Air Do Not Dry Clean Water Temperature** Bleach Any Bleach (when needed) Iron-Dry or Steam Temperatu
appendix PROTECTING THE ENVIRONMENT This appliance is manufactured from recyclable materials. If you decide to dispose of this appliance, please observe local waste disposal regulations. Cut off the power cord so that the appliance cannot be connected to a power source. Remove the door so that animals and small children cannot get trapped inside the appliance. DECLARATION OF CONFORMITY This appliance complies with UL2158. SPECIFICATIONS TYPE DIMENSIONS FRONT LOADING DRYER Div Div Inches (cm) 38” (96.
CYCLE CHART Default Cycle Cooling Wrinkle prevent Sensor dry level Time Time Time Time Normal High (Medium) Normal dry 44 min 39 min 5 min 90 min Heavy Duty High (No change) Normal dry 60 min 55 min 5 min 90 min Perm Press Medium Low (No change) Normal dry 34 min 24 min 10 min 90 min Delicates Low (No change) Normal dry 29 min 24 min 5 min 90 min Time Dry High - 40 min 35 min 5 min Wrinkle Release Medium - 25 min 20 min 5 min Air Fluff - (No change) - 20 mi
warranty SAMSUNG DRYER LIMITED WARRANTY TO ORIGINAL PURCHASER This SAMSUNG brand product, as supplied and distributed by SAMSUNG ELECTRONICS CANADA, INC.
EXCEPT AS SET FORTH HEREIN, THERE ARE NO WARRANTIES ON THIS PRODUCT EITHER EXPRESS OR IMPLIED, AND SAMSUNG DISCLAIMS ALL WARRANTIES INCLUDING, BUT NOT LIMITED TO, ANY IMPLIED WARRANTIES OF MERCHANTABILITY, INFRINGEMENT OR FITNESS FOR A PARTICULAR PURPOSE. NO WARRANTY OR GUARANTEE GIVEN BY ANY PERSON, FIRM, OR CORPORATION WITH RESPECT TO THIS PRODUCT SHALL BE BINDING ON SAMSUNG.
bit.ly/samsungwashers QUESTIONS OR COMMENTS? Country CALL OR VISIT US ONLINE AT CANADA 1-800-SAMSUNG (726-7864) www.samsung.com/ca www.samsung.com/ca_fr (French) Code No. DC68-02568B-06_EN DV218AEW-02568B-06_EN.
DV218AE* DV218AG* DV229AE* DV229AG* Sèche-linge à gaz et électrique manuel d’utilisation Ce manuel est en papier recyclé à 100%. imaginez les possibilités Merci d’avoir acheté ce produit Samsung. Afin de bénéficier d’un service plus complet, veuillez enregistrer votre produit à l’adresse www.samsung.com/register DV218AEW-02568B-06_CFR.
caractéristiques 1. Très grande capacité Profitez d’une très grande capacité de séchage, à portée de main ! Désormais, vous pouvez sécher des volumes de linge importants en une seule fois. D’une capacité plus qu’exceptionnelle de 207 litres, ce sèche-linge fait circuler plus d’air à travers vos vêtements les séchant plus vite et en réduisant le froissement. 2.
consignes de sécurité Félicitations pour l’achat de votre nouveau sèche-linge Samsung. Ce manuel contient de précieuses informations sur l’installation, l’utilisation et l’entretien de votre appareil. Prenez le temps de le lire pour tirer pleinement profit de tous les avantages et de toutes les fonctionnalités de votre sèche-linge. AVERTISSEMENT - Risque d’incendie • L’installation du sèche-linge doit être effectuée par un technicien qualifié.
consignes de sécurité AVERTISSEMENT AVERTISSEMENT: afin de réduire les risques d’incendie, d’électrocution ou de blessures lors de l’utilisation de l’appareil, respectez les règles de sécurité de base suivantes : 1. Lisez toutes les consignes de sécurité avant d’utiliser l’appareil. 2.
QUE FAIRE EN CAS D’EMANATION DE GAZ : • • • • • • N’essayez pas d’allumer un appareil électrique. Ne mettez pas l’appareil sous tension. Ne touchez à aucun interrupteur électrique. N’utilisez aucun téléphone dans le bâtiment. Faites évacuer tous les occupants de la pièce, du bâtiment ou du secteur. Appelez immédiatement votre fournisseur de gaz à partir du téléphone d’un voisin. Observez les consignes de votre fournisseur de gaz.
consignes de sécurité Cet appareil doit être correctement mis à la terre. Ne branchez jamais le cordon d’alimentation sur une prise qui n’est pas correctement reliée à la terre et qui n’est pas conforme aux réglementations locales et nationales en vigueur. Consultez les instructions d’installation pour relier cet appareil à la terre. Ne vous asseyez pas sur le sèche-linge. Dans le cadre de l’amélioration constante de ses produits, Samsung se réserve le droit de modifier les spécifications sans préavis.
table des matières 9 10 10 10 11 11 12 13 13 14 15 15 17 18 19 Outils requis pour l’installation Voir Conditions requies en matière d’évacuation.
installation du sèche-linge OUTILS REQUIS POUR L’INSTALLATION Laissez un professionnel installer correctement votre sèche-linge. Si vous contactez le service aprèsvente suite à une installation, des réglages ou un branchement mal exécutés, la responsabilité relève de l’installateur. Vérifiez que vous disposez de tous les éléments requis pour installer correctement l’appareil, comme suit. 1. Une PRISE ELECTRIQUE AVEC MISE A LA TERRE. Voir Normes électriques. Voir page 13. 2.
CONDITIONS REQUISES EN MATIÈRE DE CONDUITS • • • • • • • • • • • • • • • • • 01 installation du sèche-linge • Utilisez un conduit en aluminium ou en acier galvanisé rigide d’un diamètre de 10,2 cm. N’utilisez pas de conduit plus petit. Les conduits dont le diamètre est supérieur à 10,2 cm peuvent provoquer une trop grande accumulation de peluches. Vous devez retirer régulièrement les peluches accumulées. Si vous devez utiliser un conduit métallique flexible, optez pour un conduit aux parois rigides.
installation du sèche-linge Si un nouveau sèche-linge est relié à un système d’évacuation existant, vous devez veiller à ce que : • Le système d’évacuation soit conforme aux réglementations locales, régionales et nationales. • Aucun conduit flexible en plastique ne soit utilisé. • Le conduit existant soit contrôlé et les peluches accumulées à l’intérieur retirées. • Le conduit ne soit ni entortillé ni écrasé. • Le registre de la hotte s’ouvre et se ferme sans problème.
INSTALLATION EN MOBILE HOME 01 installation du sèche-linge L’installation du sèche-linge dans des mobiles homes doit respecter la réglementation sur les normes de sécurité et de construction de bien manufacturé, titre 24 CFR, partie 32-80 {précédemment, norme fédérale sur la sécurité et la construction de maison mobile, titre 24, HUD (partie 280), 1975} pour les Etats-Unis ou la norme CSA Standards Z240 pour le Canada.
installation du sèche-linge SYSTÈMES FONCTIONNANT AU GAZ Utilisez uniquement du gaz naturel ou du propane liquide (PL). L’INSTALLATION DOIT ETRE CONFORME AUX REGLEMENTATIONS LOCALES EN VIGUEUR OU, EN L’ABSENCE DE DISPOSITIONS SPECIFIQUES, A LA REGLEMENTATION NATIONALE SUR LE GAZ COMBUSTIBLE ANSI/Z223.1 (NATIONAL FUEL GAS CODE), DERNIERE REVISION (POUR LES ETATS-UNIS) OU AUX DISPOSITIONS D’INSTALLATION CAN/CGA-B149 (POUR LE CANADA).
NORMES ÉLECTRIQUES Un schéma de câblage figure sur une plaque située sous le panneau de commande. • • • Un branchement incorrect du conducteur de mise à la terre peut représenter un risque de surtension électrique. Demandez conseil à un électricien ou un réparateur agréé si vous avez des doutes quant à la mise à la terre correcte de l’appareil. Ne modifiez pas la prise fournie avec le sèche-linge.
installation du sèche-linge RACCORDEMENT ÉLECTRIQUE Avant toute mise en marche ou test, observez les instructions de mise à la terre présentées dans la section Mise à la terre. Nous vous recommandons de relier votre sèche-linge à une dérivation individuelle ou à un circuit distinct. N’UTILISEZ PAS DE RALLONGE AVEC CET APPAREIL. Modèles au gaz – Etats-Unis et Canada Vous devez utiliser une alimentation électrique de 120 volts, 60 Hz c.a. et un fusible de 15 A ou un coupe-circuit.
PIÈCES DE RECHANGE ET ACCESSOIRES Si vous avez besoin de pièces de rechange ou d’accessoires pour votre sèche-linge, contactez votre revendeur ou le centre d’assistance clientèle de SAMSUNG au 1-800-SAMSUNG (726-7864). Outils et pièces Cutter Pince serre-tube (modèle au gaz uniquement) Tournevis à douille Niveau Tournevis Phillips Ruban adhésif Clé anglaise 01 installation du sèche-linge Pince INSTALLATION Regroupez et vérifiez les pièces et outils requis avant de commencer l’installation.
installation du sèche-linge 4. Consultez la section Evacuation avant d’installer le système d’évacuation. Reliez le sèche-linge et la hotte avec le système de conduites. L’extrémité sertie des sections du conduit doit être orientée vers l’extérieur. N’utilisez PAS de vis métallique pour assembler les conduits. Ces jointures doivent être effectuées à l’aide de ruban adhésif. N’utilisez jamais de conduit d’évacuation flexible en plastique.
Branchements à 3 FILS AVERTISSEMENT Lors de la conversion d’un système électrique à 4fils en système électrique à 3fils, le conducteur de terre doit être rebranché sur le support du bornier, pour mettre le châssis du sèche-linge à la terre sur le conducteur neutre. Branchements à 4 FILS 1. Retirez la vis centrale du bornier. 2. Reliez le fil de terre (vert ou sans habillage) du cordon d’alimentation au conducteur à vis de terre externe. 3.
installation du sèche-linge CONSEILS POUR L’ÉVACUATION DU SÈCHE-LINGE Les conduits en plastique ou non métalliques représentent un danger potentiel d’incendie. AVERTISSEMENT 1. Assurez-vous que le sèche-linge a été installé de manière à ce que l’évacuation de l’air se fasse sans problème. 2. Utilisez un conduit d’évacuation métallique rigide de 10,2 cm. Scellez tous les joints à l’aide d’un ruban adhésif, y compris au niveau du sèche-linge.
INVERSION DU HUBLOT 8. Réinsérez la vis dans l’autre trou. 4. Retirez une vis de l’avant du cadre 9. Remontez la vis (étape 4) à l’avant du cadre 5. Retirez les deux vis sur le côté opposé de la charnière du hublot. 10. Placez le hublot de l’autre côté et refixez-le sur le sèche-linge. 6. Retirez les deux vis du dispositif de fermeture. 11. Remontez le dispositif de fermeture. 7. Retirez une vis de la charnière du hublot. 12. Remontez les vis dans les trous restant.
instructions et conseils d’utilisation PRÉSENTATION DU PANNEAU DE COMMANDE 1 1 Sélecteur de programme 2 3 4 5 6 7 8 9 10 Pour sélectionner le programme, positionnez le sélecteur Séléction du programme sur le programme de votre choix. Le témoin lumineux s’allume en regard du programme. Les programmes Normale, Très sale, Serviettes, Perm Press et Délicats sont des cycles fonctionnant avec détecteur de séchage.
2 Ecran à affichage numérique 3 Bouton Niveau de séchage 4 Bouton Température 5 Bouton Temps 6 Bouton Signal 7 Bouton Prévention des faux plis 8 Ajust. du temps 9 Bouton Démarrer/Pause Appuyez sur ce bouton pour interrompre et relancer les programmes. 10 Bouton Mise en Marche Appuyez une fois sur ce bouton pour allumer le sèche-linge. Réappuyez dessus pour l’éteindre.
instructions et conseils d’utilisation SÉCURITÉ ENFANT Cette fonction empêche les enfants de jouer avec le sèche-linge. Activation/Désactivation Si vous souhaitez activer ou désactiver la fonction Sécurité enfant, appuyez simultanément sur les boutons Temps et Signal pendant 3 secondes. Activation : 1. Vous pouvez activer cette fonction alors que le sèche-linge fonctionne. 2. Lorsque la sécurité enfant est activée, aucun bouton ne peut-être utilisé à l’exception du bouton Mise en Marche.
SUPPORT DE SÉCHAGE Installation du support de séchage ARTICLES TEMP. SUGGEREES - REGLAGES Pulls lavables (mettre en forme et poser à plat sur le support) Bas ou Très bas Peluches (remplies de fibres coton ou polyester) Bas ou Très bas Peluches (remplies de mousse ou de caoutchouc) Air Froid Oreillers à base de caoutchouc mousse Air Froid Baskets Air Froid ou Chaleur (Très bas) AVERTISSEMENT 02 instructions et conseils d’utilisation 1. Ouvrez le hublot du sèche-linge. 2.
instructions et conseils d’utilisation NETTOYAGE DU FILTRE À PELUCHES • • • Après chaque séchage. Pour réduire la durée de séchage. Pour un meilleur rendement énergétique. Ne faites pas fonctionner votre sèche-linge si le filtre à peluches n’est pas remis en place. CHARGEMENT DU SÈCHE-LINGE • • • • N’introduisez qu’une seule charge de linge lavé à la fois dans votre sèche-linge. Un mélange de textiles épais et légers séchera différemment.
entretien et nettoyage PANNEAU DE COMMANDE TAMBOUR Retirez les taches de crayon, d’encre ou de teinture (sur les articles neufs comme les serviettes ou les jeans), à l’aide d’un détachant universel. Frottez ensuite avec une vieille serviette ou un chiffon, pour retirer toute substance en excès (tache ou détachant). Une fois ces étapes terminées, il est possible que les taches soient encore visibles mais elles ne devraient pas salir le reste du linge.
conseils d’entretien du linge Conseils d’entretien du linge Respectez les symboles textiles ou les consignes du fabricant concernant le séchage des articles spéciaux. Si aucun symbole textile n’est fourni, observez les consignes suivantes. Couvre-lits et couettes • • • Couvertures • • Rideaux et tentures • • Observez les symboles de l’étiquette ou sélectionnez le programme de séchage Normale et le réglage de température Élevé.
dépannage VÉRIFIEZ LES POINTS SUIVANTS SI VOTRE SÈCHE-LINGE... SOLUTION Ne fonctionne pas correctement. • • • • Ne chauffe pas. Ne sèche pas. • • • • • • • • • • • • • • Fait du bruit. • • • • Ne sèche pas le linge uniformément. • • Dégage une odeur. • • S’arrête avant que le linge ne soit sec. • • Assurez-vous que la porte est bien fermée. Vérifiez que le cordon d’alimentation est branché sur une prise électrique opérationnelle. Vérifiez le disjoncteur et les fusibles de votre domicile.
dépannage CODES SYSTÈME Des codes système s’affichent parfois pour vous permettre de mieux comprendre le problème rencontré par le sèche-linge. AFFICHAGE DE L’ERREUR tS SIGNIFICATION SOLUTION Filtre à peluche obstrué Ventilation restreinte Nettoyez le filtre ou la ventilation. Si le problème persiste, appelez le service de dépannage. dO Faire fonctionner le sèche-linge lorsque le hublot est ouvert Fermez le hublot, puis redémarrez. Si le problème persiste, appelez le service de dépannage.
annexe TABLEAU DES SYMBOLES TEXTILES Lavage Instructions spéciales Blanchiment Normale Séchage en suspension Ne pas laver Infroissable / Antifroissage Séchage sans essorage Ne pas tordre Lavage délicat Séchage à plat Pas de blanchiment Lavage à la main Température de l’eau** Température Pas de séchage machine Élevé Pas de vapeur Chaud Moyen Pas de repassage Tiède Bas Froid Toutes températures Nettoyage à sec autorisé Ni air, ni chaleur Pas de nettoyage à sec Blanchiment Blanchime
annexe PROTECTION DE L’ENVIRONNEMENT Cet appareil a été fabriqué à partir de matériaux recyclables. Si vous décidez de le jeter, veuillez respecter les normes locales en matière de mise au rebut. Coupez le cordon d’alimentation de façon à ce que l’appareil ne puisse pas être raccordé à une source électrique. Démontez le hublot afin que des animaux et des enfants ne se retrouvent pas piégés à l’intérieur de l’appareil. DÉCLARATION DE CONFORMITÉ Cet appareil est conforme à la norme UL2158.
TABLEAU DES PROGRAMMES Valeur par défaut Programme Prévention des faux plis Durée Durée Durée Élevé (Moyen) Séchage normale 44 min 39 min 5 min 90 min Très sale Élevé (aucun changement) Séchage normale 60 min 55 min 5 min 90 min Perm Press Moyenfaible (aucun changement) Séchage normale 34 min 24 min 10 min 90 min Délicats Bas (aucun changement) Séchage normale 29 min 24 min 5 min 90 min Durée de séchage Élevé - 40 min 35 min 5 min Antifroissage Moyen - 25 min 20 min
garantie SECHE-LINGE SAMSUNG GARANTIE LIMITEE A L’ACHETEUR INITIAL Ce produit de la marque SAMSUNG, fourni, distribué par SAMSUNG ELECTRONICS CANADA, INC. (SAMSUNG) et livré neuf, dans son emballage d’origine à l’acheteur initial, est garanti par SAMSUNG contre tout défaut de fabrication relatif aux matériaux et à la qualité d’exécution, pour une période de garantie limitée de : Un (1) an (pièces et main d’oeuvre) Cette garantie limitée débute à la date originale d’achat.
EXCEPTE EN CAS DE MENTION CONTRAIRE DANS LE PRESENT MANUEL, CE PRODUIT N’EST COUVERT PAR AUCUNE GARANTIE EXPRESSE OU IMPLICITE ET SAMSUNG REFUSE TOUTE GARANTIE Y COMPRIS, MAIS SANS S’Y LIMITER, TOUTE GARANTIE IMPLICITE DE VALEUR MARCHANDE ET D’ADEQUATION A UNE UTILISATION SPECIFIQUE. SAMSUNG N’EST LIE PAR AUCUNE GARANTIE AUTRE RELATIVE AU PRESENT PRODUIT, QU’ELLE SOIT FOURNIE PAR UNE PERSONNE, UNE ENTREPRISE OU UNE ORGANISATION.
DES QUESTIONS OU DES COMMENTAIRES ? Pays APPELEZ LE OU RENDEZ-VOUS SUR LE SITE CANADA 1-800-SAMSUNG (726-7864) www.samsung.com/ca www.samsung.com/ca_fr (French) N° code DC68-02568B-06_CFR DV218AEW-02568B-06_CFR.