DW80H994 Series DW80J994 Series DW80J755 Series Dishwasher user manual imagine the possibilities Thank you for purchasing this Samsung product. DW80H994_DD68-00164A-03_EN_150408.
contents SETTING UP YOUR DISHWASHER 6 6 7 Unpacking your dishwasher Checking parts Meeting installation requirements 8 12 12 13 15 16 16 17 18 19 20 21 22 23 Control panel Cycle selector Progress displays Basic guidelines Adjusting the angle of the plate supports Adjusting the height of the upper rack Removing the upper rack (for some models) Loading the lower rack Loading the upper rack Using the 3rd (cutlery) rack (for some models) Using wine rack (for some models) Using the cutlery basket Using deter
safety information Congratulations on your new Samsung Dish washer. This manual contains important information on the installation, use, and care of your appliance. Please take time to read this manual to take full advantage of your washer’s many benefits and features. WHAT YOU NEED TO KNOW ABOUT THE SAFETY INSTRUCTIONS 01 safety information Warnings and Important Safety Instructions in this manual do not cover all possible conditions and situations that may occur.
safety information WARNING WARNING : When using your dishwasher, follow basic precautions, including the following: 1. Read all instructions before using the dishwasher. 2. Use the dishwasher only for its intended function. 3. Use only detergents or wetting agents recommended for use in a dishwasher and keep them out of the reach of children. 4.
• • • • • • • • BEFORE USING YOUR DISHWASHER WARNING WARNING Tip-Over Hazard - Do not use the dishwasher until it is correctly installed. - Do not push down on an open door. - Do not place excessive weight on the open door. Electric Shock Hazard Failure to follow these instructions can result in death, fire, or electric shock: - Electrically ground the dishwasher - Connect the ground wire to the green ground connector in the junction box. - Do not use an extension cord.
setting up your dishwasher Be sure to have your installer follow these instructions closely so that your new dishwasher works properly and that you’re not at risk of injury when washing dishes. UNPACKING YOUR DISHWASHER • • • Once your new dishwasher has been delivered to you, carefully unpack it and check for any damage. If the dishwasher has been damaged, make note of it on the waybill and keep a copy. Do not install the dishwasher, and contact Samsung Customer Service at the number listed below.
MEETING INSTALLATION REQUIREMENTS Electrical supply and grounding CAUTION WARNING Never use an extension cord. When preparing for installation, ensure that your power supply provides: • An individual 120 Volt, 60Hz branch circuit serving only your dishwasher with a 15 AMP fuse or circuit breaker Your dishwasher must be grounded. If your dishwasher malfunctions or breaks down, grounding will reduce the risk of electric shock by providing a path of least resistance for the electric current.
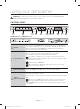
using your dishwasher WARNING WARNING: To reduce the risk of fire, electric shock, or injury to persons, read the IMPORTANT SAFETY INSTRUCTIONS before operating this appliance. CONTROL PANEL DW80H994 Series 1 2 3 4 5 6 7 8 9 10 11 DW80J994 Series / DW80J755 Series 1 Power When you press the Power button, the light of the most recently finished cycle turns on. When the cycle you selected has finished, all other indicator lights are turned off and the "End" light is illuminated for some minutes.
When you select Lower (Lower Rack - Only), only the lower rack nozzle is activated. The upper nozzle will not operate. Use this feature to wash a small load of dishes or glasses placed in the lower rack. 5 03 using your dishwasher When you select Lower (Lower Rack - Only), place items, glasses, etc. in the lower rack only. The dishwasher will not wash items placed in the upper rack. Selecting Lower (Lower Rack - Only) reduces both the cycle time and the Lower amount of electricity consumed.
using your dishwasher Use this option when you want to dry your dishes more completely. The temperature rises to 162 ˚F (72 ˚C) in the final rinse cycle and dry time is increased. If you select the this option, electricity consumption is increased. The next time you use the dishwasher, the Dry+ option will be selected automatically and applied to the next cycle. You can turn off the Dry+ option by pressing the Dry+ button. You cannot select the Dry+ option if you select the Delicate cycle.
Lack of salt indicator (*applicable models only) 11 Turns on when the water softener runs out of salt. (or the dishwasher is in the standby or pause modes.) - Turns off while the dishwasher is operating. Delay Start Delay a cycle for up to 24 hours in one-hour increments. To increase the delay start time, press or hold the Delay Start button. The hour displayed indicates the time at which the wash will be started.
using your dishwasher CYCLE SELECTOR 1 2 3 4 5 1 Auto This cycle detects the level of soil and automatically initiates the optimal cycle after a few minutes of operation. 2 Normal Use this cycle for normally soiled dishes. The energy-usage label is based on this cycle. 3 Heavy Use this cycle for heavily soiled dishes. 4 Delicate Use this cycle for soiled, fragile items such as fine glassware and crystal glass (wine glass).
BASIC GUIDELINES CAUTION 03 using your dishwasher 1. Open the door and load your dishes (see page 17 ~ 21). - Place dishes into the upper and lower racks, unless you have selected the Upper or Lower (Lower Rack - Only) option. - Remove any food remains from the dishes before placing them in the rack(s). - After placing the dishes into the racks, turn the upper nozzles to make sure none of the dishes will block nozzle rotation. - Make sure the dishes will not prevent the detergent dispenser from opening.
using your dishwasher Touch Controls Touch controls allow you to operate the dishwasher easily. • They are convenient to operate, requiring only a soft touch. • Have a simple and stylish design. • Are easy to clean. If you have children or you want to clean the Control Interface, we recommend activating the Child Lock feature to lock the control buttons. - Children will not be able to accidently start the dishwasher by touching the controls with this option selected.
ADJUSTING THE ANGLE OF THE PLATE SUPPORTS Upper rack 03 using your dishwasher You can adjust the angle of the tines in the upper rack to three different positions to match the size and shape of your dishes. To adjust the tines, grasp the handle at the back of the rack, and then push it left or right. See the illustration below. In the lower rack, you can easily fold down the fold-down tines to make room for large items such as pots and pans.
using your dishwasher ADJUSTING THE HEIGHT OF THE UPPER RACK You can adjust the height of the upper rack in your Samsung dishwasher so that the lower rack can accommodate larger sized dishes. Depending on where you set the upper rack height, the lower rack can accommodate plates up to 12 in. (30 cm) in diameter and the upper rack can accommodated plates up to 8 in. (20 cm) in diameter. 1. To lower the upper rack by 2 in.
LOADING THE LOWER RACK saucer 10 place setting 12 place setting English - 17 DW80H994_DD68-00164A-03_EN_150408.indd 17 2015-04-08 7:44:21 03 using your dishwasher Load cookware (pots, pans, etc.), up to 12 in. (30 cm) in diameter into the lower rack. The lower rack has been especially designed for dinner dishes, soup bowls, plates, pots, lids, and casserole dishes. Load your plates into the center column of the rack so that their top sides face each other.
using your dishwasher LOADING THE UPPER RACK The upper rack has been designed for small plates, mugs, glasses, and plastic items marked "dishwasher safe". Load your plates into the dishwasher so that their top sides face each other. Make sure the loaded dishes do not interfere with the rotation of the nozzle which is located at the bottom of the upper rack. (Check this by rotating the nozzle by hand.
USING THE 3RD (CUTLERY) RACK (FOR SOME MODELS) Loading the cutlery rack 03 using your dishwasher In addition to the standard cutlery basket in the lower rack, some models come with a cutlery rack. The cutlery rack is best suited for flatware and cooking or serving utensils. You can place cutlery and utensils randomly or regularly on the cutlery rack.
using your dishwasher USING WINE RACK (FOR SOME MODELS) 1 2 180-245 mm Ø 105 mm Ø 6-9 mm 3 4 5 English - 20 DW80H994_DD68-00164A-03_EN_150408.
USING THE CUTLERY BASKET The cutlery basket consists of two compartments. You can place each knife, spoon, or fork separately into the cutlery stands in the basket’s covers to prevent chipping and discoloration. 03 using your dishwasher You can use the cutlery basket with the covers open. Refer to the illustration to the right. 10 place setting Salad fork, Tea spoon Dinner fork, Dinner spoon 12 place setting The cutlery stands as seen from above with the suggested placement of cutlery items.
using your dishwasher USING DETERGENT All dishwasher cycles require detergent in the detergent compartment. Add the correct amount of detergent for the selected cycle to ensure the best performance. CAUTION WARNING WARNING Use dishwasher detergent only. Regular detergent produces too much foam, which may decrease the dishwasher’s performance or cause it to malfunction. Do not swallow dishwasher detergent. Avoid breathing in the fumes.
The cover opens automatically to dispense the detergent during the wash. AMOUNT OF DETERGENT CYCLE Main wash dispenser Onto the door for pre-wash 3/4 oz (20 g) 1/3 oz (10 g) 1 oz (30 g) 1/2 oz (15 g) Delicate 3/4 oz (20 g) 1/5 oz (5 g) 03 using your dishwasher Auto, Normal Heavy, Express 60' The numbers inside the dispenser refer to grams. USING RINSE AID Filling the rinse aid reservoir When the Rinse Refill indicator lights up on the control panel, refill with rinse aid.
cleaning and maintaining your dishwasher Keeping your dishwasher clean improves its performance, reduces unnecessary repairs, and lengthens its life. CLEANING THE EXTERIOR It’s best to clean spills on the outside of your dishwasher as they occur. Use a soft, damp cloth on the control panel to gently wipe away spills and dust. Do not use benzene, wax, thinner, chlorine bleach, or alcohol. These materials may discolor the door panel and other outer surfaces and cause stains.
CLEANING THE NOZZLES 04 cleaning and maintaining If your dishwasher does not seem to be cleaning adequately or the nozzles seem clogged, you can clean each of the nozzles. When removing the nozzles, take care as they may break. Upper nozzle 1. Pull the upper rack towards the front 2. Check whether the nozzle holes are clogged by food particles. 3. If cleaning is needed, remove the nozzle. 4. To remove the nozzle, unfasten and remove the nut, and then remove the nozzle. 5.
cleaning and maintaining your dishwasher CLEANING THE FILTER 1. Remove the lower rack first. 2. Rotate the filter handle counterclockwise to unfasten the filter compartment door. 3. Remove the filter door, and then the flat micro filter underneath. Filter with handle Flat micro filter 4. Remove any dirt or other remains from the micro filter and the filter door, and then rinse them under running water. 5. Re-install the flat micro filter, and then the filter door. 6.
cycles CYCLE CHART ( : Basic, : Optional step) Cycle Pre-wash1 Pre-wash2 Main wash Rinse1 Rinse2 Rinse3 Rinse4 Auto Normal Heavy 138 ~ 131 ˚F (59 ~ 55 ˚C) 05 cycles 143 ~ 118 ˚F (62 ~ 48 ˚C) Delicate 149 ˚F (65 ˚C) 122 ˚F (50 ˚C) Express 60' 131 ˚F (55 ˚C) Cycle Last Rinse [Sanitize] Dry Water [gal(ℓ)] 5.7 ~ 3.6 (21.6 ~ 13.6 ℓ) 7.1 ~ 2.4 (27.0 ~ 9.0 ℓ) 6.2 (23.5 ℓ) 4.5 (17.0 ℓ) 2.9 (10.
troubleshooting CHECK THESE POINTS IF YOUR DISHWASHER… PROBLEM POSSIBLE CAUSE SOLUTION The door is not closed completely. Check if the door is latched and closed completely. Check whether the Upper Rack is properly joined with Duct Nozzle. Also, Check imbalance assembly of the Upper Rack. Will not start. It’s taking too long with an operation or cycle. No cycle is selected. Select a proper cycle. The power cable is not connected. Connect the power cable properly. The water supply does not work.
PROBLEM SOLUTION Select a cycle according to the number and soil level of the dishes, as directed in this manual. The water temperature is low. Connect the water supply line to a hot water supply. For best performance, the temperature of the supplied water should be 120 ˚F (49 ˚C). Low water pressure. The water pressure should be between 20 and 120 psi (140 ~ 830 kPa). The water is too hard. Use a commercial dishwasher cleaner. Use high-quality, fresh detergent with rinse aid.
troubleshooting PROBLEM Does not dry dishes well. POSSIBLE CAUSE SOLUTION There is no rinse aid in the dispenser. Check the dispenser and add rinse aid. Use a liquid type rinse aid. The temperature of the water is low when the dishwasher is running. Connect the water supply line to a hot water supply. Use rinse aid with the Sanitize option. Too many dishes have been loaded. Proper loading of items can affect drying. Load your dishes as recommended. (See page 17.
INFORMATION CODES The Control Panel displays information codes to help you understand what is occurring with your dishwasher. Action OC Over-level water check • Functional check. Close the water supply valve and go to your house circuit breaker panel, set the dishwasher’s circuit breaker switch to off, and then contact an authorized Samsung service centre.
appendix HELPING THE ENVIRONMENT • • • Your dishwasher is manufactured from recyclable materials. If you decide to dispose of it, please observe local waste disposal regulations. Cut off the power cable so that the appliance cannot be connected to a power source. Remove the door so that animals and small children cannot get trapped inside the appliance. Do not exceed the detergent quantities recommended in the detergent manufacturers’ instructions.
warranty SAMSUNG DISHWASHER LIMITED WARRANTY TO ORIGINAL PURCHASER This SAMSUNG brand product, as supplied and distributed by USA: SAMSUNG ELECTRONICS AMERICA, INC./CANADA: SAMSUNG ELECTRONICS CANADA, INC.
warranty EXCEPT AS SET FORTH HEREIN, THERE ARE NO WARRANTIES ON THIS PRODUCT EITHER EXPRESS OR IMPLIED, AND SAMSUNG DISCLAIMS ALL WARRANTIES INCLUDING, BUT NOT LIMITED TO, ANY IMPLIED WARRANTIES OF MERCHANTABILITY, INFRINGEMENT OR FITNESS FOR A PARTICULAR PURPOSE. NO WARRANTY OR GUARANTEE GIVEN BY ANY PERSON, FIRM, OR CORPORATION WITH RESPECT TO THIS PRODUCT SHALL BE BINDING ON SAMSUNG.
note DW80H994_DD68-00164A-03_EN_150408.
bit.ly/samsungdishwashers Questions or Comments? Country CALL OR VISIT US ONLINE AT U.S.A 1-800-SAMSUNG (726-7864) www.samsung.com/us/support MEXICO 01-800-SAMSUNG(726-7864) www.samsung.com/mx/support DD68-00164A-03 DW80H994_DD68-00164A-03_EN_150408.
Serie DW80H994 Serie DW80J994 Serie DW80J755 Lavavajillas manual del usuario imagine las posibilidades Gracias por adquirir este producto Samsung. DW80H994_DD68-00164A-03_MES_150408.
contenido CONFIGURACIÓN DE SU LAVAVAJILLAS 6 6 7 Desempaque de la lavavajillas Verificación de las piezas Cumplimiento de los requisitos de instalación 8 12 12 13 15 16 16 21 22 23 Panel de control Selector de ciclos Pantallas de progreso Pautas básicas Ajuste del ángulo de los soportes para platos Ajuste de la altura del estante superior Cómo retirar el estante superior (en algunos modelos) Carga del estante inferior Carga del estante superior Uso del 3er estante (cubiertos) (en algunos modelos) Uso de
información sobre seguridad Felicitaciones por la compra de su nueva lavavajillas Samsung. Este manual contiene información importante acerca de la instalación, el uso y el cuidado del electrodoméstico. Lea detenidamente estas instrucciones a fin de aprovechar al máximo los múltiples beneficios y funciones de la lavavajillas. Las advertencias y las instrucciones de seguridad importantes de este manual no cubren todas las posibles condiciones y situaciones que pueden ocurrir.
información sobre seguridad ADVERTENCIA ADVERTENCIA PRECAUCIÓN ADVERTENCIA: Cuando utilice la lavavajillas, tome todas las precauciones básicas, incluyendo las siguientes: 1. Lea todas las instrucciones antes de usar la lavavajillas. 2. Utilice la lavavajillas únicamente para la función para la cual está diseñada. 3. Utilice únicamente detergentes o productos humectantes recomendados para utilizarse en lavavajillas y manténgalos fuera del alcance de los niños. 4.
Mantenga el detergente de la lavavajillas fuera del alcance de los niños. El detergente causa un efecto adverso en los órganos del cuerpo humano. Contiene sustancias para otorgar brillo y es corrosivo. Evite que el detergente entre en contacto con la piel o los ojos. • No empuje ni presione la puerta cuando esté abierta, ya que al hacerlo podría dañar la lavavajillas o hacerse daño. • No permita que los niños jueguen dentro o encima de la máquina lavavajillas.
configuración de su lavavajillas Asegúrese de que su instalador siga estas instrucciones minuciosamente para que su nueva lavavajillas funcione adecuadamente y no existan riesgos de sufrir lesiones al lavar los platos. DESEMPAQUE DE LA LAVAVAJILLAS • • • Cuando haya recibido su nueva lavavajillas, desempáquela con cuidado y verifique que no esté dañada. Si la lavavajillas está dañada, tome nota de ello en la carta de porte y guarde una copia.
CUMPLIMIENTO DE LOS REQUISITOS DE INSTALACIÓN Suministro eléctrico y conexión a tierra PRECAUCIÓN ADVERTENCIA 02 configuración de su lavavajillas Para evitar el riesgo de incendio, descarga eléctrica o lesiones físicas, todo el cableado y la conexión a tierra deben realizarse de conformidad con la versión más reciente del Código Eléctrico Nacional, ANSI/FNPA, Nro. 70 y los códigos y ordenanzas locales.
uso de la lavavajillas ADVERTENCIA ADVERTENCIA: Para reducir el riesgo de incendio, descarga eléctrica o lesiones personales, lea las INSTRUCCIONES DE SEGURIDAD IMPORTANTES antes de poner en marcha este electrodoméstico. PANEL DE CONTROL Serie DW80H9940 1 2 3 4 5 6 7 8 9 10 11 Serie DW80J994 Series / Serie DW80J755 1 Power (Encendido) Cuando presiona el botón Power (Encendido), se enciende la luz del último ciclo finalizado.
Cuando selecciona Lower (Lower Rack - Only) (Inferior (Estante inferior - Solo)), únicamente se activa la boquilla del estante inferior. La boquilla superior no funciona. Utilice esta función para lavar cargas pequeñas de platos o vasos colocados en el estante inferior. 5 Lower (Inferior) Si selecciona Lower (Lower Rack - Only) (Inferior (Estante inferior - Solo)), se reduce el (en algunos modelos) tiempo del ciclo y el consumo de electricidad.
uso de la lavavajillas Utilice esta opción cuando quiera secar los platos completamente. La temperatura se eleva a 162 ˚F (72 ˚C) en el ciclo de enjuague final y se incrementa el tiempo de secado. Si selecciona esta opción, se aumenta el consumo de electricidad. La próxima vez que utilice la lavavajillas, la opción Dry+ (Secado+) se seleccionará automáticamente y se aplicará al siguiente ciclo. Puede desactivar la opción Dry+ (Secado+) pulsando el botón Dry+ (Secado+).
Indicador Rinse Refill (Reponer producto de enjuague) - Está encendido cuando se agota el producto de enjuague de la lavavajillas (o la lavavajillas está en el modo de espera o de pausa). - Está apagado cuando la lavavajillas está en funcionamiento. 10 11 - Se enciende cuando se agota la sal del ablandador de agua (o la lavavajillas está en el modo de espera o de pausa). - Está apagado cuando la lavavajillas está en funcionamiento.
uso de la lavavajillas SELECTOR DE CICLOS 1 2 3 4 5 1 Auto Este ciclo detecta el nivel de suciedad e inicia automáticamente el ciclo óptimo luego de algunos minutos de funcionamiento. 2 Normal Utilice este ciclo para vajilla medianamente sucia. La etiqueta del uso de energía se basa en este ciclo. 3 Heavy (Muy sucio) Utilice este ciclo para vajilla muy sucia.
PAUTAS BÁSICAS PRECAUCIÓN Para cargar más vajilla o para hacer una pausa durante el funcionamiento, abra la puerta despacio y con cuidado, ya que existe la posibilidad de sufrir lesiones a causa del vapor caliente contenido en el interior de la lavavajillas. (Si se abre la puerta cuando la lavavajillas está funcionando, se activa un mecanismo de seguridad y se detiene el ciclo.) Para reanudar el funcionamiento, presione el botón Start (Inicio) y cierre la puerta.
uso de la lavavajillas Controles táctiles Los controles táctiles le permiten operar fácilmente la máquina lavavajillas. • Se activan fácilmente con un toque suave. • Tienen un diseño sencillo y elegante. • Son fáciles de limpiar. Si tiene niños o desea limpiar la Interfaz de control, recomendamos activar la función Child Lock (Bloqueo para niños) para bloquear los botones de control.
AJUSTE DEL ÁNGULO DE LOS SOPORTES PARA PLATOS Estante superior Estante inferior Carga de artículos grandes en las zonas de refuerzo Puede cargar artículos grandes como ollas y sartenes en el lado izquierdo y/o derecho del estante inferior -las secciones de Zone Booster (Zona refuerzo)para obtener un lavado más efectivo.
uso de la lavavajillas AJUSTE DE LA ALTURA DEL ESTANTE SUPERIOR Puede ajustar la altura del estante superior de su lavavajillas Samsung para dar cabida a platos de mayor tamaño en el estante inferior. Según la altura del estante superior que establezca, en el estante inferior puede ubicar platos de hasta 12 pulgadas (30 cm) de diámetro y en el estante superior platos de hasta 8 pulgadas (20 cm) de diámetro. 1.
CARGA DEL ESTANTE INFERIOR saucer 10 puestos 12 puestos Español - 17 DW80H994_DD68-00164A-03_MES_150408.indd 17 2015-04-08 7:43:49 03 uso de la lavavajillas Cargue los utensilios de cocina (recipientes, ollas, etc.) de hasta 12 pulgadas (30 cm) de diámetro en el estante inferior. Se ha diseñado el estante inferior específicamente para la vajilla para comida, tazones para sopa, platos, ollas, tapas y fuentes de horno.
uso de la lavavajillas CARGA DEL ESTANTE SUPERIOR El estante superior está diseñado para platos pequeños, tazones para café, vasos y artículos de plástico que tengan el rótulo "apto para lavavajillas". Cargue los platos en la lavavajillas de manera que los lados superiores se enfrenten unos a otros. Asegúrese de que la vajilla cargada no interfiera con la rotación de la boquilla que se encuentra en la parte inferior del estante superior. (Para verificarlo, haga rotar la boquilla a mano.
USO DEL 3ER ESTANTE (CUBIERTOS) (EN ALGUNOS MODELOS) Carga del estante para cubiertos 03 uso de la lavavajillas Además de la canasta para cubiertos estándar del estante superior, algunos modelos tienen un estante para cubiertos. El estante para cubiertos es adecuado para cubiertos y utensilios para cocinar y servir. Puede acomodar los cubiertos y utensilios en forma aleatoria u ordenada en el estante para cubiertos.
uso de la lavavajillas USO DE LA ESTANTERÍA PARA COPAS (PARA ALGUNOS MODELOS) 1 2 180-245 mm Ø 105 mm Ø 6-9 mm 3 4 5 Español - 20 DW80H994_DD68-00164A-03_MES_150408.
USO DE LA CANASTA PARA CUBIERTOS La canasta para cubiertos consiste en dos compartimientos. Puede colocar independientemente cada cuchillo, cuchara o tenedor en el soporte para cubiertos en la cubierta de la canasta para evitar roturas o decoloración. 03 uso de la lavavajillas La canasta para cubiertos puede utilizarse con las cubiertas abiertas. Consulte la ilustración de la derecha.
uso de la lavavajillas USO DEL DETERGENTE Todos los ciclos de la lavavajillas requieren detergente en el compartimiento correspondiente. Agregue la cantidad adecuada de detergente para el ciclo seleccionado para asegurar el mejor desempeño. PRECAUCIÓN ADVERTENCIA ADVERTENCIA Use solamente detergente para lavavajillas. Los detergentes normales producen demasiada espuma, lo que puede reducir el desempeño de la lavavajillas o causar su malfuncionamiento. No ingiera detergente para lavavajillas.
La cubierta se abre automáticamente para dosificar el detergente durante el lavado. CANTIDAD DE DETERGENTE CICLO Dosificador para el lavado principal En la puerta para el prelavado 3/4 oz (20 g) 1/3 oz (10 g) 1 oz (30 g) 1/2 oz (15 g) Delicate (Vajilla delicada) 3/4 oz (20 g) 1/5 oz (5 g) 03 uso de la lavavajillas Auto, Normal Heavy (Muy sucio), Express 60' Los números que se encuentran dentro del dosificador aluden a gramos.
limpieza y mantenimiento de la lavavajillas Mantener la lavavajillas limpia mejora su desempeño, reduce la cantidad de reparaciones innecesarias y alarga su vida. LIMPIEZA DEL EXTERIOR Se recomienda limpiar los derrames en el exterior de la lavavajillas a medida que ocurran. Utilice un paño suave y húmedo para limpiar suavemente todos los derrames y el polvo del panel de control. No utilice benceno, cera, diluyente, blanqueador a base de cloro ni alcohol.
LIMPIEZA DE LAS BOQUILLAS 04 limpieza y mantenimiento de la lavavajillas Si la lavavajillas no limpia correctamente o las boquillas parecen estar obstruidas, puede limpiarlas en forma individual. Tenga cuidado al retirar las boquillas, ya que pueden romperse. Boquilla superior 1. Jale el estante superior hacia el frente 2. Verifique que los agujeros de la boquilla no estén obstruidos con partículas de comida. 3. Si hace falta limpiar la boquilla, retírela. 4.
limpieza y mantenimiento de la lavavajillas LIMPIEZA DE LOS FILTRO 1. Retire el estante inferior. 2. Rote la manija del filtro en sentido contrario al de las agujas del reloj para aflojar la puerta del compartimiento del filtro. 3. Retire la puerta del filtro con manija y el microfiltro plano que está debajo. Filtro con manija Microfiltro plano 4. Elimine el polvo y cualquier otro residuo del microfiltro y la puerta del filtro y enjuague estos con agua de la llave. 5.
ciclos TABLA DE CICLOS ( : Básico, : paso opcional) Prelavado 1 Prelavado 2 Auto Normal Heavy (Muy sucio) Lavado principal Enjuague 1 Enjuague 2 Enjuague 3 Enjuague 4 05 ciclos Ciclo 138 - 131 ˚F (59 - 55 ˚C) 143 - 118 ˚F (62 - 48 ˚C) Delicate (Vajilla delicada) 149 ˚F (65 ˚C) 122 ˚F (50 ˚C) Express 60' 131 ˚F (55 ˚C) Ciclo Último enjuague [Desinfección] Secado Agua [gal (ℓ)] 5,7 - 3,6 (21,6 - 13,6 ℓ) 7,1
solución de problemas CONTROLE ESTOS PUNTOS SI SU LAVAVAJILLAS… PROBLEMA CAUSA POSIBLE SOLUCIÓN La puerta no está completamente cerrada. Verifique que la puerta esté trabada y completamente cerrada. Verifique si el estante superior está unido correctamente a la boquilla del conducto. Verifique también si el estante superior está equilibrado. No enciende. No se ha seleccionado ningún ciclo. Seleccione un ciclo adecuado. El cable de alimentación no está conectado.
PROBLEMA SOLUCIÓN Seleccione un ciclo de acuerdo con la cantidad de vajilla y su nivel de suciedad, tal como lo indica este manual. La temperatura del agua es baja. Conecte el conducto al suministro de agua caliente. Para un mejor desempeño, la temperatura del agua suministrada debe ser de 120 ˚F (49 ˚C). Presión de agua baja. La presión del agua debe estar entre 20 y 120 psi (140 830 kPa). El agua es demasiado dura. Use un limpiador para lavavajillas comercial.
solución de problemas PROBLEMA CAUSA POSIBLE SOLUCIÓN No hay producto de enjuague en el dosificador. Revise el dosificador y agregue producto de enjuague. Use un producto líquido para el enjuague. Cuando la lavavajillas está funcionando, la temperatura del agua es baja. Conecte el conducto al suministro de agua caliente. Utilice producto de enjuague con la opción Sanitize (Desinfección). Se cargó demasiada vajilla. Las carga inadecuada de los artículos puede afectar el secado.
CÓDIGOS DE INFORMACIÓN El panel de control muestra códigos de información para ayudarle a comprender mejor qué ocurre con la lavavajillas. Código Solución LC Control de pérdidas • Si se produce una fuga en la conexión de la válvula de suministro de agua, cierre ésta y vaya al panel del disyuntor de su casa, desconecte el disyuntor de la lavavajillas y contacte al instalador para que efectúe la reparación. Si el problema continúa, contacte a un centro de servicio técnico de Samsung autorizado.
apéndice AYUDA AL MEDIOAMBIENTE • • • Esta lavavajillas se fabrica con materiales reciclables. Si decide deshacerse de ella, siga la normativa local relacionada con la eliminación de desechos. Corte el cable de alimentación para que el aparato no pueda conectarse a una fuente de alimentación. Quite la puerta para que los animales y los niños pequeños no puedan quedar atrapados dentro del electrodoméstico. No utilice cantidades de detergente superiores a las recomendadas por el fabricante del detergente.
garantía LAVAVAJILLAS SAMSUNG GARANTÍA LIMITADA PARA EL COMPRADOR ORIGINAL El presente producto de la marca SAMSUNG, tal como lo provee y distribuye SAMSUNG ELECTRONICS AMERICA, INC. en EE.UU./ SAMSUNG ELECTRONICS CANADA, INC.
garantía SALVO LO ESTABLECIDO EN LA PRESENTE GARANTÍA, NO EXISTEN GARANTÍAS SOBRE EL PRESENTE PRODUCTO, YA SEAN EXPRESAS O TÁCITAS, Y SAMSUNG DESCONOCE TODAS LAS GARANTÍAS QUE INCLUYEN, AUNQUE NO EN CARÁCTER TAXATIVO, CUALQUIER GARANTÍA TÁCITA DE QUE EL PRODUCTO SE ENCUENTRA EN CONDICIONES APTAS PARA LA VENTA, DE DEFRAUDACIÓN DE DERECHOS O DE QUE EL PRODUCTO SE ADECUA A LOS FINES ESPECÍFICOS PARA LOS CUALES SE ADQUIERE.
notas DW80H994_DD68-00164A-03_MES_150408.
bit.ly/samsungdishwashers ¿Tiene alguna pregunta o algún comentario? País LLAME AL O VISÍTENOS EN LÍNEA EN U.S.A 1-800-SAMSUNG (726-7864) www.samsung.com/us/support MEXICO 01-800-SAMSUNG(726-7864) www.samsung.com/mx/support DD68-00164A-03 DW80H994_DD68-00164A-03_MES_150408.