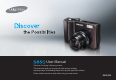
User Manual Thank you for buying a Samsung camera. This manual will guide you through using the camera, including capturing images, downloading images and using the application software. Please read this manual carefully before using your new camera.
Instructions Getting to know your camera ■ Use this camera in the following order. Set up the camera driver Take a picture Insert the USB cable Before connecting the camera to a PC, via the USB cable, you will need to set up the camera driver. Install the camera driver that is contained in Application software CD-ROM. (p.74) Take a picture. (p.14) Insert the supplied USB cable into the PC’s USB port and the camera’s USB connection terminal. (p.77) Check the camera’s power Check the camera’s power.
Danger DANGER indicates an imminently hazardous situation which, if not avoided, will result in death or serious injury. ■ Do not attempt to modify this camera in any way. To do so may result in fire, injury, electric shock or severe damage to you or your camera. Internal inspection, maintenance and repairs should only be carried out by your dealer or Samsung Camera Service centre.
Caution CAUTION indicates a potentially hazardous situation which, if not avoided, may result in a minor or moderate injury. ■ Leaking, overheating, or damaged battery could result in fire or injury. •Use battery with the correct specification for the camera. •Do not short circuit, heat or dispose of battery in fire. •Do not insert the battery with the polarities reversed. ■ Remove the battery when not planning to use the camera for a long period of time.
Contents ■E (Effect) button …………………27 ■Special Effect : Colour ……………27 ■Special Effect : Preset focus frames ………………28 ■Special Effect : Composite shooting ………………29 ■Special Effect : Photo Frame ……30 ■Movie Clip frame stabiliser ………31 ■+/ - button …………………………31 ●Using the LCD monitor to set the camera settings ……………………34 ■How to use the menu ……………35 ■Size ………………………………36 ■Quality/ Frame rate ………………36 ■Metering …………………………37 ■Auto Focus type …………………37 ■Continuous shot …………………38 ■Sharpness…………………………39 ■OSD (On Sc
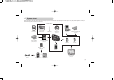
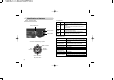
System chart Please check that you have the correct contents before using this product. The contents can vary depending on the sales region. To buy the optional equipment, contact your nearest Samsung dealer or Samsung service centre. < Included items > Camera case DPOF compatible printer (see p.55) User manual, Product warranty Camera strap Software CD (see p.74) Computer (see p.77) PictBridge compatible printer (see p.57) SD memory card/ MMC (see p.
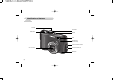
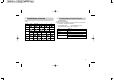
Identification of features Front & Top Mode dial Power button Shutter button Speaker Flash Self-timer lamp / Auto focus lamp USB / AV connection terminal Lens / Lens cover DC input connection port Microphone 《6》
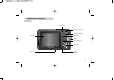
Identification of features Back & Bottom Camera status lamp Zoom T button (Digital zoom) Zoom W button (Thumbnail) LCD monitor E (Effects) button Strap eyelet +/- button, Delete button 5 function button Tripod socket Play mode / Printer button 《7》
Identification of features ■ Self-timer lamp Bottom / 5-function button Icon Status Battery chamber cover Blinking Blinking Memory card slot Blinking Battery chamber Description For the first 7 seconds, the lamp blinks at 1 second intervals. For the final 3 seconds, the lamp blinks quickly at 0.25second intervals. For the 2 seconds, the lamp blinks quickly at 0.
Identification of features Connecting to a Power Source ■ Mode icon: Refer to page 15~18 for more information about the camera mode setting. MODE AUTO PROGRAM A S M ASR MOVIE VOICE RECORDING PLAY - Icon MODE Icon MODE SCENE PORTRAIT CHILDREN LANDSCAPE TEXT ● We recommend using batteries for a digital camera (Within a year from the date of manufacture). The batteries are listed below.
Connecting to a Power Source INFORMATION Important information about battery usage ● When the camera is not used, turn off the camera power. ● Please remove the battery if the camera will not be used for long periods. Battery can lose power over time and are prone to leaking if kept inside the camera. ● Low temperatures (below 0˚C) can affect the performance of the battery and you may experience reduced battery life. ● Batteries will usually recover at normal temperatures.
Instructions on how to use the memory card ● Be sure to format the memory card (see p.63) if you are using a newly purchased memory for the first time, if it contains data that the camera cannot recognise, or if it contains images captured with a different camera. ● Turn off the camera power whenever the memory card is being inserted or removed. ● Repeated use of the memory card will eventually reduce the memory card’s performance. Should this be the case, you will need to purchase a new memory card.
Instructions on how to use the memory card INFORMATION ● Don't remove the memory card when the camera status lamp is blinking as this may cause damage to data in the memory card. ■ When using a 256MB MMC (Multi Media Card), the specified shooting capacity will be as follows. These figures are approximate as image capacities can be affected by variables such as subject matter and memory card type. Recorded image size ■ The camera can use SD/SDHC Memory Cards and MMC (Multi Media Cards).
LCD monitor indicator ■ The LCD monitor displays information about the shooting functions and selections. No. Description 4 Continuous shot Icons p.38 5 Flash / Without Sound p.24~25 / p.17 ⑳ 6 Self-timer p.26 ③ ⑲ 7 Macro p.22~23 ④ ⑱ 8 Metering p.37 9 Card inserted indicator - ① ② ⑤ ⑰ ⑥ ⑯ Page 10 Auto focus frame p.37 11 Camera shake warning p.18 ⑦ ⑮ 12 Date / Time ⑧ ⑭ 13 Exposure compensation p.34 ⑨ ⑬ 14 White Balance p.
Starting the recording mode ■ How to use the AUTO mode ( ) Please select this mode for quick and easy picture taking with minimal user interaction. 1. Insert the batteries (p.10). Insert the batteries taking note of the polarity (+ / -). 2. Insert the memory card (p.10). As this camera has a 20MB internal memory, you do not need to insert the memory card. If the memory card is not inserted, an image will be stored in the internal memory.
Starting the recording mode ■ How to use the SHUTTER PRIORITY mode ( ) 1. Select the SHUTTER PRIORITY Mode by rotating the mode dial. 2. Set the shutter speed by using the +/-, Left/Right button. 3. Press the + / - button twice and take an image. * High Shutter speeds can capture a moving object in a still image as if the object is not moving. Low Shutter speeds can capture a moving object with an ‘active’ effect. ■ How to use the ASR (Advanced Shake Reduction) mode ( Advanced Shake Reduction (ASR) mode.
Starting the recording mode ■ Wise Shot 2 images are taken at a time. One is taken in the Fill-In Flash mode and the other is taken in the ASR mode. You can select and save only one of the images. ● How to use the Wise Shot 1. Select the ASR mode by rotating the mode dial. ■ How to use the SCENE mode ( ) Use the menu to easily configure optimal settings for a variety of shooting situations. 1. Select the SCENE mode by rotating the mode dial. 2. Press the menu button and select a desired scene menu. 2.
Starting the recording mode ■ How to use the MOVIE CLIP mode ( ) A movie clip can be recorded for as long as the available recording time of the memory capacity allows. ■ Pausing while recording a movie clip (Successive Recording) This camera allows you to temporarily stop during unwanted scenes, while recording a movie clip. Using this function, you can record your favourite scenes into a movie clip without having to create multiple movie clips. 1. Select the MOVIE CLIP mode by rotating the mode dial. 2.
Starting the recording mode ■ How to use the VOICE RECORDING mode ( ) A voice can be recorded for as long as the available recording time (max:1hour) allows. 1. In any mode with the exception of Movie clip mode, select the VOICE RECORDING mode by pressing the Voice recording button twice. 2. Press the shutter button to record a voice. - Press the shutter button once and voice is recorded for as long as the available recording time (max:1hour) allows. The recording time will be displayed on the LCD monitor.
Things to Watch Out for When Taking Pictures ■ Under certain conditions the auto focus system may not perform as expected. - When photographing a subject that has little contrast. - If the subject is highly reflective or shiny. - If the subject is moving at high speed. - When there is strong reflected light, or when the background is very bright. - When the subject matter has only horizontal lines or the subject is very narrow (such as a stick or flagpole). - When the surroundings are dark.
ZOOM W / T button ● If the menu is not displayed, this button works as the OPTICAL ZOOM or DIGITAL ZOOM button. ● WIDE Zoom Optical zoom WIDE ● This camera has a 5X optical zoom and a 5X digital zoom function. Using both will offer a total zoom ratio of 25X. ● TELE Zoom Optical zoom TELE Digital zoom TELE : Pressing the ZOOM T button. This will zoom into the subject i.e. the subject will appear nearer.
ZOOM W / T button INFORMATION ● Images taken using the digital zoom may take a little longer for the camera to process. Allow time for this to take place. ● The digital zoom cannot be used in movie clip shots. ● You may notice a decrease in image quality when using the digital zoom. ● To view a clearer digital zoom image, press the shutter button halfway at the maximum (5X) optical zoom position and press the zoom T button again.
Macro( )/ Down button ■ While the menu is showing, press the DOWN button to move from the main menu to a sub menu, or to move down the sub menu. When the menu is not showing, you can use the MACRO / DOWN button to take macro pictures. The distance ranges are shown below. Press the Macro button until the desired macro mode indicator displays on the LCD monitor. INFORMATION ● When the macro mode is selected, it is possible that camera shake will occur. Take care not to shake the camera.
Macro( )/ Down button Focus lock ■ Available focusing method, by recording mode (O: Selectable , X: Not selectable, ∞: Infinity focus range) ■ To focus on a subject not positioned in the centre of the picture, use the focus lock function.
Flash ( )/ Left button ■ When the menu is displayed on the LCD monitor, pressing the LEFT button makes the cursor shift to the left tab. ■ When the menu is not displayed on the LCD monitor, the LEFT button operates as the FLASH ( ) button. INFORMATION [Selecting the Auto flash] ● Selecting the flash mode 1. Rotate the MODE DIAL to select a RECORDING mode with the exception of MOVIE CLIP mode. 2. Press the Flash button until the desired flash mode indicator displays on the LCD monitor. 3.
Flash ( )/ Left button ● Flash mode indicator Menu tab ● Available flash mode, by recording mode Flash mode Description Auto flash If the subject or background is dark, the camera flash will operate automatically. Auto & Red eye reduction Fill in flash If a subject or background is dark, the camera flash will work automatically and will reduce the red-eye effect by using the red-eye reduction function. The flash fires regardless of available light.
Self-timer( ) / Right button ■ When the menu is displayed on the LCD monitor, pressing the Right button makes the cursor shift to the right tab. ■ When the menu is not displayed on the LCD monitor, the RIGHT button operates as the Self-timer( ) button. This function is used when the photographer would also like to be in the image. ● Selecting the self-timer 1. Rotate the MODE DIAL to select a RECORDING mode with the exception of VOICE RECORDING mode. 2.
E (Effect) button Special Effect : Colour ■ It is possible to add special effects to your images by using this button. ■ Still image mode : You can select the colour, outfocus, composite and frame menus. ■ Movie clip mode : You can select the colour and stabiliser menus. ■ Available Effects, by recording mode (O : Selectable X : Not selectable) ■ By using the camera’s digital processor, it is possible to add special effects to your images 1. Press the E button in any recording mode. 2.
Special Effect : Preset focus frames ■ You can make the subject stand out from its surroundings. The subject will be sharp and in focus while making the rest out of focus. 1. Press the E button in the available camera modes(Not available: Movie clip, Voice, Auto, HighLight Manual, ASR, Scene). 2. Select the menu tab by pressing the Left / Right button. 3. Select a desired sub menu by pressing the Up / Down button and press the OK button.
Special Effect : Composite shooting ■ You can combine 2 - 4 different shots in a still image 1. Press the E button in the available camera modes(Not available: Movie clip, Voice, Auto, Manual, ASR, Scene). 2. Select the menu by pressing the Left/ Right Composite button. 3. Select a desired sub menu by pressing the Up/ Down button and press the OK button. - : cancels the composite shooting : 2 different shots are combined in a still image. : 3 different shots are combined in a still image.
Special Effect : Composite shooting ● Changing a part of composite shot after taking the last shot 1. After taking the last shot , a cursor to select a frame will display. Press the Up/ Down/ Left/ Right button to select the frame. 2. Press the +/ - button and an image will be deleted. Composite frame will be activated. 3. Press the Shutter button. You can take other images again by using the Up/ Down/ Left/ Right button and +/ - button. 4. Press the OK button again to save the captured image.
Special Effect : Photo Frame 4. The photo frame will appear. Press the shutter button to capture an image +/ - button ■ You can use the +/ - button to adjust the values for the RGB, ISO, white balance and exposure compensation. Main menu Sub menu RGB R (Red), G (Green), B (Blue) ISO AUTO, 50, 100, 200, 400, 800, 1600 WHITE BALANCE AUTO, DAYLIGHT, CLOUDY, FLUORESCENT H, FLUORESCENT L, TUNGSTEN, CUSTOM. Exposure compensation -2.0- 0.0 - + 2.0 (0.
+/ - button ■ RGB : Allows the user to adjust the R (Red), G (Green), and B (Blue) values of the images to be captured. ■ ISO : You can select the ISO sensitivity when taking pictures. The speed or specific light-sensitivity of a camera is rated by ISO numbers. ● Setting RGB Values 1. Press the +/ - button, and then use the UP and DOWN buttons to select the RGB icon ( ). The RGB menu bar will appear as shown. 2. Use the UP/ DOWN/ LEFT and RIGHT buttons to select the desired RGB value.
+/ - button ■ White balance : The white balance control allows you to adjust the colours to appear more natural. ● Selecting a White Balance 1. Press the +/ - button, and then use the UP and DOWN buttons to select the white balance icon ( ). The white balance menu bar will appear as shown. 2. Use the LEFT and RIGHT buttons to set the white balance to the desired value. The value you set wil be displayed on the LCD monitor.
+ / - button ■ Exposure compensation : This camera automatically adjusts the exposure according to the ambient lighting conditions. You can also select the exposure value by using the + / - button. ● Compensating Exposure 1. Press the + / - button, and then use the UP and DOWN buttons to select the exposure compensation icon ( ). The exposure compensation menu bar will appear as shown. 2. Use the LEFT and RIGHT buttons to set the desired exposure compensation factor. 3. Press the + / - button again.
Using the LCD monitor to set the camera settings Menu tab Main menu Sub menu Single SHOOTING Motion Capture SHARPNESS Camera working mode Continuous AEB Interval - Soft Normal Vivid - Full OSD INFORMATION LCD Save Page Basic - ※ * 30 FPS cannot be used in 800X592, 720X480 size. ※ Menus are subject to change without prior notice. How to use the menu 1. Turn on the camera and press the MENU button. A menu for each camera mode appears. However, there is no menu for Voice Recording mode ( ). 2.
Size Quality/ Frame rate ■ You can select the image size appropriate for your application. Mode Still image mode Movie clip mode Normal ■You can select the compression ratio appropriate for your application of the captured images. The higher the compression ratio, the lower the picture quality.
Metering ■ If you cannot obtain suitable exposure conditions, you can change the metering method to take brighter pictures. [Multi] : Exposure will be calculated based on an METERING average of the available light in the image Multi Spot area. However, the calculation will be biased towards the centre of the image area. This is suitable for general use. [Spot] : Only the rectangular area in the centre of [ PROGRAM mode ] the LCD monitor will be metered for light.
Continuous shot ■ You can select continuous shot, and AEB (Auto Exposure Bracketing). - [Single] - [Continuous] : Take one picture only SHOOTING : Images will be taken Single Continuous continuously until the shutter Motion Capture button is released. The shooting AEB Interval 01 min capacity depends on the 02 Pic memory. [ PROGRAM mode ] - [Motion Capture] : This takes 30 shots per second, when the shutter is pressed and held down.
Sharpness ■ You can adjust the sharpness of the picture you want to take. You cannot check the sharpness effect on the LCD monitor before you take a picture, because this function is applied only when the captured image is stored on the memory. OSD (On Screen Display) information SHARPNESS Soft Normal Vivid ■ In any mode with the exception of VOICE RECORDING mode, you can check the recording status in the LCD monitor.
Starting play mode ■If the memory card is inserted in the camera, all the camera functions apply only to the memory card. ■If the memory card is not inserted in the camera, all the camera functions apply only to the internal memory. ■If you have turned on the camera by pressing the POWER button, you can press the PLAY MODE button once to switch to Play mode and press it again to switch to Recording mode. ■You can turn the power on with the play mode button. The camera is turned on in play mode.
Starting play mode ■Movie clip capture function : capture still images from the movie clip. ■ On camera movie trimming : You can extract desired frames of movie clip during the movie clip play back. ● How to capture the movie clip Steps 1-3 are the same as those for playing back a movie clip. 4. Press the Play / Pause button while playing the movie clip. Then press the E button. 5. The paused movie clip is saved in a new file name.
Starting play mode ● Playing back a recorded voice Steps from 1-2 are the same as those to play back a still image. 3. Select the recorded voice file and press the Play & Pause button to play back a recorded voice file. PLAY: - To pause a recorded voice file, while playing it back, press the play & pause button again. - To resume playback of the voice file, press the play & pause button. - To rewind the voice file while it is playing, press the LEFT button.
Using the camera buttons to set the camera ■In Play mode, you can use the buttons on the camera to conveniently set up the Play mode functions. Thumbnail ( )/ Enlargement ( ) button ●You can view multiple pictures, enlarge a selected picture, and crop and save a selected area of an image. ●Thumbnail display 1. While an image is displayed on full screen, press the thumbnail button. 2. The thumbnail display will highlight the image that had been showing at the time the thumbnail mode was selected. 3.
Thumbnail ( )/ Enlargement ( ) button ●The maximum enlargement rate in proportion to the image size. Image size 8M 7MP 6MW 5M 3M 1M Maximum enlargement rate X12.0 X11.3 X9.5 X9.0 X8.0 X4.0 ●Trimming : You can extract part of the image that you want and save it separately. Trimming? 1. Select an image that you want to enlarge and No Yes press the enlargement button. Press the Menu Confirm : OK button and a message will be displayed. 2.
Play & Pause ( )/ Down button ■In Play mode, the play & pause/ down button works as follows: - If the menu is displayed Press the DOWN button to move from the main menu to a sub menu, or to move down the sub menu cursor. - If a still image with a voice memo, a voice file, or a movie clip is playing In Stop mode : Plays a still image with a voice memo, a voice file, or a movie clip. During playback : Temporarily stops playback.
Delete ( ) button ■This deletes images stored on the memory. ●Deleting Images in Thumbnail Display Mode 1. Use the UP, DOWN, LEFT, and RIGHT buttons to select the image you want to delete, and then press the DELETE ( ) button. 2. A message will display on the LCD monitor as shown below. 3. Select the sub menu values by pressing the LEFT/ RIGHT button and then press the OK button. If [Yes] is selected : deletes the selected images. If [No] is selected : cancels "Delete Image".
Printer button Left/ Right/ Menu/ OK button ■ If you select [Computer] sub menu in the [USB] setup menu, [Connecting Computer] message will display when you connect the camera to your printer and the connection will not be established. In this case, press the Printer button. [Connecting Printer] message will display and the Easy printing mode will be selected. ■ LEFT/ RIGHT/ MENU/ OK buttons activate the following.
Setting up the play back function using the LCD monitor ■ PLAY mode functions can be changed by using the LCD monitor. In the PLAY mode, pressing the MENU button displays the menu on the LCD monitor. The menus you can set up in Play mode are as follows. To capture an image after setting up the play menu, press the PLAY mode button or shutter button. Menu tab Main menu Sub menu Secondary menu Show Play/ Repeat Play Interval 1, 3, 5, 10 sec SLIDE Off Menu tab Main menu Page RESIZE p.
Setting up the play back function using the LCD monitor ■ This menu is available while the camera is connected to a PictBridge supporting printer (direct connection to the camera, sold separately) with a USB cable. Menu tab Main menu IMAGES AUTO SET Sub menu Secondary menu One Pic - All Pics - No - Yes - Menu tab Main menu Sub menu Type p.57 Auto CUSTOM SET Quality Date L 2L Full 1 2 Layout 4 8 9 Off Auto File Name A4 A3 p.
Starting the slide show ■ Images can be displayed continuously at pre-set intervals. You can view the slide show by connecting the camera to an external monitor. 1. Press the play mode button and press the menu button. 2. Press the LEFT / RIGHT button and select the [SLIDE] menu tab. ● Start the slide show : The slide show can start only in the [Show] menu. 1. Use the Up/ Down buttons to select the [Show] menu and press the Right button. SLIDE Show Play 2.
On Screen Display information ■ You can check shooting information about the displayed image. ● How to select the type of information you want to see 1. Press the play mode button and press the menu button. 2. Select the [OSD INFORMATION] menu tab by pressing the LEFT/ RIGHT button. 3. Select a desired sub menu by pressing the UP/ DOWN button and press the OK button. 100-0007 OSD INFORMATION Full Basic OSD Off ■ You can rotate the stored images by various degrees.
Resize ■ Change the resolution (size) of pictures taken. Select the [User Image] to save an image to be the start-up image. The resized image will have a new file name. 1. Press the play mode button and press the menu RESIZE button. 2592X1944 2. Press the LEFT/ RIGHT button and select the 2048X1536 1024X768 [RESIZE] menu tab. User Image1 User Image2 3. Select a desired sub menu by pressing the UP/ Exit:MENU Move: DOWN button and press the OK button.
Protecting images Deleting images ■ This is used to protect specific shots from being accidentally erased (Lock). It also unprotects images that have been previously protected (Unlock). ● Protecting Images 1. Press the play mode button and press the menu button. 2. Press the LEFT/ RIGHT button and select the [PROTECT] menu tab. 3. Select a desired sub menu by pressing the UP/ DOWN button and press the OK button. [Select ] : Selection window for an image to be protected/released is displayed.
Copy To Card ■ This enables you to copy image files, movie clips and voice recording files to the memory card. ● Copying to the Memory Card 1. Press the play mode button and press the menu COPY TO CARD button. No Yes 2. Select the [COPY TO CARD] menu tab by pressing the LEFT/ RIGHT button. 3. Select a desired sub menu by pressing the UP/ Exit:MENU Move: DOWN button and press the OK button. - [No] : Cancels "Copy to Card".
DPOF ■DPOF(Digital Print Order Format) allows you to embed printing information on your memory card’s MISC folder. Select the pictures to be printed and how many prints to make. ■The DPOF indicator will display on the LCD monitor when an image that has DPOF information plays back. Images can then be printed on DPOF printers, or at an increasing number of photo labs. ■This function is not available for Movie clips and Voice recording files.
DPOF : Index DPOF : Print size ■ Images (except for movie clips and voice file) are printed as index type. 1. Press the play mode button and press the menu button. Standard Index 2. Press the LEFT/ RIGHT button and select the Size [DPOF] menu tab. 3. Select the [Index] menu by pressing the UP/ Back: DOWN button and press the RIGHT button. 4. Select a desired sub menu by pressing the UP/ DOWN button. If [No] is selected : Cancel the index print setting.
PictBridge PictBridge : Picture Selection ■ You can use the USB cable to connect this camera to a printer that supports PictBridge (sold separately) and print the stored images directly. Movie clips and voice files cannot be printed. ● Setting up the camera for connection with the printer 1. In any mode with the exception of Voice Recording mode, press the MENU button. 2. Press the LEFT/ RIGHT button and select [SETUP] menu tab. 3.
PictBridge : Picture Selection ● Setting the Number of Copies to Print - Select [One Pic] or [All Pics]. A screen where you can set the number of copies to print will appear as shown below. W W Set:OK 0 prints T Exit:Shutter [When [One Pic] is selected] Set:OK 0 prints T Exit:Shutter ■ AUTO SET 1. Use the LEFT and RIGHT buttons to select the [AUTO SET] menu tab. 2. Use the UP and DOWN buttons to select the desired sub menu value, and then press the OK button. [No] : [CUSTOM SET] values are kept.
PictBridge : Print Setting Menu Size Layout Type Function Setting the size of the printing paper Sub menu Auto, PostCard, Card, 4x6, L, 2L, Letter, A4, A3 Setting the number of pictures to Auto, Full, 1, 2, 4, 8, 9, 16, Index be printed on a sheet of paper Setting the quality of the printing Auto, Plain, Photo, FastPhoto paper Quality Setting the quality of the picture to be printed Auto, Draft, Normal, Fine Date Setting whether to print the date Auto, Off, On Setting whether to print the file Fil
PictBridge : DPOF Printing PictBridge : Reset ■ DPOF Print : This allows you to directly print the files with DPOF information. 1. Use the LEFT and RIGHT buttons to select the [DPOF PRINT] menu tab. 2. Use the UP and DOWN buttons to select the desired sub menu value, and then press the OK button. [No] : Cancel the printing [Yes] : Directly print the file with the DPOF information. DPOF PRINT No Yes Move: ※ Depending on the manufacturer and printer model, some menus may not be available.
Setup menu ■In this mode, you can set up basic settings. You can use the setup menu in all camera modes, except Voice Recording mode. The items indicated by are default settings. Menu tab Main menu File Power Off Language Format Date&Time World Time Sub menu Secondary menu Page Series p.62 Reset Off, 1, 3, 5, 10min p.62 ENGLISH FRANÇAIS DEUTSCH ESPAÑOL ITALIANO P”CCK»… p.62 PORTUGUÊS DUTCH DANSK SVENSKA SUOMI BAHASA POLSKI Magyar No p.63 Yes 07/01/01 13:00 yy/mm/dd p.
Setup menu [ File name ] [ Auto power off ] ■ This function allows the user to select the file naming format. ■ This function switches the camera off after a set amount of time in order to prevent unnecessary battery drainage. ● Assigning File Names 1. In any mode with the exception of Voice SETUP Recording mode, press the MENU button. Series File 2. Press the LEFT/ RIGHT button and select the Reset Power Off Language [SETUP] menu tab. Format Date&Time 3.
Setup menu [ Formatting a memory ] [ Setting up the Date/ Time/ Date type ] ■ This is used for formatting the memory. If you run [Format] on the memory, all images, including the protected images, will be deleted. Be sure to download important images to your PC before formatting the memory. ■ You can change the date and time that will be displayed on the captured images and set up the date type. ● Sub menus [No] : The memory will not be formatted.
Setup menu [ World Time ] [ Auto Focus lamp ] ■ This menu enables you to display the local date and time on the LCD monitor. ■ You can turn on and off the Auto Focus lamp. SETUP Format Date&Time World Time Imprint AF Lamp Back: ● Sub menus [Off] : The AF lamp will not light up in a low light condition. [On] : The AF lamp will light up in a low light condition.
Setup menu [ Connecting an External Device (USB) ] [ Selecting Video out type ] ■ You can select an external device to which you want to connect the camera using the USB cable. ■ The Movie output signal from the camera can be NTSC or PAL. Your choice of output will be governed by the type of device (monitor or TV, etc.) to which the camera is connected. PAL mode can support only BDGHI. ● Sub menus - [Computer] : Select this if you want to connect the camera to your PC.
Setup menu - NTSC : U.S.A, Canada, Japan, South Korea, Taiwan, Mexico. [ Quick view ] - PAL ■ If you enable Quick View before capturing an image, you can view the image you just captured on the LCD monitor for the duration set in the [Quick View] setup. Quick view is possible only with still images. : Australia, Austria, Belgium, China, Denmark, Finland, Germany, U.K., Holland, Italy, Kuwait, Malaysia, New Zealand, Singapore, Spain, Sweden, Switzerland, Thailand, Norway.
Setting up the Mycam menu Start up sound ■ You can set up a start up image, start up sound and shutter sound. Every camera working mode (with the exception of Voice recording mode) has the MyCAM menu. The items indicated by are default settings. Menu tab Main menu Start Image Start Sound Shutter Sound Sub menu Off User Image 1 Off Sound 2 Off Sound 2 Page LOGO User Image 2 Sound 1 Sound 3 Sound 1 Sound 3 p.67 ■ You can select the sound that is activated whenever the camera is turned on.
Important notes Be sure to observe the following precautions! ■This unit contains precision electronic components. Do not use or store this unit in the following locations. - Areas exposed to severe changes in temperature and humidity. - Areas exposed to dust and dirt. - Areas exposed to direct sunlight or the inside of a vehicle in hot weather. - Environments where there is high magnetism or excessive vibration. - Areas with high explosives or highly flammable materials.
Important notes ■ Camera Maintenance - Use a soft brush (available from photo stores) to gently clean the lens and LCD assemblies. If this does not work, lens-cleaning paper with lens cleaning fluid can be used. Clean the camera body with a soft cloth. Do not allow this camera to come into contact with solvent materials such as benzol, insecticide, thinners etc. This may damage the body shell of the camera and also affect its performance. Rough handling can damage the LCD monitor.
Warning indicator Low Battery! ㆍThere is low battery capacity → Insert fresh batteries. Low Light! ㆍWhen taking pictures in dark places → Take pictures in Flash Photography mode. Before contacting a service centre ■ Please check the following The camera doesn’t switch on ㆍThere is low battery capacity → Insert fresh batteries. (p.10) ㆍBattery is inserted incorrectly with the polarities reversed.
Before contacting a service centre The images are unclear ㆍA picture was taken the subject without setting an appropriate macro mode → Select an appropriate macro mode to take a clear image.
Specifications ■ Image Sensor - Type : 1/1.8" CCD - Effective Pixel : Approx. 8.1Mega-pixel - Total Pixel : Approx. 8.3Mega-pixel ■ Lens - Focal Length : SHD f = 7.8 ~ 39mm (35mm film equivalent : 38 ~ 190mm) - F No. : F2.8 ~ 4.4 - Digital Zoom :·Still Image mode : 1.0X ~ 5.0X ·Play mode : 1.0X ~ 12.0X (depends on image size) ■ LCD Monitor : 2.
Specifications - Movie Clip :·With Audio (recording time : memory capacity dependent) ·Size: 800x592, 720x480, 640x480, 320x240 ·Frame rate : 30 fps, 20 fps, 15 fps (15/20 fps for 800x592, 720x480) ·Stabilizer ·Optical Zoom : up to 5.0X ■ Storage - Media :·Internal about 20MB ·External memory : SD / MMC/ SDHC (up to 4GB guaranteed) - File Format :·Still Image : JPEG (DCF), EXIF 2.2, DPOF 1.1, PictBridge 1.
Software Notes About the software Please ensure that you read the instruction manual carefully before use. •The attached software is a camera driver and image editing software tool for Windows. •Under no circumstances should all or part of either the software or the user manual be reproduced. •Copyrights for software are licensed only for use with a camera. •In the unlikely event of a manufacturing fault, we will repair or exchange your camera.
Setting up the application software ■ To use this camera with a PC, install the application software first. After this has been done, the stored images in the camera can be moved to the PC and can be edited by an image editing program. ■ You can visit the Samsung web-site through the internet. http://www.samsungcamera.com : English http://www.samsungcamera.co.kr : Korean 1. The auto run frame will display. Click the [Install] menu in the Auto run frame. 2.
Setting up the application software 3. After restarting the computer, connect the PC to the camera with the USB cable. 4. Turn the camera power on. The [Found New Hardware Wizard] will open and the computer will recognise the camera. ※ If your OS is Windows XP, an image viewer program will open. If the download window of Digmax Master opens after starting Digimax Master, the camera driver was set up successfully.
Starting PC mode •If you connect the USB cable to a USB port on your PC and then turn on the power, the camera will automatically switch to "computer connection mode". •In this mode, you can download stored images to your PC through the USB cable. •The LCD monitor is always turned off in PC mode. ■ Connecting the camera to a PC 1. In any mode with the exception of Voice Recording mode, press the Menu button. 2. Press the LEFT/ RIGHT button and select the [SETUP] menu tab. 3.
Starting PC mode ■ Downloading stored images You can download the still images stored on the camera to your PC's hard disk and print them or use a photo editing software to edit them. 6. Press the right mouse button and a pop-up menu will open. Click [Paste]. 1. Connect the camera to your PC with the USB cable. 2. On your computer's desktop display, select [My computer] and double click [Removable Disk → DCIM → 100SSCAM]. The image files will then be displayed. 7.
Removing the removable disk ■ Windows 98/98SE 1. Check whether the camera and PC are transferring a file. If the camera status lamp blinks, please wait until the lamp has finished blinking and is constantly on. 2. Unplug the USB cable. ■ Windows 2000/ME/XP (The illustrations may differ from those shown depending on the Windows O/S.) 1. Check whether the camera and PC are transferring a file. If the camera status lamp blinks, please wait until the lamp has finished blinking and is constantly on. 5.
Setting up the USB Driver for MAC 1. A USB Driver for MAC is not included with the software CD as MAC OS supports the camera driver. 2. Check the MAC OS version during start-up. This camera is compatible with MAC OS 10.0 ~ 10.3. 3. Connect the camera to the Macintosh and turn the camera power on. 4. A new icon will be displayed on the desktop after connecting the camera to the MAC. Removing the USB Driver for Windows 98SE ■ To remove the USB driver, refer to the process shown below. 1.
Digimax Master ■ You can download, view, edit and save your images and movies with this software. This software is only compatible with Windows except for the Windows 98. ■ To start the program, click [Start → Programs → Samsung → Digimax Master → Digimax Master]. ● Downloading images 1. Connect the camera to your PC. 2. A window for downloading images will display after connecting the camera to your PC. - To download the captured images, select the [Select All] button.
Digimax Master ● Image viewer : You can view the stored images. ① ● Image edit : You can edit the still image. ⑤ ⑥ ① ④ ⑦ ② ③ ④ ② ③ - Image viewer functions are listed below. ① Menu bar : You can select menus. File, Edit, View, Tools, Change functions, Auto download, help, etc. ② Image selection window : You can select the desired images in this window. ③ Media type selection menu : You can select image viewer, image edit and movie edit functions in this menu.
Digimax Master FAQ FAQ ● Movie edit : You can get the still image, movie clip, narration, music files together in a movie clip. ■ Please check the following if the USB connection malfunctions. Case 1 USB cable is not connected or it is not the supplied USB cable. → Connect the supplied USB cable. Case 2 The camera is not recognised by your PC. Sometimes, the camera may appear under [Unknown Devices] in Device Manager. → Install the camera driver correctly.
FAQ Case 6 When I open the Device Manager (by clicking Start → (Settings) → Control Panel → (Performance and Maintenance) → System → (Hardware) → Device Manager), there are Unknown Devices or Other Devices entries with a yellow question mark(?) beside them or devices with an exclamation mark(!) beside them. → Right-click on the entry with the question (?) or exclamation (!) mark and select "Remove". Restart the PC and connect the camera again.
FAQ ● When the DirectX 9.0 or later is not installed → Install the DirectX 9.0 or later 1) Insert the CD provided with the camera 2) Run the windows explorer and select the [CD-ROM drive:\ USB Driver\DirectX 9.0] folder and click the DXSETUP.exe file. The DirectX will be installed. Visit the following site for downloading the DirectX.http://www.microsoft.
FCC notice ■ NOTE : This equipment has been tested and found to comply with the limits for a Class B digital device, pursuant to part 15 of the FCC Rules. These limits are designed to pro-vide reasonable protection against harmful interference in a residential installation. This equipment generates, uses and can radiate radio frequency energy and, if not in-stalled and used in accordance with the instructions, may cause harmful interference to radio communications.
MEMO MEMO 《87》
MEMO 《88》 MEMO
SAMSUNG TECHWIN CO., LTD. SAMSUNG FRANCE S.A.S. SAMSUNG OPTO-ELECTRONICS UK LIMITED OPTICS & DIGITAL IMAGING DIVISION 145-3, SANGDAEWON 1-DONG, JUNGWONGU, SUNGNAM-CITY, KYUNGKI-DO, KOREA 462-121 TEL : (82) 31-740-8086, 8088, 8090, 8092, 8099 FAX : (82) 31-740-8398 www.samsungcamera.com BP 51 TOUR MAINE MONTPARNASSE 33, AV .DU MAINE 75755, PARIS CEDEX 15, FRANCE HOTLINE PHOTO NUMÉRIQUE : 00 800 22 26 37 27(Numéro Vert-Appel Gratuit) TEL : (33) 1-4279-2200 FAX : (33) 1-4320-4510 www.samsungphoto.