......... "Ow r_s cti Register your product at www.samsung.com/global/register Record your Model and Serial number here for future reference. - Model - Serial No.
i ImportantWarrantyInformationRegardingTelevisionFormatViewing Wide screen format PDP Displays (16:9, the aspect ratio of the screen width to height) are primarily designed to view wide screen format full-motion video. The images displayed on them should primarily be in the wide screen 16:9 ratio format, or expanded to fill the screen if your modet offers this feature and the images are constantly moving.
i User instructions O Screen image retention Do not display a still image (such as on a video game) on the plasma display panel for more than several minutes as it can cause screen image retention. This image retention is also known as "screen burn". To avoid such image retention, refer to page 26 of this manual to reduce the degree of brightness and contrast of the screen when displaying a still image. Altitude The PDP can only operate normally at heights under 6500ft.
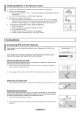
i Contents [] List of Features .............................................................. [] Accessories .................................................................... 5 5 [] Viewing the Control Panel ............................................. [] Viewing the Connection Panel ....................................... [] Remote Control .............................................................. 6 7 8 [] Installing Batteries in the Remote Control .....................
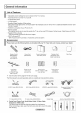
i General information List of Features . Adjustable picture settings that can be stored in the TV's memory. . Automatic timer to turn the TV on and off. . A special sleep timer. . V-Chip function. . Excellent Digita! Interface & Networking : With a built-in HD digital tuner, nomsubscription Top Box) needed. HD broadcasts can be viewed with no Cable Box/Satellite receiver (Set- . HDMI/DVl connection .
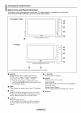
Viewing the Control Panel Buttons on the Lower-Right Part of the Panel The buttons on the lower-right panel control your TV's basic features, including the on-screen To use the more advanced features, you must use the remote control. menu. ............................................................................................................. i FP-TSO84/FP-T5884 SOURC_ o CH ..... i'l i:! U @ i \._._/ L J FP-T6374 s_Msu_o E The product color and shape may vary depending on the model.
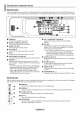
Viewing the Connection Panel Rear Panel Jacks Use the rear panel jacks to connect A/V components that wilt be connected continuously, such as VCR or DVD players. For more information on connecting equipment, see pages 9-14. The product color and shape may vary depending on the model. O POWER IN Connect the supplied power cord. O DIGITAL AUDIO OUT (OPTICAL) Connect to a Digital Audio component.
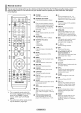
Remote Control You can use the remote control up to a distance of about 23 feet from the TV. When using the remote, always point it directly at the TV. You can also use your remote control to operate your VCR, Cable box, DVD player, or Set-Top Box. 1o O POWER Turns the TV on and off. t_ NUMERIC BUTTONS Press to directly select a channel. _) Press to backlight the VOL CH, _) OPress to select additional channels (digital and analog) being broadcast by the same station.
Installing Batteries in the Remote Control 1 Lift the cover at the back of the remote control upward as shown in the figure. 2 Install twoAAAsize _-_-- 3 _,_ batteries. Make sure to match the "+" and "-" ends of the batteries with the diagram inside the compartment. Do not mix battery types, i.e. alkaline and manganese. Close the cover as shown in the figure. _,_ Remove the batteries and store them in a cool, dry place if you won't be using the remote control for a long time.
Connecting Cable TV To connect to a cable TV system, Cable without 1 follow the instructions a Cable Box Plug the incoming cable into the ANT 2 IN(CABLE) _-- Because this TV is cable-ready, unscrambled cable channels. Find the cable that is connected terminal on the back of the TV. you do not need a cable box to view Connectin=q t£ a Cable Box that Descrambles 1 below. All Channels to the ANT OUT terminal on your cabte box.
Connecting a VCR Video Connection These instructions assume that you have already connected your TV to an antenna or a cable TV system (according to the instructions on pages 9~10). Skip step 1 if you have not yet connected to an antenna or a cable system, 1 Unplug the cabte or antenna from the back of the TV. 2 Connect the cable or antenna to the ANT IN terminal on the back of the VCR.
Connecting a Camcorder The side panel jacks on your TV make it easy to connect a camcorder to your TV. They allow you to view the camcorder tapes without using a VCR Connect a Video Cable TV Side Panel (or S-Video Cable) between the AV tN 2 [VIDEO] (or S-VIDEO) jack on the TV and the VIDEO OUT jack on the Camcorder. / _'i .............. i_'_ -- -- _.amcoraer Connect Audio Cabtes between the AV IN 2 [UAUDIO-R] jacks on the TV and the AUDIO OUT jacks on the Camcorder.
Connecting a DVD PlayedCable Box/Satellite receiver (Set-Top Box) via HDMI This connection can only be made if there is an HDMI Output jack on the external device. This connection will provide the highest quality picture. Connect an HDMI Cable between the HDMI IN 2 on the TV and the HDMI OUT on DVD Player / Cable Box/Satellite the DVD Player/Cable Box/ Satellite receiver (Set-Top Box).
Connecting a Digital Audio System The rear panel jacks on your TV make it easy to connect a Digital Audio System to your TV. 1 Connect an Optical Cable between the DIGITAL AUDIO OUT (OPTICAL) jacks on the TV and the Digital Audio Input (OPTICAL)jacks on the Digital Audio System. When a Digital Audio System is connected to the "DIGITAL AUDIO OUT (OPTICAL)" jack: Decrease the gain (volume) of the TV, and adjust the volume level with the system's volume control.
Operation Turning the TV On and Off Press the POWER button on the remote control. You can also use the POWER button on the TV. It may take a while when your TV starts. [ ........................ Plug & Play Feature When the TV is initially 1 powered On, basic settings proceed automatically and subsequently: Press the POWER button on the remote control. The message Menu language, displayed. Shop Mode, Channels and Time will be set.
The TV wilt begin memorizing all of the available channels. After all the available channels are stored, the Auto program menu reappears. Press the ENTER button when channel memorization is complete. The Clock Mode menu is automatically displayed. _,_ To stop the search before it has finished, press the ENTER button with Stop selected. Press the A or _' button to select Manual if you want to set the current time manually, then press the ENTER button. Set current date and time. is displayed.
_ou want to reset this feature... 1 Press the MENU button to display the menu. Press the A or T button to select Setup, then press the ENTER button. 2 Press the ENTER button to select Plug & Play. For further details on setting up options, refer to the page 15~16. _,_ The Plug & Play feature is only available in the TV and DTV mode. Changing Channels _the Channel Buttons Press the CH A or CH v _the 1 Number [_____[[ .................. 2:::_JL___Jl__ ........... _r- Buttons --'L_---t:j.......
Adjusting the Volume the Volume 1 Buttons Press the VOL + or VOL - button to increase or decrease the votume. Using the Mute Button At any time, you can cut off the sound using the MUTE button. 1 Press MUTE and the sound cuts off. The word "Mute" win appear in the lower-left corner of the screen. 2 To turn mute off, press the MUTE button again, or simply press the VOL + or VOL - button.
Memorizing the Channels Your TV can memorize and store all of the available channels for both air and cable channels. After the available channels are memorized, use the CH A or CH v button to scan through the channels. This eliminates the need to change channels by entering the channel digits. There are three steps for memorizing channels: selecting a broadcast source, memorizing the channels (automatic) and adding and deleting channels (manual).
Setting Up Your Remote Control After your remote control has been properly set up, your remote control can operate in five different modes: TV, VCR, Cable, DVD, or Set-Top Box. Pressing the corresponding button on the remote control allows you to switch among these modes, and control whichever piece of equipment you choose. _-- The remote control might not be compatible with all DVD Players, VCRs, Cable boxes, and Set-Top Boxes.
Setting _ the Remote to _erate Your DVD 1 Turn off your DVD. 2 Press the DVD button on your TV's remote control. 3 Press the SET button on your TV's remote control. 4 Using the number buttons on your remote control, enter three digits of the DVD code listed on page 24 of this manual for your brand of DVD. Make sure you enter three digits of the code, even if the first digit is a '0". (If more than one code is listed, try the first one.) 5 Press the POWER button on the remote control.
Remote Control Codes VCR Brand SAMSUNG ADMIRAL AIWA AKAI AUDIO DYNAMICS BELL&HOWELL BROKBONIC CANDLE CANON CITIZEN COLORTYME CRAIG CURTISMATHES DAEWOO DB DIMENSIA DYNATECH ELECTROHOME EMERSON FISHER FUNAI GENERALELECTRIC GOVIDEO LG(Goldstar) HARMANKARDON HITACHI INSTANTREPLAY JC PENNEY JCL KENWOOD KLH LLOYD LOGIK LXl JVC MAGNAVOX MARANTZ MARTA KONIA ORLON MEI MEMOREX MGA MIDLAND MINOLTA Code 000 001002 003004 005077078 079 020 025 004 027032 007 026 018 022 002 003006 008015 055 021 056 002 003006 008015
CABLE BOX Brand SAMSUNG GI HAMLIN HITACHI JERROLD MACOM MAGNAVOX OAK PANASONIC PHILIPS PIONEER RCA REGAL Code 0% 001002 003004 005006007 041 003 024031 025 030 038 039 025 030 019 023028 026 003 022027 037044 019 021023 028 004 018020 044 014 022040 003 Brand REGENCY SA SCIENTIFICATLAN SPRUCER STARGATE2000 SYLVANIA TEXSCAN TOCOM UNIVERSAL VIEWSTAR WARNERAMEX ZENITH Code 015023 042043 042043 022 036 016 016 032 033034 019021 023028 046 017029 035037045 8AMBUNG BET-TOP BOX Product GroundwaveSTB CABLESTB S
8AMSUNG DVD Product DVD DVDR BDRecord VCR COMBO VCR Record DHRCOMBO Code 0% 001 002 003004 005006 007008 009010 011 012 013 Product HomeTheaterVCRCOMBO HDDRecordCOMBO TWINTRAYCOMBO STB DVDCOMBO DVDReceiver AVReceiver Code 014015 016 017 018 019 020 021 DVD Brand ANAM AUDIOVOX AUDIOLOGIC ANABA APEX DIGITAL AIWA BROKSONIC BLAUPUNKT B&K CURTISMATHES CYBERHOME CLARION CIRRUS CINEVlSlON DAEWOO DENON FARENHEIT FISHER GPX GOVIDEO GE GREENHILL HITACHI I-tlTEKER HOYO I-tARMAN/ KARDON IRT INTEGRA JBL JVC JATON KE
To Select the Source Use to select TV or other external input sources such as DVD players or Cable Box/Satellite receivers (Set-Top Box) connected to the TV. Use to select the input source of your choice. 1 Press the MENU button to display the menu. Press the A or T button to select input, then press the ENTER button. 2 Press the ENTER button to select Source List. Press the A or _ button to select the signal source, then press the ENTER button.
i Picture Control Using Automatic Picture Settings Your new Plasma TV gives you optimal control over the picture you're watching. You can change the screen size, improve the image quality, even watch something else without turning off what you're currently watching. Please be aware that the best picture on this TV will be obtained from High Definition (HD) sources such as Digital cable or DVD players.
5 Press the A or T button to select Color Tone, then press the ENTER button. Press the ,_ or T button to select 0ool2, then press the ENTER button. Cool1, Normal, _,_ When the picture mode is set to Dynamic cannot be selected. Resetting 7 the Picture Settings to the Factory or Standard, Warm1, or Warm2, Warm1 and Warm2 Defaults Press the A, or T button to select Reset, then press the ENTER button. Press the A or T button to select OK, then press the ENTER button. Press the EXIT button to exit.
Changing the Screen Size Occasionally, you may want to change the size of the image on your screen. Your TV comes with six screen size options, each designed to work best with specific types of video input. Your cable box or satellite receiver may have its own set of screen sizes as well. in general you should view the TV in 16:9 mode as much as possible. 1 Press the MENU button to display the menu. Press the ENTER button to select Picture.
Making Detailed Picture Settings Samsung's new TVs allow you to make even more precise picture settings than previous models. See below to make Detailed picture settings. 1 Press the MENU button to display the menu. Press the ENTER button to select Picture. 2 Press the A or T button to select Detailed button. 3 Select the desired Detailed Settings option by pressing the A or _' button, then press the ENTER button. 4 When you are satisfied with your setting, press the ENTER button.
Ed_ Enhancement: You can emphasize xvYCC: Off/On object boundaries. Off/On Setting the xvYCC mode to On increases detail and color space when watching movies from an external device (ie. DVD ptayer) connected to the HDMt or Component IN jacks.You must set the Picture Mode to Movie to enjoy this feature. The xvYCC function works only in Component or HDMI mode. Active Color if you turn on this option, the blue and green colors wi!! be more vivid. 1 Press the MENU button to display the menu.
Selecting the Film Mode Automatically senses and processes film signals from all sources and adjusts 1 Press the MENU button to display the menu. Press the A or T button to select Setup, then press the ENTER button. 2 Press the A or _' button to select Film Mode, then press the ENTER button. 3 Press the A or _' button to select Off or On, then press the ENTER button. the picture for optimum quality. Press the EXIT button to exit.
Viewing Picture=in-Picture This product has one built-in tuner, which does not allow PiP to function in the same mode. For example, you cannot watch one TV channel in the main screen, and a different one in the PiP screen. Please see 'PiP Settings' below for details. You can use the PiP feature to simultaneously watch two video sources. (See page 37 to select the PiP picture sound.) _,_ While the V-Chip is in operation, the PiP function cannot be used.
Chan_ the Position of the PIP Window Press the A. or T button to select Position, then press the ENTER button. Press the A or T button to select the desired PIP window position, then press the ENTER button. In Double Window ( rT'] ) and Double Wide ( _ be selected. ) modes, Position cannot If the PIP window is set to Double Window ( rT1 ) or Double Wide ( _ ) mode, the screen size or alignment may slightly differ depending on the signal type.
i Sound Control Using Automatic Sound Settings Your TV has automatic sound settings ("Standard", "Music", "Movie", "Speech", and "Custom") that are preset at the factory. Or you can select "Custom", which automatically recalls your personalized sound settings. 1 Press the MENU button to display the menu. Press the A or _' button to select Sound, then press the ENTER button. 2 Press the ENTER button to select Mode. Press the A or T button to select Standard, Music, Movie, Speech, ENTER button.
Setting the TruSurround XT TruSurround XT is a patented SRS technology that solves the problem of playing 5.1 multichannel content over two speakers. TruSurround delivers a compelling, virtual surround sound experience through any two-speaker playback system, including internal television speakers, it is fully compatible with all multi channel formats. 1 Press the MENU button to display the menu. Press the ,& or T button to select Sound, then press the ENTER button.
Choosing a Multi-Channel Depending Sound (MTS) Track =Analog on the par{ioular program being broadcast, you can listen to Mono, Stereo or SAP. Multi-Track Sound 1 Press the MENU button to display the menu. Press the A or T button to select Sound, then press the ENTER button. 2 Press the A or T button to select Multi-Track button. Options, 3 Press the ENTER button to select Multi-Track Sound. then press the ENTER Press the A or _' button to select a setting you want, then press the ENTER button.
Press the A or T button to select Off or On, then press the ENTER button. Press the EXIT button to exit. _,_ • When Internal Mute is set to On, Sound menus except Multi-track Options cannot be adjusted. • The left/right audio outputs and digital audio outputs (Optical) remain enabled. • The VOL +, VOL = and MUTE buttons do not operate when the Internal Mute is set to On. Mute Sound Output Sound Output Adjusting the TV On/Off Melody Sound The TV power on/off melody sound volume can be adjusted.
j Channel Control Selecting the Antenna 1 Press the MENU button to display the menu. Press the A or T button to select Channel, then press the ENTER button. 2 Press the ENTER button to select Antenna. Press the A or T button to select Air or Cable, then press the ENTER button. Press the EXIT button to exit. Press the ANTENNA button on the remote control to select Air or Cable. If the an[enna _sconnected to ANT1 IN(AIR/. select Air and _fit is connected to ANT2 IN CABLE. select CabJe.
Press the _,/T/4/_ENTER button. buttons to select a channel to delete, then press the Press the A or T button to select Delete, then press the ENTER button to delete the channel. Press the EXIT button to exit. ,. RMODE (RED) button! Press repeatedly to select All, Added, Or Favorite. = ,, &MODE (GREEN) button: Press to add all channels deleted. • STILL (YELLOW) button: Press to delete all channels memorized. Setting Your Favorite Channels You can set channels you watch frequently as favorites.
Viewing the Channel Lists You can display a list of al! channels, added channels or your favorite channels. 1 Press the MENU button to display the menu. Press the A or T button to select Channel, then press the ENTER button. 2 Press the A or T button to select Channel List, then press the ENTER button. Press the A or T button to select All, Added ENTER button. or Favorite, then press the To toggle between your all channels, add channels, P.MODE(RED) button on the remote control.
Labeling Channels Channels 1 can labeled so that their cal! letters appear whenever the channel is selected. Press the MENU button to display the menu. Press the ,i_ or T button to select Channel, then press the ENTER button. Press the A or T button to select Name, then press the ENTER button. 2 3 Press the A or T button to select the channel to be assigned a new name, then press the ENTER button.
Checking the Digital-Signal Strength Unlike analog channels, which can vary in reception quality from "snowy" to clear, digital (HDTV) channels have either perfect reception quality or you will not receive them at all. So, unlike analog channels, you cannot fine tune a digital channel. You can, however, adjust your antenna to improve the reception of available digital channels. 1 Press the MENU button to display the menu. Press the A or T button to select Channel, then press the ENTER button.
PC Display Using Your TV as a Computer (PC) Display Settin U Your PC Software Based on Windows The Windows display-settings for a typical computer are shown below. The actual screens on your PC will probably be different, depending upon your particular version of Windows and your particular video card. However, even if your actual screens took different, the same basic set-up information wilt apply in almost alt cases. (If not, contact your computer or Video Card manufacturer.
Setting up the TV with your PC Use the Auto Adjust function to have the TV set automatically adjust the video signals it receives from the PC. The function also automatically fine-tunes the settings and adjusts the frequency values and positions. How to Auto Adjust 1 Press the MENU button to display the menu. Press the A or 'lr button to select Setup, then press the ENTER button. Press the A or T button to select PC, then press the ENTER button.
the Screen Position You can adjust the position of the screen after connecting the TV to your PC. _-- Change to the PC mode first. 1 Press the MENU button to display the menu. Press the A or T button to select Setup, then press the ENTER button. Press the A or T button to select PC, then press the ENTER button. 2 Press the A or T button to select Position, then press the ENTER button. 3 Press the _, or T button to adjust the V-Position. Press the 4 or _ button to adjust the H-Position.
i Time Setting Setting the Time Setting the clock is necessary in order to use the various while watching the TV. (Just press the INFO button.) Ojotion 1: Settingthe timer features of the TV. Also, you can check the time Clock Manually 1 Press the MENU button to display the menu. Press the A or T button to select Setup, then press the ENTER button. Press the A or _' button to select Time, then press the ENTER button. 2 Press the ENTER button to select Clock.
the Clock Automatically The Clock can be set automatically if you are receiving a digital signal. 1 Press the MENU button to display the menu. Press the A. or T button to select Setup, then press the ENTER button. Press the A or T button to select Time, then press the ENTER button. 2 Press the ENTER button to select Clock. 3 Press the ENTER button to select Clock Mode. Press the A or T button to select Auto, then press the ENTER button.
Setting theOn/Off Use this feature the clock first. Timer to set the TV to turn on or off at a desired time. You must set Press the MENU button to display the menu. Press the A or T button to select Setup, then press the ENTER button. Press the A or T button to select Time, then press the ENTER button. Press the A or T button to select Timer1, Timer2,or Timer& then press the ENTER button. The timer menu is displayed.
Function Description Selecting a Menu Language 1 Press the MENU button to display the menu. Press the ,_ or T button to select Setup, then press the ENTER button. Press the A or T button to select Language, then press the ENTER button. 2 Press the A or V' button to select the appropriate or Frangais, then press the ENTER button. language: English, EspaSol, Press the EXIT button to exit.
Viewing Closed Captions (On-Screen Text Messages) - Digital The Digital Captions function operates on digital channels. 1 Press the MENU button to display the menu. Press the A or T button to select Setup, then press the ENTER button. 2 Press the A or T button to select Caption, then press the ENTER button. 3 Press the ENTER button to select Caption. Press the A or T button to select On, then press the ENTER button. 4 Press the A or T button to select Caption Mode, then press the ENTER button.
Viewing Closed Captions (On-Screen Text Messages) -Analog The Analog Caption function operates in either analog TV channel mode or external signal mode. (Depending on the broadcasting signal, the Analog Caption function may operate on digital channels.) 1 Press the MENU button to display the menu. Press the A or T button to select Setup, then press the ENTER button. 2 Press the A or T button to select Caption, 3 Press the ENTER button to select Caption.
Menu Transparency Level Adjusts the transparency of the menu screen. 1 Press the MENU button to display the menu. Press the A or _' button to select Setup, then press the ENTER button. 2 Press the A or _' button to select Menu Transparency, then press the ENTER button. 3 Press the A or _' button to select level, then press the ENTER button. Press the EXIT button to exit. Setting the Light Effect You can turn the blue LED on the front of your TV on/off. 1 Press the MENU button to display the menu.
Using the Energy Saving Feature This feature adjusts the power consumption of the unit in order to save energy. 1 Press the MENU button to display the menu. Press the A or T button to select Setup, then press the ENTER button. 2 Press the A or T button to select Energy button. Saving, then press the ENTER Press the ,& or T button to select Off, Low, Medium, or High, then press the ENTER button. Press the EXIT button to exit. , Low: Operatesin standard mode.
Reducing the Effects of Screen Burn if screen burn has occurred, you can select a white screen or scrolling to help remove screen burn artifacts. 1 Press the MENU button to display the menu. Press the A or _' button to select Setup, then press the ENTER button. 2 Press the ,& or _' button to select Screen Burn Protection, ENTER button. 3 Press the A or _' button to select White, then press the ENTER button. Press the EXiT button to exit.
Using the V-Chip U.S.A Only This product is covered by the following U.S. patents : US4,930_158 US4,930_160 The V-Chip feature automatically locks out programs that are deemed inappropriate for children. The user must enter a PiN (personal ID number) before any of the V-Chip restrictions are set up or changed. _,_ When the V-Chip feature is activated, the PIP features do not function. _,_ V-Chip function is not available in HDMI or component mode.
How to Set u Restrictions Usin "TV Parental Guidelines" First, set up a personal identification number (PIN), and enable the V-Chip. (See previous section.) Parental restrictions can be set up using either of two methods: The TV guidelines or the MPAA rating. 1 Press the MENU button to display the menu. Press the A or T button to select Setup, then press the ENTER button. 2 Press the A or T button to select V-Chip, then press the ENTER button. The message Enter PIN wilt appear.
6 How to set the FV, D, L, S and V sub-ratings. First, select one of these TVRatings: TV-Y, TV-Y7, TV-G, TV-PG, TV-14, or TV-MA (See Step 4), and press the ENTER button. The "_" symbol will be displayed for each sub-rating. While "@" is selected, press the I_ button to go to a sub rating. Press the ENTER to block the sub rating. To select a different TV-Rating, press the A or T button and then repeat the process. 7 Press the EXIT button to clear all the screens.
Now to Set u Restrictions Usin "Canadian En_for Canada Models) 1 Press the MENU button to display the menu. Press the A or T button to select Setup, then press the ENTER button. 2 Press the A or T button to select V-Chip, then press the ENTER button. The message Enter PiN wilt appear. Enter your 4 digit PIN number. 3 The V-Chip screen will appear. Press the A or T button to select Canadian English, then press the ENTER button Press the A or T button to select an appropriate restriction.
How to Set _ Restrictions Usin_q"Canadian French" (for Canada Models) 1 Press the MENU button to display the menu. Press the ,& or T button to select Setup, then press the ENTER button. 2 Press the A or T button to select V-Chip, then press the ENTER button. The message Enter PIN will appear. Enter your 4 digit PIN number. 3 The V-Chip screen will appear. Press the A or T button to select Canadian French, then press the ENTER button. Press the _, or T button to select an appropriate restriction.
Usin theV-Chi for Di italchannels Parental restriction information can be used while watching DTV channels. 1 Press the MENU button to display the menu. Press the A or T button to select Setup, then press the ENTER button. 2 Press the A or T button to select V-Chip, then press the ENTER button. The message Enter PIN will appear. Enter your 4 digit PIN number. 3 The V-Chip screen will appear. Press the A or T button to select Downloadable U.S. Rating, then press the ENTER button.
Upgrading the Software Samsung may offer upgrades for your TV's firmware in the future. Please contact the Samsung call center at 1-800-SAMSUNG to receive information about downloading upgrades and using a USB drive. Upgrades will be possible by connecting a USB drive to the USB port located on the side of your TV. 1 Insert a USB drive containing on the side of the TV. 2 Press the MENU button to display the menu.
i WiSELiNK Using the WiSELiNK Function This function enables you to view and listen to photo (BASELINE, JPEG) and audio flies (MP3) saved on a USB Mass Storage Class device. insert a USB device containing JPEG and/or MP3 files into the WISELINK jack (USB jack) on the side of the TV. TV Side Panel USB (Not supplied) @ S-VIDe( ® WDE_ _,_ WISELINK only supports USB Mass Storage Class devices (MSC). MSC is a Mass Storage Class Bulk-Only Transport device.
Using the WISELINK Mode 1 Press the MENU button to display the menu. Press the ENTER button to select input. Press the A or T button to select WISELINK, then press the ENTER button. Press the A or T button to select a corresponding the ENTER button. memory device, then press A menu for selecting the Photo or Music files or setup function on a selected memory device wilt be displayed. The WISELINK menu differs depending connected to TV.
Using the Photo (JPEG) List You can play back the JPEG flies saved on a memory device in various 1 After switching the mode to WISELINK, inserted. (Refer to page 63) 2 Press the ,,1 or I_ button to select Photo, then press the ENTER button. JPEG files and existing folders are displayed. Press the A/T/4/I_ ways. select the memory device that you have buttons to select a file, then press the ENTER button.
Usin theO tions Menu Slide Show: Starts a slide show. (Refer to Viewing a Slide Show on page 66) Rotate: You can rotate images in full screen mode. Images are rotated in the order of 90 °, 180 °, 270 ° and 0 ° (original state). (Refer to Rotating on page 68) _-- You cannot save a rotated image. It may take tong time to rotate the large-size file. Zoom: You can zoom into images in full screen mode. Images are zoomed in the order of X2, X4 and Xl (original size).
_a Slide Show 1 After switching the mode to WISEUNK, inserted. (Refer to page 63) select the memory device that you have 2 Press the 4 or _- button to select Photo, then press the ENTER button. JPEG files and existing folders are displayed. 3 Press the INFO button to display the option (Slide Show, file). 4 Press the A or T button to select Slide Show, then press the ENTER button. Cancel the selected _-- The Slide show displays all JPEG files in the selected folder at a preset speed.
Usin the Menu durin a Slide Show Slide Show Speed: Setect to control the Slide Show Speed. Each time the ENTER button is pressed, the speed changes (Normal _ Slow -_ Fast) repeatedly. Background Music: Select to choose whether you want to play MP3 files during a slide show. Each time the ENTER button is pressed, the background music activation changes repeatedly. (On _ Off) Background Music Setting: While the slide show is in progress, MP3 files and folders under the same directory are displayed.
Rotatin=q, 1 After switching the mode to WISELINK, inserted. (Refer to page 63) select the memory device that you have 2 Press the ,,1 or !1_button to select Photo, then press the ENTER button. JPEG files and existing folders are displayed. 3 Press the A/T/,_/I_ buttons to select a file, then press the ENTER button. Pressing the button over a photo icon shows the currently selected photo in full screen. Press the INFO button to display the option (Slide Show, Rotate, Zoom, List).
1 After switching the mode to WISELINK, inserted. (Refer to page 63) 2 Press the _1 or m,-button to select Photo, then press the ENTER button. JPEG files and existing folders are displayed. 3 Press the A/T/4/I_ buttons to select a file, then press the ENTER button. Pressing the button over a photo icon shows the currently selected photo in full screen.
Using the Music (MP3) List You can play back the MP3 flies saved on a memory device in various ways. 1 After switching the mode to WISEUNK, inserted. (Refer to page 63) select the memory device that you have 2 Press the 4 or I_ button to select Music, then press the ENTER button. MP3 files and existing folders are displayed. Press the A or T buttons to select a file to be played, then press the ENTER button.
Using the Setup Menu Setup displays the user settings of the WISELINK menu 1 After switching the mode to WISELINK, inserted. (Refer to page 63) select the memory device that you have 2 Press the 4 or _,- button to select Setup, then press the ENTER button. The Setup menu is displayed. 3 Press the ,_ or T button to select an item you want, then press the ENTER button. 4 Press the ,_ or T button to select the option, then press the ENTER button.
i About Anynet+ What is Anynet+? Anynet+ is a function that enables Samsung TV's remote. Connecting you to control all connected Samsung devices that support Anynet+ with your Anynet + Devices The Anynet+ system can be used only with Samsung devices Samsung device has this feature, check if there is an Anynet+ that have the Anynet+ logo on it. feature.
Setting Up Anynet + The following settings To use the Anynet+ help set the Anynet + functions. Function, AnjLEet+_HDMI-CEC) must be set to On 1 Press the Anynet + button. Press the A or T button to select Setup, then press the ENTER button. 2 Press the ENTER button to select Anynet+ ENTER button. (HDMI-CEC), then press the Press the A or T button to select On, then press the ENTER button. _,_ The Anynet+ (HDMI-CEC) _-- If you select Off, Anynet+ function is enabled.
Anynet + Menu The Anynet + menu changes depending on the type and status of the Anynet + devices connected Anynet + Menu to the TV. Description View TV Switches from Anynet + to TV broadcast mode. Record Starts a recording. (This menu works only for a device supporting recording.) (Device_Name) Menu Shows the menu of the connected device. Example: When a DVD Recorder is connected, the DVD Recorder's title menu appears. (Device_Name) Operation Shows the play control menu of the connected device.
Listening through a Receiver (Home theater) You can listen to sound through a receiver instead of the TV speaker. 1 Press the Anynet + button. Press the A or T button to select Receiver, then press the ENTER button. 2 Press the 4 or _- button to select to On, then press the ENTER button. Now you can listen to sound through the receiver. 3 Press the EXIT button to exit. When the receiver (home theater) is set to On, you can hear sound output from the TV's Optica( jack.
i Appendix Troubleshooting if the TV seems to have a problem, first try this list of possible problems and solutions. if none of these troubleshooting tips apply, call your nearest Samsung service center. Problem Possible Solution Poor picture quatlty. Try another channel. Adjust the antenna. Check all wire connections. Poor sounc quaH[y Try another channel. AciiUStthe aa!er!na: Try another channel. Press the SOURCE button. Make sure the TV is plugged in. Check the antenna connections.
Auto Wall-mount adjustment (Sold separately) (FP=T5084) Once the auto wall mount is installed, the position of your TV can be easily adjusted. Auto Wall=Mount TV Rear Panel ;3 f J i m EX-UNK Cable (Not supplied) Entering the menu 1 Press the MENU button to display the menu. Press the A or T button to select Setup, then press the ENTER button. 2 Press the A or T button to select Wall=Mount ENTER button. 3 Adjust to the desired position using the A/Y/4/_ Adjustment, then press the buttons.
Wall Mount Kit Specifications (VESA) Install your wall mount on a solid wall perpendicular to the floor. When attaching to other building materials, please contact your nearest dealer. If installed on a ceiling or slanted wall, it may fall and result in severe personal injury. Product Family inch VESA Spec. (A* B) Standard Screw 23 ~ 26 200.
How to attach the Stand-Base Using the screws for securing the stand base and the monitor, firmly attach the monitor to the stand base. (The exterior of the set may be different from the picture.) FP-T5084/FP-T5884 When mounting your TV on a wall, install the cover (O) on the stand-base using two screws. FP-T6374 Warning Firmly secure the stand to the TV before moving it, as the stand may fall and could cause serious injury. _,_ Two or more people should carry the TV.
Dimensions (FP-T5084) 5O 8 444 436 , \ TOP VIEW FRONT VIEW JACK PANEL DETAIL 2.3"H x 18.8"W @ 5.
Dimensions (FP-T5884) 577 TOP VIEW FRONT VIEW JACK PANEL DETAIL 2.3"H x 18.8"W @ 5.
Dimensions (FP-T6374) 6O 2 55 6 54 8 356 TOP VIEW FRONT ViEW JACK PANEL DETAIL 2.3"H x 18.8"W @ 5.8" UP FROM BOTTOM 34 266 = (- 8£[]I ;0_¢ } .
Contact SAMSUNG WORLD-WIDE If you have any questions or comments relating to Samsung products, please contact the SAMSUNG customer care center. Communiquez avec SAMSUNG WORLD-WIDE Pour toute question ou commentaire se rapportant aux produits Samsung, veuiltez communiquer avec te centre de service a la clientele SAMSUNG. Contacte con SAMSUNG WORLD-WIDE Si tiene atguna pregunta o comentario referente a nuestros productos, per favor contacte con nuestro Servicio de Atenci6n al Cliente. CANADA U.S.