
User Manual (ver.1.0)

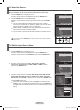
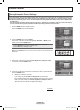
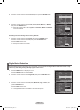

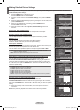
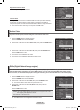
Table Of Contents
- Important Warranty Information Regarding Television Format Viewing
- User Instructions
- Contents
- General Information
- Connections
- Connecting VHF and UHF Antennas
- Connecting Cable TV
- Connecting a VCR
- Connecting a Camcorder
- Connecting a DVD Player/Cable Box/Satellite receiver (Set-Top Box)
- Connecting a DVD Player/Cable Box/Satellite receiver (Set-Top Box) via HDMI
- Connecting a DVD Player/Cable Box/Satellite receiver (Set-Top Box) via DVI
- Connecting a Digital Audio System
- Connecting an Amplifier/DVD Home Theater
- Connecting a PC
- Operation
- Picture Control
- Sound Control
- Using Automatic Sound Settings
- Customizing the Sound
- Setting the TruSurround XT
- Choosing a Multi-Channel Sound (MTS) Track - Digital
- Choosing a Multi-Channel Sound (MTS) Track - Analog
- Automatic Volume Control
- Selecting the Internal Mute
- Adjusting the TV On/Off Melody Sound
- Listening to the Sound of the Sub (PIP) Picture
- Channel Control
- PC Display
- Time Setting
- Function Description
- Selecting a Menu Language
- Using the Game Mode
- Viewing Closed Captions (On-Screen Text Messages) - Digital
- Viewing Closed Captions (On-Screen Text Messages) - Analog
- Menu Transparency Level
- Setting the Light Effect
- Using the Energy Saving Feature
- Preventing Screen Burn-in
- Reducing the Effects of Screen Burn
- Setting the Function Help
- Using the V-Chip
- Upgrading the Software
- WISELINK
- About Anynet+
- Appendix

English - 27
5 Press the ▲ or ▼ button to select Color Tone, then press the ENTER button.
6 Press the ▲ or ▼ button to select Cool2, Cool1, Normal, Warm1, or Warm2,
then press the ENTER button.
➢
When the picture mode is set to Dynamic or Standard, Warm1 and Warm2
cannot be selected.
Resetting the Picture Settings to the Factory Defaults
7 Press the ▲ or ▼ button to select Reset, then press the ENTER button.
Press the ▲ or ▼ button to select OK, then press the ENTER button.
Press the
EXIT button to exit.
➢
Each picture mode can be reset.
Digital Noise Reduction
If the broadcast signal received by your TV is weak, you can activate the Digital Noise Reduction feature to help
reduce any static and ghosting that may appear on the screen.
1 Press the MENU button to display the menu.
Press the ENTER button to select Picture.
2 Press the ▲ or ▼ button to select Digital NR, then press the ENTER button.
3 Press the ▲ or ▼ button to select Off, Low, Mediunm, High, or Auto, then
press the ENTER button.
Press the
EXIT button to exit.
➢
The Digital NR function is available in all modes except PC.
▲
More
Color Tone : Cool1
►
Detailed Settings
►
Size : 16:9
►
Digital NR : Auto
►
Active Color : On
►
DNIe : On
►
Reset : OK
►
PictureT V
Enter
Move
Return
▲
More
Color Tone : Cool1
Detailed Settings
Size : 16:9
Digital NR : Auto
Active Color : On
DNIe : On
Reset : OK
PictureT V
Enter
Move
Cool2
Cool1
Normal
Warm1
Warm2
Return
▲
More
Color Tone : Cool1
Detailed Settings
Size : 16:9
Digital NR : Auto
Active Color : On
DNIe : On
Reset :
PictureT V
Enter
Move
OK
Cancel
Return
▲
More
Color Tone : Cool1
►
Detailed Settings
►
Size : 16:9
►
Digital NR : Auto
►
Active Color : On
►
DNIe : On
►
Reset : OK
►
PictureT V
Enter
Move
Return
▲
More
Color Tone : Cool1
Detailed Settings
Size : 16:9
Digital NR : Auto
Active Color : On
DNIe : On
Reset : OK
PictureT V
Off
Low
Medium
High
Auto
Enter
Move
Return
BN68-01183Z-00Eng.indb 27 2007-07-02 ¿ÀÈÄ 4:28:17