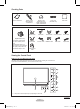
DLP TV Owner’s Instructions HL-T5076S HL-T5676S HL-T6176S Register your product at www.samsung.com/global/register Record your Model and Serial number here for future reference. ▪ Model _______________ ▪ Serial No. _______________ BP68-00630B-Eng_1.
A Guide to Digital TV ● What is Digital Television? Digital television (DTV) is a new way of transmitting high quality video and audio to your TV set. Using DTV, broadcasters can transmit high definition TV (HDTV) images, Dolby digital surround audio, and new services such as multicasting (transmitting more than one program on the same TV channel) and datacasting. Several of these services can be combined into a single digital broadcast.
Q&A 1. Is the antenna I use for existing TV reception good enough for DTV? Over-the-air (OTA) digital TV broadcasting uses the same channels as analog TV and works well with many existing TV antennas. However, DTV broadcast channel assignments are different than analog channels. You should find out whether your local DTV broadcasts are on VHF (channels 2-13) or UHF (channels 14-69) to see if you need a different antenna.
Contents CHANNEL CONTROL GENERAL INFORMATION ■ ■ ■ ■ ■ ■ ■ ■ ■ ■ ■ ■ ■ ■ ■ ■ Viewing Position ....................................................... 5 List of Features......................................................... 5 Checking Parts ......................................................... 6 Viewing the Control Panel ........................................ 6 Viewing the Connection Panel ................................. 8 Remote Control ........................................................
General Information Viewing Position To optimize your viewing comfort, please follow the guidelines below for viewing distance. If viewing for an extended period of time, sit as far back from the screen as possible. < Top view> < Side view> 50˝ screen : At least 5.9 feet 56˝ screen : At least 6.6 feet 50˝ screen : At least 5.9 feet 61˝ screen : At least 7.2 feet 61˝ screen : At least 7.2 feet 56˝ screen : At least 6.
Checking Parts Owner’s Instructions Remote Control (BP59-00125A)/ AAA Batteries Warranty Card/ Registration Card/ Safety Guide Manual/ Quick Guide Manual Power Cord (3903-000144A) Cloth-Clean Sold Separately S-Video Cable Video Cable Antenna Cable Component Cables Audio Cables D-Sub Cable PC Audio Cable HDMI/DVI Cable HDMI Cable Optical Cable Replacement Lamp For purchasing a replacement lamp, ask at a nearby service center. • Use authorized lamps only.
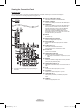
1 SOURCE Toggles between all the available input sources (TV, AV1, AV2, S-Video1, S-Video2, Component1, Component2, PC, HDMI1, HDMI2, or HDMI3/DVI). 2 MENU Press to see an on-screen menu of your TV’s features. 3 + VOL – Press to increase or decrease the volume. In the on-screen menu, use the + VOL – buttons as you would use the ◄ and ► buttons on the remote control. 4 ➢ 5 (ENTER) Press to confirm a selection. 6 POWER Press to turn the TV on and off.
Viewing the Connection Panel Side Panel Jacks Use the side panel jacks to connect A/V components that will be connected continuously, such as VCR or DVD players. For more information on connecting equipment, see pages 10~16. 1 ANT 1 IN (CABLE)/ANT 2 IN (AIR) 75Ω Coaxial connector for Air/Cable Network. 2 HDMI IN 1, HDMI IN 2 Connect to the HDMI jack of a device with HDMI output. 3 HDMI3/DVI IN Connect to the HDMI jack of a device with HDMI output.
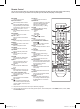
Remote Control You can use the remote control up to a distance of about 23 feet from the TV. When using the remote, always point it directly at the TV. You can also use your remote control to operate your VCR, Cable box, DVD player, or Set-Top Box. 1 POWER Turns the TV on and off. 2 Numeric Buttons Press to directly select a channel. 3 – Press to select additional channels being broadcast by the same station. For example, to select channel “54-3”, press “54”, then press “–” and “3”.
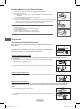
Installing Batteries in the Remote Control 1 2 3 ➢ Lift the cover at the back of the remote control upward as shown in the figure. Install two AAA size batteries. ➢ ● Make sure to match the “+” and “–” ends of the batteries with the diagram inside the compartment. ● Do not mix battery types, i.e. alkaline and manganese. Close the cover as shown in the figure. ➢ Remove the batteries and store them in a cool and dry place if you won’t be using the remote control for a long time.
Connecting Cable TV To connect to a cable TV system, follow the instructions below. Cable without a Cable Box 1 Plug the incoming cable into the ANT 1 IN (CABLE) terminal on the side of the TV. ➢ Because this TV is cable-ready, you do not need a cable box to view unscrambled cable channels. Connecting to a Cable Box that Descrambles All Channels 1 2 Find the cable that is connected to the ANT OUT terminal on your cable box. ➢ This terminal might be labeled “ANT OUT”, “VHF OUT” or simply, “OUT”.
Connecting a VCR Video Connection These instructions assume that you have already connected your TV to an antenna or a cable TV system (according to the instructions on pages 10~11). Skip step 1 if you have not yet connected to an antenna or a cable system. 1 Unplug the cable or antenna from the side of the TV 2 Connect the cable or antenna to the ANT IN terminal on the side of the VCR.
Connecting a Camcorder The side panel jacks on your TV make it easy to connect a camcorder to your TV. They allow you to view the camcorder tapes without using a VCR 1 2 ➢ ➢ Connect a Video Cable or S-Video Cable between the AV IN 1 [VIDEO] or [S-VIDEO] (or AV IN 2 [VIDEO] or [S-VIDEO]) jack on the TV and the VIDEO OUT (or S-VIDEO OUT) jack on the camcorder. Connect Audio Cables between the AV IN 1 [L-AUDIO-R] (or AV IN 2 [L-AUDIO-R]) jacks on the TV and the AUDIO OUT jacks on the camcorder.
Connecting a DVD Player/Set-Top Box via HDMI This connection can only be made if there is an HDMI Output jack on the external device. 1 Connect an HDMI Cable between the HDMI IN 1 (or HDMI IN 2) on the TV and the HDMI OUT jack on the DVD Player/Set-Top Box. TV Side Panel DVD Player/ Set-Top Box 1 HDMI Cable(Not supplied) What is HDMI? ● HDMI, or high-definition multimedia interface, is a next-generation interface that enables the transmission of digital audio and video signals using a single cable.
Connecting a Digital Audio System The side panel jacks on your TV make it easy to connect a Digital Audio System to your TV. 1 ➢ ➢ Connect an Optical Cable between the DIGITAL AUDIO OUT (OPTICAL) jack on the TV and the Digital Audio Input jack on the Digital Audio System. When a Digital Audio System is connected to the DIGITAL AUDIO OUT (OPTICAL) terminal: Decrease the volume of the TV, and adjust the volume level with the audio system’s volume control.
Connecting a PC Using the D-Sub Cable 1 2 Connect a D-Sub Cable between the PC IN [PC] jack on the TV and the PC output jack on your computer. Connect a PC Audio Cable between the PC IN [AUDIO] jack on the TV and the Audio Out jack of the sound card on your computer.
Plug & Play Feature When the TV is initially powered on, basic settings proceed automatically and subsequently: 1 Press the POWER button on the remote control. The message Menu language, Shop Mode, Channels and Time will be set. is automatically displayed. Press the ENTER button, then the message Select the language of the OSD. is displayed. 2 Press the ◄ or ► button to select a language, then press the ENTER button. 3 Press the ◄ or ► button to select Shop or Home, then press the ENTER button.
Setting the Clock Automatically 9 Plug & Play Press the ◄ or ► button to select Off or On, then the ENTER button. The message Select the time zone in which you live. is displayed. 10 Press the ▲ or ▼ button to highlight the time zone for your local area (and to move the highlight to the appropriate time zone on the map of the United States). Press the ENTER button. If clock is not automatically set, see pages 43~44 to set the clock. 11 The message Enjoy your watching. is displayed.
Adjusting the Volume Press the VOL + or VOL – button to increase or decrease the volume. Using the Mute Button At any time, you can cut off the sound using the MUTE button. 1 2 Press the MUTE button and the sound cuts off. The word Mute is displayed on the screen. To turn mute off, press the MUTE button again, or simply press the VOL + or VOL – button. Viewing the Display The display identifies the current channel and the status of certain audio-video settings.
Navigating Menus by Using the Menu Map Using the Menu Map of the main menu enables you to view all menus and select a function quickly. You can select any menu by using the menu map. 1 2 3 4 Press the MENU button. The main menu will appear at the bottom of the screen. Press the ◄ or ► button to select Menu Map, then press the ENTER button. The menu map will appear. Press the ▲/▼/◄/► button to select a menu, then press the ENTER button. The selected menu will appear.
Storing Channels in Memory (Automatic Method) 3 4 5 6 Press the ▲ or ▼ button to select Auto Program, then press the ENTER button. Press the ◄ or ► button to select an antenna connection, then press the ENTER button. ➢ Air: “Air” antenna signal. Cable: “Cable” antenna signal. Air+Cable: “Air” and “Cable” antenna signals. ➢ If the antenna is connected to ANT 1 IN (CABLE), select Cable and if it is connected to ANT 2 IN (AIR), select Air.
Setting Up the Remote to Operate Your Cable Box 1 2 3 4 5 Turn off your cable box. Press the CABLE button on your TV’s remote control. Press the SET button on your TV’s remote control. Using the number buttons on your remote control, enter three digits of the cable box code listed on page 24 of this manual for your brand of cable box. Make sure you enter three digits of the code, even if the first digit is a “0”. (If more than one code is listed, try the first one.
Remote Control Codes VCR Brand SAMSUNG ADMIRAL AIWA AKAI AUDIO DYNAMICS BELL&HOWELL BROKSONIC CANDLE CANON CITIZEN COLORTYME CRAIG CURTIS MATHES DAEWOO DB DIMENSIA DYNATECH ELECTROHOME EMERSON FISHER FUNAI GENERAL ELECTRIC GO VIDEO LG(Goldstar) HARMAN KARDON HITACHI INSTANT REPLAY JC PENNEY JCL KENWOOD KLH LIOYD LOGIK LXI JVC MAGNAVOX MARANTZ MARTA KONIA ORION MEI MEMOREX MGA MIDLAND MINOLTA Code 000 001 002 003 004 005 077 078 079 020 025 004 027 032 007 026 018 022 002 003 006 008 015 055 021 056 002 00
CABLE BOX Brand SAMSUNG GI HAMLIN HITACHI JERROLD MACOM MAGNAVOX OAK PANASONIC PHILIPS PIONEER RCA REGAL Code 000 001 002 003 004 005 006 007 041 003 024 031 025 030 038 039 025 030 019 023 028 026 003 022 027 037 044 019 021 023 028 004 018 020 044 014 022 040 003 Brand REGENCY SA SCIENTIFIC ATLAN SPRUCER STARGATE 2000 SYLVANIA TEXSCAN TOCOM UNIVERSAL VIEWSTAR WARNER AMEX ZENITH Code 015 023 042 043 042 043 022 036 016 016 032 033 034 019 021 023 028 046 017 029 035 037 045 SAMSUNG SET-TOP BOX Product
SAMSUNG DVD Product DVD DVDR BD Record VCR COMBO VCR Record DHR COMBO Code 000 001 002 003 004 005 006 007 008 009 010 011 012 013 Product Home Theater VCR COMBO HDD Record COMBO TWIN TRAY COMBO STB DVD COMBO DVD Receiver AV Receiver Code 014 015 016 017 018 019 020 021 DVD Brand ANAM AUDIOVOX AUDIOLOGIC ANABA APEX DIGITAL AIWA BROKSONIC BLAUPUNKT B&K CURTIS MATHES CYBER HOME CLARION CIRRUS CINEVISION DAEWOO DENON FARENHEIT FISHER GPX GO VIDEO GE GREENHILL HITACHI HITEKER HOYO HARMAN / KARDON IRT INTEGR
To Select the Source Use to select TV or other external input sources such as DVD players, VCRs, etc. connected to the TV. 1 Press the MENU button. Press the ◄ or ► button to select Input, then press the ENTER button. Press the ▲ or ▼ button to select Source List, then press the ENTER button. Input Return Source List Edit Name TV ► Input Enter 2 Press the ▲ or ▼ button to select a signal source, then press the ENTER button.
Picture Control Using Automatic Picture Settings Your TV has three automatic picture settings (“Dynamic”, “Standard”, “Movie”) that are preset at the factory. You can activate a Picture Setting by making a selection from the menu. 1 Press the MENU button. Press the ENTER button to select Picture. Press the ▲ or ▼ button to select Mode, then press the ENTER button.
5 Press the ▲ or ▼ button to select Color Tone, then press the ENTER button. Picture Return Mode Contrast Brightness Sharpness Color G50 Tint Color Tone Detailed Settings Size Dynamic 100 45 75 55 R50 Cool1 16:9 Picture 6 Press the ▲ or ▼ button to select Cool2, Cool1, Normal, Warm1, or Warm2, then press the ENTER button. ➢ When the picture mode is set to Dynamic or Standard, Warm1 and Warm2 cannot be selected.
Making Detailed Picture Settings You can set detailed picture settings. 1 Press the MENU button. Press the ENTER button to select Picture. Press the ▲ or ▼ button to select Detailed Settings, then press the ENTER button. Picture Return Mode Contrast Brightness Sharpness Color G50 Tint Color Tone Detailed Settings Size Standard 80 50 50 50 R50 Cool1 ► 16:9 Picture Enter 2 Select the required option by pressing the ▲ or ▼ button, then press the ENTER button.
Changing the Screen Size You can select the picture size which best corresponds to your viewing requirements. 1 Press the MENU button. Press the ENTER button to select Picture. Press the ▲ or ▼ button to select Size, then press the ENTER button. Picture Return Mode Contrast Brightness Sharpness Color G50 Tint Color Tone Detailed Settings Size Dynamic 100 45 75 55 R50 Cool1 16:9 Picture Enter 2 Press the ▲ or ▼ button to select the screen format you want, then press the ENTER button.
Digital Noise Reduction If the broadcast signal received by your TV is weak, you can activate the Digital Noise Reduction feature to help reduce any static and ghosting that may appear on the screen. 1 Press the MENU button. Press the ENTER button to select Picture. Press the ▲ or ▼ button to select Digital NR, then press the ENTER button.
Setting the Active Color If you turn on this option, the colors of the sky and grass will be stronger and clearer for a more vivid on-screen picture. 1 Press the MENU button. Press the ENTER button to select Picture. Press the ▲ or ▼ button to select Active Color, then press the ENTER button.
Adjusting the Screen Position You can adjust the horizontal and vertical position of the screen. 1 Press the MENU button. Press the ENTER button to select Picture. Press the ▲ or ▼ button to select Position, then press the ENTER button. Picture G50 Tint Color Tone Detailed Settings Size Digital NR DNIe Active Color Color Gamut Position Reset R50 Cool1 16:9 Auto On On Normal ► OK Picture Enter 2 Press the ▲/▼/◄/► button to adjust the screen position. Position ▲ Press the EXIT button to exit.
Customizing the Sound The sound settings can be adjusted to suit your personal preference. (Alternatively, you can use one of the “automatic” settings.) 1 2 Press the MENU button. Press the ◄ or ► button to select Sound, then press the ENTER button. Press the ▲ or ▼ button to select Mode, then press the ENTER button. Mode Return Mode Press the ▲ or ▼ button to select Mode, then press the ENTER button.
Setting the TruSurround XT TruSurround XT is a patented SRS technology that solves the problem of playing 5.1 multichannel content over two speakers. TruSurround delivers a compelling, virtual surround sound experience through any two-speaker playback system, including internal television speakers. It is fully compatible with all multichannel formats. 1 Press the MENU button. Press the ◄ or ► button to select Sound, then press the ENTER button.
Choosing a Multi-Channel Sound (MTS) Track - Digital The digital-TV transmission system is capable of simultaneous transmission of many audio tracks (for example, simultaneous translations of the program into foreign languages). The availability of these additional “multitracks” depends upon the program. Preferred Language 1 Press the MENU button. Press the ◄ or ► button to select Sound, then press the ENTER button. Press the ▲ or ▼ button to select Preferred Language, then press the ENTER button.
Automatic Volume Control Reduces the difference in volume level among broadcasters. 1 Press the MENU button. Press the ◄ or ► button to select Sound, then press the ENTER button. Press the ▲ or ▼ button to select Auto Volume, then press the ENTER button. Sound Return Mode SRS TruSurround XT Preferred Language Multi-Track Sound Auto Volume Internal Mute Off English Stereo Off Off Sound Enter 2 Press the ▲ or ▼ button to select Off or On, then press the ENTER button.
Channel Control Clearing Scrambled Channels - Digital The Clear Scrambled Channel function is used to filter out scrambled channels after Auto Program is completed. It removes the scrambled channels from the list by tuning the digital cable channels. This process may take up to 20-30 minutes. 1 Press the MENU button. Press the ◄ or ► button to select Channel, then press the ENTER button. Press the ▲ or ▼ button to select Clear Scrambled Channel, then press the ENTER button.
3 Press the ▲/▼/◄/► buttons to select a channel to add, then press the ENTER button. 4 Press the ▲ or ▼ button to select Add, then press the ENTER button to add the channel. The symbol appears prior to the corresponding channel number. Press the ▲ or ▼ button to select Return, then press the ENTER button to return. ➢ All added channels will be shown on Added menu.
Viewing the Channel Lists You can display a list of all channels, added channels or your favorite channels. 1 Press the MENU button. Press the ◄ or ► button to select Channel, then press the ENTER button. Press the ▲ or ▼ button to select Channel List, then press the ENTER button. Channel Return Antenna Air Auto Program Clear Scrambled Channel Channel List Fine Tune Signal Strength LNA On ► Channel Enter 2 Press the ▲ or ▼ button to select All, Added, or Favorite, then press the ENTER button.
Setting the Default Channel List Mode You can set All, Added, or Favorite to be the Default List that appears when you press the CH LIST button. 1 Press the MENU button. Press the ◄ or ► button to select Channel, then press the ENTER button. Press the ▲ or ▼ button to select Channel List, then press the ENTER button.
Checking the Digital-Signal Strength - Digital Unlike analog channels, which can vary in reception quality from “snowy” to clear, digital (HDTV) channels have either perfect reception quality or you will not receive them at all. So, unlike analog channels, you cannot fine tune a digital channel. You can, however, adjust your antenna to improve the reception of available digital channels. 1 Press the MENU button. Press the ◄ or ► button to select Channel, then press the ENTER button.
Function Description Selecting a Menu Language 1 Press the MENU button. Press the ◄ or ► button to select Setup, then press the ENTER button. Press the ▲ or ▼ button to select Language, then press the ENTER button. Setup Return Plug & Play English Language Clock Off Sleep Timer Inactivated Timer 1 Inactivated Timer 2 Inactivated Timer 3 Off Game Mode Off DLP® 3D/Dual-View Setup Enter 2 Press the ▲ or ▼ button to select : English, Español, or Français, then press the ENTER button.
4 Press the ▲ or ▼ button to select DST (Daylight Saving Time), then press the ENTER button. Press the ▲ or ▼ button to select Off or On, then press the ENTER button. Press the EXIT button to exit. ➢ Depending on the broadcast station and signal, the auto time may not be set correctly. If this occurs, set the time manually. ➢ Antenna or Cable must be connected in order to set the time automatically.
Setting the On/Off Timer Setup Return Plug & Play English Language Clock Off Sleep Timer Inactivated ► Timer 1 Inactivated Timer 2 Inactivated Timer 3 Off Game Mode Off DLP® 3D/Dual-View Use this feature to set the TV to turn on or off at a desired time. 1 Press the MENU button. Press the ◄ or ► button to select Setup, then press the ENTER button. Press the ▲ or ▼ button to select Timer 1, Timer 2, or Timer 3, then press the ENTER button. The Timer 1, Timer 2, or Timer 3 menu is displayed.
Using the 3D/Dual-View Function For the information of how to use the 3D/Dual-View Function, ● ● Please go to www.samsung.com → ‘PRODUCTS’ → ‘HDTV’ → ‘DLP TV’ Click “3D/Dual-View Information” Using the V-Chip U.S.A Only This product is covered by the following U.S. patents : US4,930,158 US4,930,160 The V-Chip feature automatically locks out programs that are deemed inappropriate for children. The user must enter a PIN (personal ID number) before any of the V-Chip restrictions are set up or changed.
Setting Up Your Personal ID Number (PIN) 1 Press the MENU button. Press the ◄ or ► button to select Setup, then press the ENTER button. Press the ▲ or ▼ button to select V-Chip, then press the ENTER button. Setup V-Chip ► Caption Menu Transparency Medium Blue Screen Off Melody Medium Color Weakness PC Home Theater PC Off Light Effect In Watching HDMI Black Level Normal Setup Enter 2 Press the ▲ or ▼ button. Press the number buttons to enter your current 4-digit PIN.
How to Set up Restrictions Using “TV Parental Guidelines” First, set up a personal identification number (PIN), and enable the V-Chip. (See previous section.) Parental restrictions can be set up using either of two methods: The TV guidelines or the MPAA rating. 1 Press the MENU button. Press the ◄ or ► button to select Setup, then press the ENTER button. Press the ▲ or ▼ button to select V-Chip, then press the ENTER button.
5 At this point, one of the TV-Ratings is selected. Press the ENTER button. Depending on your existing setup, the “ ” symbol will be selected. (Blank = Unblocked, = Blocked) While “ ” is selected, press the ENTER button to block or unblock the category. To select a different TV-Rating, press the ▲ or ▼ button and then repeat the process. FV: Fantasy violence. V: Violence. S: Sexual situation. ➢ Return Allow All Block All Adult language. L: Sexually suggestive dialog.
How to Set up Restrictions Using “Canadian English” (for Canada Models) 9 Press the ▲ or ▼ button to select Canadian English, then press the ENTER button. 10 The Canadian English screen will appear. Press the ▲ or ▼ button to select an appropriate restriction. Press the ENTER button to activate the restriction selected. The “ ” symbol is indicated. Press the ▲ or ▼ button to select Return, then press the ENTER button. Programming intended for children under age 8.
Using the V-Chip for Digital Channels V-Chip Parental restriction information can be used while watching DTV channels. 13 Press the ▲ or ▼ button to select Downloadable U.S. Rating, then press the ENTER button. ➢ If information is not downloaded from the broadcasting station, the Downloadable U.S. Rating menu is deactivated. ➢ Parental restriction information is automatically downloaded while watching DTV channels. It may take several seconds. ➢ The Downloadable U.S.
Viewing Closed Captions (On-Screen Text Messages) - Digital The Digital Captions function operates on digital channels. 1 Press the MENU button. Press the ◄ or ► button to select Setup, then press the ENTER button. Press the ▲ or ▼ button to select Caption, then press the ENTER button.
Viewing Closed Captions (On-Screen Text Messages) - Analog The Analog Caption function operates in either analog TV channel mode or external signal mode. (Depending on the broadcasting signal, the Analog Caption function may operate on digital channels.) 1 Press the MENU button. Press the ◄ or ► button to select Setup, then press the ENTER button. Press the ▲ or ▼ button to select Caption, then press the ENTER button.
Menu Transparency Level Adjusts the transparency of the menu screen. 1 Press the MENU button. Press the ◄ or ► button to select Setup, then press the ENTER button. Press the ▲ or ▼ button to select Menu Transparency, then press the ENTER button. Setup V-Chip Caption Menu Transparency Medium Blue Screen Off Melody Medium Color Weakness PC Home Theater PC Off Light Effect In Watching HDMI Black Level Normal Setup Enter 2 Press the ▲ or ▼ button to select level, then press the ENTER button.
Adjusting the Melody Sound The TV power on/off melody sound can be adjusted. 1 Setup Press the MENU button. Press the ◄ or ► button to select Setup, then press the ENTER button. Press the ▲ or ▼ button to select Melody, then press the ENTER button. V-Chip Caption Menu Transparency Medium Blue Screen Off Melody Medium Color Weakness PC Home Theater PC Off Light Effect In Watching HDMI Black Level Normal Setup 2 Press the ▲ or ▼ button to select Off, Low, Medium, or High, then press the ENTER button.
Setting the Light Effect You can turn on/off the blue LED on the front of TV according to the situation. Use it for saving power or when the LED dazzles your eyes. 1 Press the MENU button. Press the ◄ or ► button to select Setup, then press the ENTER button. Press the ▲ or ▼ button to select Light Effect, then press the ENTER button.
Setting the Film Mode - Analog You can automatically sense and process film signals and adjust the picture for optimum quality. 1 Press the MENU button. Press the ◄ or ► button to select Setup, then press the ENTER button. Press the ▲ or ▼ button to select Film Mode, then press the ENTER button.
Upgrading the Software Samsung call center at 1-800-SAMSUNG to receive information about downloading upgrades and using a USB drive. Upgrades will be possible by connecting a USB drive to the USB port located on the side of your TV. 1 Insert a USB drive containing the firmware upgrade into the USB Upgrade Port on the side of the TV. USB drive 2 Press the MENU button. Press the ◄ or ► button to select Setup, then press the ENTER button.
PC Display Using Your TV as a Computer (PC) Display Setting Up Your PC Software (Based on Windows XP) The Windows display-settings for a typical computer are shown below. The actual screens on your PC will probably be different, depending upon your particular version of Windows and your particular video card. However, even if your actual screens look different, the same basic set-up information will apply in almost all cases. (If not, contact your computer manufacturer or Samsung Dealer.
Display Modes If the signal from the system equals the standard signal mode, the screen is adjusted automatically. If the signal from the system doesn’t equal the standard signal mode, adjust the mode by referring to your videocard user guide; otherwise there may be no video. For the display modes listed below, the screen image has been optimized during manufacture.
Setting up the TV with your PC How to Auto Adjust Use the Auto Adjust function to have the TV set automatically adjust the video signals it receives from the PC. The function also automatically fine-tunes the settings and adjusts the frequency values and positions. ➢ Change to the PC mode first. 1 Press the MENU button. Press the ◄ or ► button to select Setup, then press the ENTER button. Press the ▲ or ▼ button to select PC, then press the ENTER button.
Changing the Screen Position After connecting the TV to your PC, adjust the position of the screen if it is not well-aligned. ➢ Change to the PC mode first. 6 Press the ▲ or ▼ button to select Position, then press the ENTER button. PC Return Image Lock Position ► Auto Adjustment Image Reset 1152x864 @60Hz Resolution Setup Enter ▲ ▼ Press the ▲ or ▼ button to adjust the Vertical Position. Press the ◄ or ► button to adjust the Horizontal Position. Press the ENTER button.
Changing the Picture Size (PC Mode) You can select the picture size which best corresponds to your viewing requirements. 1 Press the MENU button. Press the ENTER button to select Picture. Press the ▲ or ▼ button to select Size, then press the ENTER button. Picture Return Mode Contrast Brightness Sharpness Color G50 Tint Color Tone Detailed Settings Size Dynamic 80 55 50 60 R50 Cool1 Wide PC Picture Enter 2 Press the ▲ or ▼ button to select the screen format you want, then press the ENTER button.
WISELINK Using the WISELINK Function This function enables you to view and listen to photo (JPEG) and audio files (MP3) saved on a USB Mass Storage Class (MSC) device. 1 Press the power button on the remote control or side panel. 2 Connect a USB device containing JPEG and/or MP3 files to the WISELINK jack (USB jack) on the side of the TV. ➢ ● If you enter the WISELINK mode with no USB device connected. “There is no device connected” message will appear.
Using the WISELINK Mode 1 Press the MENU button. Press the ◄ or ► button to select Application, then press the ENTER button. Press the ▲ or ▼ button to select WISELINK, then press the ENTER button. Application Return WISELINK ► Application Enter 2 Press the ▲ or ▼ button to select the corresponding USB Memory Device, then press the ENTER button. ➢ The WISELINK menu differs depending on the USB Memory Device connected to TV.
Using the Photo (JPEG) List You can play back the JPEG files saved on a memory device in various ways. 1 After switching the mode to WISELINK, select a memory device that you have installed. (Refer to page 65) 2 Press the ENTER button to select Photo. JPEG files and existing folders are displayed. Move 3 Press the ▲/▼/◄/► buttons to select a file, then press the ENTER button. ➢ Pressing the button over a photo icon shows the currently selected photo in full screen.
Using the Options Menu Slide Show: Starts a slide show. (Refer to “Viewing a Slide Show” on page 67) Rotate: You can rotate images in full screen mode. Images are rotated in the order of 90°, 180°, 270°, and 0° (original state). (Refer to “Rotating” on page 69) Zoom: You can zoom into images in full screen mode. Images are zoomed in on in the order of x2, x4, and x1 (original size).
Using the Menu during a Slide Show Slide Show Speed: Select to control the slide show speed. Each time the ENTER button is pressed, the speed changes repeatedly. (Fast → Slow → Normal) Fast Background Music On/Off: Select to choose whether you want to play MP3 file during a slide show. Each time the ENTER button is pressed, the background music activation changes repeatedly.
Rotating 1 After switching the mode to WISELINK, select a memory device that you have installed. (Refer to page 65) 2 Press the ENTER button to select Photo. JPEG files and existing folders are displayed. Move 3 Press the ▲/▼/◄/► buttons to select a file, then press the ENTER button. Pressing the button over a photo icon shows the currently selected photo in full screen.
Zooming-In 1 After switching the mode to WISELINK, select a memory device that you have installed. (Refer to page 65) 2 Press the ENTER button to select Photo. JPEG files and existing folders are displayed. Move 3 Press the ▲/▼/◄/► buttons to select a file, then press the ENTER button. Pressing the button over a photo icon shows the currently selected photo in full screen.
Using the Music (MP3) List You can play back the MP3 files saved on a memory device in various ways. 1 After switching the mode to WISELINK, select a memory device that you have installed. (Refer to page 65) 2 Press the ◄ or ► button to select Music, then press the ENTER button. MP3 files and existing folders are displayed. Move 3 Press the ▲ or ▼ buttons to select a file to be played, then press the ENTER button.
Using the Setup Menu Setup displays the user settings of the WISELINK menu 1 After switching the mode to WISELINK, select a memory device that you have installed. (Refer to page 65) 2 Press the ◄ or ► button to select Setup, then press the ENTER button. The Setup menu is displayed. Move 3 Press the ▲ or ▼ button to select an item you want, then press the ENTER button. 4 Press the ▲ or ▼ button to select the option, then press the ENTER button.
Appendix Identifying Problems If the TV seems to have a problem, first try this list of possible problems and solutions. If none of these troubleshooting tips apply, call your nearest Samsung service center. Problem Possible Solution Poor picture quality. No sound or sound is too low at maximum volume. - Try another channel. - Adjust the antenna. - Check all wire connections. - Try another channel. - Adjust the antenna. - Try another channel. - Press the SOURCE button. - Make sure the TV is plugged in.
Replacing the Lamp Why do I need to replace the lamp? ● The lamp used in a DLP TV has a limited lifespan. For the best screen quality it needs to be replaced periodically. After replacing the lamp, the screen quality will be bright and clear as new. When do I need to replace it? ● It should be replaced when the screen becomes darker, less clear or when all three LEDs on the front (TIMER, LAMP, & STAND BY/TEMP) are flashing.
4 Separate the Lamp from the engine by holding the handle and pulling it out. ➢ ● Be sure the replacement Lamp is the same type. ● After replacing the lamp, align the lamp cover with the groove and secure the screws. ● The TV will not turn on if the lamp cover is not correctly closed (as this will activate the protective circuit). Cleaning and Maintaining Your TV Please follow these guidelines to get the maximum performance from your TV.
Technical Specifications The descriptions and characteristics in this booklet are given for information purposes only and are subject to modification without notice. Model Name Screen Size (Diagonal) HL-T5076S HL-T5676S HL-T6176S 50 inch 56 inch 61 inch Power Consumption 230 W PC Resolution 1920 X 1080 @ 60Hz Sound (Output) 10W x 2 Dimension (W x H x D) Weight Environmental Considerations Operating Temperature Operating Humidity Storage Temperature Storage Humidity 45.5 x 30.3 x 11.
This product uses parts of the software from the Independent JPEG Group. This product uses parts of the software owned by the Freetype Project (www.freetype.org). This product uses some software programs which are distributed under the GPL/LGPL license. Accordingly, the following GPL and LGPL software source codes that have been used in this product can be provided after asking to vdswmanager@samsung.com.
These requirements apply to the modified work as a whole. If identifiable sections of that work are not derived from the Program, and can be reasonably considered independent and separate works in themselves, then this License, and its terms, do not apply to those sections when you distribute them as separate works.
10. If you wish to incorporate parts of the Program into other free programs whose distribution conditions are different, write to the author to ask for permission. For software which is copyrighted by the Free Software Foundation, write to the Free Software Foundation; we sometimes make exceptions for this. Our decision will be guided by the two goals of preserving the free status of all derivatives of our free software and of promoting the sharing and reuse of software generally. NO WARRANTY 11.
GNU Lesser General Public License (LGPL) Version 2.1, February 1999 Copyright (C) 1991, 1999 Free Software Foundation, Inc. 59 Temple Place, Suite 330, Boston, MA 02111-1307 USA Everyone is permitted to copy and distribute verbatim copies of this license document, but changing it is not allowed. [This is the first released version of the Lesser GPL. It also counts as the successor of the GNU Library Public License, version 2, hence the version number 2.1.
“Source code” for a work means the preferred form of the work for making modifications to it. For a library, complete source code means all the source code for all modules it contains, plus any associated interface definition files, plus the scripts used to control compilation and installation of the library. Activities other than copying, distribution and modification are not covered by this License; they are outside its scope.
Otherwise, if the work is a derivative of the Library, you may distribute the object code for the work under the terms of Section 6. Any executables containing that work also fall under Section 6, whether or not they are linked directly with the Library itself. 6.
This section is intended to make thoroughly clear what is believed to be a consequence of the rest of this License. 12. If the distribution and/or use of the Library is restricted in certain countries either by patents or by copyrighted interfaces, the original copyright holder who places the Library under this License may add an explicit geographical distribution limitation excluding those countries, so that distribution is permitted only in or among countries not thus excluded.
DLP TV Guide de l’utilisateur HL-T5076S HL-T5676S HL-T6176S Enregistrez vos produits Samsung en vous connectant sur : www.samsung.com/global/register Inscrivez ici le modèle et le numéro de série pour référence ultérieure. ▪ Modèle ______________ ▪ N° de série ______________ BP68-00630B-Fre_1.
Guide d’installation du téléviseur numérique ● Qu’est-ce que la télévision numérique? La télévision numérique (DTV) est la nouvelle façon d’envoyer les données audio et vidéo vers votre téléviseur. Grâce à la télévision numérique, les diffuseurs peuvent transmettre des images haute définition (HDTV), un son ambiophonique Dolby digital et de nouveaux services comme le multiplexage de programmes (transmettre plus d’une émission sur une même chaîne) et la diffusion de données.
Questions et réponses 1. L’antenne que j’utilise actuellement convient-elle à la télévision numérique? La télédiffusion numérique en direct utilise les mêmes canaux que la télévision analogique et convient parfaitement à de nombreuses antennes de télévision existantes. Toutefois, les assignations de canaux de télévision numérique sont différentes de celles des canaux analogiques.
Contenu RÉGLAGE DES CHAÎNES RENSEIGNEMENTS GÉNÉRAUX ■ ■ ■ ■ ■ ■ ■ Position de visionnement ............................................. 5 Liste des caractéristiques ............................................ 5 Vérification des pièces ................................................. 6 Affichage du panneau de configuration ....................... 6 Affichage du panneau de branchement ....................... 8 Télécommande ............................................................
Renseignements généraux Position de visionnement Pour optimiser votre confort pendant le visionnement, veuillez suivre les directives suivantes quant à la distance à conserver avec le téléviseur. Pour un visionnement prolongé, veuillez vous asseoir le plus loin possible du téléviseur.
Vérification des pièces Guide de l’utilisateur Télécommande (BP59-00125A) et piles AAA Carte de garantie/ Carte d’enregistrement/ Guide de sécurité/ Guide de consultation rapide Cordon d’alimentation (3903-000144) Nettoyage avec un chiffon Vendues séparément Câble S-Vidéo Câble vidéo Câble D-Sub Câble Audio PC Câble d’antenne Câble à composants Câble audio Ampoule de rechange Pour acheter une ampoule de rechange, s’adresser au centre de service le plus proche.
1 SOURCE Alterner entre toutes les sources accessibles (TV, AV1, AV2, S-Vidéo1, S-Vidéo2, Composante1, Composante2, PC, HDMI1, HDMI2 et HDMI3/DVI). 2 MENU Afficher le menu des fonctions du téléviseur. 3 + VOL – Augmenter ou diminuer le volume. Dans le menu à l’écran, utiliser les touches + VOL – de la même manière que les touches ◄ et ► de la télécommande. 4 ➢ 5 (ENTER) Confirmer une sélection. 6 POWER Allumer et éteindre le téléviseur.
Affichage du panneau de branchement Prises des panneaux latéraux Utiliser les prises du panneau arrière pour brancher des composants audiovisuels utilisés continuellement, par exemple un magnétoscope ou un lecteur DVD. Pour savoir comment brancher ces dispositifs, consulter les pages 10 à 16. 1 ANT 1 IN (CABLE)/ANT 2 IN (AIR) Connecteur coaxial de 75 Ω pour l’antenne et le réseau câblé. 2 HDMI IN 1, HDMI IN 2 Pour raccorder la prise HDMI d’un appareil avec sortie HDMI.
Télécommande La télécommande peut être utilisée jusqu’à une distance d’environ 7 mètres (23 pieds) du téléviseur. Toujours diriger la télécommande directement vers le téléviseur. Vous pouvez également utiliser votre télécommande pour commander votre magnétoscope, votre câblosélecteur, votre lecteur DVD ou votre récepteur. 1 POWER Pour allumer et éteindre le téléviseur. 2 Touches numériques Sélectionner directement un canal. 3 – Pour sélectionner des chaînes supplémentaires diffusées par la même station.
Insertion des piles dans la télécommande 1 2 3 ➢ Soulevez le couvercle à l’arrière de la télécommande, comme indiqué dans la figure. Insérez deux piles AAA. ➢ ● Veillez à faire correspondre les bornes “+” et “–” des piles avec le schéma qui figure à l’ intérieur du compartiment. ● N’utilisez pas de piles de types différents, par exemple, une pile alcaline et une pile au manganèse. Refermez le couvercle, comme indiqué dans la figure.
Branchement du câble Pour raccorder un service de câblodistribution, procéder comme suit. Service de câblodistribution sans câblosélecteur 1 Brancher le câble d’entrée dans la borne ANT 1 IN (CABLE), située sur le côté du téléviseur. ➢ Ce téléviseur étant configuré pour le câble, il n’est pas nécessaire de posséder un câblosélecteur pour recevoir les canaux de câblodistribution diffusés en clair.
Branchement d’un magnétoscope Branchement vidéo Ces instructions supposent que le téléviseur est déjà branché à une antenne ou à un système de câblodistribution (conformément aux instructions des pages 10 et 11). Ignorer l’étape 1 si le téléviseur n’est pas branché à une antenne ou un système de câblodistribution. 1 Débrancher le câble ou l’antenne de l’arrière du téléviseur. 2 Raccorder le câble ou l’antenne à la borne d’entrée d’antenne ANT IN, située sur le côté du magnétoscope.
Branchement d’un caméscope Les prises du panneau latéral du téléviseur simplifient le branchement d’un caméscope. Ils permettent de regarder directement les cassettes du caméscope, sans passer par un magnétoscope. 1 2 ➢ ➢ Raccorder un câble vidéo ou S-Vidéo entre la prise d’entrée vidéo AV IN 1 [VIDEO] ou [S-VIDEO] (ou AV IN 2 [VIDEO] ou [S-VIDEO]) du téléviseur et la prise de sortie VIDEO OUT (ou SVIDEO OUT) du caméscope.
Branchement d’un lecteur DVD/récepteur à la prise HDMI Ce branchement n’est possible que si l’appareil externe est pourvu d’une prise de sortie HDMI. 1 Brancher un câble HDMI entre la prise HDMI IN 1 (ou HDMI IN 2) du téléviseur et la prise de sortie HDMI OUT du lecteur DVD ou du récepteur.
Branchement d’un système audio numérique Les prises du panneau latéral du téléviseur permettent de le brancher facilement à un système audionumérique. 1 ➢ ➢ Brancher un câble optique entre les prises de sortie optique DIGITAL AUDIO OUT (OPTICAL) du téléviseur et les prises d’entrée audionumérique du système audionumérique.
Branchement d’un ordinateur personnel À l’aide du câble D-Sub 1 2 Brancher un câble D-Sub entre la prise d’entrée PC IN [PC] du téléviseur et la prise de sortie PC de l’ordinateur. Brancher un câble audio PC entre la prise d’entrée PC IN [AUDIO] du téléviseur et la prise de sortie audio de la carte son de l’ordinateur.
Fonction Prêt-à-l’emploi Au moment de la première mise en marche du téléviseur, les réglages de base s’effectuent automatiquement et en séquence : 1 Appuyer sur la touche POWER de la télécommande. Le message La langue des menus, le mode Megasin, les canaux et l’heure sont réalés. s’affiche automatiquement. Appuyez sur ENTER. Le message Pour sélectionner la langue d’affichage. s’affiche 2 Appuyer sur la touche ◄ ou ► pour sélectionner la langue, suivie de la touche ENTER.
Réglage automatique de l’horloge 9 Prêt à l’emploi Appuyer sur la touche ◄ ou ► pour sélectionner Off ou On, suivie de la touche ENTER. Le message Choisir le fuseau horaire dans lequel vous vivez. s’affiche. 10 Appuyer sur la touche ▲ ou ▼ pour mettre le fuseau horaire en surbrillance (et pour mettre le fuseau horaire approprié en surbrillance sur la carte des États-Unis). Appuyer sur la touche ENTER. Si l’horloge ne se règle pas automatiquement, consulter les pages 43 à 44.
Réglage du volume Appuyez sur VOL+ pour monter le volume et sur VOL– pour le baisser. Utilisation de la touche MUTE Vous pouvez à tout moment couper le son en appuyant sur la touche MUTE. 1 2 Appuyez sur la touche MUTE pour couper le son. L’indicateur Silence apparaît dans le coin inférieur gauche de l’écran. Pour rétablir le son, appuyez de nouveau sur MUTE, ou appuyez sur VOL + ou VOL –. Affichage des paramètres L’écran indique le canal actif et l’état de certains réglages audiovisuels.
Navigation dans les menus à l’aide de la carte des menus La carte de menus du menu principal permet de voir tous les menus et de choisir une fonction rapidement. Vous pouvez choisir tout menu en utilisant la carte des menus. 1 2 3 4 Appuyez sur la touche MENU. Le menu principal s’affiche au bas de l’écran. Appuyez sur la touche ◄ ou ► pour sélectionner Menu Plan de site, puis appuyez ENTER. La carte des menus s’affiche. Appuyez sur la touche ▲/▼/◄/► pour sélectionner un menu, puis appuyez ENTER.
Mémorisation des chaînes (méthode automatique) 3 4 Prog. auto Appuyez sur la touche ▲ ou ▼ pour sélectionner Prog. auto, puis appuyez sur ENTER. Choisir les antennes à mettre en mémoire Appuyez sur la touche ◄ ou ► pour sélectionner la connexion avec l’antenne, puis appuyez sur ENTER. Air+Câble Câble Air ➢ Air : signal d’antenne de type “Air”. Retour Intro. Câble : signal d’antenne de type “Câble”. Air+Câble : signaux d’antenne de type “Air” et “Câble”.
Configuration de la télécommande pour faire fonctionner votre câblosélecteur 1 2 3 4 5 Éteignez le câblosélecteur. Appuyez sur la touche CABLE de la télécommande du téléviseur. Appuyez sur la touche SET de la télécommande du téléviseur. Appuyez sur les touches numériques de votre télécommande qui correspondent aux trois chiffres du code du câblosélecteur dont les marques sont répertoriées à la page 24 du présent guide. Veillez à entrer tous les chiffres du code, même si le premier chiffre est “0”.
Codes de programmation de la télécommande Magnétoscope Marque SAMSUNG ADMIRAL AIWA AKAI AUDIO DYNAMICS BELL&HOWELL BROKSONIC CANDLE CANON CITIZEN COLORTYME CRAIG CURTIS MATHES DAEWOO DB DIMENSIA DYNATECH ELECTROHOME EMERSON FISHER FUNAI GENERAL ELECTRIC GO VIDEO LG(Goldstar) HARMAN KARDON HITACHI INSTANT REPLAY JC PENNEY JCL KENWOOD KLH LIOYD LOGIK LXI JVC MAGNAVOX MARANTZ MARTA KONIA ORION MEI MEMOREX MGA MIDLAND MINOLTA Code 000 001 002 003 004 005 077 078 079 020 025 004 027 032 007 026 018 022 002 003
CÂBLOSÉLECTEUR Marque SAMSUNG GI HAMLIN HITACHI JERROLD MACOM MAGNAVOX OAK PANASONIC PHILIPS PIONEER RCA REGAL Code 000 001 002 003 004 005 006 007 041 003 024 031 025 030 038 039 025 030 019 023 028 026 003 022 027 037 044 019 021 023 028 004 018 020 044 014 022 040 003 Marque REGENCY SA SCIENTIFIC ATLAN SPRUCER STARGATE 2000 SYLVANIA TEXSCAN TOCOM UNIVERSAL VIEWSTAR WARNER AMEX ZENITH Code 015 023 042 043 042 043 022 036 016 016 032 033 034 019 021 023 028 046 017 029 035 037 045 RÉCEPTEUR SAMSUNG Pro
LECTEUR DVD SAMSUNG Produit DVD DVDR BD Record VCR COMBO VCR Record DHR COMBO Code 000 001 002 003 004 005 006 007 008 009 010 011 012 013 Produit Home Theater VCR COMBO HDD Record COMBO TWIN TRAY COMBO STB DVD COMBO DVD Receiver AV Receiver Code 014 015 016 017 018 019 020 021 DVD Marque ANAM AUDIOVOX AUDIOLOGIC ANABA APEX DIGITAL AIWA BROKSONIC BLAUPUNKT B&K CURTIS MATHES CYBER HOME CLARION CIRRUS CINEVISION DAEWOO DENON FARENHEIT FISHER GPX GO VIDEO GE GREENHILL HITACHI HITEKER HOYO HARMAN / KARDON I
Pour choisir la source Sélectionner le téléviseur ou une autre source d’entrée externe branchée au téléviseur, comme un lecteur DVD ou un magnétoscope. 1 Appuyez sur la touche MENU. Appuyez sur la touche ◄ ou ► pour sélectionner Entrée, puis appuyez sur ENTER. Appuyez sur le bouton ▲ ou ▼ pour sélectionner Liste source, puis appuyez sur le bouton ENTER. Entrée Retour Liste source Entrer le nom TV ► Input Intro.
Paramètres vidéo Réglage automatique de l’image Le téléviseur est doté de trois modes d’image automatiques réglés en usine (Dynamique, Standard, Cinéma). Il est possible d’activer un réglage d’image en le sélectionnant dans le menu. 1 Appuyez sur la touche MENU. Appuyer sur ENTER pour choisir Image. Appuyez sur la touche ▲ ou ▼ pour sélectionner Mode, puis appuyez sur ENTER. Image Retour Mode Dynamique Contraste Luminosité Netteté Couleur G50 Teinte Froide1 Nuance coul.
5 Appuyez sur la touche ▲ ou ▼ pour sélectionner Nuance coul., puis appuyez sur ENTER. Image Retour Mode Dynamique Contraste Luminosité Netteté Couleur G50 Teinte Froide1 Nuance coul. Réglages des détails Format 16:9 100 45 75 55 R50 Picture Intro. 6 Appuyez sur la touche ▲ ou ▼ pour sélectionner Froide2, Froide1, Normal, Chaude1 ou Chaude2, puis appuyez sur ENTER. ➢ Lorsque le mode d’image est réglé à Dynamique ou Standard, Chaude1 et Chaude2 ne peuvent être sélectionnés.
Réglages d’image détaillés Il est possible de procéder au réglage détaillé de l’image. 1 Appuyez sur la touche MENU. Appuyer sur ENTER pour choisir Image. Appuyez sur la touche ▲ ou ▼ pour sélectionner Réglages des détails, puis appuyez sur ENTER. Image Retour Mode Contraste Luminosité Netteté Couleur G50 Teinte Nuance coul. Réglages des détails Format Standard 80 50 50 50 R50 Froide1 16:9 ► Picture Intro. 2 Sélectionner l’option désirée en appuyant sur la touche ▲ ou ▼, suivie de la touche ENTER.
Redimensionnement du format de l’image Vous pouvez choisir le format de l’image qui correspond à vos exigences. 1 Appuyez sur la touche MENU. Appuyer sur ENTER pour choisir Image. Appuyez sur la touche ▲ ou ▼ pour sélectionner Format, puis appuyez sur ENTER. Image Retour Mode Dynamique Contraste Luminosité Netteté Couleur G50 Teinte Froide1 Nuance coul. Réglages des détails Format 16:9 100 45 75 55 R50 Picture Intro.
Réduction numérique des bruits Si le signal de diffusion capté par votre téléviseur est faible, vous pouvez activer la fonction de réduction numérique des bruits pour aider à éliminer les parasites et les images fantômes qui apparaissent à l’écran. 1 Appuyez sur la touche MENU. Image Appuyer sur ENTER pour choisir Image. G50 R50 Teinte Appuyez sur la touche ▲ ou ▼ pour sélectionner Réduct. bruit num., puis appuyez sur Nuance coul. Froide1 ENTER. Réglages des détails Format Réduct. bruit num.
Réglage de la couleur active Lorsque cette option est activée, les couleurs du ciel et de l’herbe seront plus riches et plus claires, offrant ainsi une image plus vive à l’écran. 1 Appuyez sur la touche MENU. Appuyer sur ENTER pour choisir Image. Appuyez sur la touche ▲ ou ▼ pour sélectionner Couleur activée, puis appuyez sur ENTER. Image G50 Teinte Nuance coul. Réglages des détails Format Réduct. bruit num.
Réglage de la position de l’écran Il est possible d’ajuster la position horizontale et verticale de l’écran. 1 Appuyez sur la touche MENU. Appuyer sur ENTER pour choisir Image. Appuyez sur la touche ▲ ou ▼ pour sélectionner Position, puis appuyez sur ENTER. Image G50 Teinte Nuance coul. Réglages des détails Format Réduct. bruit num. DNIe Couleur activée Gamme de Couleurs Position Régler R50 Froide1 16:9 Auto On On Normale ► OK Picture Intro.
Réglages audio Vous pouvez régler le son selon vos préférences. (Vous pouvez aussi utiliser l’un des réglages automatiques.) 1 2 Appuyez sur la touche MENU. Appuyez sur la touche ◄ ou ► pour sélectionner Son, puis appuyez sur la touche ENTER. Appuyez sur la touche ▲ ou ▼ pour sélectionner Mode, puis appuyez sur ENTER. Appuyez sur la touche ▲ ou ▼ pour sélectionner Mode, puis appuyez sur la touche ENTER.
Configuration de la fonction SRS TSXT TruSurround XT est une technologie SRS brevetée qui permet de passer le contenu multichaîne 5.1 sur un système à deux hautparleurs. Le mode TruSurround permet d’obtenir un son ambiophonique renversant sur tout système d’écoute à deux haut-parleurs, y compris les haut-parleurs internes d’un téléviseur. Ce mode est entièrement compatible avec tous les formats multichaîne. 1 Appuyez sur la touche MENU.
Sélection d’une bande son à canaux multiples (MTS) - Numerique Le système de télévision numérique est capable de réaliser la transmission simultanée de plusieurs pistes audio (par exemple, la traduction simultanée de l’émission en plusieurs langues). La disponibilité de ces multipistes supplémentaires dépend de l’émission choisie. Langue privilégiée 1 Appuyez sur la touche MENU. Appuyez sur la touche ◄ ou ► pour sélectionner Son, puis appuyez sur la touche ENTER.
Réglage automatique du volume Réduit la différence de niveau sonore entre les diffuseurs. 1 Appuyez sur la touche MENU. Appuyez sur la touche ◄ ou ► pour sélectionner Son, puis appuyez sur la touche ENTER. Appuyez sur la touche ▲ ou ▼ pour sélectionner Volume auto, puis appuyez sur la touche ENTER. Son Retour Mode SRS TruSurround XT Langue privilégiée Son multi-piste Volume auto Sourdine int. Off Anglais Stéréo Off Off Sound Intro.
Réglage des chaînes Suppression des canaux brouillés - Numerique La fonction Suppression des canaux brouillés permet d’éliminer les canaux brouillés une fois que la programmation automatique est terminée. Elle supprime les canaux brouillés de la liste en syntonisant les canaux numériques. Cette procédure peut prendre de 20 à 30 minutes. 1 Appuyez sur la touche MENU. Appuyez sur la touche ◄ ou ► pour sélectionner Chaîne, puis appuyez sur ENTER.
3 Appuyer sur les touches ▲/▼/◄/► pour sélectionner le canal à ajouter, suivies de la touche ENTER. 4 Appuyer sur la touche ▲ ou ▼ pour sélectionner Aiouté, suivie de la touche ENTER. Le symbole s’affiche devant le numéro du canal correspondant. Appuyer sur la touche ▲ ou ▼ pour choisir Retour, suivie de la touche ENTER pour revenir en arrière. ➢ Tous les canaux ajoutés seront affichés dans le menu Aiouté.
Affichage des listes de canaux Vous pouvez afficher la liste de tous les canaux, des canaux ajoutés ou des canaux favoris. 1 Appuyez sur la touche MENU. Appuyez sur la touche ◄ ou ► pour sélectionner Chaîne, puis appuyez sur ENTER. Appuyez sur la touche ▲ ou ▼ pour sélectionner le Liste des canaux, puis appuyez sur ENTER. Chaîne Retour Antenne Air Prog. auto Effacer les canaux brouillés Liste des canaux Syn. Précise Puissance signal AFB On ► Channel Intro.
Réglage du mode de liste des canaux par défaut Il est possible de sélectionner Tout, Ajouter ou Favorite comme liste par défaut à afficher en appuyant sur la touche CH MGR. 1 Appuyez sur la touche MENU. Appuyez sur la touche ◄ ou ► pour sélectionner Chaîne, puis appuyez sur ENTER. Appuyez sur la touche ▲ ou ▼ pour sélectionner le Liste des canaux, puis appuyez sur ENTER. Chaîne Retour Antenne Air Prog. auto Effacer les canaux brouillés Liste des canaux Syn.
Contrôle de la puissance du signal numérique - Numerique Contrairement aux chaînes analogiques, dont la qualité de réception peut varier (d’enneigée à claire), les chaînes numériques (HDTV) offrent soit une réception parfaite, soit aucune réception. Ainsi, contrairement aux chaînes analogiques, vous ne pouvez pas syntoniser de façon précise la réception des chaînes numériques. Cependant, vous pouvez régler votre antenne afin d’améliorer la réception des chaînes numériques disponibles.
Description des fonctions Sélection de la langue des menus 1 Appuyez sur la touche MENU. Appuyez sur la touche ◄ ou ► pour sélectionner Configuration, puis appuyez sur ENTER. Appuyez sur la touche ▲ ou ▼ pour sélectionner Langue, puis appuyez sur ENTER. Configuration Retour Prêt à l’emploi Langue Horloge Mise en veille Minuterie 1 Minuterie 2 Minuterie 3 Mode Jeu DLP® 3D/Dual-View Français Off Désactivé Désactivé Désactivé Off Off Setup Intro.
4 Appuyez sur le bouton ▲ ou ▼ pour sélectionner “H. d’été”, puis appuyez sur le bouton ENTER. Appuyez sur la touche ▲ ou ▼ pour sélectionner Off ou On, puis appuyez sur la touche ENTER. Appuyez sur la touche EXIT pour quitter le menu. ➢ En fonction de la station émettrice et du signal, il est possible que la fonction de réglage automatique de l’heure ne fonctionne pas correctement. Dans un tel cas, régler l’horloge manuellement.
Réglage de la minuterie de marche/arrêt Configuration Retour Prêt à l’emploi Langue Horloge Mise en veille Minuterie 1 Minuterie 2 Minuterie 3 Mode Jeu DLP® 3D/Dual-View Cette fonction permet d’allumer ou d’éteindre le téléviseur à l’heure voulue. 1 Appuyez sur la touche MENU. Appuyez sur la touche ◄ ou ► pour sélectionner Configuration, puis appuyez sur ENTER. Appuyez sur la touche ▲ ou ▼ pour choisir Minuterie 1, Minuterie 2, ou Minuterie 3, puis appuyez sur ENTER.
Utilisation de la fonction 3D/Dual-View Pour plus d’information au sujet de l’utilisation de la 3D/Dual-View, ● ● Veuillez aller à www.samsung.com → ‘PRODUCTS’ → ‘HDTV’ → ‘DLP TV’ Cliquez sur “3D/Dual-View” information Fonction de contrôle parental (V-Chip) La fonction V-Chip bloque automatiquement la diffusion d’émissions pouvant ne pas convenir aux enfants.
Configuration de votre numéro d’identification personnel (NIP) 1 Appuyez sur la touche MENU. Appuyez sur la touche ◄ ou ► pour sélectionner Configuration, puis appuyez sur ENTER. Appuyez sur la touche ▲ ou ▼ pour sélectionner V-Chip, puis appuyez sur la touche ENTER. Configuration V-Chip ► Sous-titres Transparence menu Moyen Écran Bleu Off Mélodie Moyen Faibl. couleurs PC PC cinéma maison Off Effet lumière Pen. écoute Nv nr HDMI Normal Setup Intro. 2 Appuyez sur la touche ▲ ou ▼.
Configuration des restrictions au moyen des classifications de contrôle parental Premièrement, créer un numéro d’identification personnel (NIP). Activer ensuite la fonction V-Chip. (consulter la section précédente). Le contrôle parental se configure de deux façons : à l’aide du contrôle parental du téléviseur ou à l’aide des classifications de la MPAA. 1 Appuyez sur la touche MENU. Appuyez sur la touche ◄ ou ► pour sélectionner Configuration, puis appuyez sur ENTER.
5 À ce moment, une des classifications est sélectionnée. Appuyer sur la touche ENTER. En fonction de la configuration existante, le symbole “ ” est sélectionné. (Espace = débloqué, = bloqué). Si le symbole “ ” est sélectionné, appuyer sur la touche ENTER pour bloquer ou débloquer la classification. Pour sélectionner une classification différente, appuyer sur la touche ▲ ou ▼ et répéter les étapes. FV: Fantastique, violence. V: Violence. S: Contenu sexuel. ➢ Retour Perm. Tout Bloq.
Configuration des restrictions au moyen des Anglais canadien (modèles canadiens) 9 Appuyez sur la touche ▲ ou ▼ pour sélectionner Anglais Canadien, puis appuyez sur la touche ENTER. 10 L’écran Anglais Canadien s’affiche. Appuyez sur la touche ▲ ou ▼ pour entrer une restriction appropriée. Appuyez sur la touche ENTER pour activer la restriction sélectionnée. Le symbole “ s’affiche. ” V-Chip Retour Blocage V-Chip On Cont. paren. TV Classif. MPAA Anglais Canadien ► Français Canadien Catég.
Fonction V-Chip pour les canaux numériques V-Chip Il est possible d’utiliser les informations relatives au contrôle parental pour l’écoute de canaux numériques. 13 Appuyez sur la touche ▲ ou ▼ pour sélectionner Catég. américaine téléchargeable, puis appuyez sur la touche ENTER. ➢ S’il n’est pas possible de télécharger les informations de la station émettrice, le menu Catég. américaine téléchargeable est désactivé.
Affichage des sous-titres codés (messages à l’écran) - Digital La fonction de sous-titrage numérique est compatible avec les canaux numériques. 1 Appuyez sur la touche MENU. Appuyez sur la touche ◄ ou ► pour sélectionner Configuration, puis appuyez sur ENTER. Appuyez sur la touche ▲ ou ▼ pour choisir Sous-titres, puis sur ENTER. Configuration V-Chip Sous-titres ► Transparence menu Moyen Écran Bleu Off Mélodie Moyen Faibl. couleurs PC PC cinéma maison Off Effet lumière Pen.
Affichage des sous-titres codés (messages à l’écran) - Analogique La fonction Sous-titres analogiques fonctionne en mode chaînes RF analogiques ou source externe. (Selon le signal du diffuseur, la fonction Sous-titres analogiques pourra fonctionner sur les chaînes numériques.) 1 Appuyez sur la touche MENU. Appuyez sur la touche ◄ ou ► pour sélectionner Configuration, puis appuyez sur ENTER. Appuyez sur la touche ▲ ou ▼ pour choisir Sous-titres, puis sur ENTER.
Niveau de transparence Cette fonction permet de régler la transparence de l’écran du menu. 1 Appuyez sur la touche MENU. Appuyez sur la touche ◄ ou ► pour sélectionner Configuration, puis appuyez sur ENTER. Appuyez sur la touche ▲ ou ▼ pour choisir Transparence menu, puis sur ENTER. Configuration V-Chip Sous-titres Transparence menu Moyen Écran Bleu Off Mélodie Moyen Faibl. couleurs PC PC cinéma maison Off Effet lumière Pen. écoute Nv nr HDMI Normal Setup Intro.
Réglage de la mélodie La mélodie jouée par le téléviseur à l’allumage et à l’arrêt est configurable. 1 Appuyez sur la touche MENU. Appuyez sur la touche ◄ ou ► pour sélectionner Configuration, puis appuyez sur ENTER. Appuyez sur la touche ▲ ou ▼ pour choisir Mélodie, puis sur ENTER. Configuration V-Chip Sous-titres Transparence menu Moyen Écran Bleu Off Mélodie Moyen Faibl. couleurs PC PC cinéma maison Off Effet lumière Pen. écoute Nv nr HDMI Normal Setup Intro.
Réglage de l’effet lumineux Il est possible d’activer ou de désactiver la DEL bleue située sur le devant du téléviseur, selon les circonstances. Cette fonction permet de réaliser des économies d’énergie ou d’éteindre la DEL si elle éblouit. 1 Appuyez sur la touche MENU. Appuyez sur la touche ◄ ou ► pour sélectionner Configuration, puis appuyez sur ENTER. Appuyez sur la touche ▲ ou ▼ pour sélectionner Effet lumière, puis appuyez sur la touche ENTER.
Réglage du mode film - Analogique Il est possible de détecter et de traiter automatiquement des signaux de film et de régler l’image afin d’obtenir une qualité optimale. 1 Appuyez sur la touche MENU. Appuyez sur la touche ◄ ou ► pour sélectionner Configuration, puis appuyez sur ENTER. Appuyez sur la touche ▲ ou ▼ pour sélectionner Mode film, puis appuyez sur la touche ENTER. Configuration Off Écran Bleu Mélodie Moyen Faibl. couleurs PC PC cinéma maison Off Effet lumière Pen.
Mise à jour du logiciel Contacter le centre d’appel Samsung au 1-800-SAMSUNG pour obtenir de l’information sur le téléchargement des mises à jour et sur l’utilisation d’une clé USB. Les mises à jour sont accessibles par le branchement d’une clé USB dans le port USB situé sur le côté du téléviseur. 1 Insérer une clé USB contenant la mise à jour du microprogramme dans le port de mise à jour USB situé sur le côté du téléviseur. Clé USB 2 Appuyez sur la touche MENU.
Écran d’ordinateur Utilisation du téléviseur comme écran d’ordinateur Configuration du logiciel pour ordinateur (D’après Windows XP) Les paramètres d’affichage de Windows pour un ordinateur standard sont indiqués ci-dessous. Cependant, les paramètres réels de l’ordinateur peuvent différer en fonction de la version de Windows et de la carte graphique utilisée. Même si l’ affichage diffère, les paramètres de base s’appliquent dans la grande majorité des cas.
Modes d’affichage Si le signal en provenance du système équivaut au mode de signal standard, l’affichage s’ajuste automatiquement. Si le signal n’équivaut pas au mode de signal standard, consulter le manuel d’utilisation de la carte vidéo pour régler le mode. Sinon, il est possible qu’il n’y ait pas d’affichage vidéo. L’image à l’écran a été optimisée en usine pour les modes d’affichage ci-dessous.
Configuration du téléviseur par l’ordinateur Réglages automatiques Utiliser la fonction de réglage automatique pour que le téléviseur règle automatiquement les signaux vidéo reçus de l’ ordinateur. En outre, cette fonction syntonise automatiquement les réglages et ajuste les valeurs et les positions de la fréquence. ➢ En premier lieu, passer en mode PC. 1 Appuyez sur la touche MENU. Appuyez sur la touche ◄ ou ► poursélectionner Configuration, puisappuyez sur ENTER.
Repositionnement de l’image Après avoir branché l’ordinateur sur le téléviseur, si nécessaire vous pouvez réglez la position de l’image. ➢ En premier lieu, passer en mode PC. 6 Appuyez sur la touche ▲ ou ▼ pour sélectionner Position, puis appuyez sur la touche ENTER. PC Retour Verrouiller l’image Position ► Réglage Auto Rétablir l’image 1152x864 @60Hz Résolution Setup Intro. 7 Appuyer sur la touche ▲ ou ▼ pour ajuster la position verticale de l’image.
Redimensionnement de l’image (mode PC) Vous pouvez sélectionner le format d’image que vous préférez. 1 Appuyez sur la touche MENU. Appuyer sur ENTER pour choisir Image. Appuyez sur la touche ▲ ou ▼ pour sélectionner Format, puis appuyez sur la touche ENTER. Image Retour Mode Dynamique Contraste Luminosité Netteté Couleur G50 Teinte Normal Nuance coul. Réglages des détails Format Large PC 80 55 50 60 R50 Picture Intro.
WISELINK Utilisation de la fonction WISELINK Cette fonction permet de regarder des fichiers de photos (JPEG) et d’écouter des fichiers sonores(MP3) sauvegardés sur un dispositif à mémoire de grande capacité (MSC) USB. 1 Appuyez sur la touche power de la télécommande ou sur le panneau latéral. 2 Branchez un dispositif USB contenant des fichiers JPEG et/ouMP3 à la prise WISELINK (priseUSB) sur le côté du téléviseur. ➢ ● Si vous passez en mode WISELINK et qu’aucun dispositif USB n’est branché.
Utilisation du mode WISELINK 1 Appuyez sur la touche MENU. Appuyez sur la touche ◄ ou ► pour sélectionner Application, puis appuyez sur ENTER. Appuyez sur la touche ▲ ou ▼ pour sélectionner WISELINK, puis appuyez sur la touche ENTER. Application Retour WISELINK ► Application Intro. 2 3 Appuyez sur la touche ▲ ou ▼ pour sélectionner le dispositif à mémoire USB correspondant, puis appuyez sur la touche ENTER.
À l’aide de la liste PHOTO (JPEG) Vous pouvez reproduire de différentes façons les fichiers JPEG mémorisés dans un dispositif à mémoire. 1 En mode WISELINK, sélectionner un dispositif de mémoire installé. (Consulter la page 65) 2 Appuyer sur ENTER pour choisir Photo. Les fichiers JPEG et dossiers existants s’affichent. 3 Appuyez sur les touches ▲/▼/◄/► pour sélectionner un fichier, puis appuyez sur la touche ENTER.
Menu des options Diaporama: Démarre un diaporama. (Consulter “Visualiser un diaporama” à la page 67) lecture Rotation: Il est possible de faire tourner les images en mode plein écran. La rotation des images s’effectue dans l’ordre suivant : 90°, 180°, 270° et 0° (position d’origine). (Consulter “Rotation” à la page 69) Zoom: Il est possible de zoomer les images en mode plein écran. Les zooms sur images s’effectuent dans l’ordre X2, X4 et X1 (dimension d’origine).
Utilisation du menu durant un diaporama Vitesse diaporama: Permet de déterminer la vitesse du diaporama. Chaque fois que la touche ENTER est enfoncée, la vitesse de défilement change. (Rapide → Lent → Normal) Rapide Fond musical act./dés.: Indiquez si vous voulez lire un fichier M’P3 durant un diaporama. Chaque fois que la touche ENTER est enfoncée, l’activation de la musique de fond change.
Rotation 1 En mode WISELINK, sélectionner un dispositif de mémoire installé. (Consulter la page 65) 2 Appuyer sur ENTER pour choisir Photo. Les fichiers JPEG et dossiers existants s’affichent. 3 Appuyez sur les touches ▲/▼/◄/► pour sélectionner un fichier, puis appuyez sur la touche ENTER. Appuyez sur la touche au-dessus d’une icône de photo pour montrer la photo présentement choisie en plein écran. Dépl. Retour 1/10 Page 709x531 2006-1-30 1/14 Dossier supér... Dépl.
Zoom avant 1 En mode WISELINK, sélectionner un dispositif de mémoire installé. (Consulter la page 65) 2 Appuyer sur ENTER pour choisir Photo. Les fichiers JPEG et dossiers existants s’affichent. 3 Appuyez sur les touches ▲/▼/◄/► pour sélectionner un fichier, puis appuyez sur la touche ENTER. Appuyez sur la touche au-dessus d’une icône de photo pour montrer la photo présentement choisie en plein écran. Dépl. Retour 1/10 Page 709x531 2006-1-30 1/14 Dossier supér... Folder 1 Dépl.
Utiliser la liste de pièces musicales (MP3) Il existe plusieurs méthodes de lecture des fichiers MP3 mémorisés dans un dispositif à mémoire. 1 En mode WISELINK, sélectionner un dispositif de mémoire installé. (Consulter la page 65) 2 Appuyez sur la touche ◄ ou ► pour sélectionner Music, puis appuyez ENTER. Les fichiers MP3 et les dossiers existants s’affichent. 3 Appuyer sur la touche ▲ ou ▼ pour sélectionner un fichier à lire, suivie de la touche ENTER.
Menu de configuration Le menu de configuration affiche les paramètres d’utilisateur du menu WISELINK. 1 En mode WISELINK, sélectionner un dispositif de mémoire installé. (Consulter la page 65) 2 Appuyez sur la touche ◄ ou ► poursélectionner Configuration, puisappuyez sur ENTER. Le menu Configuration apparaît. 3 Appuyez sur la touche ▲ ou ▼ pour sélectionner l’élément souhaité, puis appuyez sur la touche ENTER.
Annexe Identification des problèmes Le tableau ci-dessous dresse la liste des problèmes courants et suggère des solutions. Si aucun de ces conseils ne permet de corriger le problème, contactez un centre de service Samsung autorisé. Problème Solution possible Image de mauvaise qualité. - Essayez une autre chaîne. - Réorientez l’antenne. - Vérifiez les connexions de tous les câbles. - Essayez une autre chaîne. - Réorientez l’antenne. - Essayez une autre chaîne. - Appuyez sur la touche SOURCE.
Remplacement de la lampe Pourquoi remplacer la lampe? ● La lampe de téléviseur à projection a une durée utile limitée. Pour préserver la qualité de l’image, il faut remplacer la lampe régulièrement. Une fois la lampe remplacée, l’écran redeviendra aussi brillant et précis qu’un neuf.
4 Saisir la poignée et la tirer pour séparer l’ampoule du moteur. ➢ ● Utiliser une ampoule de remplacement de même type. ● Après avoir remplacé l’ampoule, aligner son couvercle sur l’onglet et serrer les vis. ● Le téléviseur ne s’allume pas si le couvercle de l’ampoule n’est pas bien fermé (ce qui active le circuit de protection). Nettoyage et entretien du téléviseur Suivez ces instructions pour obtenir des performances optimales avec votre téléviseur.
Fiche technique Les descriptions et caractéristiques figurant dans ce manuel sont offertes à titre d’information seulement. Elles sont susceptibles de modifications sans préavis.
Contact SAMSUNG WORLD-WIDE If you have any questions or comments relating to Samsung products, please contact the SAMSUNG customer care center. Communiquez avec SAMSUNG WORLD-WIDE Pour toute question ou commentaire se rapportant aux produits Samsung, veuillez communiquer avec le centre de service à la clientèle SAMSUNG.. Country Customer Care Center Web Site CANADA 1-800-SAMSUNG (7267864) www.samsung.com/ca U.S.A 1-800-SAMSUNG (7267864) www.samsung.com Address Samsung Electronics Canada Inc.