HT-F4500 HT-F4530 5.1CH Blu-ray™ Home Entertainment System user manual imagine the possibilities Thank you for purchasing this Samsung product. To receive more complete service, please register your product at www.samsung.com/register HT-F4500_30_ZC_0109.
Safety Information Warning TO REDUCE THE RISK OF ELECTRIC SHOCK, DO NOT REMOVE THE COVER (OR BACK). NO USER-SERVICEABLE PARTS ARE INSIDE. REFER SERVICING TO QUALIFIED SERVICE PERSONNEL. CAUTION RISK OF ELECTRIC SHOCK DO NOT OPEN The lighting flash and arrowhead within the triangle are warning signs alerting you to dangerous voltage inside the product. CAUTION: TO REDUCE THE RISK OF ELECTRIC SHOCK, DO NOT REMOVE THE COVER (OR BACK). NO USER SERVICEABLE PARTS INSIDE.
Precautions 1. 2. 3. 4. 5. 6. 7. Read these instructions. 8. Do not install near any heat sources such as radiators, heat registers, stoves, or other apparatus (including AV receivers) that produce heat. 9. Do not defeat the safety purpose of the polarized or grounding-type plug. A polarized plug has two blades with one wider than the other. A grounding type plug has two blades and a third grounding prong. The wide blade or the third prong are provided for your safety.
Safety Information • To turn this apparatus off completely, you must pull the power plug out of the wall socket. Consequently, the power plug must be easily and readily accessible at all times. License Manufactured under license from Dolby Laboratories. Dolby, Pro Logic, and the double-D symbol are trademarks of Dolby Laboratories. Manufactured under license under U.S. Patent Nos: 5,956,674; 5,974,380; 6,226,616; 6,487,535; 7,392,195; 7,272,567; 7,333,929; 7,212,872 & other U.S.
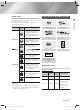
GETTING STARTED Disk and Format Compatibility Logos of Discs the product can play Accessories Front Panel Rear Panel Remote Control Safety Information 6 7 9 10 10 11 01 • If you want to enjoy 3D content, connect a 3D device (3D compliant AV receiver or TV) to the product’s HDMI OUT port using a high-speed HDMI cable. Put on 3D glasses before playing the 3D content. • The product outputs 3D signals only through HDMI cable connected to the HDMI OUT port.
Getting Started Disk and Format Compatibility Disc Types and Contents Your Product Can Play Media Disc Type Blu-ray Disc 3D Blu-ray Disc VIDEO Details BD-ROM or BD-RE/-R disc recorded in the BD-RE format. DVD-VIDEO, DVD-RW, DVD-R, DVD+RW, DVD+R DVD-VIDEO, recorded DVD+RW/DVD-RW(V)/DVD-R/+R discs that have been recorded and finalized, or a USB storage media containing MKV, MP4 contents.
Region Code Logos of Discs the product can play Region Code Area A North America, Central America, South America, Korea, Japan, Taiwan, Hong Kong and South East Asia. B Europe, Greenland, French territories, Middle East, Africa, Australia and New Zealand. C India, China, Russia, Central and South Asia. 1 The U.S., U.S.
Getting Started Picture File Support File Extension Type *.jpg *.jpeg *.jpe JPEG *.png PNG Resolution 15360x8640 Video File Support File Extension Container Video Codec Audio Codec *.avi AVI MP4v3 H.264 BP/MP/HP MP3, Dolby Digital, DTS, WMA, PCM *.mkv MKV VC-1 AP H.264 BP/MP/HP MP3, Dolby Digital, DTS *.wmv WMV (wmv9) VC-1 AP VC-1 SM WMA *.mp4 MP4 MP4 (mp4v) H.264 BP/MP/HP AAC *.mpg *.mpeg PS MPEG1 MPEG2 H.
• “x.v.Color” is a trademark of Sony Corporation. • “AVCHD” and the AVCHD logo are trademarks of Matsushita Electronic Industrial Co., Ltd. and Sony Corporation. 02 | NOTES | Some AVCHD format discs may not play, depending on the recording conditions. AVCHD format discs need to be finalized. “x.v.Color” offers a wider color range than normal DVD camcorder discs. Some MKV and MP4 format discs may not play, depending on their video resolution and frame rate.
Getting Started Front Panel PLAY/PAUSE ENTER STOP OPEN/CLOSE VOLUME CONTROL FUNCTION 5V 500mA DISPLAY DISC TRAY USB HOST POWER REMOTE CONTROL SENSOR | NOTES | To upgrade the product's software through the USB Host jack, you must use a USB memory stick. When the product displays the Blu-ray Disc menu, you cannot start the movie by pressing the 6 button on the product or the remote. To play the movie, you must select Play Movie or Start in the disc menu, and then press the E button.
Remote Control 02 Tour of the Remote Control Getting Started Turn the product on and off. FUNCTION VOLUME Adjust the volume. MUTE - + 1 2 3 4 5 6 7 8 Press to select Blu-ray's mode. (BD/DVD, D. IN, AUX, etc.). To open and close the disc tray. Cut off the sound temporarily. Press numeric buttons to operate options. 9 DISC MENU TITLE MENU Press to view the disc menu. 0 POPUP Press to skip backwards or forwards. Press to search backwards or forwards. Press to play a disc.
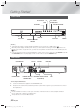
Connections This section describes various methods of connecting the product to other external components. Before moving or installing the product, be sure to turn off the power and disconnect the power cord. Connecting the Speakers Position of the product Place it on a stand or cabinet shelf, or under the TV stand. Center Subwoofer Front (R) Surround (R) Product Front (L) Selecting the Listening Position The listening position should be located about 2.
HT-F4530 03 (R) SCREW (5x20): 8EA SPEAKER CABLE CENTER (L) FRONT STAND STAND BASE Connections (L) (R) SURROUND SUBWOOFER Installing the Speakers on the Tallboy Stand * HT-F4530 only - Front Speakers 1. 2. Turn the Stand Base upside-down and connect it to the Stand. 1 Stand Base 2 Use the driver to combine the screws on the 3 marked holes. Stand 3. Straighten a supplied speaker wire to the gravity direction and put in the hole on the center of Stand Base. 4.
Connections In case of HT-F4500 Surround Speaker (L) Front Speaker (R) SURROUND FRONT SURROUND R FRONT R SUBWOOFER L L SPEAKER IMPEDANCE : 3 Surround Speaker (R) Front Speaker (L) CENTER Center Speaker Subwoofer SURROUND FRONT R R SUBWOOFER SURROUND FRONT L L SPEAKER IMPEDANCE : 3 SPEAKERS OUT AUX IN SPEAKERS OUT FM ANT L CENTER R OPTICAL DIGITAL AUDIO IN | CAUTION | If you want to install the speakers on the wall, fasten screws or nails (not provided) firmly to the w
Connecting to TV/External Devices 03 Connections AUX IN FM ANT SURROUND FRONT R R SUBWOOFER SURROUND FRONT L L SPEAKER IMPEDANCE : 3 L POWER AUX IN FM ANT L CENTER SPEAKERS OUT R OPTICAL DIGITAL AUDIO IN HDMI OUT LAN R OPTICAL DIGITAL AUDIO IN Method 1 R Red W White HDMI OUT LAN Method 2 External Devices OPTICAL OUT HDMI IN Connecting to a TV Connect an HDMI cable (not supplied) from the HDMI OUT jack on the back of the product to the HDMI IN jack on your TV.
Settings 4:3 Letter Box - For older, standard screen, analog TVs. Displays 4:3 pictures in full screen and 16:9 pictures in letter box format that retains the 16:9 aspect ratio but puts black bars above and below the picture. 4:3 Pan-Scan - For older, standard screen, analog TVs. Displays 4:3 pictures in full screen and 16:9 pictures in Pan-Scan format that fills the screen, but cuts off the left and right sides of the picture and enlarges the middle vertically.
MAC Address (d0:66:7b:dc:28:fc) IP Address, Subnet Mask, Gateway, DNS Server | NOTES | To play or view video, photo, music files located on Your network is operating properly. If you still have a network problem, contact your network service provider. your PC, you must connect your home theater and PC to a home network and you must download, install, and configure the DLNA software on your PC. (See page 22.
Settings 2 RETURN (') Button : Return to the previous menu. 3 E (Enter) / DIRECTION Button : • Press ▲▼◄► to move the cursor or select an item. • Press the E button to activate the currently selected item or confirm a setting. 4 EXIT Button : Press to exit the current menu. BD Wise BD Wise is Samsung’s latest interconnectivity feature.
Audio Return Channel Digital Output Dynamic Range Control Lets you select which speakers you want active, either the TV's speakers or the home theater's speakers. Lets you direct the sound from the TV to the home theater speakers. Requires an HDMI connection and an Audio Return Channel (ARC) compatible TV. • When Audio Return Channel is set to Auto, the home theater automatically selects either ARC or optical input as the audio source, depending on your connections.
Settings Language You can select the language you prefer for the OnScreen Menu, disc menu, etc. • The selected language will only appear if it is supported on the disc. Security Configuring Your Network Connection If you skipped network setup during the Initial Setup, follow the instructions below to configure the home theater's network connection. Before you begin, contact your ISP to find out if your IP address is static or dynamic. If it is dynamic, we recommend you use the automatic procedure below.
Settings 0 0 Press the E button. Directions for each method begin below. 0 : 0 System Subnet Mask : 255 255 255 0 Language Gateway : 0 Security DNS : Manual : 0 DNS Server 0 0 0 0 0 0 Support > Move " Select ' Return 1. Follow the first four steps in the Automatic procedure, but select Manual instead of Auto in Step 4. 2. Press the ▼ button to go to the first entry field (IP Address). 3. Use the number buttons on your remote to enter numbers. 4.
Settings 3. Enter the product's model number into the search field. As you enter the model number, a drop down will display products that match the model number. 4. Left click your product's model number in the drop down list. 5. On the page that appears, scroll down to and then click Firmware Manuals & Downloads. 6. 7. Click Firmware in the center of the page. 8. Click Send in the first pop-up that appears. Click OK in the second pop-up to download and save the firmware file to your PC. 9.
Media Play Playing Files on a USB Device Move to the Home menu. 3. Press the ◄► button to select Yes, then press the E button. 4. Press the RED (A) button. In Stop mode, connect the USB storage device to the USB port on the front panel of the product. The message “Do you want to access the device?” is displayed. Videos Photos Music Media Play 1. 2. 05 You can play multimedia files located on a connected USB device. 6-1.
Media Play Playing a Commercial Video Disc Place a disc into the disc tray with the disc’s label facing up and then close the disc tray. Playback starts automatically. If it does not playback automatically, move to Videos in the Home menu and press the E button. In most cases, commercial videos will display a disc menu. To play the movie on the disc, select Play on the disc menu, and then press E. 2 | NOTES | For more information about playing videos, go to "Controlling Video Playback" on this page.
Angle To view a scene from another angle. The Angle option displays the number of angles available to view (1/1, 1/2, 1/3, etc.). BONUSVIEW Video / BONUSVIEW Audio Select to set the desired bonusview option. To play a particular track, use the ▲▼ buttons on the remote to select the track, and then press the E button. 2. | NOTES | Media Play Select to set the desired subtitle language. 05 Subtitle For more information about playing music, go to "Controlling Music Playback" on this page.
Media Play Creating a Music Playlist 1. 2. Controlling Photo Playback If playing music from a commercial CD or DVD, press the 5 or RETURN (') button. The Music List Screen appears. If you are creating a playlist from music on a user created disk or USB device, access the Music list as described in "Playing Files on a USB Device" on page 23 or "Playing a Disc with User Recorded Content" on page 23. Press the ▲▼◄► buttons to move to the desired file, and then press the YELLOW (C) button to select it.
Listening to Radio Press the FUNCTION button to select FM. Tune in to the desired station. • Preset Tuning 1 : Press the 5 button to select PRESET and then press the TUNING UP, DOWN button to select the preset station. - Before you can tune to preset stations, you must add preset stations to the product's memory. See Presetting Stations below. • Manual Tuning : Press the 5 button to select MANUAL and then press the TUNING UP, DOWN button to tune in to a lower or higher frequency.
Network Services Using BD-LIVE™ 1. Connect the product to the network. (See page 14) 2. Configure the network settings. (See pages 20~21) Once the product is connected to your network, you can enjoy various movie-related service contents available on BD-LIVE compliant discs. 1. Attach a USB memory stick to the USB jack on the front of the product, and then use BD Data Management to check its remaining memory. The memory device must have at least 1GB of free space to accommodate the BD-LIVE services.
Appendix Additional Information HDMI OUT • Certain HDMI output resolutions may not work, depending on your TV. • You must have an HDMI connection to enjoy videos with 3D technology. • A long HDMI cable may cause screen noise. If this occurs, set HDMI Deep Color to Off in the menu. Settings 3D Settings • For some 3D discs, to stop a movie during 3D playback, press the 5 button once. The movie stops and the 3D mode option is de-activated.
Appendix Speaker Settings Playing a JPEG files • When Speaker Selection is set to TV Speaker, audio is produced through the TV speakers. • You can’t enlarge the subtitle and PG graphic in the full screen mode. Media Play HDMI audio • When HDMI audio is outputted to the TV speaker, it is automatically down-mixed to 2 channels. Audio Return Channel • When Anynet+ (HDMI-CEC) is Off, the Audio Return Channel function is not available.
Digital Output Selection PCM Audio Stream on Blu-ray Disc PCM Dolby Digital Dolby Digital Up to PCM 7.1ch Dolby TrueHD DTS DTS-HD High Resolution Audio Definition for Blu-ray Disc Dolby Digital Plus Dolby TrueHD Up to PCM 6.1ch Up to PCM 7.
Appendix Resolution according to the output mode Blu-ray Disc/E-contents/Digital Contents playback DVD playback HDMI Mode Output Setup BD Wise E-contents/ Digital contents HDMI Mode Blu-ray Disc Resolution of Blu-ray Disc 1080p@60F 480i Auto Max. Resolution of TV input Max.
Symptom Check/Remedy The remote control does not work. • Are you operating the remote within its operational range and within the proper angle relative to the sensor? • Are the batteries drained? • The disc is rotating but no picture is produced. • Picture quality is poor and picture is shaking. • • • • Audio language and subtitles do not work. • Audio language and subtitles will not work if the disc does not contain them. The menu screen does not appear even when the menu function is selected.
Appendix Symptom Check/Remedy If the HDMI output is set to a resolution your TV cannot support (for example, 1080p), you may not see a picture on your TV. • Press and hold the 5 button on front panel for more than 5 seconds with no disc inserted. All settings will revert to the factory settings. No HDMI output. • Check the connection between the TV and the HDMI jack of the product. • Check if your TV supports 480p/720p/1080i/1080p HDMI input resolution. Abnormal HDMI output screen.
Specifications 16.9 (W) x 2.1 (H) x 9.8 (D) inches General Appendix 5.0 Ibs Dimensions 07 Weight Operating Temperature Range +41°F to +95°F FM Tuner Operating Humidity Range 10 % to 75 % Signal/noise ratio 55 dB Usable sensitivity 12 dB Total harmonic distortion 0.
Appendix 5.1ch speaker system Speaker system Front Surround Center Subwoofer Impedance 3 3 3 3 Frequency range 200Hz~ 20kHz 200Hz~ 20kHz 200Hz~ 20kHz 55Hz ~ 300Hz Output sound 84dB/W/M pressure level 84dB/W/M 84dB/W/M 84dB/W/M Rated input 80W 80W 80W 100W Maximum input 160W 160W 160W 200W Speaker HT-F4500 3.7 x 4.5 x 2.9 Dimensions (W x H x D) (Unit : inch) 3.7 x 4.5 x 2.9 3.7 x 4.5 x 2.9 6.1 x 11.8 x 11.2 HT-F4530 3.7 x 43.7 x 2.9 (Stand base: 10.8 x 7.4) 3.7 x 4.
LIMITED WARRANTY TO ORIGINAL PURCHASER Samsung Electronics Canada Inc.(SECA), warrants that this product is free from defective material and workmanship. SECA further warrants that if this product falls to operate properly within the specified warranty period and the failure is due to improper workmanship or defective materials, SECA will repair or replace the product at its option. All warranty repairs must be performed by a SECA Authorized Service Center.
Contact SAMSUNG WORLD WIDE If you have any questions or comments relating to Samsung products, please contact the SAMSUNG customer care center. Area Contact Center Web Site ` North America Canada 1-800-SAMSUNG (726-7864) www.samsung.com Mexico 01-800-SAMSUNG (726-7864) www.samsung.com U.S.A 1-800-SAMSUNG (726-7864) www.samsung.com HT-F4500_30_ZC_0109.
HT-F4500 HT-F4530 Technoloisir Blu-ray™ 5,1 canaux Guide d’utilisation imaginez les possibilités Merci d'avoir acheté ce produit Samsung. Pour obtenir notre service complet, veuillez enregistrer votre produit sur www.samsung.com/register HT-F4500_30_ZC_FRC-0111.
Information relative à la sécurité Avertissement POUR RÉDUIRE LES RISQUES D’ÉLECTROCUTION, NE RETIREZ JAMAIS LE CAPOT (NI L’ARRIÈRE). LES PIÈCES DE CE PRODUIT NE SONT PAS RÉPARABLES PAR L’UTILISATEUR. VEUILLEZ CONTACTER UN TECHNICIEN QUALIFIÉ POUR TOUTE RÉPARATION. ATTENTION RISQUE DE CHOC ÉLECTRIQUE NE PAS OUVRIR. L’éclair et la flèche inclus dans le triangle représentent un avertissement à l’égard de tensions dangereuses se trouvant à l’intérieur du produit.
Précautions 1. 2. 3. 4. 5. 6. 7. Lisez ces instructions. 8. Ne l’installez jamais à proximité de sources de chaleur telles que les radiateurs, les registres de chaleur, les poêles ou autres appareils (y compris les récepteurs A/V) qui dégagent de la chaleur. 9. Ne démontez pas le dispositif de sécurité de la fiche polarisée ou de mise à la terre. Les fiches polarisées sont pourvues de deux lames, dont l’une est plus large que l’autre.
Information relative à la sécurité • Pour mettre cet appareil totalement hors tension, vous devez retirer la fiche électrique de la prise murale. Par conséquent, la fiche doit être aisément accessible en tout temps. Licence Fabriqué sous licence concédée par Dolby Laboratories. Dolby, Pro Logic et le symbole du double-D sont des marques de commerce de Dolby Laboratories.
© 2013 Samsung Electronics Co.,Ltd. Tous droits réservés. Le présent guide d’utilisation ne peut être reproduit ou copié, partiellement ou dans son intégralité, sans le consentement écrit préalable de Samsung Electronics Co., Ltd.
Pour démarrer Compatibilité du disque et du format Types de disque et contenus que votre produit peut lire Média Type de disque Disque Blu-ray Disque Blu-ray 3D VIDÉO DVD-VIDÉO, DVDRW, DVD-R, DVD+RW, DVD+R Détails Le disque BD-ROM ou BD-RE/-R est enregistré dans le format BD-RE. DVD-VIDÉO, disques DVD+RW/DVD-RW(V)/DVD-R/+R qui ont été enregistrés et finalisés ou périphérique USB comprenant du contenu MKV ou MP4.
Code de région Code de région Zone A Amérique du Nord, Amérique Centrale, Amérique du Sud, Corée, Japon, Taïwan, Hong Kong et Sud-Est asiatique. B Europe, Groenland, territoires français, Moyen-Orient, Afrique, Australie et Nouvelle Zélande. C Inde, Chine, Russie, Asie centrale et Asie méridionale. 1 États-Unis, territoires américains et Canada 2 Europe, Japon, Moyen Orient, Égypte, Afrique du Sud et Groenland. 3 Taiwan, Corée, Philippines, Indonésie et Hong Kong.
Pour démarrer Support pour fichiers d’images Extension de fichier Type *.jpg *.jpeg *.jpe JPEG *.png PNG Résolution 15360x8640 Fichiers vidéo pris en charge Extension de fichier Conteneur Codec vidéo Codec audio *.avi AVI MP4v3 H.264 BP/MP/HP MP3, Dolby Digital, DTS, WMA, PCM *.mkv MKV VC-1 AP H.264 BP/MP/HP MP3, Dolby Digital, DTS *.wmv WMV (wmv9) VC-1 AP VC-1 SM WMA *.mp4 MP4 MP4 (mp4v) H.264 BP/MP/HP AAC *.mpg *.mpeg PS MPEG1 MPEG2 H.
• « x.v.Color » est une marque de commerce de Sony Corporation. • « AVCHD » et le logo AVCHD sont des marques de commerce de Matsushita Electronic Industrial Co., Ltd. et de Sony Corporation. Pour démarrer Remarques sur la connexion USB 02 | REMARQUE | Il se pourrait que certains disques de format AVCHD ne puissent pas être lus en raison des conditions d'enregistrement. Les disques de format AVCHD doivent être finalisés. Le format « x.v.
Pour démarrer Face avant LECTURE/PAUSE ARRÊT ENTRER OUVRIR/FERMER COMMANDES DU VOLUME FONCTION 5V 500mA AFFICHAGE TIROIR DISQUE HÔTE USB DÉTECTEUR DE TÉLÉCOMMANDE MARCHE/ ARRÊT | REMARQUE | Pour mettre à niveau le logiciel du produit en utilisant la prise Hôte USB, vous devez utiliser une clé USB. Lorsque le produit affiche le menu du disque Blu-ray, vous ne pouvez pas commencer à visionner le film en appuyant sur la touche 6 du produit ou sur la touche de la télécommande.
Télécommande 02 Aperçu de la télécommande FUNCTION VOLUME MUTE Pour régler le volume. - + Appuyez sur les touches numériques pour exécuter les options. 1 2 3 4 5 6 7 8 9 TITLE MENU Pour accéder au menu Disque. Pour effectuer un saut vers l’avant ou vers l’arrière. Appuyez pour lire un disque. 0 POPUP Appuyez pour arrêter un disque. Pour accéder au menu Accueil. Pour utiliser le menu Outils. Pour sélectionner les éléments du menu à l’écran et en changer les valeurs.
Connexions Cette section couvre différentes méthodes pour connecter le produit à d’autres périphériques. Avant de déplacer ou d’installer le produit, assurez-vous de couper l’alimentation et de débrancher le cordon d'alimentation. Connexion des enceintes Mise en place du produit Placez le produit sur un socle, sur une étagère du meuble ou sous le pied du téléviseur.
HT-F4530 03 (D) VIS (5x20): 8EA CÂBLE D’ENCEINTE CENTRALE (G) AVANT PIED BASE DU PIED Connexions (G) (D) AMBIOPHONIQUES CAISSON DES BASSES Installation des enceintes sur le socle Tallboy * HT-F4530 seulement – Enceintes avant 1. 2. Tournez le pied à l’envers et fixez-le au socle. 1 Base du pied 2 Utilisez le tournevis pour insérer les vis dans les trois orifices marqués. Pied 3.
Connexions Dans le cas du modèle HT-F4500 Enceinte ambiophonique (D) SURROUND SURROUND R L Enceinte avant (D) FRONT FRONT R SUBWOOFER L SPEAKER IMPEDANCE : 3 Enceinte ambiophonique (G) Enceinte avant (G) CENTER Enceinte centrale Caisson des basses SURROUND FRONT R R SUBWOOFER SURROUND FRONT L L SPEAKER IMPEDANCE : 3 SPEAKERS OUT AUX IN FM ANT L CENTER SPEAKERS OUT R OPTICAL DIGITAL AUDIO IN | MISES EN GARDE | Si vous voulez installer les enceintes sur le mur, vissez le
Branchement à des périphériques externes/un téléviseur 03 Connexions AUX IN FM ANT SURROUND FRONT R R SUBWOOFER SURROUND FRONT L L SPEAKER IMPEDANCE : 3 L POWER AUX IN FM ANT L CENTER SPEAKERS OUT R OPTICAL DIGITAL AUDIO IN HDMI OUT LAN R OPTICAL HDMI OUT DIGITAL AUDIO IN Méthode 1 R Rouge W Blanc LAN Méthode 2 Périphériques OPTICAL OUT HDMI IN Connexion à un téléviseur Branchez un câble HDMI (non fourni) de la prise HDMI OUT située à l’arrière du produit à la prise HDMI
Définition des Paramètres 4:3 Letter Box - Pour les anciens téléviseurs analogiques à écran standard. Affiche les images 4:3 en format plein écran et les images 16:9 en format panoramique qui maintient le format d’image 16:9, mais remet les barres au-dessus et au-dessous de l’image. 4:3 Pan-Scan - Pour les anciens téléviseurs analogiques à écran standard.
MAC adresse (d0:66:7b:dc:28:fc) Adresse IP,Masque sous-réseau,Passerelle, Serveur DNS | REMARQUE | Pour lire ou afficher une vidéo, une photo ou des Votre réseau fonctionne correctement.Si vous rencontrez encore des problèmes réseau, contactez votre fournisseur de services réseau. fichiers musicaux de votre PC vous devez brancher votre cinéma maison et votre ordinateur à un réseau domestique, puis télécharger, installer et configurer le logiciel DLNA sur votre ordinateur. (Voir page 22.
Définition des Paramètres 2 Touche RETURN (') : Pour revenir au menu précédent. 3 Touche E (Entrer) / DIRECTION : • Appuyez sur les touches ▲▼◄► pour déplacer le curseur ou sélectionner un élément du menu. • Appuyez sur la touche E pour activer l’élément actuellement sélectionné ou confirmer un paramètre. 4 Touche EXIT : Appuyez sur cette touche pour quitter le menu. | REMARQUE | BD Wise BD Wise est la fonctionnalité d’interconnectivité la plus récente de Samsung.
Fonct. Retour Audio Sortie numérique Contrôle de la dynamique Vous permet de diriger le son du téléviseur vers les enceintes du cinéma maison. Requiert une connexion HDMI et un canal retour audio (ARC) compatible avec le téléviseur. • Lorsque l’option Fonc. Retour Audio est réglée sur Auto, le cinéma maison sélectionne automatiquement ARC ou l’entrée optique comme source audio, selon vos connexions. Si l’option Fonc. Retour Audio est activée, l’entrée optique sera inopérante.
Définition des Paramètres Langue Vous pouvez sélectionner votre langue préférée pour les options Menu à l'écran, le menu du disque, etc. • La langue sélectionnée ne s’affiche que lorsqu’elle est prise en charge par le disque. Sécurité Le NIP par défaut est 0000. Si vous n’avez pas créé votre propre NIP, saisissez le NIP par défaut pour accéder à la fonction de sécurité.
4. Paramètres Paramètres réseau câblé : Manuel : 0 0 0 Système Masque sous-réseau : 255 255 255 Langue Passerelle : 0 Sécurité DNS : Manuel Général : 0 Serveur DNS 0 0 0 0 0 0 0 0 Assistance > Déplacer 1. 2. 3. 4. 5. 6. 7. " Sélectionner ' Retour Exécutez les quatre premières étapes de la procédure automatique, mais sélectionnez Manuel à la place d’Auto à l’étape 4. Appuyez sur la touche ▼ pour accéder au premier champ d’entrée (Adresse IP).
Définition des Paramètres Saisissez le numéro de modèle du produit dans le champ de recherche. Pendant que vous entrez le numéro de modèle, un menu déroulant affiche des produits qui lui correspondent. 4. À l’aide du bouton de gauche de la souris, cliquez sur le numéro de modèle du produit dans la liste déroulante.Sur la page qui s’affiche, déroulez le menu, puis cliquez sur Firmware Manuals & Downloads. 5. Cliquez sur Firmware au centre de la page. 6.
Diffuseur de Médias Lecture des fichiers stockés sur un périphérique USB 3. 4. Accédez au menu Accueil. En mode Arrêt, connectez le périphérique de stockage USB au port USB situé sur le panneau avant du produit. Le message «Changer de périphérique ?» s’affiche. Appuyez sur la touche ◄► pour sélectionner Oui, puis appuyez sur la touche E. Appuyez pp y sur la touche ROUGE ((A). ) Vidéos Photos Musique USB Flash Disk 5. 6. 7. 8. App 2 App 3 a Changer périph.
Diffuseur de Médias Lecture d’un disque vidéo disponible dans le commerce Placez un disque dans le tiroir disque, face imprimée dirigée vers le haut, puis fermez le tiroir. La lecture commence automatiquement. Si tel n’est pas le cas, accédez à l'élément Vidéos dans le menu Accueil, puis appuyez sur la touche E. La plupart des vidéos disponibles dans le commerce affichent un menu de disque. Pour lire le film stocké sur le disque, sélectionnez Lecture dans le menu du disque, puis appuyez sur E.
Angle Pour visionner une scène sous un autre angle. L’option Angle affiche le nombre d’angles sous lesquels il est possible de visionner (1/1, 1/2, 1/3, etc.). BONUSVIEW Vidéo / BONUSVIEW Audio Sélectionnez pour définir l’option Bonusview souhaitée. Menu qui apparaît seulement lors de la lecture d’un fichier Plein écran Sélectionnez pour définir la taille de plein écran souhaitée. Vous pouvez sélectionner Original, Mode1 (plus grand) et Mode2 (le plus grand).
Diffuseur de Médias Création d’une liste d’écoute musicale 1. 2. Si la lecture musicale est effectuée à partir du contenu d’un CD ou d’un DVD commercial, appuyez sur la touche 5 ou RETURN ('). L’écran Liste des fichiers musicaux apparaît.
Écoute de la radio 2. Appuyez sur la touche FUNCTION pour sélectionner l’entrée FM. Réglez sur la station souhaitée. • Préréglez Syntonisation 1 : Appuyez sur la touche 5 pour sélectionner PRESET puis sur la touche TUNING UP, DOWN pour sélectionner la station préréglée. - Avant de syntoniser les stations préréglées, vous devez les ajouter à la mémoire du produit. Voir Préréglable des stations cidessous.
Services Réseau Utilisation de BD-LIVE™ 1. Connecter le produit au réseau. (Voir page 14.) 2. Configurer les paramètres réseau. (Voir page 20-21.) Après avoir connecté le produit au réseau, vous pouvez apprécier plusieurs contenus de services cinématographiques offerts sur des disques compatibles avec la technologie BD-LIVE. 1. Insérez une clé USB dans la prise USB située à l’avant du produit et vérifiez l'espace mémoire disponible via la commande Gestion données Bluray.
Annexe Information complémentaire SORTIE HDMI • Selon votre téléviseur, certaines résolutions de sortie HDMI pourraient être incompatibles. • Vous devez avoir une connexion HDMI pour visionner les vidéos en 3D. • Un câble HDMI qui est trop long pourrait entraîner du bruit à l’écran. Si c’est le cas, réglez la fonction Couleur intense HDMI en la réglant à Arrêt dans le menu. Paramètres Paramètres 3D • Avec certains disques 3D, pour arrêter la lecture 3D d'un film, appuyez une fois sur la touche 5.
Annexe Paramètre haut-parleur Lecture de fichiers JPEG • Losque Sélect. haut-parleur est réglé à Hautparleur TV, l’audio est produite par les enceintes du téléviseur. • Vous ne pouvez pas agrandir les sous-titres et les éléments de présentation graphique en mode Plein écran. Diffuseur de Médias Audio HDMI • Lorsque la sortie audio HDMI est produite par l’enceinte du téléviseur, elle est automatiquement sous-échantillonnée à 2 canaux. Fonct.
Sélection de la sortie numérique PCM Flux de données audio sur disque Bluray PCM Dolby numérique Dolby numérique Jusqu’à 7,1 canaux PCM Dolby numérique Plus Dolby TrueHD Définition pour disque Blu-ray Dolby numérique Plus Dolby TrueHD Jusqu’à 6,1 canaux PCM Audio DTS-HD Haute résolution Jusqu’à 7,1 canaux PCM DTS-HD Master Audio Flux de données audio sur DVD Train de bits (Dolby D réencodé) Récepteur A/V HDMI PCM DTS Train de bits (DTS réencodé) DTS ré-encodé Dolby numérique réencodé* DTS A
Annexe Résolution en fonction du mode de sortie Lecture de contenus de disques Blu-ray/e-Content/Numérique Sortie Configuration BD Wise Lecture de DVD Mode HDMI Contenu e-Content/ Numérique Mode HDMI Disque Blu-ray Résolution de disque Blu-ray 1080p à 60 ips 480i Résolution max. de l'entrée du téléviseur Auto Résolution max.
La télécommande ne fonctionne pas. • Utilisez-vous la télécommande dans les limites de la distance opérationnelle et dans l’angle approprié par rapport au capteur? • Les piles sont-elles épuisées? • Le disque tourne mais aucune image n’est produite. • La qualité de l’image est mauvaise et l’image tremble. • • • • La langue de l’audio et les sous-titres ne fonctionnent pas. • La langue de l’audio et les sous-titres ne fonctionnent pas si le disque ne les comprend pas.
Annexe Symptôme Vérification/Résolution Si la sortie HDMI est définie à une résolution que votre téléviseur ne peut pas prendre en charge (par exemple 1080p), il se peut qu'aucune image n'apparaisse à l'écran. • Appuyez pendant plus de 5 secondes sur le touche 5 situé sur la face avant du lecteur, lequel ne doit pas contenir de disque. Tous les paramètres reviennent aux valeurs par défaut définies à l’usine. Aucune sortie HDMI • Vérifiez la connexion entre le téléviseur et la prise HDMI du lecteur.
Caractéristiques techniques Dimensions 16,9 (L) x 2,1 (H) x 9,8 (P) po Plage de températures d’utilisation Plage de taux d’humidité d’utilisation Annexe Syntoniseur FM 5,0 Ib 07 Général Poids +41 °F à +95 °F 10 % à 75 % Rapport signal/bruit 55 dB Sensibilité utilisable 12 dB Distorsion harmonique totale 0,5 % Vidéo 1080p, 1080i, 720p, 480p Audio Audio PCM multicanal, audio Bitstream, audio PCM Sortie enceinte avant 80 W x 2 (3 ) Sortie enceinte centrale 80 W (3 ) Sortie enceinte a
Annexe Enceinte Système d’enceinte 5,1 canaux Système d’enceinte Avant Ambiophonique Centrale Caisson des basses Impédance 3 3 3 3 Gamme de fréquences 200 Hz - 20 kHz 200 Hz - 20 kHz 200 Hz - 20 kHz 55 Hz - 300 kHz Niveau de pression sonore de sortie 84dB/W/M 84dB/W/M 84dB/W/M 84dB/W/M Entrée nominale 80 W 80 W 80 W 100 W Entrée maximum 160 W 160 W 160 W 200 W HT-F4500 3,7 x 4,5 x 2,9 Dimensions (L x H x P) (Unité : po) 3,7 x 4,5 x 2,9 3,7 x 4,5 x 2,9 6,1 x 11,8 x 11,
GARANTIE LIMITÉE DE L’ACHETEUR INITIAL Samsung Electronics Canada Inc. (SECA) garantit ce produit contre les vices de matériau(x) et de fabrication. Si l'appareil ne fonctionne pas convenablement durant la période de garantie et que son mauvais fonctionnement est dû à un défaut de matériau(x) ou de fabrication, SECA réparera ou remplacera, à sa seule discrétion, l'appareil défectueux. Toutes les réparations sous garantie doivent être effectuées par un centre de service autorisé SECA.
Contacter SAMSUNG À TRAVERS LE MONDE Si vous avez des questions ou commentaires concernant les produits Samsung, veuillez communiquer avec le service à la clientèle SAMSUNG. Area Contact Center Web Site ` North America Canada 1-800-SAMSUNG (726-7864) www.samsung.com Mexico 01-800-SAMSUNG (726-7864) www.samsung.com U.S.A 1-800-SAMSUNG (726-7864) www.samsung.com AH68-02574D-00 HT-F4500_30_ZC_FRC-0111.