
User Manual

10
connections
INSTALLING THE WALL MOUNT
You can use the wall mount bracket to mount this unit on a wall.
Installation Precautions
• Install on a vertical wall only.
• For the installation, avoid a location with high temperature or humidity, or a wall that cannot sustain the
weight of the set.
• Check the strength of the wall. If the wall is not strong enough to support the unit, reinforce the wall or install
the unit on a different wall that can support the unit's weight.
• Purchase and use the fixing screws or anchors appropriate for the kind of wall you have (plaster board, iron
board, wood, etc.). If possible, fix the support screws into wall studs.
• Purchase wall mounting screws according to the type and thickness of the wall you will mount the Soundbar
on.
• Diameter : M5
• Length: 1 3/8 in (35 mm) or longer recommended.
• Connect cables from the unit to external devices before you install it on the wall.
• Make sure the unit is turned off and unplugged before you install it.
Otherwise, it may cause an electric shock.
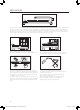
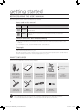
1. Place the installation guide against the wall surface.
• The installation guide must be placed parallel to the
wall.
• Installation should be done at least 2 inches (5 cm)
below the TV.
2. Mark the location where the screws will go through
on the wall using a pen, and then remove the
installation guide.
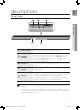
3. Fasten the wall mount and screw to the marked
location.
• The left and right mounts are different shapes.
4. Secure the two holder screws to the screw holes on
the back of the Soundbar's main body, one on the
left and one on the right.
5. Insert the USB cable into the unit before installing it
on the wall.
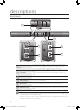
6. Set the holder screws on the back of the Soundbar
into the grooves of the wall mount.
For safe installation, make sure to push the holder
screws all the way to the bottom of the grooves.
( )
Using the Soundbar with Wall Mount
[Wall Mounting the Soundbar]
2 inches(5 cm) or more
HW-H550_H551-ZA-ENG-IB_20141024-delete.indd 10 2014/11/7 11:29:43