HW-J450 User manual Wireless Audio - Soundbar Imagine the possibilities Thank you for purchasing this Samsung product. To receive a more complete service, please register your product at www.samsung.com/register 'This Nanum Gothic Eco font is provided by NAVER' HW-J450-XU ENG-0115.
FEATURES FEATURES TV SoundConnect TV SoundConnect lets you listen to audio from your TV on your Soundbar via a Bluetooth connection and lets you control the sound. HDMI HDMI transmits video and audio signals simultaneously, and provides a clearer picture. The unit is also equipped with the ARC function which lets you listen to sound from your TV through the Soundbar via an HDMI cable. This function is only available if you connect the unit to an ARC compliant TV.
SAFETY INFORMATION SAFETY INFORMATION ENG SAFETY WARNINGS TO REDUCE THE RISK OF ELECTRIC SHOCK, DO NOT REMOVE THE COVER (OR BACK). NO USER-SERVICEABLE PARTS ARE INSIDE. REFER SERVICING TO QUALIFIED SERVICE PERSONNEL. This symbol indicates “dangerous voltage” inside the product that presents a risk of electric shock or personal injury. CAUTION RISK OF ELECTRIC SHOCK DO NOT OPEN This symbol indicates important instructions accompanying the product.
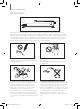
SAFETY INFORMATION PRECAUTIONS 68.6 mm 99.1mm 99.1mm 99.1mm Ensure that the AC power supply in your house complies with the power requirements listed on the identification sticker located on the back of your product. Install your product horizontally, on a suitable base (furniture), with enough space around it for ventilation 7~10 cm. Make sure the ventilation slots are not covered. Do not place the unit on amplifiers or other equipment which may become hot. This unit is designed for continuous use.
CONTENTS CONTENTS ENG 2 FEATURES 17 FUNCTIONS 2 Licenses 17 Input Mode 17 ARC (HDMI OUT) SAFETY INFORMATION 18 Bluetooth 3 Safety Warnings 20 Using Samsung Audio Remote App 4 Precautions 21 TV SoundConnect 22 USB 23 Software update 3 6 GETTING STARTED 6 Before reading the User’s Manual 6 What’s Included 24 TROUBLESHOOTING 7 DESCRIPTIONS 25 APPENDIX 7 Top/Front Panel 25 8 Rear Panel 9 REMOTE CONTROL 9 Remote Control Buttons and Functions Specifications 11 CONNEC
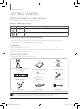
GETTING STARTED GETTING STARTED BEFORE READING THE USER’S MANUAL Note the following terms before reading the user manual. ++Icons used in this manual Icon Term Definition Caution Indicates a situation where a function does not operate or settings may be canceled. Note Indicates tips or instructions on the page that help you operate a function. ++Safety Instructions and Troubleshooting 1) Be sure to familiarise yourself with the Safety Instructions before using this product.
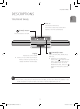
DESCRIPTIONS DESCRIPTIONS ENG TOP/FRONT PANEL VOL -/+ Controls the volume level. The numeric value of the volume level appears in the front panel display. (Power) Button Turns the power on and off. (SOURCE) Button Display Selects the D.IN, AUX, HDMI, BT, TV, USB input. Displays the current mode. ●● If there is no input from the product or remote control for 25 seconds, the display will dimmer automatically.
DESCRIPTIONS REAR PANEL HDMI IN Inputs digital video and audio signals simultaneously using an HDMI cable. Use when connecting a supported external device. (USB Port) HDMI OUT(TV) OPTICAL IN HDMI IN Connect to the Analog output of an external device. Connect USB devices such as MP3 players here to play files on the devices. AUX IN AUX IN DC 24V (Power Supply In) OPTICAL IN Connect the DC power adaptor to the power supply jack, and then connect the AC power adaptor plug to a wall outlet.
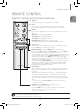
REMOTE CONTROL REMOTE CONTROL ENG REMOTE CONTROL BUTTONS AND FUNCTIONS SOURCE Press to select a source connected to the Soundbar. MUTE You can turn the volume down to 0 with the push of a button. Press again to restore the sound to the previous volume level. REPEAT Press to set the REPEAT function during music playback from a USB device. OFF-REPEAT : Cancels Repeat Playback. TRACK-REPEAT : Repeatedly play a track. ALL-REPEAT : Repeatedly play all tracks. RANDOM-REPEAT : Plays tracks in random order.
REMOTE CONTROL POWER Turns the Soundbar on and off. VOLUME Adjusts the volume level of the unit. Play/Pause Press the +# button to pause playing the file temporarily. Press the +# button again to play the selected file. Skip Back If there is more than one file on the device you are playing, and you press the [ button, the previous file is selected. SOUND EFFECT You can select different sound modes - STANDARD,MUSIC, VOICE, SPORTS, CINEMA, and NIGHT MODE - depending on the type of sources you want to enjoy.
CONNECTIONS CONNECTIONS ENG INSTALLING THE WALL MOUNT You can use the wall mount bracket to mount this unit on a wall. ++Installation Precautions ●● Install on a vertical wall only. ●● For the installation, avoid a location with high temperature or humidity, or a wall that cannot sustain the weight of the set. ●● Check the strength of the wall. If the wall is not strong enough to support the unit, reinforce the wall or install the unit on a different wall that can support the unit's weight.
CONNECTIONS DETACHING THE WALL MOUNT 1. Pull the Soundbar upwards as shown in the figure to separate it from the wall mount. Using the Soundbar with Wall Mount [Detaching the Soundbar from the Wall Mount] ●● Do not hang onto the installed unit and avoid striking or dropping the unit. ●● Secure the unit firmly to the wall so that it does not fall off. If the unit falls off, it may cause an injury or damage the product.
CONNECTIONS CONNECTING THE WIRELESS SUBWOOFER ENG The Subwoofer's linking ID is preset at the factory and the main unit and subwoofer should link (connect wirelessly) automatically when the main unit and subwoofer are turned on. If the Link indicator ( ) does not light when the main unit and subwoofer are turned on, please set the ID by following the procedure below. 1. Plug the power cords of the main unit and subwoofer into an AC wall outlet. 2.
CONNECTIONS ●● Before moving or installing the product, be sure to turn off the power and disconnect the power cord. ●● If the main unit is powered off, the wireless subwoofer will be in standby mode and the STANDBY LED on the upper side will come on after the Link indicator (Blue LED) blinks for 30 seconds. ●● If you use a device that uses the same frequency (2.4GHz) as the Soundbar near the Soundbar, interference may cause some sound interruption.
CONNECTIONS CONNECTING AN EXTERNAL DEVICE USING AN HDMI CABLE AUX IN OPTICAL IN ENG HDMI is the standard digital interface for connecting to such TVs, projectors, DVD players, Blu-ray players, set top boxes, and more. Because HDMI transmits the highest quality digital signal, you can enjoy superior video and audio - as it was originally created at the digital source.
CONNECTIONS CONNECTING AN EXTERNAL DEVICE USING AUDIO (ANALOGUE) CABLE OR OPTICAL (DIGITAL) CABLE AUX IN OPTICAL IN This unit comes equipped with one optical in digital jack and one audio Analogue in jack, giving you two ways to connect it to a TV.
FUNCTIONS FUNCTIONS ENG INPUT MODE Press the ( ) button on the main unit’s top panel or the select the mode you want. Input mode The unit turns off automatically in the following situations. Display Optical Digital input D.IN AUX input AUX HDMI input HDMI BLUETOOTH mode BT TV SoundConnect TV USB mode USB (SOURCE) button on the remote control to ●● D.IN/HDMI/BT/TV/USB Mode --If there is no audio signal for 25 minutes. ●● AUX Mode --If the AUX cable is disconnected for 25 minutes.
FUNCTIONS BLUETOOTH You can connect a Bluetooth device to the Soundbar and enjoy music with high quality stereo sound, all without wires! ++To connect the Soundbar to a Bluetooth device Check if the Bluetooth device supports the Bluetooth compliant stereo headset function. Connect Bluetooth device 1. Press the ( ) button on the main unit’s top panel or the (SOURCE) button on the remote control to select the BT mode. ●● If asked for PIN code when connecting a Bluetooth device, enter <0000>.
FUNCTIONS ++Bluetooth POWER on (Bluetooth POWER) 1. Press the Bluetooth POWER on the remote while the Soundbar is turned on. 2. ON-Bluetooth POWER appears on the Soundbar's display. ENG When the Bluetooth Power On function is on and the Soundbar is turned off, if a previously paired Bluetooth device tries to pair with the Soundbar, the Soundbar turns on automatically. ●● Available only if the Soundbar is listed among the Bluetooth device’s paired devices.
FUNCTIONS USING SAMSUNG AUDIO REMOTE APP Install Samsung Audio Remote App To control the product with your Smart Device via the Samsung Audio Remote app, download the Samsung Audio Remote App by accessing the app through Google Play store. Accessing the Samsung Audio Remote App After you install the Samsung Audio Remote app, follow the instructions in the app. ●● The APP function only supports Android mobile phone devices running Android OS 3.0 or later. 20 HW-J450-XU ENG-0115.
FUNCTIONS TV SOUNDCONNECT ++Connecting a TV to the Soundbar ENG You can enjoy TV sound through your Soundbar when it is connected to a Samsung TV that supports the TV SoundConnect function. Connect ●● If the distance between the TV and Soundbar exceeds 5 m, the connection may not be stable or the audio may stutter. If this occurs, relocate the TV or Soundbar so that they are within operational range, and then re-establish the TV SoundConnect connection. 1. Turn on the TV and Soundbar.
FUNCTIONS USB You can play music files located on USB storage devices through the Soundbar. Display USB port 1. Connect the USB device to the USB port of the product. 2. Press the ( ) button on the main unit’s top panel or the (SOURCE) button on the remote control to select the USB mode. 3. USB appears on the display screen. • The Soundbar connection to the USB device is complete. • The Soundbar automatically turns off (Auto Power Off) if no USB device has been connected for more than 25 minutes.
FUNCTIONS SOFTWARE UPDATE ENG Samsung may offer updates for the Soundbar's system firmware in the future. If an update is offered, you can update the firmware by connecting a USB device with the firmware update stored on it to the USB port on your Soundbar. Note that if there are multiple update files, you must load them onto the USB device singly and use them to update the firmware one file at a time. Please visit Samsung.
TROUBLESHOOTING TROUBLESHOOTING Before requesting service, please check the following. The unit will not turn on. • Is the power cord plugged into the outlet? ¼¼Connect the power plug to the outlet. A function does not work when the button is pressed. • Is there static electricity in the air? ¼¼Disconnect the power plug and connect it again. Sound is not produced. • Is the Mute function on? ¼¼Press the Mute button to cancel the function. • Is the volume set to minimum? ¼¼Adjust the Volume.
APPENDIX APPENDIX ENG SPECIFICATIONS Model name HW-J450 5V/0.5A USB Weight GENERAL Dimensions (W x H x D) 1.62 kg Subwoofer 4.6 kg Main Unit 957.5 x 59.5 x 66.5 mm Subwoofer 179 x 361 x 299.
Contact SAMSUNG WORLD WIDE If you have any questions or comments relating to Samsung products, please contact the SAMSUNG customer care Centre. Area ` Europe Contact Centre AUSTRIA 0800 - SAMSUNG (0800 7267864) BELGIUM 02-201-24-18 BOSNIA BULGARIA CROATIA CZECH DENMARK FINLAND FRANCE 051 331 999 07001 33 11 , sharing cost 062 726 786 800 - SAMSUNG (800-726786) 70 70 19 70 030-6227 515 01 48 63 00 00 0180 6 SAMSUNG bzw. 0180 6 7267864* (*0,20 €/Anruf aus dem dt. Festnetz, aus dem Mobilfunk max.