HW-K550 HW-K551 User manual Imagine the possibilities Thank you for purchasing this Samsung product. To receive more complete service, please register your product at www.samsung.com/register * ©2016 Samsung Electronics Co.,Ltd.
GETTING STARTED GETTING STARTED SAFETY INFORMATION SAFETY WARNINGS TO REDUCE THE RISK OF ELECTRIC SHOCK, DO NOT REMOVE THE COVER (OR BACK). NO USER-SERVICEABLE PARTS ARE INSIDE. REFER SERVICING TO QUALIFIED SERVICE PERSONNEL. This symbol indicates that high voltage is present inside. It is dangerous to make any kind of contact with any internal part of this product. CAUTION RISK OF ELECTRIC SHOCK. DO NOT OPEN.
GETTING STARTED PRECAUTIONS 99.1mm 99.1mm Ensure that the AC power supply in your house complies with the power requirements listed on the identification sticker located on the back of your product. Install your product horizontally, on a suitable base (furniture), with enough space around it for ventilation (7~10 cm). Make sure the ventilation slots are not covered. Do not place the unit on amplifiers or other equipment which may become hot. This unit is designed for continuous use.
GETTING STARTED CONTENTS 2 2 5 6 GETTING STARTED 26 FUNCTIONS What’s Included 27 Safety Information DESCRIPTIONS 6 Front / Right Side Panel 8 Remote Control 7 Rear / Bottom Panel 11 INSTALLATION 11 Installing the Soundbar 15 Detaching the Soundbar from the Wall 11 26 Input Mode 31 Software Update 33 TROUBLESHOOTING 33 34 20 Connecting to a TV 18 20 21 22 TV SoundConnect Connecting to a TV Using a Digital Optical Cable 23 Optical or Analogue Audio Cable 24 ●● You will be inf
GETTING STARTED WHAT’S INCLUDED ENG BEFORE READING THE USER’S MANUAL Note the following terms before reading the user manual. ++Icons used in this manual Icon Term Caution Note Definition Indicates a situation where a function does not operate or settings may be cancelled. Indicates tips or instructions on the page that help you operate a function. Check for the supplied accessories shown below.
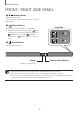
DESCRIPTIONS DESCRIPTIONS FRONT / RIGHT SIDE PANEL 1 / (Volume) Button Controls the volume level. The numeric value of the volume level appears in the front panel display. 2 (Source) Button Right Side Selects the D.IN, AUX, HDMI, BT, TV, or USB input. button ●● While the unit is powered on, pressing the for more than 3 seconds sets the button to act as the (Mute) button. To cancel the (Mute) button button for more than 3 seconds setup, press the again.
DESCRIPTIONS REAR / BOTTOM PANEL ENG DIGITAL AUDIO IN (OPTICAL) Connect to the digital (optical) output of an external device. (Micro USB Port) You can play the music from USB memory device if connecting Micro USB memory device or Micro USB to USB adapter cable (not supplied). Refer to Micro USB to USB adapter cable specification on page 24.
DESCRIPTIONS REMOTE CONTROL SOURCE Press to select a source connected to the Soundbar. Mute You can turn the volume down to 0 with the push of a button. Press again to restore the sound to the previous volume level. Repeat Press to set the Repeat function during music playback from a USB device. OFF - REPEAT : Cancells Repeat Playback. TRACK - REPEAT : Plays a track repeatedly. ALL - REPEAT : Plays all tracks repeatedly. RANDOM - REPEAT : Plays tracks in random order.
DESCRIPTIONS Power Turns the Soundbar on and off. Play / Pause Press the p button to pause a file temporarily. Press the p button again to play the selected file. Skip Back If there is more than one file on the device you are playing, and you press the [ button, the previous file is selected. SOUND CONTROL Press to select TREBLE, BASS, SUBWOOFER LEVEL, AUDIO SYNC, REAR SPEAKER, or REAR LEVEL.
DESCRIPTIONS ++Controlling the Soundbar using Your TV Remote Control 1. Press and hold the SOUND button for more than 5 seconds while the Soundbar is turned on. 2. "ON - TV REMOTE" appears on the Soundbar's display. 3. In the TV's menu, set the TV speaker to external speaker. ●● ●● ●● ●● Not available if the TV ARC function or HDMI mode is in use. All buttons are not available except the VOL +/- and the (Mute) buttons in this function. TV menus differ by manufacturer and model.
INSTALLATION INSTALLING THE SOUNDBAR INSTALLATION ENG INSTALLING THE WALL MOUNT ++Installation Precautions ●● Install on a vertical wall only. ●● For the installation, avoid a location with high temperature or humidity, or a wall that cannot sustain the weight of the set. ●● Check the strength of the wall. If the wall is not strong enough to support the unit, reinforce the wall or install the unit on a different wall that can support the unit's weight.
INSTALLATION A B B A-TYPE : 616mm B-TYPE : 360mm CENTER LINE A Centre Line 2. Align the Paper Template's Centre Line with the centre of your TV (if you are mounting the Soundbar below your TV), and then fix the Wall Mount Guide to the wall using tape. ●● If you are not mounting below a TV, place the Centre Line in the centre of the installation area. A B CENTER LINE A-TYPE : 616mm B-TYPE : 360mm B A A B 3.
INSTALLATION ENG 5. Push a screw (not supplied) through each Holder-Screw, and then screw each screw firmly into a support screw hole. 6. Use the two Screws (M4 x L12) to attach both Bracket-Wall Mount L and R to the Soundbar's bottom. For a proper fit, make sure to align the bumps on the Soundbar to the holes on the brackets. Rear side of Soundbar Right end of Soundbar ●● When assembling, make sure the hanger part of Bracket-Wall Mounts faces backwards.
INSTALLATION 7. Install the Soundbar with the attached Bracket-Wall Mounts by hanging the Bracket-Wall Mounts on the Holder-Screws on the wall. ●● Slightly tilt the Soundbar to insert both Holder-Screw heads into Bracket-Wall Mount holes. Push the Soundbar in the direction of the arrow to make sure both sides are firmly fixed.
DETACHING THE SOUNDBAR FROM THE WALL INSTALLATION ●● Do not hang onto the installed unit and avoid striking or dropping the unit. ●● Secure the unit firmly to the wall so that it does not fall off. If the unit falls off, it may cause an injury or damage the product. ●● When the unit is installed on a wall, please make sure that children do not pull any of the connecting cables, as this may cause it to fall.
CONNECTIONS CONNECTIONS ●● Do not connect the power cord of this product or your TV to a wall outlet until all connections between components are complete. ●● Before moving or installing this product, be sure to turn off the power and disconnect the power cord. CONNECTING THE SUBWOOFER CONNECTING TO THE SUBWOOFER AUTOMATICALLY The Subwoofer's linking ID is preset at the factory and the main unit and subwoofer should link (connect wirelessly) automatically when the main unit and subwoofer are turned on.
CONNECTIONS ●● The wireless receiving antenna is built into the wireless subwoofer. Keep the unit away from water and moisture. ●● For optimal listening performance, make sure that the area around the wireless subwoofer location is clear of any obstructions.
CONNECTIONS CONNECTING THE SWA-8000S (SOLD SEPARATELY) ●● Expand to true wireless surround sound by connecting the Samsung Wireless Rear Speaker Kit (SWA-8000S) to your Soundbar. (Sold separately) ●● Before connecting to the Wireless Receiver Module, connect your subwoofer first. ●● Use the speaker cable to connect the wireless receiver module to the speakers. ●● Plug the Power cord into a power outlet. The LED turns on. 1. While the main unit is powered off (in STANDBY mode), press and hold the 5 seconds.
L R ENG CONNECTING THE SURROUND SPEAKERS (SOLD SEPARATELY) CONNECTIONS SURROUND SPEAKERS OUT SPEAKER IMPEDANCE : 3Ω ID SET Surround Speaker (L) Surround Speaker (R) Wireless Receiver Module ●● Place these speakers to the side of your listening position. If there isn't enough room, place these speakers so they face each other. Position them about 60 to 90 cm above your ear, facing slightly downward. ●● Use the speaker cable to connect the Wireless Receiver Module to the Surround Speakers.
CONNECTIONS CONNECTING TO A TV ●● Important: Before you begin, put the battery into the remote. See page 10 for instructions. TV SOUNDCONNECT You can enjoy TV sound through your Soundbar when it is connected to a Samsung TV that supports the TV SoundConnect function. Connect 1. Turn on the TV and Soundbar. 2. Press the mode. button on the main unit’s right side or the SOURCE button on the remote control to select the TV 3.
CONNECTIONS ++Using the Bluetooth POWER On function 1. Connect the TV to your Soundbar using the TV SoundConnect function. 2. Press the Bluetooth POWER button on the Soundbar remote. ON - BLUETOOTH POWER appears on the Soundbar's display. • • ON - BLUETOOTH POWER : The Soundbar turns on and off when you turn the TV on or off. OFF - BLUETOOTH POWER : The Soundbar only turns off when you turn the TV off. ●● This function is supported by some Samsung TVs released from 2013 on.
CONNECTIONS CONNECTING TO A TV USING A DIGITAL OPTICAL CABLE Optical Cable (not supplied) DIGITAL AUDIO IN (OPTICAL) OPTICAL OUT DIGITAL AUDIO IN (OPTICAL) HDMI IN DIGITAL AUDIO IN (OPTICAL) USB (5V 0.5A) Wi-Fi SETUP SPK ADD DC 24V HDMI OUT (TV-ARC) AUX IN 1. Connect the DIGITAL AUDIO IN (OPTICAL) jack on the Soundbar to the OPTICAL OUT jack of the TV with a digital optical cable. 2. Press the button on the right side of the Soundbar or the SOURCE button on the remote control to select the D.
CONNECTIONS CONNECTING TO EXTERNAL DEVICES HDMI is the standard digital interface for connecting to TVs, projectors, DVD players, Blu-ray players, set top boxes, and more. HDMI prevents any degradation to the signal due to conversion to analogue and maintains the video and audio quality of the original digital source. Digital Devices HDMI OUT HDMI Cable (not supplied) HDMI IN DIGITAL AUDIO IN (OPTICAL) HDMI IN HDMI IN DIGITAL AUDIO IN (OPTICAL) USB (5V 0.
CONNECTIONS ++Optical Cable 1. Connect DIGITAL AUDIO IN (OPTICAL) on the main unit to the OPTICAL OUT jack of the Source Device using a digital optical cable. 2. Press the button on the right side of the Soundbar or the SOURCE button on the remote control to select the D.IN mode. USB You can play music files located on USB storage devices through the Soundbar. USB port HDMI IN DIGITAL AUDIO IN (OPTICAL) USB (5V 0.
CONNECTIONS 4. USB appears on the display screen. • The Soundbar connection to the USB device is complete. The Soundbar automatically turns off (Auto Power Off) if no USB device has been connected for more than 5 minutes. ++Before you connect a USB device Be aware of the following: ●● If the file name of a file on a USB device exceeds 10 characters, it is not displayed on the Soundbar's display. ●● This product may not be compatible with certain types of USB storage media.
FUNCTIONS FUNCTIONS INPUT MODE button on the main unit’s right side or the SOURCE button on the remote control to select the mode Press the you want. Right Side of the Soundbar Input mode Display Optical Digital input D.IN ARC (HDMI OUT) input AUX input HDMI input AUX HDMI BLUETOOTH mode TV SoundConnect USB mode BT TV USB AUTO POWER DOWN FUNCTION The unit turns off automatically in the following situations. ●● D.IN / HDMI / BT / TV / USB Mode -- If there is no audio signal for 5 minutes.
FUNCTIONS BLUETOOTH TO CONNECT THE SOUNDBAR TO A BLUETOOTH DEVICE Check if the Bluetooth device supports the Bluetooth compliant stereo headset function. Connect 1. Press the mode. • Bluetooth device button on the main unit’s right side or the SOURCE button on the remote control to select the BT You will see BT READY on the front display of the Soundbar. 2. Select the Bluetooth menu on the Bluetooth device you want to connect. (Refer to the Bluetooth device's user manual.) 3.
FUNCTIONS ●● ●● ●● ●● ●● ●● ●● ●● ●● ●● ●● If asked for a PIN code when connecting a Bluetooth device, enter <0000>. Only one Bluetooth device can be paired at a time. The Bluetooth connection will be terminated when you turn the Soundbar off. The Soundbar may not perform Bluetooth search or connection correctly under the following circumstances: -- If there is a strong electrical field around the Soundbar. -- If several Bluetooth devices are simultaneously paired with the Soundbar.
FUNCTIONS ++More About Bluetooth Bluetooth is a technology that enables Bluetooth-compliant devices to interconnect easily with each other using a short wireless connection. ●● A Bluetooth device may cause noise or malfunction, depending on usage, if: -- A part of your body is in contact with the receiving/transmitting system of the Bluetooth device or the Soundbar. -- It is subject to electrical variation from obstructions caused by a wall, corner, or office partition.
FUNCTIONS USING THE SAMSUNG AUDIO REMOTE APP ++Installing the Samsung Audio Remote App To control the Soundbar with your smart device and the Samsung Audio Remote app, download the Samsung Audio Remote app from the Google Play store. Market search : Samsung Audio Remote ++Launching the Samsung Audio Remote App To launch and use the Samsung Audio Remote app, touch the Audio Remote icon on your smart device, and then follow the directions on the screen.
FUNCTIONS SOFTWARE UPDATE USB (5V 0.5A) Wi-Fi SETUP SPK ADD DC 24V HDMI OUT (TV-ARC) AUX IN DIGITAL AUDIO IN (OPTICAL) USB (5V 0.5A) AUX IN Samsung may offer updates for the Soundbar's system firmware in the future. If an update is offered, you can update the firmware by connecting a USB device with the firmware update stored on it to the USB port on your Soundbar.
FUNCTIONS IF UPDATE IS NOT DISPLAYED 1. Turn off the Soundbar, connect the USB storage device that contains update files to the Soundbar’s USB port. 2. Disconnect the power cord, reconnect it, and then turn on the Soundbar. ●● Insert a USB device containing the firmware update into the USB port on the main unit. ●● Updating firmware may not work properly if audio files supported by the Soundbar are stored in the USB storage device.
TROUBLESHOOTING TROUBLESHOOTING TROUBLESHOOTING ENG Before requesting service, please check the following. The unit will not turn on. • Is the power cord plugged into the outlet? ¼¼Connect the power plug to the outlet. A function does not work when the button is pressed. • Is there static electricity in the air? ¼¼Disconnect the power plug and connect it again. Sound is not produced. • Is the Mute function on? ¼¼Press the function.
APPENDIX APPENDIX SPECIFICATIONS USB Weight GENERAL Dimensions (W x H x D) 5V / 0.5A Main Unit Subwoofer (PS-WK550, PS-WK551) Main Unit Subwoofer (PS-WK550, PS-WK551) Operating Temperature Range Operating Humidity Range AMPLIFIER * * Rated Output Main Unit Power Subwoofer (PS-WK550, PS-WK551) 2.6 kg 6.8 kg 1010.5 x 54.0 x 87.5 mm 452.0 x 335.0 x 154.0 mm +5°C to +35°C 10 % to 75 % 30W x 6, 6 ohm, THD≦10% 160W, 3 ohm, THD≦10% Design and specifications are subject to change without prior notice.
UNITED UNITED KINGDOM KINGDOM UNITED KINGDOM EIRE EIRE EIRE beyond beyondthe thecontrol control ofofSamsung. Samsung. ssSamsung SamsungThis product product isiswarranted warranted for theperiod periodof oftwelve twelve (12) (12)months from the origiorigi-from the origibeyond the control of Samsung productfor is the warranted for the period ofmonths twelvefrom (12)the months This Samsung product is warranted for the period ofand workmanship. 4. event This product not6.6. considered to6.
Contact SAMSUNG WORLD WIDE If you have any questions or comments relating to Samsung products, please contact the SAMSUNG customer care Centre. Country ` Europe Contact Centre U.K EIRE 0330 SAMSUNG (7267864) 0818 717100 0180 6 SAMSUNG bzw. 0180 6 7267864* GERMANY (*0,20 €/Anruf aus dem dt. Festnetz, aus dem Mobilfunk max. 0,60 €/Anruf) FRANCE 01 48 63 00 00 ITALIA 800-SAMSUNG (800.