FULL MANUAL HW-Q990B Imagine the possibilities Thank you for purchasing this Samsung product. To receive more complete service, please register your product at www.samsung.com/register Para evitar cualquier avería o daños, lea detalladamente este manual de instrucciones antes de conectar y utilizar este aparato. Conserve el manual para referencia futura.
SAFETY INFORMATION SAFETY WARNINGS TO REDUCE THE RISK OF ELECTRIC SHOCK, DO NOT REMOVE THE COVER (OR BACK). NO USER-SERVICEABLE PARTS ARE INSIDE. REFER SERVICING TO QUALIFIED SERVICE PERSONNEL. Refer to the table below for an explanation of symbols which may be on your Samsung product. CAUTION RISK OF ELECTRIC SHOCK. DO NOT OPEN. This symbol indicates that high voltage is present inside. It is dangerous to make any kind of contact with any internal part of this product.
PRECAUTIONS 1. Ensure that the AC power supply in your house complies with the power requirements listed on the identification sticker located on the bottom of your product. Install your product horizontally, on a suitable base (furniture), with enough space around it for ventilation (7~10 cm). Make sure the ventilation slots are not covered. Do not place the unit on amplifiers or other equipment which may become hot. This unit is designed for continuous use.
CONTENTS 01 Checking the Components 6 02 Product Overview 7 Top Panel of the Soundbar . . . . . . . . . . . . . . . . . . . . . . . . . . . . . . . . . . . . . . . . . . . . . . . . . . . . . . . . . . . . . . . . . . . . . . . . . . . . . . . . . . . . . . . . . . . . . . . . . . . . . 7 Bottom Panel of the Soundbar. . . . . . . . . . . . . . . . . . . . . . . . . . . . . . . . . . . . . . . . . . . . . . . . . . . . . . . . . . . . . . . . . . . . . . . . . . . . . . . . . . . . . . . . . . . . . .
10 Installing the Soundbar in front of TV 31 Component . . . . . . . . . . . . . . . . . . . . . . . . . . . . . . . . . . . . . . . . . . . . . . . . . . . . . . . . . . . . . . . . . . . . . . . . . . . . . . . . . . . . . . . . . . . . . . . . . . . . . . . . . . . . . . . . . . 31 11 Software Update 32 Auto Update . . . . . . . . . . . . . . . . . . . . . . . . . . . . . . . . . . . . . . . . . . . . . . . . . . . . . . . . . . . . . . . . . . . . . . . . . . . . . . . . . . . . . . . . . . . . .
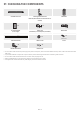
01 CHECKING THE COMPONENTS SOUNDBAR Soundbar Main Unit x2 Samsung Smart Remote & Batteries (Not available in some locations or models) x4 POWER Surround Speaker (Left / Right) A TYPE : 450mm Subwoofer Power Cord (Subwoofer, Surround Speaker, Soundbar) x2 HDMI Cable x2 (M4 x L10) Wall Mount Guide Holder-Screw x4 x2 Bracket-Wall Mount Screw Rubber-Foot • For more information about the power supply and power consumption, refer to the label attached to the product.
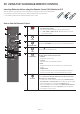
02 PRODUCT OVERVIEW Top Panel of the Soundbar 1 3 2 4 1 (Multi Function) Button • In standby mode, press the (Multi Function) button to turn on the Soundbar. • Press the (Multi Function) button to change the input source. 2 (Volume) Button Adjusts the volume. 3 (Mic On/Off) Button Press the button to turn the microphone on or off. When the microphone is off, the LED indicator will light red. 4 Mic On Mic Off Red Off Red On Display Displays the product’s status and current mode. D.
03 USING THE SOUNDBAR REMOTE CONTROL Inserting Batteries before using the Remote Control (AAA batteries X 2) Slide the back cover in the direction of the arrow until it is completely removed. Insert 2 AAA batteries (1.5V) oriented so that their polarity is correct. Slide the battery cover back into position. • The illustration differs with the respective Remote Control model. How to Use the Remote Control 1 1 Power 2 3 2 4 10 Press to select a source connected to the Soundbar.
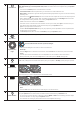
7 Sound Control 8 By pressing the button, you can set the audio function such as Auto EQ, Spacefit sound, AVA, Voice enhance mode, Night mode, Sync, Surround speaker mode, Virtual. The desired item can be adjusted using the Up/Down buttons. • You can use the Auto EQ function if a subwoofer is connected. • Voice enhance mode enhances spoken dialog in movies and TV to make it easier to hear.
Active Voice Amplifier (AVA) • Analyzes external noise in real time while soundbar is playing, so that voice audio can always be heard clearly. • No data is saved during the analysis.
Adjusting the Soundbar volume with a TV remote control Adjust the Soundbar volume using the TV’s remote control. • This function can be used with IR remote controls only. Bluetooth remote controls (remote controls that require pairing) are not supported. • Set the TV speaker to External Speaker to use this function. • Manufacturers supporting this function: Samsung, VIZIO, LG, Sony, Sharp, PHILIPS, PANASONIC, TOSHIBA, Hisense, RCA 1. Turn Off the Soundbar. 2.
04 CONNECTING THE SOUNDBAR Connecting the power and units Use the Power cord to connect the Subwoofer, Surround Speakers, and Soundbar to an electrical outlet in the following order: • For more information about the required electrical power and power consumption, refer to the label attached to the product. (Label: Rear of the Soundbar Main Unit) 1. Connect the Power cord to the Subwoofer. Power Cord Rear of Subwoofer 2. Connect the power cord to the Left and Right Surround Speakers.
Recommended Speaker Layout CAUTION • Wireless receiving antennas are built into the wireless subwoofer and surround speakers. Keep the units away from water and moisture. • For optimal listening performance, make sure that the areas around the wireless subwoofer and surround speakers locations are clear of any obstructions.
Manually connecting the Subwoofer or Surround Speakers Before performing the manual connection procedure below: • Check whether the power cables for the Soundbar and subwoofer or Surround Speakers are connected properly. • Make sure that the Soundbar is turned off. 1. Turn off the Soundbar main. 2. Press and hold ID SET on the rear of the subwoofer and surround speakers for at least 5 seconds. • The red indicator at the rear of each speaker turns off and the blue indicator blinks.
LED Indicator Lights on the Rear of Subwoofer and Surround Speakers LED Subwoofer Status On Description Resolution Successfully connected (normal operation) - Recovering the connection Check if the power cable attached to the main Soundbar unit is connected properly or wait about 5 minutes. If blinking persists, try manually connecting the subwoofer and Surround Speakers. See page 14.
Auto EQ The Auto EQ technology of Samsung provides more natural and softer bass by calibrating low frequency detected via the mic on the subwoofer. Low frequency usually occurs due to the size of the room and the location of the subwoofer. • Ensure the subwoofer is placed at least 8 cm away from walls, furniture or other partitions. • You must keep the room as quiet as possible while operating the Auto EQ tuning. • Do not use any buttons until the Auto EQ tuning is complete.
05 CONNECTING TO A TV Connecting the TV that supports HDMI ARC (Audio Return Channel) CAUTION • When both the HDMI cable and optical cable are connected, the HDMI signal is received first. • To connect the HDMI cable between the TV and Soundbar, be sure to connect the terminals marked ARC. Otherwise, the TV sound may not be output. • The recommended cable is High Speed HDMI Cable with Ethernet. Connect to the HDMI TO TV (eARC/ARC) port of the Soundbar main unit.
Connecting using an Optical Cable Pre-connection Checklist • When both the HDMI cable and optical cable are connected, the HDMI signal is received first. • When you use an optical cable and the terminals have covers, be sure to remove the covers. Optical Cable (not supplied) Bottom of the Soundbar DIGITAL AUDIO IN (OPTICAL) OPTICAL OUT Top of the Soundbar D.IN 1.
Connecting via Bluetooth When a Samsung TV is connected using Bluetooth, you can hear stereo sound without the hassle of cabling. • Only one Samsung TV can be connected at a time. • Samsung TV that supports Bluetooth can be connected. Check the specifications of your TV. Top of the Soundbar 5 Sec PAIR OR BT PAIRING The initial connection 1. Press the (OR) PAIR button on the Soundbar remote control to enter the “BT PAIRING” mode. a.
Connecting via Wi-Fi Pre-connection Checklist • Wi-Fi connection is available only on Samsung TV. • Check whether the wireless router (Wi-Fi) is turned on and the TV is connected to the router. • The TV and Soundbar must be connected to the same wireless network (Wi-Fi). • If your wireless router (Wi-Fi) uses a DFS channel, you will not be able to establish a Wi-Fi connection between the TV and Soundbar. Contact your Internet service provider for details.
Using the Q-Symphony Function For Q-Symphony, the Soundbar syncs with a Samsung TV to output sound through two devices for optimum surround effect. When the Soundbar is connected, the menu, “TV+Soundbar” appears under the Sound Output menu of the TV. Select the corresponding menu. TV menu HDMI Cable OR Optical Cable (not supplied) D.
Using the Spacefit sound Provides optimized sound quality by analyzing the listening spaces. Method 1. Connecting via Soundbar To enable this function, turn on the Spacefit sound mode with the remote control of the Soundbar. ( (Sound Control) → “Spacefit sound Off” → ( Up ) → “Spacefit sound On”) • This is available in all Sound modes. Method 2. Connecting via TV To enable this function, turn on the Adaptive Sound+ mode on your Samsung TV menu.
06 CONNECTING AN EXTERNAL DEVICE Method 1. Connecting using an HDMI Cable (Capable of Dolby Atmos / DTS:X decoding and playback) Pre-connection Checklist • If the Audio Output options include Secondary Audio, make sure Secondary Audio is set to Off. • Make sure that the content supports Dolby Atmos® / DTS:X. Top of the Soundbar HDMI 1 OR HDMI 2 DIGITAL AUDIO IN (OPTICAL) HDMI 2 External Device OR HDMI OUT HDMI Cable HDMI IN (ARC) HDMI Cable HDMI 1 HDMI TO TV (eARC/ARC) Bottom of the Soundbar 1.
Method 2. Connecting using an Optical Cable Top of the Soundbar BD / DVD player / Settop box / Game console D.IN DIGITAL AUDIO IN (OPTICAL) OPTICAL OUT Optical Cable (not supplied) Bottom of the Soundbar 1. Use an optical cable (not supplied) to connect the DIGITAL AUDIO IN (OPTICAL) on the Soundbar main and the OPTICAL OUT port on the external device. 2. Turn on the Soundbar and external device. 3. To select “D.
07 CONNECTING A MOBILE DEVICE Method 1. Connecting via Bluetooth When a mobile device is connected using Bluetooth, you can hear stereo sound without the hassle of cabling. • When you connect a paired Bluetooth device with the Soundbar off, the Soundbar automatically turns on. Top of the Soundbar 5 Sec Mobile device PAIR OR BT PAIRING The initial connection • When connecting to a new Bluetooth device, make sure the device is within 1 m distance. 1.
• A Bluetooth device may experience noise or malfunction under in the following conditions: ‒ When the body is in contact with the signal transceiver on the Bluetooth device or Soundbar ‒ In corners or when there is an obstacle in proximity, such as a wall or partition, where electrical changes may occur. ‒ When exposed to radio interferences by other products operating on the same frequency ranges, such as medical equipment, microwave ovens, and wireless LAN devices.
Method 2. Connecting via Wi-Fi (Wireless Network) To connect a Soundbar to a mobile device via a wireless network (Wi-Fi), the SmartThings app is required. The initial connection 1. Install and launch the SmartThings app from your mobile device (smartphone or tablet). 2. On the app, follow the screen instructions to add the Soundbar. • The automatic pop-up (the second screenshot below) may not show on some devices. If the pop-up window does not appear, press “ ” on the Home screen.
Using the Tap Sound Tap the Soundbar with your mobile device to play the sound of content on the mobile device through the Soundbar. • This function may not be supported, depending on the mobile device. • This function is only compatible with Samsung mobile devices with Android 8.1 or later. SmartThings App Top of the Soundbar Mobile device 1. Turn on the Tap Sound function on your mobile device. • For details on how to turn on the function, refer to “Setting the Tap Sound function” below. 2.
08 CONNECTING VIA APPLE AIRPLAY 2 • This feature may not be available in some countries. • This Samsung Soundbar supports AirPlay 2 and requires iOS 11.4 or later. With AirPlay 2, you can stream music, podcasts, and other audio from your Apple devices to the Samsung Soundbar. • Make sure the Soundbar is powered on and connected to the same Wi-Fi network as your Apple device. from an AirPlay-supported app or Control Center on your iPhone, iPad, or Mac.
09 INSTALLING THE WALL MOUNT 2. Align the Wall Mount Guide’s Center Line with the center of your TV (if you are mounting the Soundbar below your TV), and then fix the Wall Mount Guide to the wall using tape. • If you are not mounting below a TV, place the Center Line in the center of the installation area. Installation Precautions • Install on a vertical wall only. • Do not install in a place with high temperature or humidity. • Verify whether the wall is strong enough to support the product’s weight.
10 INSTALLING THE SOUNDBAR IN FRONT OF TV 7. Install the Soundbar with the attached Bracket-Wall Mounts by hanging the Bracket-Wall Mounts on the Holder-Screws on the wall. Component x4 8. Slide the Soundbar down as shown below so that the Bracket-Wall Mounts rest securely on the Holder-Screws. • Insert the Holder-Screws into the wide (bottom) part of the Bracket-Wall Mounts, and then slide the Bracket-Wall Mounts down so that the Bracket-Wall Mounts rest securely on the Holder-Screws.
As illustrated in the image, align the center of the Soundbar with the center of the TV, carefully place the Soundbar onto the TV stand. At this time, place the microphones at the front of the stand not to interfere with voice recognition. TV Right end of Soundbar NOTE 11 SOFTWARE UPDATE Auto Update When the Soundbar is connected to the Internet, software updates automatically occur even when the Soundbar is turned off. • To use the Auto Update function, the Soundbar must be connected to the Internet.
12 TROUBLESHOOTING Initialization Top of the Soundbar Before seeking assistance, check the following. Soundbar does not turn on. • Check whether the power cord of the Soundbar is correctly inserted into the outlet. INIT With the Soundbar on, press the (Volume) buttons on the body at the same time for at least 5 seconds. “INIT” appears on the display and then the Soundbar is initialized. CAUTION • All the settings of the Soundbar are initialized.
In case there is sound jitter, delays, or noise from the Subwoofer and Surround Speaker Sound drops out when connected via Bluetooth. • If there are any objects between the Soundbar and Subwoofer speaker, this could cause a problem. Please reposition these to a place without such an object. • There may be sound jitter or delays when the Subwoofer and Surround Speaker are far from the Soundbar. Please place them near the Soundbar.
13 LICENSE 14 OPEN SOURCE LICENSE NOTICE Dolby, Dolby Atmos, and the double-D symbol are registered trademarks of Dolby Laboratories Licensing Corporation. Manufactured under license from Dolby Laboratories. Confidential unpublished works. Copyright © 2012-2021 Dolby Laboratories. All rights reserved. To send inquiries and requests for questions regarding open sources, contact Samsung Open Source (http://opensource.samsung.
16 SPECIFICATIONS AND GUIDE Specifications Model Name HW-Q990B Weight 7.7 kg Dimensions (W x H x D) 1232.0 x 69.5 x 138.0 mm Operating Temperature Range +5°C to +35°C Operating Humidity Range AMPLIFIER Rated Output power Supported play formats 10 % ~ 75 % (18 W x 4) + (10 W x 2) + (18 W x 2) + (10 W x 1) + (18 W x 6) Dolby 5.1ch / Dolby Digital Plus / Dolby TRUE HD / Dolby ATMOS / DTS 5.1ch / DTS HD / DTS-HD Master Audio / DTS:X / LPCM 8Ch Subwoofer Name PS-WB99B Weight 11.
INFORMACIÓN DE SEGURIDAD ADVERTENCIA ADVERTENCIAS DE SEGURIDAD PARA REDUCIR EL RIESGO DE DESCARGA ELÉCTRICA, NO QUITE LA TAPA (O LA PARTE TRASERA). NO CONTIENE PIEZAS QUE PUEDAN SER REPARADAS O REEMPLAZADAS POR EL USUARIO. TODAS LAS REPARACIONES DEBEN SER REALIZADAS POR PERSONAL CAPACITADO. Consulte la tabla a continuación para obtener una explicación de los símbolos que podrían aparecer en su producto Samsung. PRECAUCIÓN RIESGO DE DESCARGA ELÉCTRICA. NO ABRIR.
PRECAUCIONES 1. Asegúrese de que el suministro eléctrico de CA en su hogar cumpla con los requisitos de energía enumerados en la etiqueta de identificación ubicada en la parte inferior de su producto. Instale su producto de manera horizontal, sobre una base adecuada (mueble), con suficiente espacio alrededor para su ventilación (7 a 10 cm). Asegúrese de que las ranuras de ventilación no estén cubiertas. No coloque la unidad sobre amplificadores u otros equipos que puedan calentarse.
CONTENIDO 01 Verificación de los componentes 6 02 Información general del producto 7 Panel superior de la Soundbar . . . . . . . . . . . . . . . . . . . . . . . . . . . . . . . . . . . . . . . . . . . . . . . . . . . . . . . . . . . . . . . . . . . . . . . . . . . . . . . . . . . . . . . . . . . . . . . . . . . . . . . . . . . . . . . . . . . . .7 Panel inferior de la Soundbar . . . . . . . . . . . . . . . . . . . . . . . . . . . . . . . . . . . . . . . . . . . . . . . . . . . . . . . . . . . . . . .
10 Instalación de la Soundbar frente al TV 31 Componente . . . . . . . . . . . . . . . . . . . . . . . . . . . . . . . . . . . . . . . . . . . . . . . . . . . . . . . . . . . . . . . . . . . . . . . . . . . . . . . . . . . . . . . . . . . . . . . . . . . . . . . . . . . . . . . . . . . . . . . . . . . . . . . . . . . .31 11 Actualización de software 32 Actualización automática . . . . . . . . . . . . . . . . . . . . . . . . . . . . . . . . . . . . . . . . . . . . . . . . . . . . . . . . . . . . . .
01 VERIFICACIÓN DE LOS COMPONENTES SOUNDBAR Unidad principal de la Soundbar x2 Control remoto Samsung Smart & Pilas (no disponible en algunos lugares o para algunos modelos) x4 POWER Altavoz surround (Izquierdo/Derecho) Altavoz de graves Cable de alimentación (altavoz de graves, altavoz surround, Soundbar) x2 A TYPE : 450mm Cable HDMI x2 (M4 x L10) Guía de montaje en la pared Tornillo de sujeción x4 x2 Soporte de montaje en la pared Tornillo Pie de goma • Para obtener más información acerca
02 INFORMACIÓN GENERAL DEL PRODUCTO Panel superior de la Soundbar 1 3 2 4 1 Botón (Multifunción) • En modo de espera, presione el botón (Multifunción) para encender la Soundbar. • Presione el botón (Multifunción) para cambiar la fuente de entrada. 2 (Volumen) Botón Permite ajustar el volumen. 3 Botón (Micrófono encendido/apagado) Presione el botón para encender o apagar el micrófono. Cuando el micrófono está apagado, el indicador LED será de color rojo.
03 USO DEL CONTROL REMOTO DE LA SOUNDBAR Colocación de las baterías antes de utilizar el control remoto (2 baterías AAA) Deslice la cubierta posterior en la dirección de la flecha hasta retirarla completamente. Inserte 2 baterías AAA (1,5 V) correctamente según su polaridad. Vuelva a deslizar la cubierta de las baterías a su posición inicial. • La ilustración difiere del modelo de control remoto respectivo.
7 Control de sonido 8 Puede presionar este botón para establecer la función de audio, como Auto EQ, Spacefit sound, AVA, Voice enhance mode, Night mode, Sync, Surround speaker mode, Virtual. Se puede ajustar el elemento deseado con los botones Arriba/Abajo. • Puede usar la función Auto EQ si hay un altavoz de graves conectado. • Voice enhance mode hace que sea más fácil oír el diálogo hablado en las películas y contenido de TV.
Amplificador de voz activo (AVA) • Analiza el ruido externo en tiempo real mientras se está reproduciendo la Soundbar, para que el audio de voz siempre pueda oírse con claridad. • No se guardan datos durante este análisis.
Ajuste del volumen de la Soundbar con un control remoto de TV Ajuste el volumen de la Soundbar utilizando el control remoto del TV. • Esta función solo se puede usar con controles remotos IR. Los controles remotos Bluetooth (controles remotos que requieren emparejamiento) no son compatibles. • Configure el altavoz del TV en Altavoz externo para usar esta función. • Fabricantes que admiten esta función: Samsung, VIZIO, LG, Sony, Sharp, PHILIPS, PANASONIC, TOSHIBA, Hisense, RCA 1. Apague la Soundbar. 2.
04 CONEXIÓN DE LA SOUNDBAR Conexión de las unidades a la fuente de alimentación Use el cable de alimentación para conectar el Altavoz de graves, los Altavoces surround y el Soundbar a un enchufe eléctrico en el siguiente orden: • Para obtener más información acerca del suministro eléctrico necesario y el consumo de energía, consulte la etiqueta del producto. (Etiqueta: Parte posterior de la unidad principal de la Soundbar). 1. Conecte el cable de alimentación al altavoz de graves.
Diseño recomendado para los altavoces PRECAUCIÓN • Las antenas receptoras inalámbricas están integradas en los altavoces surround y el altavoz de graves inalámbrico. Mantenga las unidades lejos del agua y la humedad. • Para obtener un rendimiento del sonido óptimo, asegúrese de que en las áreas alrededor del lugar donde se encuentran los altavoces surround y el altavoz de graves inalámbrico no haya obstáculos.
Conexión manual del altavoz de graves o los altavoces surround Antes de realizar la conexión manual que se indica a continuación, siga estos pasos: • Verifique que los cables de alimentación del Altavoz de graves y el Soundbar o los Altavoces surround estén conectados correctamente. • Asegúrese de que la Soundbar esté apagada. 1. Apague la unidad principal de la Soundbar. 2. Mantenga presionado ID SET en la parte posterior del altavoz de graves y los altavoces surround durante, al menos, 5 segundos.
Luces del indicador LED de la parte posterior del altavoz de graves y los altavoces surround LED Altavoz de graves Estado Encendido Descripción Conectado correctamente (operación normal) Azul Altavoces surround Parpadeante Resolución - Recuperando la conexión Compruebe si el cable de alimentación conectado a la unidad principal de la Soundbar está conectado correctamente o espere unos 5 minutos.
Auto EQ La tecnología Auto EQ de Samsung proporciona un bajo más natural y suave gracias a que calibra la frecuencia baja que se detecta a través del micrófono ubicado en el altavoz de graves. La frecuencia baja suele deberse al tamaño de la sala y la ubicación del altavoz de graves. • Asegúrese de que el altavoz de graves esté situado, como mínimo, a 8 cm de las paredes, los muebles u otras divisiones. • La habitación debe estar lo más silenciosa posible mientras realiza el ajuste de Auto EQ.
05 CONEXIÓN A UN TV Conexión al TV que es compatible con HDMI ARC (Retorno del canal de audio) PRECAUCIÓN • Cuando el cable HDMI y el cable óptico estén conectados al mismo tiempo, la señal HDMI se recibe primero. • Para conectar el cable HDMI entre el TV y la Soundbar, asegúrese de conectar las terminales marcadas como ARC. De lo contrario, es posible que el sonido del TV no se escuche. • El cable recomendado es High Speed HDMI Cable with Ethernet.
Conexión con un cable óptico Lista de verificación previa a la conexión • Cuando el cable HDMI y el cable óptico estén conectados al mismo tiempo, la señal HDMI se recibe primero. • Si usa un cable óptico y las terminales tienen cubiertas, quítelas. Cable óptico (no suministrado) Parte inferior de la Soundbar DIGITAL AUDIO IN (OPTICAL) OPTICAL OUT Parte superior de la Soundbar D.IN 1.
Conexión a través de Bluetooth Cuando se conecta un TV Samsung a través de Bluetooth, puede escuchar sonido en estéreo sin cables de por medio. • Solo se puede conectar un TV Samsung por vez. • Se puede conectar un TV Samsung que sea compatible con Bluetooth. Compruebe las especificaciones de su TV. Parte superior de la Soundbar 5 Sec PAIR O BT PAIRING La conexión inicial 1. Presione el botón PAIR del control remoto de la Soundbar para entrar al modo “BT PAIRING”. (O) a.
Conexión mediante Wi-Fi Lista de verificación previa a la conexión • La conexión Wi-Fi solo está disponible en el TV Samsung. • Compruebe si el enrutador inalámbrico (Wi-Fi) está encendido y si el TV está conectado al router. • El TV y la Soundbar deben estar conectados a la misma red inalámbrica (Wi-Fi). • Si su enrutador inalámbrico (Wi-Fi) usa un canal de DFS, no podrá establecer una conexión Wi-Fi entre el TV y la Soundbar. Comuníquese con su proveedor de servicio de Internet para obtener más detalles.
Cómo utilizar la función Q-Symphony En el caso de Q-Symphony, la Soundbar se sincroniza con un TV Samsung para emitir el sonido a través de dos dispositivos a fin de brindar un efecto envolvente óptimo. Cuando la Soundbar está conectada, aparece el menú “TV+Soundbar” debajo del menú Salida de sonido del TV. Seleccione el menú correspondiente. Menú del TV Cable HDMI O Cable óptico (no suministrado) D.
Uso del sonido Spacefit Brinda una calidad de sonido optimizada mediante el análisis de los espacios de escucha. Método 1. Conexión mediante la Soundbar Para habilitar esta función, active el modo Spacefit sound con el control remoto de la Soundbar. ( (Control de sonido) → “Spacefit sound Off” → ( Arriba ) → “Spacefit sound On”) • Este menú está disponible en todos los modos de Sonido. Método 2.
06 CONEXIÓN A UN DISPOSITIVO EXTERNO Método 1. Conexión con un cable HDMI (capaz de decodificar y reproducir Dolby Atmos/DTS:X) Lista de verificación previa a la conexión • Si las opciones de Salida de audio incluyen Audio secundario, asegúrese de que esté en la posición Apagado. • Asegúrese de que el contenido admita Dolby Atmos®/DTS:X.
Método 2. Conexión con un cable óptico Parte superior de la Soundbar BD / Reproductor de DVD / Decodificador / Consola de juegos D.IN DIGITAL AUDIO IN (OPTICAL) OPTICAL OUT 1. 2. 3. 4. Cable óptico (no suministrado) Parte inferior de la Soundbar Use un cable óptico (no suministrado) para conectar DIGITAL AUDIO IN (OPTICAL) en el puerto principal de la Soundbar y OPTICAL OUT en el dispositivo externo. Encienda la Soundbar y el dispositivo externo. Para seleccionar el modo “D.
07 CONEXIÓN A UN DISPOSITIVO MÓVIL Método 1. Conexión a través de Bluetooth Cuando se conecta un dispositivo móvil a través de Bluetooth, puede escuchar sonido en estéreo sin cables de por medio. • Cuando conecta un dispositivo Bluetooth emparejado y la Soundbar está apagada, la Soundbar se enciende automáticamente.
• Un dispositivo Bluetooth puede presentar ruido o puede no funcionar correctamente en las siguientes condiciones: ‒‒ Si una parte de su cuerpo está en contacto con el transceptor de señal del dispositivo Bluetooth o la Soundbar ‒‒ En esquinas o lugares donde hay un obstáculo cerca, como en las paredes o divisiones, donde puedan producirse cambios eléctricos.
Método 2. Conexión a través de wifi (Red inalámbrica) Para conectar la Soundbar a un dispositivo móvil a través de una red inalámbrica (wifi), se necesita la aplicación SmartThings. La conexión inicial 1. Instale e inicie la aplicación SmartThings en su dispositivo móvil (teléfono inteligente o tableta). 2. En la aplicación, siga las instrucciones de la pantalla para agregar la Soundbar.
Uso de Tap Sound Toque la Soundbar con su dispositivo móvil para reproducir el sonido del contenido del dispositivo móvil a través de la Soundbar. • Es posible que esta función no sea compatible, según el dispositivo móvil. • Esta función solo es compatible con dispositivos móviles Samsung con Android 8.1 o una versión posterior. Aplicación SmartThings Parte superior de la Soundbar Dispositivo móvil 1. Active la función Tap Sound en su dispositivo móvil.
08 CONEXIÓN MEDIANTE APPLE AIRPLAY 2 • Es posible que esta función no esté disponible en algunos países. • La Samsung Soundbar admite AirPlay 2 y requiere iOS 11.4 o posterior. Con AirPlay 2, puede transmitir música, podcasts y otro tipo de audio desde sus dispositivos Apple a la Samsung Soundbar. • Asegúrese de que la Soundbar esté encendida y conectada a la misma red Wi-Fi que su dispositivo Apple. en una aplicación compatible con AirPlay o en el Centro de control de su iPhone, iPad o Mac.
09 INSTALACIÓN DEL SOPORTE DE MONTAJE EN LA PARED 2. Haga coincidir la Línea central de la guía de montaje en la pared con el centro del TV (si va a montar la Soundbar debajo del TV) y luego fije la Guía de montaje en la pared a la pared con cinta adhesiva. • Si no la va a montar debajo de un TV, coloque la Línea central en el centro del área de instalación. Precauciones durante la instalación • Instálelo solo en una pared vertical. • No lo instale en un lugar con altas temperaturas o humedad.
10 INSTALACIÓN DE LA SOUNDBAR FRENTE AL TV 7. Para instalar la Soundbar con los Soportes de pared ya colocados, cuélguelos en los Tornillos de sujeción que están en la pared. Componente x4 Pie de goma 8. Deslice la Soundbar hacia abajo como se muestra a continuación de manera que los Soportes de pared queden asentados de forma segura sobre los Tornillos de sujeción.
11 ACTUALIZACIÓN DE SOFTWARE Como se indica en la imagen, alinee el centro de la Soundbar con el centro del TV, y coloque con cuidado la Soundbar en el soporte para TV. En este momento, coloque los micrófonos en la parte delantera del soporte a fin de que no interfieran con el reconocimiento de voz. TV Actualización automática Cuando la Soundbar está conectada a Internet, las actualizaciones de software se realizan de forma automática, incluso cuando la Soundbar está apagada.
12 RESOLUCIÓN DE PROBLEMAS Inicialización Parte superior de la Soundbar Antes de buscar ayuda, compruebe lo siguiente. La Soundbar no se enciende. • Compruebe si el cable de alimentación de la Soundbar se insertó correctamente en el enchufe. INIT La Soundbar funciona de forma errática. Con la Soundbar encendida, presione los botones (Volumen) al mismo tiempo durante un mínimo de 5 segundos. Aparece “INIT”en la pantalla y se inicia la Soundbar.
En caso de que el sonido del altavoz de graves o el altavoz surround tenga interferencias, ruido o retrasos No hay sonido cuando se conecta mediante Bluetooth. • Si hay algún objeto entre la Soundbar y el Altavoz de graves, eso podría causar un problema. Cambie los altavoces a otro lugar donde ese objeto no se interponga. • Puede haber interferencias o retrasos en el sonido si el altavoz de graves o el altavoz surround están lejos de la Soundbar. Acérquelos a la Soundbar.
13 LICENCIA Dolby, Dolby Atmos, and the double-D symbol are registered trademarks of Dolby Laboratories Licensing Corporation. Manufactured under license from Dolby Laboratories. Confidential unpublished works. Copyright © 2012-2021 Dolby Laboratories. All rights reserved. 14 AVISO SOBRE LA LICENCIA DE CÓDIGO ABIERTO Para enviar consultas y solicitudes relacionadas con el código abierto, comuníquese con Samsung Open Source (http://opensource.samsung.com).
16 ESPECIFICACIONES Y GUÍA Especificaciones Nombre del modelo HW-Q990B Requisitos de electricidad AC 100-240 V ~ 50/60 Hz (solo México) Consumo de energía 41 W (solo México) Peso 7.7 kg Dimensiones (An. x Al. x Prof.) 1232.0 x 69.5 x 138.0 mm Rango de temperatura de funcionamiento De +5°C a +35°C Rango de humedad de funcionamiento AMPLIFICADOR Potencia de salida nominal Formatos de reproducción admitidos 10 % ~ 75 % (18 W x 4) + (10 W x 2) + (18 W x 2) + (10 W x 1) + (18 W x 6) Dolby 5.
© 2022 Samsung Electronics Co., Ltd. All rights reserved. Contact SAMSUNG WORLD WIDE If you have any questions or comments relating to Samsung products, please contact the SAMSUNG customer care Center. Country Samsung Service Center Web Site MEXICO 800-SAMSUNG www.samsung.com/mx/support BRAZIL 0800 555 0000 (Demais cidades e regiões) 4004-0000 (Capitais e grandes centros) www.samsung.