
User Manual
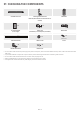

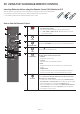
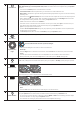

Table Of Contents
- ENG
- Checking the Components
- Product Overview
- Using the Soundbar Remote Control
- Inserting Batteries before using the Remote Control (AAA batteries X 2)
- How to Use the Remote Control
- Active Voice Amplifier (AVA)
- Using the Hidden Buttons (Buttons with more than one function)
- Output specifications for the different sound effect modes
- Adjusting the Soundbar volume with a TV remote control
- Connecting the Soundbar
- Connecting to a TV
- Connecting an External Device
- Connecting a Mobile Device
- Connecting via Apple Airplay 2
- Installing the Wall Mount
- Installing the Soundbar in front of TV
- Software Update
- Troubleshooting
- License
- Open Source License Notice
- Important Notes About Service
- Specifications and Guide
- SPA
- Verificación de los componentes
- Información general del producto
- Uso del control remoto de la Soundbar
- Colocación de las baterías antes de utilizar el control remoto (2 baterías AAA)
- Cómo usar el control remoto
- Amplificador de voz activo (AVA)
- Uso de los botones ocultos (botones con más de una función)
- Especificaciones de salida para los diferentes modos de efectos de sonido
- Ajuste del volumen de la Soundbar con un control remoto de TV
- Conexión de la Soundbar
- Conexión a un TV
- Conexión a un dispositivo externo
- Conexión a un dispositivo móvil
- Conexión mediante Apple AirPlay 2
- Instalación del soporte de montaje en la pared
- Instalación de la Soundbar frente al TV
- Actualización de software
- Resolución de problemas
- Licencia
- Aviso sobre la licencia de código abierto
- Notas importantes sobre el servicio
- Especificaciones y guía

ENG - 7
02 PRODUCT OVERVIEW
Top Panel of the Soundbar
2
1 3
4
1
(Multi Function) Button
• In standby mode, press the (Multi Function) button to turn on the Soundbar.
• Press the (Multi Function) button to change the input source.
2
(Volume) Button
Adjusts the volume.
3
(Mic On/Off) Button
Press the button to turn the microphone on or off.
When the microphone is off, the LED indicator will light red.
Red On
Mic Off
Red Off
Mic On
4 Display
Displays the product’s status and current mode.
D.IN → HDMI 1 → HDMI 2 → Wi-Fi → BT
• When you plug in the AC cord, the power button will begin working in 4 to 6 seconds.
• When you turn on this unit, there will be a 4 to 5 second delay before it produces sound.
• If you hear sounds from both the TV and Soundbar, go to the Settings menu for the TV audio and change the TV speaker to External Speaker.
Bottom Panel of the Soundbar
DIGITAL AUDIO IN
(OPTICAL)
HDMI TO TV
(eARC/ARC)
HDMI 1
HDMI 2
SERVICE
HDMI TO TV
(eARC/ARC)
HDMI 1
HDMI 2
DIGITAL AUDIO IN
(OPTICAL)
SERVICE
ID SET
HDMI IN 1
HDMI IN 2
POWER
NETWORK
SERVICE
DIGITAL AUDIO IN
(OPTICAL)
HDMI TO TV
(eARC/ARC)
HDMI 2
HDMI 1
ID SET
(WOOFER/REAR)
ID SET
NETWORK
SERVICE
ID SET
(WOOFER/REAR)
DIGITAL AUDIO IN
(OPTICAL)
HDMI TO TV
(eARC/ARC)
HDMI 2
HDMI 1
5
DIGITAL AUDIO IN
(OPTICAL)
HDMI TO TV
(eARC/ARC)
HDMI 1
HDMI 2
SERVICE
HDMI TO TV
(eARC/ARC)
HDMI 1
HDMI 2
DIGITAL AUDIO IN
(OPTICAL)
SERVICE
DIGITAL AUDIO IN
(OPTICAL)
HDMI TO TV
(eARC/ARC)
HDMI 1
HDMI 2
SERVICE
HDMI TO TV
(eARC/ARC)
HDMI 1
HDMI 2
DIGITAL AUDIO IN
(OPTICAL)
SERVICE
DIGITAL AUDIO IN
(OPTICAL)
HDMI TO TV
(eARC/ARC)
HDMI 1
HDMI 2
SERVICE
HDMI TO TV
(eARC/ARC)
HDMI 1
HDMI 2
DIGITAL AUDIO IN
(OPTICAL)
SERVICE
2
1
3
4
1 DIGITAL AUDIO IN (OPTICAL)
Connect to the digital (optical) output of an external device. (See page 24)
2 SERVICE
Connect a USB storage device to upgrade the product’s software.
3 HDMI 1 / HDMI 2
Inputs digital video and audio signals simultaneously using an HDMI cable.
Connect to the HDMI output of an external device. (See page 23)
4 HDMI TO TV (eARC/ARC)
Connect to the HDMI jack on a TV. (See page 17)
5 POWER
Connect the Soundbar’s AC power cable. (See page 12)
• When disconnecting the power cord from a wall outlet, pull the plug. Do not pull the cable.
• Do not connect this unit or other components to an AC outlet until all connections between components are complete.