FULL MANUAL HW-LST70T Imagine the possibilities Thank you for purchasing this Samsung product. To receive more complete service, please register your product at www.samsung.
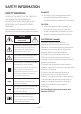
SAFETY INFORMATION SAFETY WARNINGS WARNING •• To prevent injury, this apparatus must be TO REDUCE THE RISK OF ELECTRIC SHOCK, DO securely attached to the floor/wall in NOT REMOVE THE COVER (OR BACK). accordance with the installation instructions. NO USER-SERVICEABLE PARTS ARE INSIDE. CAUTION REFER SERVICING TO QUALIFIED SERVICE PERSONNEL.
Radiation Exposure Statement This equipment complies with IC RSS-102 radiation exposure limits set forth for an uncontrolled environment. This equipment should be installed and operated with minimum distance 20 cm between the radiator & your body. Important Safety Instructions Read these operating instructions carefully before using the unit. Follow all the safety instructions listed below. Keep these operating instructions handy for future reference. 1. Read these instructions. 2. Keep these Instructions.
PRECAUTIONS 5. The battery used with this product contains chemicals that are harmful to the environment. Do not dispose of the battery 1. Ensure that the AC power supply in your in the general household trash. Do not house complies with the power expose the battery to excess heat or fire. Do requirements listed on the identification not short circuit, disassemble, or overheat sticker located on the bottom of your the battery. product.
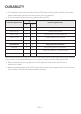
DURABILITY •• The Soundbar provides the robust durability by IP55 so that it can be used in outdoor environment (when installed and used as per the instructions in this User Manual). •• The remote control of this product provides durability by IP56. Protection against solids IP Protection against water 5 5 No protection 0 0 No protection Solids > 50 mm 1 1 Vertically falling water Solids > 12 mm 2 2 Vertically water - enclosure tilted 15° Solids > 2.
CONTENTS 01 Checking the Components Inserting Batteries before using the Remote Control (AAA batteries X 2) 02 03 04 05 06 Product Overview -------------------------- 9 10 Front Panel / Bottom Panel of the Soundbar -------------------------- 10 Rear Panel of the Soundbar -------------------------- 11 Using the Remote Control 12 How to Use the Remote Control -------------------------- 12 Using the Hidden Buttons (Buttons with more than one function) -------------------------- 15 Output s
08 Connecting an External Device Connecting using an Optical Cable 09 10 11 28 -------------------------- 28 Connecting a Mobile Device 29 Method 1. Connecting via Bluetooth -------------------------- 29 Method 2.
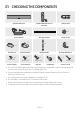
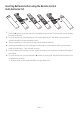
01 CHECKING THE COMPONENTS Soundbar Main Unit Soundbar Remote Control / Batteries Optical Cable x2 AC/DC Adapter Wall Mount Guide x2 Holder-Screw x2 x2 x2 Bracket-Top Bracket-Bottom x2 x4 Bracket-Guide x2 (M3 x L10) (M4 x L10) (M6 x L10) Screw-Taptype Screw-Machine Bolt-Etc Bracket-Wall Mount x2 A/S Bolt-Etc x2 x2 (M5 x L50) Anchor / Screw •• For more information about the power supply and power consumption, refer to the label attached to the product.
Inserting Batteries before using the Remote Control (AAA batteries X 2) 1 3 2 1 3 2 1. Press the ^ button at the top rear of the Soundbar remote control. The body will pop out slightly from the body cover. 2. Turn the remote over, push the body of the remote upwards until the battery compartment is revealed, and then remove the battery cover. 3. If there are batteries in the remote, to remove the existing batteries. 4. Insert two new batteries (1.
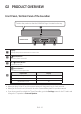
02 PRODUCT OVERVIEW Front Panel / Bottom Panel of the Soundbar Position the product so that the SAMSUNG logo is located on the top. Bottom Panel Display Displays the product’s status and current mode. (Power) Button Turns the power on and off. (Volume) Button Adjusts the volume. (Source) Button Selects the source input mode. Input mode Display Optical Digital input D.
Rear Panel of the Soundbar DIGITAL AUDIO IN (OPTICAL) SERVICE DC 23V DIGITAL AUDIO IN (OPTICAL) SERVICE DC 23V DIGITAL AUDIO IN (OPTICAL) Connect to the digital (optical) output of an external device. (See page 28) SERVICE Connect a USB storage device to upgrade the product's software. DC 23V (Power Supply In) Connect the AC/DC power adapter. (See page 17) •• When disconnecting the power cable of the AC/DC power adaptor from a wall outlet, pull the plug. Do not pull the cable.
03 USING THE REMOTE CONTROL How to Use the Remote Control Power Press to enter the “D.IN” mode. Turns the Soundbar on and off. •• Auto Power Down Function The unit turns off automatically in the following situations: –– In D.IN / Wi-Fi / BT mode if there is no audio signal for 18 minutes. D.IN Press to select a source connected to the Soundbar. Source Press the (Mute) button to mute the sound. Press it again to unmute the sound.
VOLUME Push the button up or down to adjust the volume. •• Mute Press the VOL button to mute the sound. Press it again to unmute the sound. Press this button to outputs the original sound. STANDARD Switch the Soundbar to Bluetooth pairing mode. Press the button and wait for the “BT PAIRING” screen to connect to a new Bluetooth device. Bluetooth PAIR You can also play or pause music by pressing the button. Play / Pause Press the indicated areas to select Up/Down/Left/Right.
BASS Push this button up or down to adjust the bass volume within a -6 to +6 range. Press this button to analyzes the content in real time and automatically provides the optimal sound field based on the characteristics of the content. ADAPTIVE Press this button to provide a wider sound stage than standard.
Using the Hidden Buttons (Buttons with more than one function) Hidden Button Reference page Remote Control Button Function BASS (Up) TV remote control On/Off (Standby) page 16 7 Band EQ page 12 (Sound Control) Output specifications for the different sound effect modes Effect STANDARD SURROUND ADAPTIVE Input Output 2.0 ch 2.0 ch 5.1 ch 3.0 ch 2.0 ch 3.0 ch 5.1 ch 3.0 ch 2.0 ch 2.0 ch 5.1 ch 3.
Adjusting the Soundbar volume with a TV remote control Adjust the Soundbar volume using the TV’s remote control. •• This function can be used with IR remote controls only. Bluetooth remote controls (remote controls that require pairing) are not supported. •• Set the TV speaker to External Speaker to use this function. •• Manufacturers supporting this function: VIZIO, LG, Sony, Sharp, PHILIPS, PANASONIC, TOSHIBA, Hisense, RCA 1. Turn Off the Soundbar. 2. Push up and hold the BASS button for 5 seconds.
04 CONNECTING THE SOUNDBAR Connecting Electrical Power How to mount the AC/DC adapter Connect the Soundbar to an electrical outlet in the following order: 1. Connect the AC/DC adapter to the Soundbar. 2. Connect the power cord to a wall socket. •• For more information about the required electrical power and power consumption, refer to the label attached to the product.
05 INSTALLING THE WALL MOUNT Method 1. TV mount Pre-connection Checklist •• This Soundbar is compatible with the Samsung outdoor TV model called “The Terrace” with the following model names: QN**LST**, GQ**LST**, QA**LST**, QE**LST** (e.g., QN65LST7T) Installation Precautions •• Install on a vertical wall only. •• Verify whether the wall is strong enough to support the product’s weight. If not, reinforce the wall or choose another installation point.
DC 23V 3. < 55” TV > < Rear of the Soundbar > A B C D E F G H F G DIGITAL AUDIO IN (OPTICAL) SERVICE DC 23V A 7.9” (200 mm) 1. DIGITAL AUDIO IN (OPTICAL) SERVICE DC 23V < Rear of the Samsung TV > A B C B D 4. C D < Bottom of the Soundbar > DIGITAL AUDIO IN (OPTICAL) SERVICE DC 23V E F G H A 2. B C < Rear of the Samsung TV > D E F G A A B H B C D E B F C G D H 5. C A E D B E C F D G E H F G H •• Tighten the TV with it lying down A B C .
6. 8. A B C D •• Before hooking up the Soundbar to A B C , slightly D lift E the product F Gand then H push it down for assembly. NOTES 7. Screw While the cable is not in use, seal it DIGITAL AUDIO IN A with the(OPTICAL) silicone. B C D E F G H SERVICE DIGITAL AUDIO IN (OPTICAL) DC 23V SERVICE •• When separating the Soundbar frome the TV, DC 23V please loosen te screw A onBthe C .
C Method 2. Wall mount 3. Wallmount Components D E F G H x2 x2 (M4 x L10) AJI I 4. x2 BKJ CLK D ML ENM FON GP O H P I J K L M N O I J K L M N O x2 x2 (M5 x L50) I JI KJ LK M L N M O N P O 5. 1. 2” (5 cm) or more A B Center D ELine F C G H 15.7” (400 mm) 2. I J K L M N O P ENG - 21 P •• Recommended torque : 10~12 kgf.
6. 8. While the cable is not in use, seal it DIGITAL AUDIO IN with the(OPTICAL) silicone. SERVICE DC 23V DIGITAL AUDIO IN (OPTICAL) SERVICE DC 23V •• After the cable is connected, close its cover and then tighten the loosened screws. 7.
06 USING A WIRED CONNECTION TO THE TV Connecting using an Optical Cable When the audio in a broadcast is encoded in Dolby Digital and the “Digital Output Audio Format” on your TV is set to PCM, we recommend that you change the setting to Dolby Digital. When the setting on the TV is changed, you will experience better sound quality. (The TV menu may use different words for Dolby Digital and PCM depending on the TV manufacturer.
1. With the TV and Soundbar turned off, connect the DIGITAL AUDIO IN (OPTICAL) port on the Soundbar and the OPTICAL output port on the TV with the optical cable, as shown in the figure. 2. Turn on the Soundbar and TV. 3. Select “D.IN” mode by pressing the (Source) button on the bottom of the Soundbar or the D.IN button on the Soundbar remote control. 4. The TV sound is output from the Soundbar.
07 USING A WIRELESS CONNECTION TO THE TV Pre-connection Checklist •• When used outdoors, wireless performance may degrade. Accordingly, use the provided optical cable if possible. Method 1. Connecting via Bluetooth When a Samsung TV is connected using Bluetooth, you can hear stereo sound without the hassle of cabling. •• Only one Samsung TV can be connected at a time. •• Samsung TV that supports Bluetooth can be connected. Check the specifications of your TV.
3. Select “[AV] Samsung Soundbar LST70T” from the list on TV’s screen. An available Soundbar is indicated with “Needs Pairing” or “Paired” on the TV’s Bluetooth device list. To connect the Samsung TV to the Soundbar, select the message, and then establish a connection. •• When the Samsung TV is connected, [TV] Name → “BT” appears on the Soundbar’s front display. 4. You can now hear Samsung TV sound from the Soundbar.
Notes on Bluetooth connection •• Locate a new device within 3.28 ft (1 m) to connect via Bluetooth communication. •• If asked for a PIN code when connecting a Bluetooth device, enter <0000>. •• The Soundbar automatically turns off after 18 minutes in the Ready state. •• The Soundbar may not perform Bluetooth search or connection correctly under the following circumstances: –– If there is a strong electrical field around the Soundbar.
08 CONNECTING AN EXTERNAL DEVICE Connecting using an Optical Cable Rear of the Soundbar BD / DVD player / Set-top box / Game console DIGITAL AUDIO IN (OPTICAL) Optical Cable OPTICAL OUT D.IN SERVICE DC 23V Bottom of the Soundbar 1. Use an optical cable to connect the DIGITAL AUDIO IN (OPTICAL) on the Soundbar main and the OPTICAL OUT port on the external device. 2. Turn on the Soundbar and external device. 3. Select “D.IN” mode by pressing the (Source) button on the bottom of the Soundbar or the D.
09 CONNECTING A MOBILE DEVICE Method 1. Connecting via Bluetooth When a mobile device is connected using Bluetooth, you can hear stereo sound without the hassle of cabling. •• When you connect a paired Bluetooth device with the Soundbar off, the Soundbar automatically turns on. BT PAIRING OR 5 Sec Mobile device Bottom of the Soundbar The initial connection •• When connecting to a new Bluetooth device, make sure the device is within 3.28 ft (1 m) distance. 1.
If the device fails to connect •• If you have an existing Soundbar (e.g., “[AV] Samsung Soundbar LST70T”) in the list of speakers on the Mobile device, delete it. •• Repeat steps 1 and 2. What is the difference between BT READY and BT PAIRING? •• BT READY : In this mode, you can reconnect any Samsung TV or mobile device that was connected before. •• BT PAIRING : In this mode, you can connect a new device to the Soundbar.
•• A Bluetooth device may experience noise or malfunction under in the following conditions: –– When the body is in contact with the signal transceiver on the Bluetooth device or Soundbar –– In corners or when there is an obstacle in proximity, such as a wall or partition, where electrical changes may occur. –– When exposed to radio interferences by other products operating on the same frequency ranges, such as medical equipment, microwave ovens, and wireless LAN devices.
Method 2. Connecting via Wi-Fi (Wireless Network) To connect a Soundbar to a mobile device via a wireless network (Wi-Fi), the SmartThings app is required. The initial connection 1. Install and launch the SmartThings app from your mobile device (smartphone or tablet). 2. On the app, follow the screen instructions to add the Soundbar. •• The automatic pop-up (the second screenshot below) may not show on some devices. If the pop-up window does not appear, press “ ” on the Home screen.
Using the Tap Sound Tap the Soundbar with your mobile device to play the sound of content on the mobile device through the Soundbar. •• This function may not be supported, depending on the mobile device. •• This function is only compatible with Samsung mobile devices with Android 8.1 or later. SmartThings App Top of the Soundbar Mobile device 1. Turn on the Tap Sound function on your mobile device. •• For details on how to turn on the function, refer to “Setting the Tap Sound function” below. 2.
10 CONNECTING AN AMAZON PRODUCT •• This feature may not be available in some countries. •• This service is provided by Amazon and can be terminated at any time. Samsung does not assume responsibility for service availability. •• Amazon Alexa app screen is subject to change without prior notice. Connect and use with an Amazon product (Amazon Echo) Use an Amazon Echo product to control your Soundbar and enjoy music services provided by Amazon Echo. NOTE •• Confirm that the Soundbar is connected to Wi-Fi.
11 SOFTWARE UPDATE Auto Update When the Soundbar is connected to the Internet, software updates automatically occur even when the Soundbar is turned off. •• To use the Auto Update function, the Soundbar must be connected to the Internet. The Wi-Fi connection to the Soundbar will be terminated if the Soundbar’s power cord is disconnected or the power is cut off. If the power is cut off, when the power comes back on or you reconnect the power cord, turn on the Soundbar, and then reconnect it to the 1.
12 TROUBLESHOOTING Before seeking assistance, check the following. In case the power is not turned on ;; Check whether the power cord of the Soundbar is correctly inserted into the outlet. In case the functions do not work properly ;; After removing the power cord, insert it again. ;; Remote the power cord from the external device and try again. ;; If there is no signal, the Soundbar automatically turns off after a certain period of time. Turn on the power. (See page 12).
In case Bluetooth sound breaking occurs ;; Sounds may be breaking due to interference by radio frequency or electronic devices nearby. Keep such devices away from the Soundbar to avoid radio interference. Example: microwave ovens. ;; Because the device to connect is far away from the Soundbar, sound breaking may occur. Move the device near the Soundbar. ;; If a part of your body is in contact with the Bluetooth transceiver or the product is installed on metal furniture, sound breaking may occur.
14 OPEN SOURCE LICENSE NOTICE To send inquiries and requests for questions regarding open sources, contact Samsung Open Source (http://opensource.samsung.com) 15 IMPORTANT NOTES ABOUT SERVICE Figures and illustrations in this User Manual are provided for reference only and may differ from actual product appearance.
16 SPECIFICATIONS AND GUIDE Specifications Model Name HW-LST70T Weight 14.8 lbs (6.7 kg) 48.0 x 5.5 x 2.1 inches Dimensions (W x H x D) (1220.0 x 140.0 x 53.
LIMITED WARRANTY TO ORIGINAL PURCHASER Samsung Electronics Canada Inc.(SECA), warrants that this product is free from defective material and workmanship. SECA further warrants that if this product falls to operate properly within the specified warranty period and the failure is due to improper workmanship or defective materials, SECA will repair or replace the product at its option. All warranty repairs must be performed by a SECA Authorized Service Center.
© 2020 Samsung Electronics Co., Ltd. All rights reserved. Contact SAMSUNG WORLD WIDE If you have any questions or comments relating to Samsung products, please contact the SAMSUNG customer care Center. HEADQUARTERS Samsung Electronics Canada Inc. 2050 Derry Road West, Mississauga, Ontario L5N 0B9 Canada TEL: 1-800-SAMSUNG (1-800-726-7864) www.samsung.com/ca/support Country Samsung Service Center Web Site ` North America CANADA 1-800-SAMSUNG (726-7864) www.samsung.com/ca/support (English) www.
MANUEL COMPLET HW-LST70T Imaginez les possibilités Merci d’avoir choisi un appareil Samsung. Pour recevoir une assistance plus complète, veuillez enregistrer votre produit sur www.samsung.
INFORMATIONS RELATIVES À LA SÉCURITÉ AVERTISSEMENTS AVERTISSEMENT •• Pour éviter des blessures, cet appareil doit POUR ÉVITER LES RISQUES DE CHOC être solidement fixé au plancher/au mur ÉLECTRIQUE, NE DÉMONTEZ PAS LE CAPOT. conformément aux directives d’installation. L’APPAREIL NE CONTIENT PAS DE PIÈCES RÉPARABLES PAR L’UTILISATEUR. S’ADRESSER À UN SERVICE APRÈS-VENTE QUALIFIÉ. MISE EN GARDE •• La prise d’alimentation fait office de système Reportez-vous au tableau ci-dessous pour de déconnexion.
Declaration d’exposition aux radiations: 9. Placez le cordon d’alimentation de sorte qu’il Cet equipement est conforme aux limites ne puisse être ni piétiné ni pincé, d’exposition aux rayonnements IC RSS-102 particulièrement au niveau de la fiche, de la etablies pour un environnement non controle. prise de courant et du point de sortie de Cet equipement doit etre installe et utilise avec l’appareil. un minimum de 20 cm de distance entre la source 10.
PRÉCAUTIONS 5. Les piles utilisées dans ce produit peuvent contenir des produits chimiques dangereux pour l’environnement. Ne jetez pas les 1. Assurez-vous que le bloc d’alimentation CA chez vous est conforme aux exigences de puissance figurant sur la plaque d’identification située à en dessous de votre produit. Installez votre produit horizontalement, sur un socle approprié (meuble), en laissant un espace suffisant pour la ventilation sur le pourtour 3~4 po.
DURABILITÉ •• Le Soundbar offre le niveau élevé de durabilité de la classe IP55. Il peut donc être utilisé à l’extérieur (s’il est installé et utilisé conformément aux instructions figurant dans le présent manuel utilisateur). •• La télécommande de ce produit offre le niveau de durabilité de la classe IP56.
SOMMAIRE 01 Vérification des composants Insertion des piles avant d'utiliser la télécommande (2 piles AAA) 02 03 Présentation du produit 8 -------------------------- 9 10 Panneau avant/Panneau inférieur du Soundbar -------------------------- 10 Panneau arrière du Soundbar -------------------------- 11 Utilisation de la télécommande 12 Comment utiliser la télécommande -------------------------- 12 Utilisation des boutons masqués (boutons ayant plusieurs fonctions) --------------------------
08 Connexion d'un appareil externe Connexion à l'aide d'un câble optique 09 10 11 28 -------------------------- 28 Connexion d'un appareil mobile 29 Méthode 1. Connexion par Bluetooth -------------------------- 29 Méthode 2.
01 VÉRIFICATION DES COMPOSANTS Unité principale du Soundbar Télécommande/ piles du Soundbar Câble optique x2 Adaptateur CA/CC Guide de montage mural x2 Vis de fixation x2 x2 x2 Dessus du support x4 Dessous du support x2 Guide du support x2 (M3 x L10) (M4 x L10) (M6 x L10) Vis taptite Vis machine Boulon Etc Support de montage mural x2 Boulon Etc A/S x2 x2 (M5 x L50) Ancrage / Vis •• Pour plus d'informations sur l'alimentation et la consommation électriques, reportez-vous à l'étiqu
Insertion des piles avant d'utiliser la télécommande (2 piles AAA) 1 3 2 1 3 2 1. Appuyez sur le bouton ^ situé sur la partie arrière supérieure de la télécommande du Soundbar. Le corps sortira légèrement de son cache. 2. Retournez la télécommande, poussez le corps de la télécommande vers le haut jusqu’à ce que le compartiment à piles apparaisse, puis retirez le couvercle. 3. S’il y a des piles dans la télécommande, retirez-les. 4.
02 PRÉSENTATION DU PRODUIT Panneau avant/Panneau inférieur du Soundbar Placez le produit de sorte que le logo SAMSUNG soit situé sur le dessus. Panneau inférieur Écran Affiche l'état du produit et le mode actuel. Bouton (Alimentation) Permet d'allumer et d'éteindre l'appareil. Bouton (Volume) Règle le volume. Bouton (Source) Permet de sélectionner le mode d'entrée source. Mode d’entrée Affichage Entrée numérique optique D.
Panneau arrière du Soundbar DIGITAL AUDIO IN (OPTICAL) SERVICE DC 23V DIGITAL AUDIO IN (OPTICAL) SERVICE DC 23V DIGITAL AUDIO IN (OPTICAL) Permet de connecter la sortie numérique (optique) d'un appareil externe. (Voir page 28) SERVICE Connectez un périphérique de stockage USB pour mettre à niveau le logiciel du produit. DC 23V (Entrée de l'alimentation) Connectez l'adaptateur secteur CA/CC.
03 UTILISATION DE LA TÉLÉCOMMANDE Comment utiliser la télécommande Permet d'allumer et d'éteindre le Soundbar. •• Fonction Auto Power Down L’appareil s’éteint automatiquement dans les Alimentation situations suivantes : –– En mode D.IN/Wi-Fi/BT en l’absence de signal audio pendant 18 minutes. Appuyez sur pour accéder au mode « D.IN ». D.IN Appuyez sur ce bouton pour sélectionner une source connectée au Soundbar.
VOLUME Faites basculer ce bouton vers le haut ou vers le bas pour régler le volume. •• Silence Appuyez sur le bouton VOL pour désactiver le son. Appuyez de nouveau sur ce bouton pour activer le son. Appuyez sur ce bouton pour que la sortie audio restitue le son d'origine. STANDARD Basculez le Soundbar en mode association Bluetooth. Appuyez sur ce bouton et attendez que l'écran « BT PAIRING » se connecte à un nouvel appareil Bluetooth.
BASS Appuyez sur ce bouton (haut ou bas) pour régler le volume des basses sur une plage allant de -6 à +6. Appuyez sur ce bouton pour analyser le contenu en temps réel et fournir automatiquement le champ sonore optimal en fonction des caractéristiques du contenu. ADAPTIVE Appuyez sur ce bouton pour fournir un environnement sonore plus important que la norme.
Utilisation des boutons masqués (boutons ayant plusieurs fonctions) Bouton masqué Page de référence Bouton de la télécommande Fonction BASS (Haut) Activer/Désactiver la fonction Télécommande de votre téléviseur (mode veille) page 16 EQ 7 bandes page 12 (Réglages sonores) Caractéristiques de sortie pour les différents modes d’effets sonores Effet STANDARD SURROUND ADAPTIVE Entrée Sortie 2.0 canaux 2.0 canaux 5.1 canaux 3.0 canaux 2.0 canaux 3.0 canaux 5.1 canaux 3.0 canaux 2.
Réglage du volume du Soundbar avec une télécommande du téléviseur Contrôlez le volume du Soundbar à l’aide de la télécommande du téléviseur. •• Cette fonction ne peut être utilisée qu’avec des télécommandes infrarouges. Les télécommandes Bluetooth (télécommandes qui nécessitent un appairage) ne sont pas prises en charge. •• Réglez le haut-parleur du téléviseur sur Haut-p. externe pour utiliser cette fonction.
04 CONNEXION DU SOUNDBAR Connexion de l’alimentation électrique Comment monter l’adaptateur CA/CC Connectez le Soundbar à une prise électrique dans l’ordre suivant : 1. Connectez l’adaptateur CA/CC au Soundbar. 2. Raccordez le cordon d’alimentation à une prise murale. •• Pour plus d'informations sur les exigences en matière d'alimentation électrique et de consommation d'énergie, reportez-vous à l'étiquette apposée sur le produit.
05 INSTALLATION DU SUPPORT MURAL Précautions d’installation •• Il est recommandé de mettre la Soundbar à l’abri, hors des conditions météorologiques extrêmes. Méthode 1. Fixation au téléviseur •• Procédez à l’installation sur un mur vertical Liste de contrôle de pré-connexion uniquement. •• Cette Soundbar est compatible avec le •• Vérifiez que le mur est suffisamment solide pour supporter le poids du produit.
DC 23V 3. < Téléviseur 55” > < Arrière du Soundbar > A B C D E F G H F G DIGITAL AUDIO IN (OPTICAL) SERVICE DC 23V A 7,9” (200 mm) 1. DIGITAL AUDIO IN (OPTICAL) SERVICE DC 23V < Arrière du téléviseur Samsung > A B C B D 4. C D < Dessous du Soundbar > DIGITAL AUDIO IN (OPTICAL) SERVICE DC 23V E F G H A 2. B C < Arrière du téléviseur Samsung > D E F A G A B H B E C D E B F C G D E H 5.
6. 8. A B C D •• Avant de raccorder le Soundbar à A B légèrement le C , soulevez D E F G produit, H puis poussez-le vers le bas pour l’assemblage. 7. Lorsque le câble n’est REMARQUES Vis pas utilisé, scellez-le DIGITAL AUDIO IN avec de(OPTICAL) la silicone. A SERVICE DIGITAL AUDIO IN (OPTICAL) B C D E F G H DC 23V SERVICE DC 23V •• Pour dissocier la Soundbar du téléviseur, desserrezAla vis sur B le C .
C Méthode 2. Support mural 3. Composants du montage mural D E F G H x2 x2 (M4 x L10) AJI I 4. x2 BKJ CLK D ML ENM FON GP O H P I J K L M N O I J K L M N O x2 x2 (M5 x L50) I JI KJ LK M L N M O N P O 5. 1. 2” (5 cm) ou plus A C Ligne D centrale E F B G H 15,7” (400 mm) 2. I J K L M N O P FRA - 21 P •• Couple recommandé : 10 à 12 kgf.
6. 8. Lorsque le câble n’est pas utilisé, scellez-le DIGITAL AUDIO IN (OPTICAL) avec de la silicone. SERVICE DC 23V DIGITAL AUDIO IN (OPTICAL) SERVICE DC 23V •• Une fois le câble connecté, fermez son cache, puis serrez les vis desserrées. 7.
06 UTILISATION D'UNE CONNEXION FILAIRE AVEC LE TÉLÉVISEUR Connexion à l’aide d’un câble optique Lorsque le son d'une diffusion est encodé en Dolby Digital et que le paramètre « Format de sortie audio numérique » est défini sur PCM sur votre téléviseur, nous recommandons de changer ce paramètre en le définissant sur Dolby Digital. Une fois que vous aurez modifié ce paramètre sur le téléviseur, vous pourrez profiter d'une meilleure qualité sonore.
1. Le téléviseur et le Soundbar étant éteints, connectez le port DIGITAL AUDIO IN (OPTICAL) du Soundbar et le port de sortie OPTICAL du téléviseur à l'aide du câble optique, comme indiqué sur la figure. 2. Allumez le Soundbar et le téléviseur. 3. Sélectionnez le mode « D.IN » en appuyant sur le bouton le bouton D.IN de la télécommande du Soundbar. 4. Le son du téléviseur est émis par le Soundbar.
07 UTILISATION D'UNE CONNEXION SANS FIL AVEC LE TÉLÉVISEUR Liste de contrôle de pré-connexion •• Lorsqu’il est utilisé à l’extérieur, les performances sans fil peuvent être altérées. Par conséquent, utilisez le câble optique fourni lorsque c’est possible. Méthode 1. Connexion par Bluetooth Lorsqu'un téléviseur Samsung est connecté via Bluetooth, vous pouvez entendre le son stéréo sans les tracas du câblage. •• Un seul téléviseur Samsung peut être connecté à la fois.
3. Sélectionnez « [AV] Samsung Soundbar LST70T » dans la liste sur l'écran du téléviseur. Un Soundbar disponible est indiquée par « Besoin d’appairage » ou « Associé » sur la liste des appareils Bluetooth du téléviseur. Pour connecter le téléviseur Samsung au Soundbar, sélectionnez le message, puis établissez une connexion. •• Lorsque le téléviseur Samsung est connecté, Nom [TV] → « BT » apparaît sur l'écran avant du Soundbar. 4.
Remarques sur la connexion Bluetooth •• Localisez un nouvel appareil à moins d’3,28 pi (1 m) pour vous connecter via la communication Bluetooth. •• Si un code PIN vous est demandé lors de la connexion d'un appareil Bluetooth, entrez <0000>. •• Le Soundbar s'éteint automatiquement au bout de 18 minutes à l'état Prêt. •• Le Soundbar peut ne pas effectuer correctement la recherche ou la connexion Bluetooth dans les circonstances suivantes : –– S'il y a un fort champ électrique autour du Soundbar.
08 CONNEXION D'UN APPAREIL EXTERNE Connexion à l'aide d'un câble optique Arrière du Soundbar Lecteur BD/DVD/Décodeur/ Console de jeu DIGITAL AUDIO IN (OPTICAL) Câble optique OPTICAL OUT D.IN SERVICE DC 23V Dessous du Soundbar 1. Utilisez un câble optique pour connecter le port DIGITAL AUDIO IN (OPTICAL) au Soundbar principal et le port OPTICAL OUT à l’appareil externe. 2. Allumez le Soundbar et l’appareil externe. 3. Sélectionnez le mode « D.IN » en appuyant sur le bouton sur le bouton D.
09 CONNEXION D'UN APPAREIL MOBILE Méthode 1. Connexion par Bluetooth Lorsqu'un appareil mobile est connecté par Bluetooth, vous pouvez entendre le son stéréo sans les tracas du câblage. •• Lorsque vous connectez un appareil Bluetooth associé alors que le Soundbar est éteint, le Soundbar s'allume automatiquement.
En cas d’échec de la connexion de l’équipement •• Si un Soundbar (par exemple, « [AV] Samsung Soundbar LST70T ») figure déjà dans la liste des haut-parleurs de l’appareil mobile, supprimez-le. •• Répétez les étapes 1 et 2. Quelle est la différence entre BT READY et BT PAIRING ? •• BT READY : dans ce mode, vous pouvez reconnecter n'importe quel téléviseur ou appareil mobile Samsung connecté auparavant. •• BT PAIRING : dans ce mode, vous pouvez connecter un nouvel appareil au Soundbar.
•• Un périphérique Bluetooth peut émettre du bruit ou devenir défaillant dans les conditions suivantes : –– Lorsque le corps est en contact avec l’émetteur-récepteur de signal sur l’appareil Bluetooth ou le Soundbar –– Dans les coins ou lorsqu’il y a un obstacle à proximité, tel qu’un mur ou une cloison, où des changements électriques peuvent se produire.
Méthode 2. Connexion par Wi-Fi (réseau sans fil) Pour connecter un Soundbar à un appareil mobile via un réseau sans fil (Wi-Fi), l’application SmartThings est requise. Connexion initiale 1. Installez et lancez l’application SmartThings sur votre appareil mobile (téléphone intelligent ou tablette). 2. Dans l’application, suivez les instructions à l’écran pour ajouter le Soundbar. •• La fenêtre contextuelle automatique (deuxième illustration ci-dessous) peut ne pas s’afficher sur certains appareils.
Utilisation de la fonction Tap Sound Appuyez sur le Soundbar avec votre appareil mobile pour lire le son du contenu de l’appareil mobile via le Soundbar. •• Cette fonction peut ne pas être prise en charge en fonction de l’appareil mobile. •• Cette fonction n’est compatible qu’avec les appareils mobiles Samsung fonctionnant sous Android 8.1 ou une version ultérieure. Application SmartThings Dessus du Soundbar Appareil mobile 1. Activez la fonction Tap Sound sur votre appareil mobile.
10 CONNECTER UN PRODUIT AMAZON •• Cette fonction peut ne pas être disponible dans certains pays. •• Ce service est fourni par Amazon et peut être résilié à tout moment. Samsung n’assume pas la responsabilité de la disponibilité du service. •• L’écran de l’application Amazon Alexa peut faire l’objet d’une modification sans préavis.
11 MISE À JOUR LOGICIELLE Mise à jour automatique Lorsque le Soundbar est connecté à Internet, les mises à jour logicielles s'installent automatiquement, même lorsque le Soundbar est éteint. •• Pour utiliser la fonction de mise à jour automatique, le Soundbar doit être connecté à Internet. La connexion Wi-Fi au Soundbar sera interrompue si le cordon d'alimentation du Soundbar est débranché ou si l'alimentation est coupée.
12 DÉPANNAGE Avant de contacter l'assistance, effectuez les vérifications suivantes. Si l'alimentation n'est pas activée ;; Vérifiez si le cordon d'alimentation du Soundbar est correctement inséré dans la prise. Si les fonctions ne marchent pas correctement ;; Après avoir retiré le cordon d'alimentation, réinsérez-le. ;; Retirez le cordon d’alimentation de l’appareil externe et réessayez. ;; S'il n'y a pas de signal, le Soundbar s'éteint automatiquement après un certain temps. Allumez le produit.
13 LICENCE Si le son Bluetooth est interrompu ;; Les sons peuvent se briser en raison d’interférences dues aux signaux radioélectriques ou aux appareils électroniques situés à proximité. Éloignez ces appareils du Soundbar pour éviter les interférences radio. Exemple : fours à micro-ondes. ;; L'appareil à connecter étant éloigné du Soundbar, une coupure du son peut se produire. Déplacez l'appareil près du Soundbar.
14 AVIS DE LICENCES LIBRES Pour envoyer des questions concernant les sources ouvertes, communiquez avec Samsung Open Source (http://opensource.samsung.com). 15 REMARQUE IMPORTANTE CONCERNANT LE SERVICE Les chiffres et les illustrations contenus dans ce Guide d’utilisation sont fournis à titre de référence uniquement et pourraient ne pas représenter exactement le produit.
16 CARACTÉRISTIQUES ET GUIDE Spécifications Nom de modèle HW-LST70T Poids 14,8 lbs (6,7 kg) 48,0 x 5,5 x 2,1 po Dimensions (L x H x P) (1220,0 x 140,0 x 53,5 mm) Plage de températures en fonctionnement -24°F à 122°F (-31°C à 50°C) Plage d’humidité en fonctionnement 10 % à 80 %, sans condensation Plage de températures d’entreposage -24°F à 122°F (-31°C à 50°C) Plage d’humidité d’entreposage 5 % à 95 %, sans condensation AMPLIFICATEUR Puissance de sortie nominale (45W x 4) + (10W x 3) LPCM 2ch,
GARANTIE LIMITÉE À L’ACHETEUR INITIAL Samsung Electronics Canada Inc. (SECA) garantit ce produit contre tout défaut de fabrication. SECA garantit aussi que si cet appareil ne fonctionne pas convenablement durant la période de garantie SECA se réservera le droit de réparer ou de remplacer l’appareil défectueux. Toutes les réparations sous garantie doivent être effectuées par un Centre de service autorisé SECA.
© 2020 Samsung Electronics Co., Ltd. Tous droits réservés. Comment contacter Samsung dans le monde Si vous avez des suggestions ou des questions concernant les produits Samsung, veuillez contacter le Service Consommateurs Samsung. SIÈGE SOCIAL Samsung Electronics Canada Inc. 2050 Derry Road West, Mississauga, Ontario L5N 0B9 Canada TEL: 1-800-SAMSUNG (1-800-726-7864) www.samsung.com/ca_fr/support Pays Centre de service Samsung Site Web ` Amérique du Nord CANADA 1-800-SAMSUNG (726-7864) www.samsung.