LCD TV LE23R8 LE26R8 Contact SAMSUNG WORLD-WIDE If you have any questions or comments relating to Samsung products, please contact the SAMSUNG customer care centre. Country REPUBLIC OF IRELAND U.K Customer Care Centre 0818 717 100 0870 SAMSUNG (7267864) Web Site www.samsung.com/uk www.samsung.com/uk Owner’s Instructions Before operating the unit, please read this manual thoroughly, and retain it for future reference.
Precautions When Displaying a Still Image A still image may cause permanent damage to the TV screen. WARNINGS: Image retention, commonly known as screen burn-in, can occur on most types of television if the same image is displayed continuously. The most common causes of image retention are logos that remain stationary on the TV screen. These logos are common on many programmes received via a Setop Box.
Contents Connecting and Preparing Your TV Setting the Time List of Parts........................................................2 Installing the Stand............................................2 Installing the Wall Mount Kit...............................2 Viewing the Control Panel..................................3 Viewing the Connection Panel...........................4 Viewing the Remote Control..............................7 Installing Batteries in the Remote Control..........
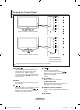
List of Parts Please make sure the following items are included with your LCD TV. If any items are missing, contact your dealer. M4 X L16 Remote Control & Batteries (AAA x 2) Power Cord Stand Screw X4 Cover-Bottom Owner’s Instructions Stand Cleaning Cloth Registration Card Registration Cards (Not available in all locations) The stand and stand screw may not be included depending on the model. Installing the Stand <3> <2> 1. Place the TV faced down on a soft cloth or cushion on a table. 2.
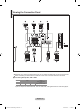
Viewing the Control Panel 1 2 3 4 5 [LE23R81, LE26R81, LE23R83, LE26R83] 6 7 1 2 3 4 5,6 7 [LE23R82, LE26R82, LE23R84, LE26R84] Front Panel buttons Touch the right side of each button to operate. The product colour and shape may vary depending on the model. 1 SOURCE Toggles between all the available input sources (TV, Ext1, Ext2, AV, S-Video, Component, PC, HDMI1, HDMI2,). In the on-screen menu, use this button as you would use the ENTER button on the remote control. 4 Press to change channels.
Viewing the Connection Panel 1 2 3 4 5 Power Input 9 0 8 7 6 Whenever you connect an external device to your TV, make sure that power on the unit is turned off. When connecting an external device, match the colour of the connection terminal to the cable. 1 Connecting Set-Top Box, VCR or DVD Connector EXT 1 EXT 2 Video O O Input Audio (L/R) O O RGB O Output Video + Audio (L/R) Only TV Output you can choose.
2 Connecting AUDIO - Connect RCA audio cables to "R - AUDIO - L" on the rear of your set and the other ends to corresponding audio in connectors on the Amplifier or DVD Home Theater. 3 HDMI IN 1, HDMI IN 2 - Supports connections between HDMI-connection-enabled AV devices (Set-Top Boxes, DVD players) - No additional Audio connection is needed for an HDMI to HDMI connection.
SERVICE - Service connection for qualified service engineer. 9 Connecting Component Devices (DTV/DVD) - Connect component video cables (optional) to component connector ("PR", "PB", "Y") on the rear of your set and the other ends to corresponding component video out connectors on the DTV or DVD. - If you wish to connect both the Set-Top Box and DTV (or DVD), you should connect the Set-Top Box to the DTV (or DVD) and connect the DTV (or DVD) to component connector ("PR", "PB", "Y") on your set.
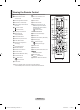
Viewing the Remote Control 1 Television Standby button 2 Number buttons for direct channel access aC ontrol the cursor in the menu b Use to see information on the current broadcast 3 One/Two-digit channel selection c Picture freeze 4 Selects the TV mode directly eP icture size selection 5 Used to display Channel Lists on f PIP:Picture-In-Picture On / Off the screen.
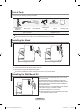
Installing Batteries in the Remote Control 1. Lift the cover at the back of the remote control upward as shown in the figure. 2. Install two AAA size batteries. Make sure to match the "+" and "–" ends of the batteries with the diagram inside the compartment. 3. Replace the cover. Remove the batteries and store them in a cool, dry place if you won’t be using the remote control for a long time. The remote control can be used up to about 23 feet from the TV.
Plug & Play When the TV is initially powered on, several basic settings proceed automatically and subsequently. The following settings are available. 1. 2. Press the POWER button on the remote control. The message "Start Plug & Play" is displayed with "OK" selected. Select the appropriate language by pressing the ▲ or ▼ but tons. Press the ENTER button to confirm your choice. Plug & Play Start Plug & Play. OK Enter Exit 3. Press the ◄ or ► buttons to select “Shop” or “Home”, then the ENTER button.
If you want to reset this feature... TV 1. Press the MENU button to display the menu. Press the ▲ or ▼ button to select "Setup", then press the ENTER button. 2. Press the ENTER button again, to select "Plug & Play". 3. The message to "Start Plug & Play" is displayed. Setup Plug & Play Language : English Time Game Mode : Off Blue Screen : Off Melody : Off PC sMore Move Enter Return Plug & Play Start Plug & Play.
Storing Channels Manually You can store up to 100 channels, including those received via cable networks. When storing channels manually, you can choose: Whether or not to store each of the channels found. The programme number of each stored channel which you wish to identify. 1. Press the MENU button to display the menu. Press the ▲ or ▼ button to select "Channel", then press the ENTER button. 2. Press the ▲ or ▼ button to select "Manual Store", then press the ENTER button. 3.
Setting the Channel Lists Set the channels according to your preference. You can easily delete, add, or lock the channel you want. 1. 2. Press the MENU button to display the menu. Press the ▲ or ▼ button to select "Channel", then press the ENTER button. Channel List P 1 C3 1 / 10 Prog. Press the ▲ or ▼ button to select "Channel Manager", then press the ENTER button. 0 C-- 1 C3 2 BBC 1 3 C74 3. Press the ENTER button again, to select "Channel List". 4. Press the ► button to select " 5.
Sorting the Stored Channels You can exchange the numbers of two channels, in order to: TV Modify the numeric order in which the channels have been automatically stored. Give easily remembered numbers to the channels that you watch most often. 1. Press the MENU button to display the menu. Press the ▲ or ▼ button to select "Channel", then press the ENTER button. 2. Press the ▲ or ▼ button to select "Sort", then press the ENTER button.
Fine Tuning Channel Reception Use fine tuning to manually adjust a particular channel for optimal reception. 1. Use the number buttons to directly select the channel that you want to fine tune. 2. Press the MENU button to display the menu. Press the ▲ or ▼ button to select "Channel", then press the ENTER button. 3. Press the ▲ or ▼ button to select "Fine Tune", then press the ENTER button. 4. Press the ◄ or ► button to adjust the fine tuning. Press the ENTER button. 5.
Adjusting the Custom Picture Your set has several settings which allow you to control picture quality. 1. To select the desired picture effect, follow the "Changing the Picture Standard" instructions number 1 to 3. (on page 14) 2. Press the ▲ or ▼ button to select a particular item. Press the ENTER button. 3. Press the ◄ or ► button to decrease or increase the value of a particular item. Press the ENTER button. 4. Press the EXIT button to exit.
Activating Backlight. You can adjust the screen brightness by adjusting the LCD backlight brightness. (0~10) 1. To select the desired picture effect, follow the “Changing the Picture Standard” instructions number 1 to 3. (On page 14) 2. Press the ▲ or ▼ button to select “Backlight”, then press the ENTER button. 3. Press the ◄ or ► button to decrease or increase the value of a particular item. Press the ENTER button. 4. Press the EXIT button to exit.
Configuring Detailed Settings on the Picture TV You can set detailed picture settings. 1 Press the MENU button to display the menu. 2 Press the ENTER button, to select “Picture”. 3 Press the ▲ or ▼ button to select Detail Settings, then press the ENTER button. 4 Select the required option by pressing the ▲ or ▼ button, then press the ENTER button.
Changing the Picture Size You can select the picture size which best corresponds to your viewing requirements. 1. Press the MENU button to display the menu. Press the ENTER button, to select "Picture" 2. Press the ▲ or ▼ button to select "Size", then press the ENTER button. 3. Select the required option by pressing the ▲ or ▼ button. Press the ENTER button. 4. Press the EXIT button to exit.
Freezing the Current Picture Press the STILL button to freeze a moving picture into a still one. Press again to cancel. Selecting the Screen Mode When setting the picture size to Auto Wide in a 16:9 wide TV, you can determine the picture size you want to see the 4:3 WSS (Wide Screen Service) image or nothing. Each individual European country requires different picture size so this function is intended for users to select it. 1. Press the MENU button to display the menu.
Digital NR / Active Colour / DNIe If the broadcast signal received by your TV is weak, you can activate the Digital Noise Reduction feature to help reduce any static and ghosting that may appear on the screen. 1. Press the MENU button to display the menu. Press the ENTER button, to select “Picture”. 2. Select the required option by pressing the ▲ or ▼ button, then press the ENTER button. Available options: Digital NR, Active Colour, DNIe. 3.
Viewing the Picture In Picture (PIP) You can display a sub picture within the main picture of set programme or video input. In this way, you can watch the picture of set programme or video input from any connected equipment while watching the main picture. 1. Press the MENU button to display the menu. Press the ▲ or ▼ button to select “Setup”, then press the ENTER button. 2. Press the ▲ or ▼ button to select "PIP", then press the ENTER button. 3. Press the ENTER button again.
HDMI Black Level Mode : Custom Setup Equalizer rMore SRS TSXT : Off Home Auto Theater VolumePC :: Off Off Mode On Light Effect :: Watching Internal Mute Off Energy Reset Saving : Off HDMI Black Level : Low PIP You can directly select the black level on the screen to adjust the screen depth. 1. Press the MENU button to display the menu. Press the ▲ or ▼ button to select "Setup", then press the ENTER button. 2.
Adjusting the Sound Settings The sound settings can be adjusted to suit your personal preferences. 1. Press the MENU button to display the menu. Press the ▲ or ▼ button to select "Sound", then press the ENTER button. 2. Press the ▲ or ▼ button to select "Equalizer", then press the ENTER button. 3. Press the ◄ or ► button to select a particular item. Press the ENTER button. 4. Press the ▲ or ▼ button to reach the required setting. Press the ENTER button. 5.
Connecting Headphones You can connect a set of headphones to your set if you wish to watch a TV programme without disturbing the other people in the room. When you insert the head set jack into the corresponding port, you can operate only “SRS TS XT” and “Auto Volume” in Sound menu. Prolonged use of headphones at a high volume may damage your hearing. You will not receive sound from the speakers when you connect headphones to the system. The headphone volume and TV volume are adjusted differently.
Selecting the Internal Mute If you want to hear the sound through separate speakers, cancel the internal amplifier. 1. Press the MENU button to display the menu. Press the ▲ or ▼ button to select "Sound", then press the ENTER button. 2. Press the ▲ or ▼ button to select "Internal Mute", then press the ENTER button. 3. Press the ▲ or ▼ button to select "On" or "Off". Press the ENTER button. 4. Press the EXIT button to exit.
Resetting the Sound Settings to the Factory Defaults If Game Mode is On, the Reset Sound function is activated. Selecting the Reset function after setting the equalizer resets the equalizer setting to the factory defaults. 1. Press the MENU button to display the menu. Press the ▲ or ▼ button to select "Sound", then press the ENTER button. 2. Press the ▲ or ▼ button to select "Reset", then press the ENTER button. 3. Press the EXIT button to exit.
Setting the Sleep Timer You can select a time period of between 30 and 180 minutes after which the television automatically switches to standby mode. 1. Press the MENU button to display the menu. Press the ▲ or ▼ button to select "Setup", then press the ENTER button. 2. Press the ▲ or ▼ button to select "Time", then press the ENTER button. 3. Press the ▲ or ▼ button to select "Sleep Timer", then press the ENTER button. 4.
Choosing Your Language When you start using your set for the first time, you must select the language which will be used for displaying menus and indications. 1. Press the MENU button to display the on-screen menu. Press the ▲ or ▼ button to select "Setup", then press the ENTER button. 2. Press the ▲ or ▼ button to select "Language", then press the ENTER button. 3. Select a particular language by pressing the ▲ or ▼ button repeatedly. Press the ENTER button. You can choose one of 21 languages. 4.
Setting the Blue Screen Mode / Selecting the Melody Blue Screen: If no signal is being received or the signal is very weak, a blue screen automatically replaces the noisy picture background. If you wish to continue viewing the poor picture, you must set the "Blue Screen" mode to "Off". Melody: You can hear melody sound when the television is powered on or off. 1. Press the MENU button to display the menu. Press the ▲ or ▼ button to select "Setup", then press the ENTER button. 2.
Setting the Light Effect You can turn on/off the blue LED on the front of TV according to the situation. Use it for saving power or when the LED dazzles your eyes. 1. TV Press the MENU button to display the on-screen menu. Press the ▲ or ▼ button to select "Setup", then press the ENTER button. 2. Press the ▲ or ▼ button to select "Light Effect", then press the ENTER button. 3. Move Move Select the required option (Off, Standby Mode On, Watching Mode On, On) by pressing the ▲ or ▼ button.
Selecting the Source You can select among external sources connected to your TV’s input jacks. 1. TV Press the MENU button to display the menu. Press the ▲ or ▼ button to select "Input", then press the ENTER button Press the ENTER button again, to select "Source List". When no external device is connected to your set, only “TV”, “Ext.1”, “Ext.2” are activated in the “Source List”. “AV”, “S-Video”, “Component”, “PC”, “HDMI1”, “HDMI2”, are activated only when they are connected to your set.
Teletext Decoder Most set channels carry " teletext ", pages of written information that provide information such as: Television programme times. News bulletins and Weather forecasts. Sports results. Subtitles for the hard of hearing. The teletext pages are organized according to six categories: Part A B C D E F Contents Selected page number. Broadcasting station identity. Current page number or search status. Date and time. Text. Status information.
Selecting a Specific Teletext Page Press the number buttons on the remote control to enter the page number directly: 1. Enter the three-digit page number listed in the contents by pressing the corresponding numeric buttons. 2. If the selected page is linked with several secondary pages, the secondary pages are displayed in sequence. To freeze the display on a given page, press the PIP ( ) . Press the PIP ( ) button again to resume. 3. Using the various display options: To display... Press the...
Setting up Your PC Software (Based on Windows XP) The Windows display-settings for a typical computer are shown below. The actual screens on your PC may be different depending upon your particular version of Windows and your particular video card. Even if your actual screens look different, the same, basic set-up information will apply in almost all cases. (If not, contact your computer manufacturer or Samsung Dealer.) 1. 2. First, click on "Control Panel" on the Windows start menu.
Setting the PC Coarse and Fine Tuning of the Image (Image Lock): The purpose of picture quality adjustment is to remove or reduce picture noise. If the noise is not removed by Fine-tuning alone, then adjust the frequency as best as possible (coarse) and Fine-tune again. After the noise has been reduced, re-adjust the picture so that it is aligned on the center of screen. 1. Preset: Press the SOURCE button to select PC mode. 2. Press the MENU button to display the menu.
Using the Anti-Theft Kensington Lock The Kensington lock is a device used to physically fix the system when using it in a public place. The locking device has to be purchased separately. The appearance and locking method may differ from the illustration depending on the manufacturer. Please refer to the manual provided with the Kensington lock for proper use. 1. Insert the locking device into the Kensington slot on the LCD TV (Figure 1), and turn it in the locking direction (Figure 2). 2.
Technical and Environmental Specifications Model Name LE23R8 Screen Size (Diagonal) 23 inch 26 inch 1360 x 768 @ 60 Hz 1360 x 768 @ 60 Hz 3WX2 5WX2 586 x 84 x 406 mm 586 x 216 x 445 mm 666 X 85 X 461 mm 666 X 216 X 500 mm 8 kg 10 kg 10 °C to 40 °C (50 °F to 104 °F) 10 % to 80 %, non-condensing -20 °C to 45 °C (-4 °F to 113 °F) 5 % to 95 %, non-condensing 10 °C to 40 °C (50 °F to 104 °F) 10 % to 80 %, non-condensing -20 °C to 45 °C (-4 °F to 113 °F) 5 % to 95 %, non-condensing PC Resolution So
Warning! Important Safety Instructions Please read the appropriate section that corresponds to the marking on your Samsung product before attempting to install the product. CAUTION RISK OF ELECTRIC SHOCK DO NOT OPEN CAUTION: TO REDUCE THE RISK OF ELECTRIC SHOCK, DO NOT REMOVE COVER (OR BACK). THERE ARE NO USER SERVICEABLE PARTS INSIDE. REFER ALL SERVICING TO QUALIFIED PERSONNEL. This symbol indicates that high voltage is present inside.
Wiring the Mains Power Supply Plug (UK Only) IMPORTANT NOTICE The mains lead on this equipment is supplied with a moulded plug incorporating a fuse. The value of the fuse is indicated on the pin face of the plug and, if it requires replacing, a fuse approved to BSI1362 of the same rating must be used. Never use the plug with the fuse cover omitted if the cover is detachable. If a replacement fuse cover is required, it must be of the same colour as the pin face of the plug.
This page is intentionally left blank. BN68-01166M-02Eng-0402.
Correct Disposal of This Product (Waste Electrical & Electronic Equipment) (Applicable in the European Union and other European countries with separate collection systems) This marking shown on the product or its literature, indicates that it should not be disposed with other household wastes at the end of its working life.