LCD TV Contact SAMSUNG WORLD-WIDE If you have any questions or comments relating to Samsung products, please contact the SAMSUNG customer care centre. Comment contacter Samsung dans le monde Si vous avez des suggestions ou des questions concernant les produits Samsung, veuillez contacter le Service Consommateurs Samsung. Kontakt zu Samsung Falls Sie Fragen oder Anregungen zu Samsung-Produkten haben, wenden Sie sich bitte an den Samsung-Kundendienst.
Precautions When Displaying a Still Image A still image may cause permanent damage to the TV screen. • Do not display a still image on the LCD panel for more than 2 hours as it can cause screen image retention. This image retention is also known as "screen burn". To avoid such image retention, reduce the degree of brightness and contrast of the screen when displaying a still image.
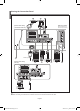
English Contents Connecting and Preparing Your TV List of Parts............................................................... Installing the Stand................................................... Installing the Wall Mount Kit.................................. Viewing the Control Panel........................................ Viewing the Connection Panel.................................. Viewing the Remote Control..................................... Installing Batteries in the Remote Control.............
List of Parts Please make sure the following items are included with your LCD TV. If any items are missing, contact your dealer.
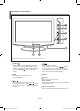
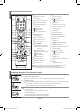
Viewing the Control Panel The product colour and shape may vary depending on the model. SOURCE Toggles between all the available input sources (TV, Ext.1, Ext.2, AV, S-Video, Component, PC, HDMI). In the on-screen menu, use this button as you use the ENTER button on the remote control. MENU Press to see an on-screen menu of your TV’s features. Press to change channels. In the on-screen menu, use the buttons as you use the and buttons on the remote control.
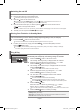
Viewing the Connection Panel [Side Panel Jacks] [Rear Panel Jacks] (32inch/37inch/40 inch) (26 inch model does not have the side panel jacks.) Power Input [Rear Panel Jacks] (26 inch) Whenever you connect an external device to your TV, make sure that power on the unit is turned off. When connecting an external device, match the colour of the connection terminal to the cable. English- BN68-00983F-00Eng.
Connecting an Aerial or Cable Television Network To view television channels correctly, a signal must be received by the set from one of the following sources: - An outdoor aerial / A cable television network / A satellite network Connecting HDMI/DVI - Supports connections between HDMI-connection-enabled AV devices (Set-Top Boxes, DVD players, AV receivers and digital TVs). - No additional Audio connection is needed for an HDMI to HDMI connection.
Viewing the Remote Control Television Standby button elects the PC mode directly S N umber buttons for direct channel access utomatic Power-off A One/Two-digit channel selection P P Selects the TV mode directly Exit the OSD display “Channel Manager” It on the screen.
Switching On and Off The mains lead is attached to the rear of your set. 1. Plug the mains lead into an appropriate socket. 2. Press the 3. Press the numeric button (0~9) or channel up/down ( / ) button on the remote control or button on the right side of the set. The standby indicator lights up on the front of the set. 4. button on the front of the set. You also can press the POWER button or the TV ( ) button on the remote control to turn the TV on.
If you want to reset this feature... 1. Press the MENU button to display the menu. Press the or button to select “Setup”, then press the ENTER 2. Press the ENTER 3. The message to “Start Plug & Play” is displayed. button. button again, to select “Plug & Play”. - Storing Channels Automatically - Storing Channels Manually Storing Channels Automatically You can scan for the frequency ranges available to you (and availability depends on your country).
5. Press the or button to select “Colour System”, then press the ENTER 6. Select the colour standard required by pressing the or button then, press the ENTER 7. Press the or button to select “Sound System”, then press the ENTER 8. Select the sound standard required by pressing the or button, then press the ENTER button. button. button. button. I f there is an abnormal sound or no sound, re-select the sound system required. 9.
Activating the Child Lock This feature allows you to prevent unauthorized users, such as children, from watching unsuitable programmes by muting out video and audio. Child Lock cannot be released using the buttons on the side. Only the remote control can release the Child Lock setting, so keep the remote control away from children. 1. Press the MENU button to display the menu. Press the or button to select “Channel”, then press the ENTER button. 2.
Assigning Channels Names Channel names will be assigned automatically when channel information is broadcast. These names can be changed, allowing you to assign new names. 1. Press the MENU button to display the menu. Press the or button to select “Channel”, then press the ENTER button. 2. Press the or button to select “Name”, then press the ENTER 3. If necessary, select the channel to be assigned to a new name by pressing the or button. Press the ENTER button. button.
Changing the Picture Standard You can select the type of picture which best corresponds to your viewing requirements. You can also press the P.MODE button on the remote control to select one of the picture settings. 1. Press the MENU button to display the menu. Press the or button to select “Picture”, then press the ENTER button. 2. Press the ENTER button again, to select “Mode”. 3. Press the ENTER button again, to select “Mode”. 4.
Resetting the Picture Settings to the Factory Defaults You can return to the factory defaults picture settings. 1. To select the desired picture effect, follow the “Changing the Picture Standard” instructions number 1 to 4 on page 12. 2. Press the or button to select “Reset”, then press the ENTER button. 3. Press the EXIT button to exit. The “Reset” will be set for each picture mode. Changing the Picture Size You can select the picture size which best corresponds to your viewing requirements.
DNIe Demo (Digital Natural Image engine) Samsung’s new technology brings you more detailed images with contrast and white enhancement. A new image compensation algorithm gives viewers brighter and clearer images. DNIe technology will match every signal to your eyes. You can see how DNIe improves the picture by setting DNIe Demo mode to On. 1. Press the MENU button to display the menu. Press the or button to select “Picture”, then press the ENTER button. 2.
8. Press the or button to select “Programme” and then press the ENTER button. You can select the channel that you want to view through sub picture by pressing the or button. Press the ENTER button. 9. Press the EXIT button to exit. The “Programme” can be active when the sub picture is set to TV. You may notice that the picture in the PIP window becomes slightly unnatural when you use the main screen to view a game or karaoke. Source: Used to select a source of the sub picture.
Setting the TruSurround XT (SRS TSXT) TruSurround XT is a patented SRS technology that solves the problem of playing 5.1 multichannel content over two speakers. TruSurround delivers a compelling,virtual surround sound experience through any two-speaker playback system, including internal television speakers. It is fully compatible with all multichannel formats. You can also set these options simply by pressing the SRS button on remote control. 1. Press the MENU button to display the menu.
Listening to the Sound of the Sub Picture During the PIP features activation, you can listen to the sound of the sub picture. 1. Press the MENU button to display the menu. Press the or button to select “Sound”, then press the ENTER button. 2. Press the or button to select “Sound Select”, then press the ENTER button. 3. Press the or button to select “Sub”. Press the ENTER button. 4. Press the EXIT button to exit. Main: Used to listen to the sound of the main picture.
Setting the Sleep Timer You can select a time period of between 30 and 180 minutes after which the television automatically switches to standby mode. Press the SLEEP button on the remote control repeatedly until the appropriate time interval appears. 1. Press the MENU button to display the menu. Press the or button to select “Setup”, then press the ENTER button. 2. Press the or button to select “Time”, then press the ENTER 3.
Choosing Your Language When you start using your set for the first time, you must select the language which will be used for displaying menus and indications. 1. 2. Press the MENU button to display the on-screen menu. Press the or button to select “Setup”, then press the ENTER button. Press the or button to select “Language”, then press the ENTER button. 3. Select a particular language by pressing the or button repeatedly. Press the ENTER button. 4. Press the EXIT button to exit.
Using the Energy Saving Feature This function adjusts the brightness of the TV so as to reduce power consumption. When you watching TV at night, set the "Energy Saving " mode option to "High" so as to reduce the dazzling of your eyes as well as the power consumption. 1. Press the MENU button to display the on-screen menu. Press the or button to select “Setup”, then press the ENTER button. 2. Press the or button to select “Energy Saving”, then press the ENTER button. 3.
Teletext Decoder Most set channels carry “ teletext ”, pages of written information that provide information such as: Television programme times. News bulletins and Weather forecasts. Sports results. Subtitles for the hard of hearing. The teletext pages are organized according to six categories: Part Contents A Selected page number. B Broadcasting station identity. C Current page number or search status. D Date and time. E Text. F Status information.
Selecting a Specific Teletext Page Press the number buttons on the remote control to enter the page number directly: 1. E nter the three-digit page number listed in the contents by pressing the corresponding numeric buttons. 2. I f the selected page is linked with several secondary pages, the secondary pages are displayed in sequence. To freeze the display on a given page, press the PIP ( ) button. Press the PIP ( ) button again to resume. 3. Using the various display options: To display...
Setting up Your PC Software (Based on Windows XP) The Windows display-settings for a typical computer are shown below. The actual screens on your PC may be different depending upon your particular version of Windows and your particular video card. Even if your actual screens look different, the same, basic set-up information will apply in almost all cases. (If not, contact your computer manufacturer or Samsung Dealer.) 1. First, click on “Control Panel” on the Windows start menu. 2.
Setting the PC Coarse and Fine Tuning of the Image (Image Lock): The purpose of picture quality adjustment is to remove or reduce picture noise. If the noise is not removed by Fine-tuning alone, then adjust the frequency as best as possible (coarse) and Fine-tune again. After the noise has been reduced, re-adjust the picture so that it is aligned on the center of screen. Press the PC button on the remote control to select the PC mode. 1. Preset: Press the PC button to select PC mode. 2.
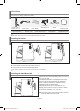
Using the Anti-Theft Kensington Lock The Kensington lock is a device used to physically fix the system when using it in a public place. The locking device has to be purchased separately. The appearance and locking method may differ from the illustration depending on the manufacturer. Please refer to the manual provided with the Kensington lock for proper use. 1. I nsert the locking device into the Kensington slot on the LCD TV (Figure 1), and turn it in the locking direction (Figure 2). Cable Figure 2 2.
Technical and Environmental Specifications Model Name Screen Size (Diagonal) Power Supply Power Consumption PC Resolution Sound Output Dimension (WxDxH) Body With stand Weight With stand Environmental Considerations Operating Temperature Operating Humidity Storage Temperature Storage Humidity LE26R7 LE32R7 LE37R7 26 inch 32 inch 37 inch LE40R7 40 inch AC220-240V 50 Hz AC220-240V 50 Hz AC220-240V 50 Hz AC220-240V 50 Hz 120 W 152 W 170 W 205 W 1360 x 768 @ 60 Hz 1360 x 768 @ 60 Hz 1360 x 768
Table des matières CONNEXION ET PREPARATION DE VOTRE TELEVISEUR 2 2 2 3 4 6 6 7 7 7 Réglage et affichage de l’heure............................... 17 Réglage de la minuterie de mise en veille............ 18 Marche et arrêt automatique du téléviseur........... 18 REGLAGE DES AUTRES OPTIONS REGLAGE DES CANAUX Mémorisation automatique des chaînes................... 8 Mémorisation manuelle des chaînes........................ 8 Réglage de Gestionnaire de Chaînes......................
Liste de pièces Veuillez vous assurer que les composants suivants sont bien inclus avec votre téléviseur LCD. Le cas échéant, contactez votre revendeur.
Présentation du panneau de commande La couleur et la forme du produit peuvent varier en fonction du modèle. SOURCE Bascule entre toutes les sources d’entrée disponibles. (TV, Ext.1, Ext.2, AV, S-Vidéo, Composant, PC, HDMI). Dans le menu à l’écran, utilisez ce bouton de la même manière que le bouton ENTER de la télécommande. MENU Appuyez sur ce bouton pour afficher le menu des fonctions de votre téléviseur. Appuyez pour diminuer ou augmenter le volume.
Présentation du panneau de branchement [Prises du panneau latéral] (Le modèle 26 pouce n’est pas équipé de prises de panneau latéral.) [Prises du panneau arrière] (32 pouce / 37pouce / 40 pouce) Entrée del’alimentation [Prises du panneau arrière] (26 pouce) Lorsque vous raccordez un appareil externe au téléviseur, assurez-vous que l’appareil est arrêté. Lorsque vous connectez un périphérique externe, faites correspondre les couleurs du terminal de connexion et du câble. Français- BN68-00983F-00Fre.
Branchement à un réseau de télévision câblé ou hertzien Afin d’afficher correctement les canaux de télévision, un signal doit être reçu par le téléviseur/moniteur depuis l’une des sources suivantes: - Une antenne extérieure / Un réseau de télévision câblée / Un réseau satellite Branchement HDMI/DVI - Prend en charge les connexions entre des périphériques audio/vidéo compatibles HDMI (boîtiers décodeurs, lecteurs DVD, récepteurs AV et moniteurs).
Présentation de la télécommande Bouton veille du téléviseur rrêt automatique A Boutons numériques d’accès direct aux chaînes Sélection des effets visuels P P Sélection de canaux à 1 ou 2 chiffres Permet d’accéder directement au mode TV Déplacement du curseur dans le menu Il affiche “Gestionnaire de Chaînes” à l’écran.
Mise en marche et arrêt Le câble relié au secteur est fixé à l’arrière du téléviseur/moniteur. 1. Relier le câble principal à la prise appropriée. 2. Appuyez sur le bouton L’indicateur de veille situé à l’avant du téléviseur s’allume. à l’avant du téléviseur. Vous pouvez également appuyer sur le bouton POWER ou le bouton TV ( ) de la télécommande pour allumer le téléviseur. Le dernier programme que vous avez regardé est automatiquement re-sélectionné. 3.
Pour réinitialiser cette fonction… 1. Appuyez sur le bouton MENU pour afficher le menu. Appuyez sur le bouton ou pour sélectionner “Configuration”, puis sur la touche ENTER . 2. Appuyez de nouveau sur le bouton ENTER “Plug & Play”. 3. Le message de démarrage du mode Plug & Play s’affiche.
7. Appuyez sur le bouton ou pour sélectionner “Système Sonore”, puis sur la touche ENTER 8. Sélectionnez la norme audio voulue en appuyant de façon répétée sur la touche ou , puis sur la touche ENTER 9. Si vous connaissez le numéro de la chaîne à enregistrer, appuyez sur le bouton ou pour sélectionner “Canal”. Appuyez sur le bouton ENTER . Sélectionnez C (Chaîne par voie hertzienne) ou S (Chaîne câblée) en appuyant sur le bouton ou . Appuyez sur la touche pour sélectionner la chaîne.
Activation de la sécurité enfant Cette fonction vous permet d’empêcher que des utilisateurs non autorisés, tels que des enfants, regardent des programmes inappropriés en désactivant la vidéo et l’audio. La sécurité enfant ne peut pas être désactivée à l’aide des boutons du panneau latéral. La télécommande étant le seul moyen de désactiver la sécurité enfant, gardez-la hors de portée des enfants. 1. Appuyez sur le bouton MENU pour afficher le menu.
Attribution de noms aux canaux Les noms de chaînes sont attribués automatiquement lorsque les informations des chaînes sont émises. Ces noms peuvent être changés, vous autorisant à attribuer de nouveaux noms. 1. Appuyez sur le bouton MENU pour afficher le menu. Appuyez sur le bouton ou pour sélectionner “Canal”, puis sur la touche ENTER 2. Appuyez sur le bouton ou pour sélectionner “Nom station”, puis sur la touche ENTER . 3.
Modification de l’image standard Vous pouvez sélectionner le type d’image qui correspond le mieux à vos exigences d’affichage. Vous pouvez également appuyer sur le bouton P.MODE de la télécommande pour sélectionner l’une des configurations d’image. 1. Appuyez sur le bouton MENU pour afficher le menu. Appuyez sur le bouton ou pour sélectionner “Image”, puis sur la touche ENTER 2. Appuyez de nouveau sur le bouton ENTER pour sélectionner “Mode”. 3.
Rétablir les paramètres de réglage de l’image d’usine. Vous pouvez rétablir les réglages de l’image définis par défaut en usine. 1. Pour sélectionner l’effet visuel souhaité, observez les instructions 1 à 4 dans la section “Modification de l’image standard” à la page 12. 2. Appuyez sur le bouton ou pour sélectionner “Réinitialiser”, puis sur la touche ENTER . 3. Appuyez sur le bouton EXIT pour quitter le menu. La fonction “Réinitialiser” réinitialise chaque mode d’image.
DNle Démo (Digital Natural Image engine) La nouvelle technologie de Samsung vous apporte des images plus détaillées avec une amélioration des contrastes et des blancs. Le nouvel algorithme de compensation d’images vous donne une image plus lumineuse et plus claire. La technologie DNIe adaptera tous les signaux à votre vue, quels qu’ils soient. Vous pouvez apprécier l’amélioration de l’image par la technologie DNIe en activant le mode “DNle Démo”. 1. Appuyez sur le bouton MENU pour afficher le menu.
9. Appuyez sur le bouton EXIT pour quitter le menu. Il est possible que l’image affichée dans la fenêtre PIP soit légèrement déformée lorsque vous utilisez la fenêtre principale pour diffuser un jeu vidéo ou du karaoké. Source: Permet de sélectionner la source de l’image secondaire. Intervertir: Pour faire alterner l’image principale et l’image secondaire. Taille: permet de sélectionner la taille de l’image secondaire. Position: Permet de déplacer l’image secondaire.
Paramétrage de la technologie TruSurround XT (SRS TSXT) La technologie TruSurround XT est une technologie SRS brevetée qui répond au problème de lecture des contenus multicanaux 5.1 sur deux haut-parleurs. La technologie TruSurround garantit un son surround virtuel d’une exceptionnelle qualité sur tout système de lecture à deux haut-parleurs, dont les haut-parleurs du téléviseur. Cette technologie est entièrement compatible avec tous les formats multicanaux.
Ecoute du son accompagnant l’image secondaire Lorsque la fonction PIP est activée, vous pouvez écouter le son accompagnant l’image secondaire. 1. Appuyez sur le bouton MENU pour afficher le menu. Appuyez sur le bouton ou pour sélectionner “Son”, puis sur la touche ENTER . 2. Appuyez sur le bouton ou pour sélectionner “Sélection du son”, puis sur la touche ENTER . 3. Appuyez sur le bouton ou pour sélectionner “Secondaire”. Appuyez sur le bouton ENTER . 4.
Réglage de la minuterie de mise en veille Vous pouvez sélectionner une durée comprise entre 30 et 180 minutes à l’issue de laquelle le téléviseur passera automatiquement en mode veille. 1. Appuyez sur le bouton MENU pour afficher le menu. Appuyez sur le bouton ou pour sélectionner “Configuration”, puis sur la touche ENTER . 2. Appuyez sur le bouton ou pour sélectionner “Horloge”, puis sur la touche ENTER . 3.
Choix de la langue Lorsque vous utilisez le téléviseur pour la première fois, vous devez sélectionner la langue utilisée pour afficher les menus et les indications. 1. Appuyez sur le bouton MENU pour afficher le menu affiché à l’écran. Appuyez sur le bouton ou pour sélectionner “Configuration”, puis sur la touche ENTER . 2. Appuyez sur le bouton ou pour sélectionner “Langue”, puis sur la touche ENTER . 3. Sélectionnez la langue voulue en appuyant de façon répétée sur la touche ou .
Utilisation de la fonction d’économie d’énergie Cette fonction règle la luminosité du téléviseur afin de réduire la consommation d’énergie. Lorsque vous regardez la télévision le soir, réglez l’option du mode “Economie d’énergie” sur “Elevée” afin de réduire l’éblouissement ainsi que la consommation. 1. Appuyez sur le bouton MENU pour afficher le menu affiché à l’écran. Appuyez sur le bouton ou pour sélectionner “Configuration”, puis sur la touche ENTER . 2.
Décodeur télétexte La plupart des chaînes du téléviseur possèdent des pages “télétexte” fournissant des informations telles que : L es horaires des programmes télévisés. B ulletins d’informations et prévisions météo. D es résultats sportifs. D es sous-titres pour les malentendants. Les pages télétextes sont organisées en six catégories Part Table des matières A Numéro de la page sélectionnée. B Identité de la chaîne émettrice. C Numéro de page actuelle ou état de recherche. D Date et heure.
Sélection d’une page télétexte spécifique Appuyez sur les touches numériques de la télécommande pour entrer directement le numéro de page: 1. E ntrez le numéro de page à trois chiffres figurant dans la table des matières en appuyant sur les boutons numériques correspondants. 2. S i la page sélectionnée est liée à plusieurs pages secondaires, celles-ci sont affichées par séquence. Pour figer l’affichage sur une page donnée, appuyez sur le bouton PIP ( ).
Paramétrage du logiciel PC (Basé sur Windows XP) Les paramètres d’affichage de Windows pour un ordinateur courant sont affichés ci-dessous. Les écrans sur votre PC seront probablement différents, selon votre version de Windows et votre carte vidéo. Même si vos écrans sont différents, des informations de configuration de base identiques seront applicables dans pratiquement tous les cas. (Si ce n’est pas le cas, contactez le fabricant de votre ordinateur ou un revendeur Samsung.) 1.
Sélection du PC Réglage de base et réglage fin de l’image (Verrouillage Image) : Le but du réglage de la qualité de l’image est d’éliminer ou de réduire le bruit parasite de l’image (défauts). Si le bruit parasite n’est pas éliminé en effectuant uniquement une syntonisation fine, réglez la fréquence du mieux que vous pouvez (approximative) puis effectuez à nouveau une syntonisation plus fine. Une fois le bruit parasite réduit, réajustez l’image pour l’aligner au centre de l’écran. 1.
Utilisation du verrouillage Kensington antivol Le verrou Kensington est un dispositif permettant de fixer le système lorsqu’il est utilisé dans un lieu public. Le dispositif de verrouillage doit être acheté séparément. Il se peut que l’apparence et la mé thode de verrouillage soient différents de l’illustration en fonction du fabricant. Veuillez vous reporter au manuel fourni avec le verrou Kensington pour une utilisation adéquate. 1.
Spécifications techniques et environnementales Modèle Taille de l’écran (diagonale) Alimentation LE26R7 LE32R7 LE37R7 26 pouce 32 pouce 37 pouce LE40R7 40 pouce AC220-240V 50 Hz AC220-240V 50 Hz AC220-240V 50 Hz AC220-240V 50 Hz Consommation 120 W 152 W 170 W 205 W PC Résolution 1360 x 768 @ 60 Hz 1360 x 768 @ 60 Hz 1360 x 768 @ 60 Hz 1360 x 768 @ 60 Hz 5WX2 10 W X 2 10 W X 2 10 W X 2 675,0 x 75,0 x 475,5 mm 675,0 x 215,5 x 530,0 mm 800,0 x 80,0 x 548,5 mm 800,0 x 252,0 x 603,0 mm
Inhalt ANSCHLIESSEN UND VORBEREITEN DES FERNSEHGERÄTS Lieferumfang............................................................. Montage des Ständers.............................................. Wandhalterung anbringen..................................... Bedienfeld................................................................. Anschlussfeld............................................................ Fernbedienung..........................................................
Lieferumfang Überprüfen Sie die Verpackung Ihres LCD-Fernsehgeräts auf Vollständigkeit. Sollten Teile fehlen, wenden Sie sich bitte an Ihren Händler. M4 X L16 Fernbedienung und 2 Netzkabel Batterien (Typ AAA) Bedienungsanleitung Bodenabdeckung Garantiekarte 4 Schrauben für Standfuß Servicenetzliste Fuß Reinigungstuch Sicherheitshinweise Registrierungskarte Garantiekarte / Servicenetzliste / Sicherheitshinweise / Registrierungskarte (Nicht in allen Gebieten erhältlich).
Bedienfeld Die Produktfarbe und -form kann je nach Modell unterschiedlich sein. SOURCE Schaltet zwischen allen verfügbaren Signalquellen um. (TV, Ext.1, Ext.2, AV, S-Video, Komp., PC, HDMI). Im Bildschirmmenü können Sie diese Taste wie die Taste ENTER auf der Fernbedienung verwenden. MENU Drücken Sie diese Taste, um ein Bildschirmmenü zu den Funktionen des TVGeräts einzublenden. Kanäle wechseln.
Anschlussfeld [Buchsen an der Seitenverkleidung] [Buchsen an der Rückseite] (32 Zoll / 37 Zoll / 40 Zoll) (Das Modell 26 Zoll verfügt nicht über Buchsen an der Seitenverkleidung) Netzkabelbuchse [Buchsen an der Rückseite] (26 Zoll) Wenn Sie ein externes Gerät an das Fernsehgerät anschließen möchten, muss das Gerät unbedingt ausgeschaltet sein. Achten Sie beim Anschließen von Kabeln an die Ausgänge des Geräts darauf, das die Kabel den entsprechenden farbcodierten Anschlüssen zugeordnet werden.
An der Antenne oder am Kabelfernsehnetz anschließen Damit die Fernsehkanäle korrekt empfangen werden, muss der Monitor an eine der folgenden Signalquellen angeschlossen sein: - Terrestrische Antenne / Kabelfernsehanschluss / Satellitenempfänger Anschließen von HDMI/DVI-Schnittstellen - Unterstützt Verbindungen zwischen AVGeräten (Settopboxen, DVD-Playern, AVReceivern und Digital-TV-Geräten), die für HDMI-Schnittstellen geeignet sind.
Fernbedienung Standby-Taste des Fernsehgeräts Modus PC direkt aufrufen Zifferntasten für direkte Kanalwahl Sleep-Timer aktivieren/stellen Taste zum Auswählen von ein-/ zweistelligen Programmplätzen P P Modus TV direkt aufrufen OSD-Menü ausblenden Anzeige der “Programmverwaltung” auf dem Bildschirm Den Cursor im Menü Lautstärkeverminderung Lautstärkeerhöhung Ton vorübergehend aussc halten Menüanzeige und Änderungsbestätigung Audiomodusauswahl Bild-im-Bild Ein/Aus B ildeff
Ein-und Ausschalten Das Netzkabel ist auf der Rückseite des Geräts angeschlossen. 1. Schließen Sie das Netzkabel an eine geeignete Netzsteckdose an. Die Standby-Anzeige auf der Vorderseite des Geräts leuchtet. 2. Drücken Sie auf der Vorderseite des Geräts die Taste 3. Drücken Sie auf der Fernbedienung die Zifferntasten (0~9) oder eine der Programmplatz-Wahltasten ( / ), oder drücken Sie auf der rechten Seite des Geräts die Taste . 4. .
So setzen Sie diese Funktion zurück: 1. Drücken Sie die Taste MENU, um das Menü anzuzeigen. Drücken Sie die Taste oder , um “Einstellungen” auszuwählen, und drücken Sie dann die Taste ENTER . 2. Drücken Sie die Taste ENTER 3. Die Meldung zum Starten von Plug & Play wird angezeigt. erneut, um “Plug & Play” auszuwählen.
5. Drücken Sie die Taste oder, um “Fernsehnorm” auszuwählen, und drücken Sie dann die Taste ENTER 6. Wählen Sie den erforderlichen Farbstandard aus, indem Sie wiederholt die Taste oder drücken und dann die Taste ENTER drücken. 7. Drücken Sie die Taste oder um “Tonsystem” auszuwählen, und drücken Sie dann die Taste ENTER 8. Wählen Sie den erforderlichen Audiostandard aus, indem Sie wiederholt die Taste oder drücken und dann die Taste ENTER drücken. 9.
Aktivieren der Kindersicherung Mit dieser Funktion können Sie nicht autorisierte Benutzer, z. B. Kinder, daran hindern, ungeeignete Programme anzuschauen, indem das Bild blockiert und der Ton stummgeschaltet wird. Die Kindersicherung kann nicht über die Tasten an der Seite aufgehoben werden. Sie kann nur über die Fernbedienung deaktiviert werden. Bewahren Sie die Fernbedienung deshalb für Kinder unzugänglich auf. 1. Drücken Sie die Taste MENU, um das Menü anzuzeigen.
Kanalnamen zuweisen Kanalnamen werden automatisch zugewiesen, sofern Kanalinformormationen ausgestrahlt werden. Diese Namen können geändert werden, so dass Sie neue Namen vergeben können. 1. Drücken Sie die Taste MENU, um das Menü anzuzeigen. Drücken Sie die Taste oder , um “Kanal” auszuwählen, und drücken Sie dann die Taste ENTER . 2. Drücken Sie die Taste oder , um “Name” auszuwählen, und drücken Sie dann die Taste ENTER . 3. Wählen Sie ggf.
Bildstandard ändern Sie können den Bildstandard auswählen, der für Ihre Sehgewohnheiten am besten geeignet ist. 1. Drücken Sie die Taste MENU, um das Menü anzuzeigen. Drücken Sie die Taste oder , um “Bild” auszuwählen, und drücken Sie dann die Taste ENTER . 2. Drücken Sie die Taste ENTER erneut, um “Modus” auszuwählen. 3. Drücken Sie die Taste ENTER erneut, um “Modus” auszuwählen. 4. Drücken Sie die Taste oder , um das gewünschten Bildeffekt auszuwählen. Drücken Sie die Taste ENTER . 5.
Zurücksetzen der Bildeinstellungen auf die werkseitig festgelegten Standardwerte Sie können die Einstellungen auf die werkseitig festgelegten Standard bildeinstellungen zurücksetzen. 1. Um den gewünschten Bildeffekt zu erzielen, befolgen Sie die Anweisungen 1 bis 4 unter “Bildstandard ändern” auf Seite 12. 2. Drücken Sie die Taste oder , um “Reset” auszuwählen, und drücken Sie dann die Taste ENTER button. 3. Zum Beenden drücken Sie die Taste EXIT. Die Option “Reset” wird auf jeden Bildmodus angewendet.
DNIe Demo (Digital Natural Image engine) Die neue Technologie von Samsung garantiert kontrastreiche, detailgetreuere Bilder mit verbesserter Weißdarstellung. Der neue Bildausgleichsalgorithmus sorgt für ein helleres, klareres Bild. Wenn Sie den DNIe Demomodus auf „Ein” stellen, können Sie sich von der Optimierung der Bildwiedergabe durch DNIe überzeugen. 1. Drücken Sie die Taste MENU, um das Menü anzuzeigen. Drücken Sie die Taste oder um “Bild” auszuwählen, und drücken Sie dann die Taste ENTER . 2.
8. Drücken Sie die Taste oder um “Programm” auszuwählen, und drücken Sie dann die Taste ENTER . Mit den Tasten oder können Sie nun den Sender auswählen, der im Nebenbild wiedergegeben werden soll. Drücken Sie die Taste ENTER . 9. Zum Beenden drücken Sie die Taste EXIT. “Programm” kann auch aktiv sein, wenn das PIP-Bild auf “TV” eingestellt ist. Möglicherweise wirkt das Bild im PIP-Fenster leicht unnatürlich, wenn Sie den Hauptbildschirm zum Anzeigen von Spielen oder Karaoke verwenden.
Einstellen von TruSurround XT (SRS TSXT) TruSurround XT ist eine patentierte SRSTechnologie, die das Problem des Betreibens von 5.1-Mehrkanalinhalten über zwei Lautsprecher löst. TruSurround bietet ein beeindruckendes Virtual-Surround-Klangerlebnis über Wiedergabesysteme mit zwei Lautsprechern, z. B. internen Fernsehlautsprechern. Es ist vollständig kompatibel mit allen Mehrkanalformaten. Sie können diese Optionen auch einfach auswählen, indem Sie auf der Fernbedienung die Taste SRS drücken. 1.
Ton des Nebenbildes wiedergeben Wenn die PIP-Funktion aktiviert ist, können Sie den Ton des PIP-Bildes wiedergeben. 1. Drücken Sie die Taste MENU, um das Menü anzuzeigen. Drücken Sie die Taste oder , um “Ton” auszuwählen, und drücken Sie dann die Taste ENTER . 2. Drücken Sie die Taste oder , um “Ton wählen” auszuwählen, und drücken Sie dann die Taste ENTER . 3. Drücken Sie die Taste oder um die Option “PIP-sender” auszuwählen. Drücken Sie die Taste ENTER . 4.
Stellen der Einschlafschaltuhr Sie können ein Intervall zwischen 30 und 180 Minuten auswählen, nach dessen Ablauf der Fernseher automatisch in den Standby-Modus geschaltet wird. Drücken Sie auf der Fernbedienung mehrmals die Taste SLEEP, bis das gewünschte Zeitintervall angezeigt wird. 1. Drücken Sie die Taste MENU, um das Menü anzuzeigen. Drücken Sie die Taste oder , um “Einstellungen” auszuwählen, und drücken Sie dann die Taste ENTER . 2.
Sprache der Bedienerführung wählen Wenn Sie das Gerät das erste Mal verwenden, müssen Sie die Sprache auswählen, die für die Menüs und Hinweise verwendet wird. 1. Drücken Sie die Taste MENU, um das Bildschirmmenü anzuzeigen. Drücken Sie die Taste oder , um “Einstellungen” auszuwählen, und drücken Sie dann die Taste ENTER . 2. Drücken Sie die Taste oder , um “Sprache” auszuwählen, und drücken Sie dann die Taste ENTER . 3.
Verwenden der Energiesparfunktion Mit dieser Funktion stellen Sie die Helligkeit des Fernsehgeräts ein, um den Stromverbrauch zu senken. Wenn Sie nachts fernsehen, stellen Sie “Energiesparmod.” auf “Hoch” ein, um sowohl den Blendeffekt als auch den Stromverbrauch zu senken. 1. Drücken Sie die Taste MENU, um das Bildschirmmenü anzuzeigen. Drücken Sie die Taste oder , um “Einstellungen” auszuwählen, und drücken Sie dann die Taste ENTER . 2. Drücken Sie die Taste oder , um “Energiesparmod.
Videotextdecoder Zusammen mit den meisten Fernsehprogrammen werden Videotextseiten ausgestrahlt. Diese Seiten enthalten unter anderem die folgenden Informationen: Sendezeiten. Nachrichten und Wetterberichte. Sportergebnisse. Untertitel für Hörgeschädigte.
Auswählen einer bestimmten Videotextseite Sie können Seitenzahlen direkt über die Nummerntasten auf der Fernbedienung eingeben. 1. G eben Sie die dreistellige Seitennummer der gewünschten Seite mitden entsprechenden Nummerntasten ein. 2. 3. F alls die ausgewählte Seite mit weiteren Unterseiten verknüpft ist, werden diese nacheinander angezeigt. Drücken Sie die Taste PIP( ) um das Blättern zu unterbrechen. Drücken Sie die Taste PIP( ) erneut, um das Blättern fortzusetzen.
Installation der PC-Software (Unter Windows XP) Im Folgenden sind die Windows-Anzeigeeinstellungen für die meisten Computer aufgeführt. Die tatsächlich auf dem Computer angezeigten Fenster variieren je nach Version von Windows und der jeweiligen Videokarte. Selbst wenn das angezeigte Fenster abweicht, gelten in den meisten Fällen die gleichen Grundinformationen für die Einstellung. (Wenden Sie sich andernfalls an den Computerhersteller oder Samsung-Händler.) 1.
PC auswählen Grob-und Feinabstimmung des Bildes vornehmen (Bildjustierung): Mithilfe der Anpassung der Bildqualität sollen Bildstörungen beseitigt oder verringert werden. Sollte sich das Bildrauschen durch die Feinabstimmung allein nicht beheben lassen, stellen Sie zunächst die Frequenz möglichst genau ein (Grob), und führen Sie dann erneut eine Feinabstimmung durch. Nachdem die Störungen reduziert worden sind, richten Sie das Bild erneut aus, so dass es auf dem Bildschirm zentriert ist. 1.
Kensington-Schloss als Diebstahlsicherung Das Kensington-Schloss dient zur sicheren Befestigung des Geräts an einem öffentlichen Ort. Das Schloss muss separat erworben werden. Je nach Hersteller können Aussehen und Verriegelungsverfahren von der Abbildung abweichen. Informationen zur richtigen Anwendung entnehmen Sie bitte der Bedienungsanleitung des Kensington-Schlosses. 1.
Technische Daten und Umgebungsbedingungen Modell Bildgröße (Diagonal) Stromversorgung Leistungsaufnahme Auflösung (PC) Ton Ausgang Abmessungen (B x T x H) Gehäuse Mit Fuß Gewicht Mit Fuß Umgebungsbedingungen Temperatur (Betrieb) Luftfeuchtigkeit (Betrieb) Temperatur (Lagerung) Luftfeuchtigkeit (Lagerung) LE26R7 LE32R7 LE37R7 26 Zoll 32 Zoll 37 Zoll LE40R7 40 Zoll AC220-240V 50 Hz AC220-240V 50 Hz AC220-240V 50 Hz AC220-240V 50 Hz 120 W 152 W 170 W 205 W 1360 x 768 @ 60 Hz 1360 x 768 @ 60 Hz
Inhoud UWTV/MONITOR AANSLUITEN EN GEBRUIKSKLAAR MAKEN Lijst met onderdelen................................................. De standaard installeren........................................... De muurbevestigingsbeugel installeren................... Overzicht van het bedieningspaneel........................ Overzicht van het aansluitpaneel............................. Overzicht van de afstandsbediening ....................... Batterijen in de afstandsbediening plaatsen............. In - en uitschakelen......
Lijst met onderdelen Controleer of de volgende onderdelen bij uw LCD-TV geleverd zijn. Neem contact op met uw verkoper als er onderdelen ontbreken. M4 X L16 Afstandsbediening en 2 batterijen (AAA) Netsnoer Gebruikershandleiding Garantiekaart 4 schroeven voor de voet Bodemkap Voet Schoonmaakdoek Service netwerkkaart Veiligheidsinstructies Registratiekaarten Garantiekaart / Service netwerkkaart / Veiligheidsinstructies / Registratiekaarten (Niet overal verkrijgbaar).
Overzicht van het bedieningspaneel De kleur en vormgeving van het product kunnen afhankelijk van het model variëren. SOURCE Schakelen tussen alle beschikbare ingangsbronnen. (TV, Ext.1, Ext.2, AV, S-Video, Component, PC, HDMI). Gebruik deze knop in het schermmenu zoals u de knop ENTER gebruikt op de afstandsbediening. MENU Druk op de toets om op uw scherm het menu met de functies van uw televisie te bekijken. Hiermee kunt u het volume verlagen of verhogen.
Overzicht van het aansluitpaneel [Aansluitingen op zijpaneel] [Aansluitingen op chterpaneel] (32 inch / 37 inch / 40 inch) (Het model 26 inch heeft geen aansluitingen op het zijpaneel.) Netvoeding [Aansluitingen op chterpaneel] (26 inch) Wanneer u een extern apparaat aansluit op de tv moet het toestel zijn uitgeschakeld. Zorg bij het aansluiten van een externe aansluiting dat de kleuren van de aansluiting en de kabel overeenkomen. Nederlands- BN68-00983F-00Dut.
Aansluiten op antenne of kabeltelevisienetwerk Voor de juiste weergave van tv-kanalen moet het toestel een signaal ontvangen via een van de volgende bronnen: - Een buitenantenne / Een kabeltelevisienetwerk / Een satellietnetwerk Het aansluiten van HDMI/DVI - Ondersteunt verbindingen met audiovisuele apparatuur die met HDMI verbonden kan worden (set top boxes, DVD-spelers, audiovisuele ontvangers en digitale tv’s). - Voor een HDMI - HDMI aansluiting is geen extra audio-aansluiting nodig.
Overzicht van de afstandsbediening Standby-toets voor de televisie Selecteer direct de PC-modus N ummertoetsen voor directe kanaalkeuze utomatisch uitschakelen A Kanaal kiezen met één/twee cijfers P P Selecteer direct de TV-modus Het schermmenu afsluiten Hiermee komt “Kanaalbeheer” op het scherm.
In - en uitschakelen Het netsnoer is bevestigd aan de achterzijde van de TV. 1. Steek de stekker in een geschikt stopcontact. 2. Druk op de AAN/UIT-knop aan de voorzijde van de set. of de toets TV ( ) op de afstandsbediening drukken om de tv aan te zetten. U kunt ook op de toets POWER 3. Druk op de cijfertoetsen (0~9) of de toets kanaal omhoog/omlaag ( / ) op de afstandsbediening of op toets aan de rechterzijde van de TV. De stand-by-indicator op het voorpaneel gaat branden.
Als u deze functie wilt herstellen... 1. Druk op de toets MENU voor weergave van het menu. Druk op de of toets om “Instellingen” te selecteren en druk vervolgens op ENTER . 2. Druk nogmaals op de toets ENTER 3. Het bericht om Start Plug & Play wordt weergegeven. om “Plug & Play” te selecteren. - Kanalen automatisch opslaan - Kanalen handmatig opslaan Kanalen automatisch opslaan U kunt zoeken naar de beschikbare frequenties (deze zijn afhankelijk van het land waar u woont).
7. Druk op de of toets om “Geluidssysteem” te selecteren en druk vervolgens op ENTER 8. Selecteer het gewenste standaardgeluid door op de of toets te blijven drukken en vervolgens op ENTER te drukken. 9. Als u het nummer weet van het kanaal dat u wilt opslaan, drukt u op de toets of om “Kanaal” te selecteren. Druk op de toets ENTER . Selecteer C (Antenne) of S (kabel) door te drukken op de toets of . Druk op de toets om een kanaal te selecteren.
Het kinderslot activeren Met deze functie kunt u voorkomen dat bijvoorbeeld kinderen naar programma’s kijken die niet geschikt zijn voor hen, door het beeld en het geluid uit te schakelen. Het kinderslot kan niet uitgezet worden door de toetsen op het zijpaneel te gebruiken. Alleen de afstandsbediening kan de instelling van het kinderslot ongedaan maken: houd de afstandsbediening daarom uit de buurt van kinderen. 1. Druk op de toets MENU voor weergave van het menu.
Kanaalnamen vastleggen Kanalen krijgen automatisch een naam toegewezen wanneer kanaalinformatie wordt uitgezonden. U kunt deze naam wijzigen en nieuwe Naam toewijzen. 1. Druk op de toets MENU voor weergave van het menu. Druk op de of toets om “Kanaal” te selecteren en druk vervolgens op ENTER . 2. Druk op de of toets om “Naam” te selecteren en druk vervolgens op ENTER . 3. Indien van toepassing selecteert u het kanaal waaraan u een nieuwe naam wilt geven door te drukken op de of toets.
De beeldstandaard aanpassen U kunt het beeld selecteren dat het best overeenkomt met uw wensen. U kunt ook met behulp van de toets P.MODE op de afstandsbediening een beeldinstelling selecteren. 1. Druk op de toets MENU voor weergave van het menu. Druk op de of toets om “Beeld” te selecteren en druk vervolgens op ENTER . 2. Druk nogmaals op de toets ENTER om “Modus” te selecteren. 3. Druk nogmaals op de toets ENTER om “Modus” te selecteren. 4.
De beeldinstellingen terugstellen naar de standaard fabrieksinstellingen U kunt terugkeren naar de beeldinstellingen zoals deze standaard in de fabriek zijn ingesteld. 1. Om het gewenste beeldeffect te selecteren, volgt u de instructies 1 t/m 4 op pagina 12 van “De beeldstandaard aanpassen”. 2. Druk op de of toets om “Reset” te selecteren en druk vervolgens op ENTER . 3. Druk op de toets EXIT om af te sluiten. “Reset” wordt voor elke beeldmodus ingesteld.
DNIe-demo (Digital Natural Image engine) Met de nieuwe technologie biedt Samsung u nog betere beeldkwaliteit met scherper contrast en versterking van de wittonen. Dit nieuwe systeem voor beeldsamenstelling biedt de kijkers een helderder en duidelijker beeld. De DNIe-technologie garandeert een perfecte beeldkwaliteit. Als u de DNIe demo-modus inschakelt, zult u zien hoe de beeldkwaliteit verbetert. 1. Druk op de toets MENU voor weergave van het menu.
8. Druk op of om “Prog.” te selecteren druk op ENTER . U kunt het kanaal dat u via het subbeeld wilt bekijken selecteren door op of te drukken. Druk op ENTER . 9. Druk op de toets EXIT om af te sluiten. De functie “Prog.” kan actief zijn als het subbeeld is ingesteld op tv. Het beeld in het PIP-scherm kan enigszins onnatuurlijk worden weergegeven als u het hoofdscherm gebruikt voor spelletjes of karaoke. Bron: Bestemd om een bron voor het ondergeschikte beeld te selecteren.
De TruSurround XT (SRS TSXT) instellen TruSurround XT is een gepatenteerde SRS-technologie die er voor zorgt dat het afspelen van 5.1 inhoud van meerdere kanalen via twee speakers verloopt. TruSurround biedt een fascinerende virtuele surround geluidservaring via elk twee-speaker playbacksysteem, waaronder ook ingebouwde televisiespeakers. Het is volledig compatibel met alle apparatuur voor meerdere kanalen.
Het geluid van het subbeeld weergeven Zolang de PIP-functie is geactiveerd, kunt u naar het geluid bij het subbeeld luisteren. 1. Druk op de toets MENU voor weergave van het menu. Druk op de of toets om “Geluid” te selecteren en druk vervolgens op ENTER . 2. Druk op de of toets om “Geluidskeuze” te selecteren en druk vervolgens op ENTER . 3. Druk op de of om “Subtuner” te selecteren. Druk op ENTER . 4. Druk op de toets EXIT om af te sluiten.
Standby-klok instellen U kunt een tijdsduur tussen 30 en 180 minuten instellen waarna de TV automatisch uitschakelt. ruk herhaaldelijk op de knop D SLEEP op de afstandsbediening totdat het juiste tijdsinterval verschijnt. 1. Druk op de toets MENU voor weergave van het menu. Druk op de of toets om “Instellingen” te selecteren en druk vervolgens op ENTER . 2. Druk op de of toets om “Tijd” te selecteren en druk vervolgens op ENTER 3.
Taal kiezen Wanneer u de TV voor het eerst gebruikt, moet u de taal selecteren voor het weergeven van menu’s en aanwijzingen. 1. Druk op de toets MENU voor weergave van het menu. Druk op de of toets om “Instellingen” te selecteren en druk vervolgens op ENTER . 2. Druk op de of toets om “Taalkeuze” te selecteren en druk vervolgens op ENTER . 3. Selecteer een bepaalde taal door te blijven drukken op de of toets. Druk op ENTER . 4. Druk op de toets EXIT om af te sluiten.
De functie spaarstand gebruiken Met deze functie kunt u de helderheid van de tv aanpassen om het energieverbruik te verminderen. Als u ’s avonds tv kijkt, kunt u de modus “Spaarstand” in de stand “Hoog” zetten. Zo kunt u de glinstering in uw ogen tegengaan en tevens besparen op het energieverbruik. 1. Druk op de toets MENU voor weergave van het menu. Druk op de of toets om “Instellingen” te selecteren en druk vervolgens op ENTER . 2.
Teletekstdecoder De meeste TV-kanalen bieden “teletekst” aan, ofwel pagina’s met schriftelijke informatie over zaken als: Tijden van tv-programma’s. Nieuws- en weerberichten. Sportuitslagen. Ondertiteling voor slechthorenden. Deze informatie is onderverdeeld in genummerde pagina’s (zie schema). Onderdeel Inhoud A Geselecteerd paginanummer. B Aanduiding kanaal/zendstation. C Huidig paginanummer of zoekstatus. D Datum en tijd. E Tekst. F Statusinformatie.
Specifieke teletekstpagina selecteren Druk op de cijfertoetsen op de afstandsbediening om het paginanummer direct op te vragen: 1. V oer het op de inhoudspagina vermelde driecijferig paginanummer in door op de desbetreffende cijfertoetsen te drukken. 2. A ls de geselecteerde pagina koppelingen naar subpagina’s bevat, worden de subpagina’s na elkaar weergegeven. U kunt het beeld op een bepaalde pagina stilzetten door op PIP ( ). Druk nogmaals op PIP ( ) om het stilzetten te annuleren. 3.
Uw software installeren (gebaseerd op Windows XP) Hieronder worden de weergave-instellingen van Windows voor een normale computer weergegeven. De weergaven op uw PC kunnen anders zijn, afhankelijk van uw Windows-versie en uw videokaart. Ook als uw weergaven anders zijn, kloppen de instellingsgegevens in grote lijnen in bijna alle gevallen. Als dit niet het geval is, kunt u contact opnemen met uw computerfabrikant of uw Samsung-dealer. 1. Klik op “Configuratiescherm” in het menu Start van Windows. 2.
De PC selecteren Grovere of fijnere afstelling van het beeld (Beeld vergrendelen): U past de beeldkwaliteit aan om beeldruis te verwijderen of te verminderen. Als de ruis niet verdwijnt door het kanaal nauwkeurig (fine) in te stellen, stel dan de frequentie zo goed mogelijk in (coarse)en voer opnieuw een nauwkeurige instelling uit. Stel het beeld opnieuw in het midden van het scherm in nadat de ruis is. ruk op de PC toets van de D afstandsbediening om de PC-modus te selecteren. 1.
De anti-diefstal vergrendeling gebruiken Het Kensington-slot is een apparaat om het systeem fysiek te vergrendelen bij gebruik in een openbare ruimte. Het slot dient apart te worden aangeschaft. Het ontwerp en gebruik kan iets afwijken, afhankelijk van de fabrikant. Gebruik de bijgeleverde handleiding voor juist gebruik. 1. B reng het slot aan in het Kensington-slot op de LCD TV (Afbeelding 1) en draai het in de richting van sluiten (Afbeelding 2). Kabel 2. S luit de Kensington-slotkabel aan.
Technische specificaties en milieu Type Schermgrootte (diagonaal) Stroomtoevoer Energieverbruik PC Resolutie Geluid Uitgang Afmetingen (B X D X H) Kast Met standaard Gewicht Met standaard Omgevingsvereisten Temperatuur bij werking Vochtigheid bij werking Temperatuur bij opslag Vochtigheid bij opslag LE26R7 LE32R7 LE37R7 26 inch 32 inch 37 inch LE40R7 40 inch AC220-240V 50 Hz AC220-240V 50 Hz AC220-240V 50 Hz AC220-240V 50 Hz 120 W 152 W 170 W 205 W 1360 x 768 @ 60 Hz 1360 x 768 @ 60 Hz 136
Indice CONEXIÓN Y CONFIGURACIÓN DEL TELEVISOR Lista de componentes............................................... Instalación del soporte.............................................. Instalación del equipo de montaje en la pared..... Visualización del Panel de control............................ Visualización del Panel de conexión........................ Visualización del mando a distancia......................... Instalación de las pilas en el mando a distancia...... Encendido y apagado...................
Lista de componentes Asegúrese de que los siguientes elementos se incluyan con el televisor de pantalla LCD. Si falta alguno, póngase en contacto con su distribuidor.
Visualización del Panel de control El color y la forma del producto pueden variar según el modelo. SOURCE Cambia entre todas las fuentes de entrada disponibles. (TV, Ext., AV, S-Vídeo, Componente, PC, HDMI). En el menú de la pantalla, use este botón del mismo modo que el botón ENTER del mando a distancia. MENU Púlselo para ver en pantalla un menú de las características del televisor. Púlselos para cambiar de canal.
Visualización del Panel de conexión [Tomas del panel posterior] (32pulg./ 37pulg. /40pulg.) [Tomas del panel lateral] (El modelo 26 pulg. no tiene tomas en el panel lateral.) Entrada de alimentación [Tomas del panel posterior] (26 pulg.) Cada vez que conecte un dispositivo externo al televisor, compruebe que la unidad esté desconectada de la alimentación. Cuando conecte un terminal externo, debe hacer coincidir los colores del terminal de conexión y del cable. Español- BN68-00983F-00spa.
Conexión a la antena o a la red de televisión por cable Para ver los canales de televisión correctamente, la unidad debe recibir una señal de una de las fuentes siguientes: - Una antena exterior / Una red de televisión por cable / Una red por satélite Conexión de HDMI/DVI - Admite conexiones entre dispositivos de AV con conexión HDMI (receptores de televisión digital, reproductores de DVD, receptores de AV y televisores digitales).
Visualización del mando a distancia Botón de suspensión del televisor pagado automático A Botón numéricos para elegir un canal directamente P P Selección de canal de uno/dos dígitos Sale del menú en pantalla Selecciona el modo TV directamente Controla el cursor en el menú Muestra el “Gestor de Canales” en la pantalla.
Encendido y apagado El cable de alimentación se encuentra en la parte posterior de la unidad. 1. Conecte el cordón eléctrico en un enchufe adecuado. Se enciende el indicador de modo en espera de la parte frontal del equipo. 2. Pulse el botón 3. Pulse el botón numérico (0~9) o el botón de canal siguiente/anterior ( / ) del mando a distancia o el botón de la parte derecha del equipo. 4. de la parte frontal del aparato.
Si quiere volver a ajustar esta característica... 1. Pulse el botón MENU para ver el menú. Pulse los botones o para seleccionar “Configuración” y pulse el botón ENTER . 2. Pulse de nuevo el botón ENTER 3. Aparece el mensaje para iniciar “Start Plug & Play” para seleccionar “Plug & Play”. - Memorización automática de canales - Memorización manual de canales Memorización automática de canales Puede explorar los rangos de frecuencia disponibles (la disponibilidad varía en función del país).
5. Pulse los botones o para seleccionar “Sistema de color” y pulse el botón ENTER 6. Seleccione el estándar de color deseado pulsando varias veces los botones o y, a continuación, pulse el botón ENTER . 7. Pulse los botones o para seleccionar “Sistema de sonido” y pulse el botón ENTER 8. Seleccione el estándar de sonido deseado pulsando varias veces los botones o y, a continuación, pulse el botón ENTER . 9.
Activación del bloqueo para niños Esta función permite evitar que usuarios no autorizados, como niños, puedan ver programas poco recomendables desactivando el vídeo y el audio. El bloqueo infantil no se puede desactivar mediante los botones del panel lateral. Únicamente con el mando a distancia es posible desactivar el ajuste del bloqueo infantil; por tanto, mantenga el mando a distancia fuera del alcance de los niños. 1. Pulse el botón MENU para ver el menú.
Asignación de nombres de canales Los nombres de los canales se asignarán automáticamente si se emite la información del canal. Estos nombres se pueden cambiar y puede asignar nombres nuevos. 1. Pulse el botón MENU para ver el menú. Pulse los botones o para seleccionar “Canal” y pulse el botón ENTER . 2. Pulse los botones o para seleccionar “Nombre” y pulse el botón ENTER 3. Si es necesario, seleccione el canal al que se va a asignar un nombre nuevo pulsando los botones o button.
Cambio del formato de la imagen Se puede seleccionar el tipo de imagen que mejor se corresponda a los requisitos de visualización. 1. Pulse el botón MENU para ver el menú. Pulse los botones o para seleccionar “Imagen” y pulse el botón ENTER . 2. Pulse de nuevo el botón ENTER para seleccionar “Modo”. 3. Pulse de nuevo el botón ENTER para seleccionar “Modo”. 4. Pulse el botón o para seleccionar el efecto de imagen deseado. Pulse el botón ENTER . 5. Pulse el botón EXIT para salir.
Reajuste de los valores de la imagen a los valores predefinidos de fábrica Puede volver a los ajustes de imagen predefinidos de fábrica. 1. Para seleccionar el efecto de imagen deseado, siga las instrucciones 1 a 4 de “Cambio de la imagen estándar” de la página 12. 2. Pulse los botones o para seleccionar “Restablecer” y pulse el botón ENTER 3. Pulse el botón EXIT para salir. . La función “Restablecer” afectará a cada modo de imagen.
DNIe Demo (motor digital de imágenes naturales) La nueva tecnología de Samsung le ofrece imágenes más detalladas con mejoras en contraste y blancos. Un nuevo algoritmo de compensación de imagen proporciona a los usuarios una imagen más brillante y más clara. La tecnología DNIe adaptará todas las señales a su vista. Puede ver cómo DNIe mejora la imagen activando el modo DNIe Demo. 1. Pulse el botón MENU para ver el menú. Pulse los botones o para seleccionar “Imagen” y pulse el botón ENTER . 2.
8. Pulse el botón o para seleccionar “Programa” y pulse el botón ENTER . Puede seleccionar el canal que desee ver en la imagen secundaria pulsando el botón o . Pulse el botón ENTER . 9. Pulse el botón EXIT para salir. “Programa” puede estar activo cuando la imagen secundaria esté configurada como TV. Cuando utilice la pantalla principal para visualizar un juego o un karaoke, podrá advertir que la imagen en la ventana PIP no resultará del todo natural.
Configuración de TruSurround XT (SRS TSXT) TruSurround XT es una tecnología patentada de SRS que resuelve el problema de la reproducción de contenidos multicanal 5.1 con dos altavoces. TruSurround XT proporciona una convincente experiencia de sonido surround virtual a través de cualquier sistema de reproducción con dos altavoces, como los propios altavoces internos del televisor. Es totalmente compatible con todos los formatos multicanal. 1. 2.
Cómo escuchar el sonido de la imagen secundaria Mientras esté activada la función PIP se puede escuchar el sonido de la imagen secundaria. 1. Pulse el botón MENU para ver el menú. Pulse los botones o para seleccionar “Sonido” y pulse el botón ENTER . 2. Pulse los botones o para seleccionar “Selección de sonido” y pulse el botón ENTER . 3. Pulse el botón o para seleccionar “Sub”. Pulse el botón ENTER . 4. Pulse el botón EXIT para salir.
Ajuste del temporizador de desconexión Puede seleccionar un período de tiempo entre 30 y 180 mins para que, una vez transcurridos, el televisor pase automáticamente al modo de espera. Pulse repetidamente el botón SLEEP del mando a distancia hasta que aparezca el intervalo deseado. 1. Pulse el botón MENU para ver el menú. Pulse los botones o para seleccionar “Configuración” y pulse el botón ENTER . 2. Pulse los botones o para seleccionar “Hora” y pulse el botón ENTER 3.
Selección del idioma Cuando utilice la unidad por primera vez, debe seleccionar el idioma que se utilizará para visualizar menús e indicaciones. 1. Pulse el botón MENU para ver el menú en pantalla. Pulse los botones o para seleccionar “Configuración” y pulse el botón ENTER . 2. Pulse los botones o para seleccionar “Idioma” y pulse el botón ENTER . 3. Seleccione un idioma pulsando varias veces los botones o . Pulse el botón ENTER . Puede elegir uno de los 21 idiomas. 4.
Uso de la función de ahorro de energía Esta función ajusta el brillo del televisor, lo cual reduce el consumo de energía. Si desea ver la televisión por la noche, ajuste la opción del modo “Ahorro energía” en “Alto” sus ojos se lo agradecerán y, además, reducirá el consumo de energía. 1. Pulse el botón MENU para ver el menú en pantalla. Pulse los botones o para seleccionar “Configuración” y pulse el botón ENTER . 2. Pulse los botones o para seleccionar “Ahorro energía” y pulse el botón ENTER .
Decodificador de teletexto Muchos canales de Televisor incluyen “teletexto”, páginas de información escrita que proporciona datos como: Horas de los programas de televisión Boletines de noticias y partes meteorológicos Resultados deportivos Subtítulos para sordos Las páginas de teletexto se organizan en seis categorías : Parte Contenido A Número de página seleccionado. B Identidad de la emisora. C Número de página actual o estado de la búsqueda. D Fecha y hora. E Texto.
Selección de una página de teletexto específica Pulse los botón numéricos en el mando a distancia para introducir los números de página directamente: 1. I ntroduzca los tres dígitos del número de la página que se enumera en el índice pulsando los botón numéricos correspondientes. 2. S i la página seleccionada está vinculada con varias páginas secundarias, éstas se mostrarán secuencialmente. Para congelar la imagen en una página, pulse el botón PIP( ). Para reanudar, vuelva a pulsar el bon PIP( ). 3.
Configuración del software del PC (basado en Windows XP) A continuación se muestra la configuración de visualización de Windows para un ordenador típico. Probablemente la pantalla real de su PC sea distinta; dependerá de la versión concreta de Windows y de la tarjeta de vídeo que tenga. Pero aunque las pantallas reales tengan un aspecto diferente, se aplicarán los mismos ajustes básicos y la misma información en la mayoría de los casos.
Selección del PC Sintonización gruesa y fina de la imagen (Bloqueo de Imagen): El propósito del ajuste de imagen calidad es remitir o reducir el ruido de la imagen. Si no se eliminan mediante la sintonización Fina, ajuste la frecuencia lo mejor que pueda (grueso) y vuelva a realizar la sintonización fina. Después de reducir el ruido, vuelva a ajustar la imagen para que quede alineada en el centro de la pantalla. 1. Ajustes predefinidos: Pulse el botón PC para seleccionar el modo PC. 2.
Especificaciones técnicas y medioambientales El anclaje Kensington es un dispositivo utilizado para asegurar un aparato cuando se utiliza en un sitio público. Este dispositivo de bloqueo se adquiere por separado. El aspecto y método de bloqueo puede diferir del que se muestra en la ilustración dependiendo del fabricante. Consulte el manual incluido con el anclaje Kensington para utilizarlo adecuadamente. 1.
Especificaciones técnicas y medioambientales Nombre del modelo Tamaño de pantalla (diagonal) Fuente de alimentación Consumo de energía PC Resolución Sonido Salida Dimensiones (An x Pr x Al) Cuerpo principal Con soporte Peso Con soporte Factores medioambientales Temperatura de funcionamiento Humedad de funcionamiento Temperatura de almacenamiento Humedad de almacenamiento LE26R7 LE32R7 LE37R7 26 pulg. 32 pulg. 37 pulg. LE40R7 40 pulg.
Índice LIGAÇÃO E PREPARAÇÃO DO TELEVISOR ACERTO DA HORA Lista de acessórios................................................... Instalar a Base.......................................................... Instalar o kit de montagem na parede.................. Funções do painel de controlo................................. Apresentar o painel de ligação................................. Funções do telecomando......................................... Colocar as pilhas no telecomando...........................
Lista de acessórios Verifique se recebeu os seguintes acessórios com o televisor LCD. Se faltar algum dos acessórios, contacte o revendedor.
Funções do painel de controlo A forma e a cor do produto podem variar consoante o modelo. SOURCE Alterna entre todas as fontes de entrada disponíveis. (TV, Ext.1, Ext.2, AV, S-Vídeo, Componente, PC, HDMI). No menu no ecrã, utilize este botão tal como usa o botão ENTER do telecomando. MENU Carregue para ver as opções de menu das funções do televisor. Prima para reduzir ou aumentar o volume. No menu no ecrã, utilize os botões talcomo usa os botões e do telecomando.
Apresentar o painel de ligação [Tomadas do painel posterior] (32 polegadas/ 37 polegadas /40 polegadas) [Tomadas do painel lateral] (O modelo 26 polegadas não tem tomadas no painel lateral.) Potência de entrada [Tomadas do painel posterior] (26 polegadas) Sempre que ligar um dispositivo externo ao televisor, verifique se a unidade está desligada. Quando ligar um terminal exterior, faça a correspondências de cores entre o terminal e o respectivo cabo. Português- BN68-00983F-00Por.
Ligar uma antena ou uma rede de televisão por cabo Para ver os canais de televisão correctamente, o aparelho tem de receber um sinal de uma das seguintes fontes: - Uma antena externa / Uma rede de televisão por cabo / Uma rede por satélite Ligar HDMI/DVI - Suporta ligações entre os dispositivos AV compatíveis com ligação HDMI (set top boxes, leitores de DVD, receptores de AV e tele visores digitais). - Uma ligação HDMI a HDMI não precisa de ligação áudio adicional.
Funções do telecomando Botão de televisor em espera Desligar o televisor automaticamente Botões numéricos para acesso directo aos canais P P Selecção de canais com um/ dois dígitos Sair do menu no ecrã Entra directamente no modo (TV) Apresentação das informações da difusão actual Aparece “Gestor Canais” no ecrã.
Ligar/desligar o aparelho O cabo de alimentação está ligado à parte traseira do aparelho. 1. Ligue o cabo principal a uma tomada adequada. 2. Carregue no botão Os indicadores luminosos do modo de suspensão acendem-se na parte frontal do televisor. na parte da frente do televisor. ou no botão TV ( ) do telecomando para ligar o televisor. Também pode carregar no botão POWER 3. É seleccionado automaticamente o último programa a que assistiu.
Se desejar repor esta função... 1. Carregue no botão MENU para ver o menu. Carregue no botão ou para seleccionar “Configurar” e depois carregue no botão ENTER . 2. Carregue novamente no botão ENTER 3. Aparece a mensagem “Iniciar Plug & Play” para seleccionar “Plug & Play”. - Memorizar canais automaticamente - Memorizar canais manualmente Memorizar canais automaticamente Pode procurar os intervalos de frequência disponíveis (a isponibilidade depende do país em que se encontre).
5. Carregue no botão ou para seleccionar “Sistema cores” e depois carregue no botão ENTER 6. Seleccione a cor padrão necessária carregando repetidamente no botão ou e depois carregue no botão ENTER . 7. Carregue no botão ou para seleccionar “Sistema som” e depois carregue no botão ENTER 8. Seleccione o som padrão necessário premindo repetidamente o botão ou e em seguida prima o botão ENTER . 9.
Activar Bloqueio crianças Esta função permite-lhe evitar que utilizadores não autorizados, como as crianças, vejam programas não apropriados, cortando o som e a imagem. Não é possível desactivar a opção Bloqueio crianças com os botões laterais. Como só o telecomando consegue desbloquear a definição Bloqueio crianças, mantenha o telecomando longe do alcance de crianças. 1. Carregue no botão MENU para ver o menu. Carregue no botão ou para seleccionar “Canal” e depois carregue no botão ENTER . 2.
Atribuir nomes a canais Os nomes dos canais serão atribuídos automaticamente quando a informação do canal é transmitida. Estes nomes podem ser alterados o que lhe permite atribuir nomes novos. 1. Carregue no botão MENU para ver o menu. Carregue no botão ou para seleccionar “Canal” e depois carregue no botão ENTER . 2. C arregue no botão ou para seleccionar “Nome” e depois carregue no botão ENTER . 3.
Escolher o tipo de imagem Pode seleccionar o tipo de imagem que melhor corresponda aos requisitos de visualização. 1. Carregue no botão MENU para ver o menu. Carregue no botão ou para seleccionar “Imagem” e depois carregue no botão ENTER . 2. Carregue novamente no botão ENTER , para seleccionar “Modo”. 3. Carregue novamente no botão ENTER , para seleccionar “Modo”. 4. Prima o botão ou para seleccionar o efeito de imagem desejado. Prima o botão ENTER . 5. Prima o botão EXIT para sair.
Repor os valores de fábrica das definições de imagem Pode voltar aos valores de fábrica das definições de imagem. 1. Para seleccionar o efeito de imagem pretendido, siga as instruções 1 a 4 de “Alterar o tipo de imagem” na página 12. 2. Carregue no botão ou para seleccionar “Reiniciar” e depois carregue no botão ENTER . 3. Prima o botão EXIT para sair. A opção “Reiniciar” é definida para cada modo de imagem.
Demonstração DNIe (Digital Natural Image Engine) A nova tecnologia da Samsung permite obter imagens mais detalhadas, com melhorias no contraste e no equilíbrio do branco. Um novo algoritmo de compensação de imagem proporciona imagens mais nítidas. A tecnologia DNIe adapta todos os sinais à sua visão. Pode ver de que maneira a tecnologia DNIe melhora a imagem, programando o modo DNIe Demo para On. 1. Carregue no botão MENU para ver o menu.
8. Carregue no botão ou para seleccionar “Programa” e depois car regue no botão ENTER . Pode seleccionar o canal que pretende ver na imagem secundária, carregando no botão ou . Prima o botão ENTER . 9. Prima o botão EXIT para sair. Pode activar “Programme” se a imagem secundária estiver definida para TV. A imagem na janela PIP pode ficar pouco natural se utilizar o ecrã principal para ver um jogo ou um programa de karaoke. Fonte: Utilizada para seleccionar uma fonte da imagem secundária.
Definir TruSurround XT (SRS TSXT) TruSurround XT é uma tecnologia SRS patenteada que resolve o problema da reprodução de conteúdos multi-canais 5.1 através de dois altifalantes. A tecnologia TruSurround oferece uma experiência de som surround virtual envolvente através de qualquer sistema de reprodução de duas colunas, incluindo as colunas internas do televisor. É totalmente compatível com todos os formatos multi-canais. 1. Carregue no botão MENU para ver o menu.
Ouvir o som da imagem secundária Durante a activação das funções PIP, pode ouvir o som da imagem secundária. 1. Carregue no botão MENU para ver o menu. Carregue no botão ou para seleccionar “Som” e depois carregue no botão ENTER . 2. Carregue no botão ou para seleccionar “Selecção do som” e depois carregue no botão ENTER . 3. Prima o botão ou para seleccionar “Sub”. Prima o botão ENTER . 4. Prima o botão EXIT para sair. Principal: Utiliza-se para ouvir o som da imagem principal.
Programar o temporizador Pode seleccionar um intervalo de tempo entre 30 e 180 mins, após o qual o televisor muda automaticamente para o modo de espera. Carregue repetidamente no botão SLEEP do telecomando até aparecer o intervalo de tempo apropriado. 1. Carregue no botão MENU para ver o menu. Carregue no botão ou para seleccionar “Configurar” e depois carregue no botão ENTER . 2. Carregue no botão ou para seleccionar “Tempo” e depois carregue no botão ENTER . 3.
Seleccionar o idioma Quando utilizar o aparelho pela primeira vez, tem de seleccionar o idioma dos menus e indicações apresentados no ecrã. 1. Carregue no botão MENU para ver o menu no ecrã. Carregue no botão ou para seleccionar “Configurar” e depois carregue no botão ENTER . 2. Carregue no botão ou para seleccionar “Idioma” e depois carregue no botão ENTER . 3. Seleccione um idioma específico carregando repetidamente no botão ou . Prima o botão ENTER . Pode escolher um de 21 idiomas. 4.
Utilizar a função Poupar energia Esta função ajusta a luminosidade da televisão de maneira a reduzir o consumo de energia. Quando estiver a ver televisão à noite, defina a opção do modo “Poupança energ.” para “Alto” de maneira a reduzir o reflexo e o consumo de energia. 1. Carregue no botão MENU para ver o menu no ecrã. Carregue no botão ou para seleccionar “Configurar” e depois carregue no botão ENTER . 2. Carregue no botão ou para seleccionar “Poupança energ.
Descodificador de teletexto Amaioria dos canais de televisão têm páginas de “teletexto”, com informações escritas sobre o seguinte: Horários dos programas de televisão. Serviços informativos e boletins meteorológicos. Resultados desportivos. Legendas para os deficientes auditivos. As páginas do teletexto estão divididas em seis categorias: Secção Conteúdo A Número da página seleccionada. B Nome da estação transmissora. C Número da página actual ou estado da procura. D Data e hora. E Texto.
Seleccionar uma página de teletexto específica Carregue nos botões numéricos do telecomando para introduzir directamente o número da página: 1. I ntroduza o número de página de três dígitos, fornecido no conteúdo, premindo os botões numéricos correspondentes. 2. S e a página seleccionada estiver ligada a várias páginas secundárias, as páginas secundárias são apresentadas em sequência. Para fixar a visualização de uma página determinada, carregue em PIP ( ). Carregue novamente em PIP( ) para recomeçar.
Configurar o software do PC (Baseado no Windows XP) Seguem-se as definições do visor do Windows para um computador típico. Os ecrãs reais do seu PC podem ser diferentes, dependendo da versão do Windows e da placa de vídeo. Em quase todos os casos, mesmo que os ecrãs reais tenham um aspecto diferente, aplica-se a mesma informação de configuração básica. (Caso contrário, contacte o fabricante do computador ou o distribuidor da Samsung.) 1. Primeiro, clique em “Control Panel” no menu Iniciar do Windows. 2.
Seleccionar o PC Sintonização básica e fina da imagem (Bloq. imagem): O objectivo da regulação da qualidade da imagem é reduzir o ruído da imagem. Se não conseguir retirar o ruído fazendo apenas a sintonização fina, regule a frequência o melhor possível e volte a fazer a sintonização fina. Depois de ter reduzido o ruído, volte a regular a imagem de forma a ficar alinhada no centro do ecrã. 1. Predefinição: Carregue no botão PC para seleccionar o modo PC. 2. Carregue no botão MENU para ver o menu.
Utilizar o sistema de bloqueio Kensington anti-roubo O mecanismo de fixação Kensington refere-se a um dispositivo utilizado para fixar fisicamente o sistema quando o utilizar num local público. O dispositivo de fixação tem de ser adquirido em separado. O aspecto e mé todo de fixação podem diferir da ilustração dependendo do fabricante. Consulte o manual fornecido com o mecanismo de fixação Kensington para obter informações sobre uma utilização correcta. 1.
Características técnicas e ambientais LE26R7 LE32R7 LE37R7 LE40R7 26 polegadas 32 polegadas 37 polegadas 40 polegadas Fonte de alimentação AC220-240V 50 Hz AC220-240V 50 Hz AC220-240V 50 Hz AC220-240V 50 Hz Consumo de energia 120 W 152 W 170 W 205 W 1360 x 768 @ 60 Hz 1360 x 768 @ 60 Hz 1360 x 768 @ 60 Hz 1360 x 768 @ 60 Hz 5WX2 10 W X 2 10 W X 2 10 W X 2 675,0 x 75,0 x 475,5 mm 675,0 x 215,5 x 530,0 mm 800,0 x 80,0 x 548,5 mm 800,0 x 252,0 x 603,0 mm 923,0 x 87,0 x 618,5 mm 923,
Sommario COLLEGAMENTO E PREPARAZIONE DEL TELEVISORE Elenco dei componenti............................................. Installazione del supporto......................................... Installazione del Kit di montaggio a parete........... Vista del pannello di controllo................................... Vista del pannello dei collegamenti.......................... Illustrazione del telecomando................................... Inserimento delle batterie nel telecomando..............
Elenco dei componenti Controllare che nella confezione del TV LCD siano contenuti i seguenti componenti. Se qualsiasi componente risulta mancante, contattare il rivenditore.
Vista del pannello di controllo La forma e il colore del prodotto possono variare in base al modello. SOURCE Passa tra tutte le sorgenti di ingresso disponibili Premere per cambiare canale. (TV, Est.1, Est.2, AV, S-Video, Comp., PC, HDMI). Nel menu a video, utilizzare i tasti così Nel menu a video, utilizzare questo tasto così come come si usano i tasti e del telecomando. si usa il tasto ENTER del telecomando.
Vista del pannello dei collegamenti [Jack pannello laterale] [Jack pannello posteriore] (32poll. / 37poll. / 40poll.) (Il modello 26 poll. non dispone di jack sul pannello laterale.) Ingresso alimentazione [Jack pannello posteriore] (26 poll.) Quando si collega un dispositivo esterno al televisore, assicurarsi che l’alimentazione dell’unità sia scollegata. Quando si collega un terminale esterno, far corrispondere il colore del terminale di collegamento a quello del cavo.
Collegamento di un’antenna o di una rete televisiva via cavo Per vedere correttamente i canale televisivi, il monitor TV deve ricevere un segnale da una delle seguenti fonti: - Un’antenna all’esterno / Una rete televisiva via cavo / Una rete satellitare Collegamento di HDMI/DVI - Supporta le connessioni tra periferiche AV con connessione HDMI (set top box, lettori DVD, ricevitori AV e televisori digitali). - Non è necessario un ulteriore collegamento audio per la connessione HDMI-HDMI.
Illustrazione del telecomando Pulsante di standby del televisore Seleziona direttamente la modalità PC Tasti numerici per l’accesso diretto ai canale Spegnimento automatico Selezione dei canali memorizzati con una/due cifre P P Selezione diretta della modalità TV Esci dal menu a video Visualizza “Gestore Canale” sullo schermo Controllo del cursore nel menu Aumento del volume Diminuzione del volume Disattivazione temporanea audio Visualizzazione menu e conferma modifica Selez
Accensione e spegnimento Il conduttore isolato di corrente è collegato al retro del monitor. 1. Inserire il conduttore isolato di corrente nell’apposita presa. 2. Premere il pulsante L’indicatore di standby sul pannello anteriore del dispositivo si accende. sul pannello anteriore del dispositivo.. E’ possibile accendere il televisore anche premendo il tasto POWER o il tasto TV ( ) sul telecomando. Viene selezionato automaticamente l’ultimo programma che si stava vedendo. 3.
Per reimpostare questa funzione… 1. Premere il tasto MENU per visualizzare il menu. Premere il pulsante o per selezionare “Impostazione” e premere ENTER 2. Premere nuovamente il tasto ENTER 3. Viene visualizzato il messaggio “Avvio Plug & Play” . per selezionare la funzione “Plug & Play”.
5. Premere il pulsante o per selezionare “Sistema colore” e premere ENTER 6. Per selezionare i colori standard desiderati, premere il pulsante o più volte, quindi premere ENTER 7. Premere il pulsante o per selezionare “Sistema audio” e premere ENTER 8. Per selezionare lo standard audio desiderato, premere il pulsante o più volte, quindi premere ENTER . . . . Se l’audio non c’è o è distorto, riselezionare la norma audio desiderata. 9.
Attivazione di Blocco canali Tramite questa funzione è possibile impedire a utenti non autorizzati, ad esempio i bambini, di guardare programmi non adatti annullando il video e azzerando l’audio. La funzione Blocca canali non può essere disattivata utilizzando i tasti sul pannello laterale. La disattivazione della funzione Blocco canali può essere eseguita solo tramite telecomando, perciò si consiglia di tenerlo fuori dalla portata dei bambini. 1. Premere il tasto MENU per visualizzare il menu.
Assegnazione dei nomi ai canali I nomi dei canali vengono attribuiti automaticamente al ricevimento del segnale di broadcasting del canale. Tali nomi possono essere modificati in seguito, consentendone una personalizzazione. 1. Premere il tasto MENU per visualizzare il menu. Premere il pulsante o per selezionare “Canale” e premere ENTER . 2. Premere il pulsante o per selezionare “Nome” e premere ENTER 3.
Modifica dello standard dell’immagine È possibile selezionare il tipo di ‘immagine che si adatta meglio alle proprie esigenze di visualizzazione. 1. Premere il tasto MENU per visualizzare il menu. Premere il pulsante o per selezionare “Immagine” e premere ENTER . 2. Premere nuovamente il tasto ENTER per selezionare “Modalità”. 3. Premere nuovamente il tasto ENTER per selezionare “Modalità”. 4. Premere il tasto o per selezionare l’effetto immagine desiderato. Premere il tasto ENTER . 5.
Azzeramento delle impostazioni di visualizzazione dell’immagine ai valori preimpostati in fabbrica E’ possibile ripristinare le impostazioni di visualizzazione dell’immagine preimpostate in fabbrica. 1. Per selezionare l’effetto dell’immagine desiderato, seguire le istruzioni “Modifica dello standard dell’immagine” dal punto 1 al punto 4 a pagina 12. 2. Premere il pulsante o per selezionare ““Reset” e premere ENTER 3. Premere il tasto EXIT per uscire. .
DNIe Demo (Digital Natural Image engine) La nuova tecnologia Samsung offre immagini più dettagliate e un miglioramento del contrasto e del bianco. Un nuovo algoritmo di compensazione dell’immagine offre immagini più chiare e brillanti. La tecnologia DNIe adatta ogni segnale per offrire un’immagine perfetta. E’ possibile vedere come la funzione DNIe migliori la qualità dell’immagine impostando la modalità DNIe Demo (Demo DNIe) su On. 1. Premere il tasto MENU per visualizzare il menu.
8. Premere il tasto o per selezionare “Programma” e poi ENTER . E’ possibile selezionare il canale da vedere nell’immagine secondaria premendo il tasto or . Premere il tasto ENTER . 9. Premere il tasto EXIT per uscire. La funzione “Programma” può essere attivata quando l’immagine secondaria è impostata su TV. L’immagine nella finestra PIP può diventare lievemente innaturale quando si usa lo schermo principale per visualizzare un videogioco o il karaoke.
Impostazione di TruSurround XT (SRS TSXT) TruSurround XT è una tecnologia SRS brevettata che risolve il problema della riproduzione di contenuti multicanale 5.1 su due altoparlanti. TruSurround offre una straordinaria esperienza Surround Sound virtuale attraverso un sistema di riproduzione a due altoparlanti, inclusi gli altoparlanti interni del televisore. È pienamente compatibile con tutti i formati multicanale.
Ascolto dell’audio dell’immagine secondaria Durante l’uso della funzione PIP, è possibile ascoltare l’audio dell’immagine secondaria. 1. Premere il tasto MENU per visualizzare il menu. Premere il pulsante o per selezionare “Suono” e premere ENTER . 2. Premere il pulsante o per selezionare “Selezione audio” e premere ENTER . 3. Premere il tasto o per selezionare “Secondario”. Premere il tasto ENTER . 4. Premere il tasto EXIT per uscire.
Impostazione del timer È possibile impostare un periodo di tempo compreso tra 30 e 180 minuti, scaduto il quale il monitor TV si spegne automaticamente. 1. Premere ripetutamente il tasto SLEEP sul telecomando finché appare l’intervallo di tempo appropriato. Premere il tasto MENU per visualizzare il menu. Premere il pulsante o per selezionare “Impostazione” e premere ENTER . 2. Premere il pulsante o per selezionare “Ora” e premere ENTER 3.
Scelta della lingua Quando si utilizza il monitor TV per la prima volta, è necessario selezionare la lingua di visualizzazione dei menu e delle indicazioni. 1. Premere il tasto MENU per visualizzare il menu a video. Premere il pulsante o per selezionare “Impostazione” e premere ENTER . 2. Premere il pulsante o per selezionare “Lingua” e premere ENTER . 3. Selezionare la lingua desiderata premendo il pulsante o più volte. Premere il tasto ENTER .
Utilizzo della funzione Risparmio energia Questa funzione regola la luminosità del televisore oltre a ridurre il consumo di energia. Quando si guarda il televisore di notte, impostare la modalità “Risp. energia” su “Alto” in modo da ridurre l’affaticamento della vista e il consumo di corrente. 1. Premere il tasto MENU per visualizzare il menu a video. Premere il pulsante o per selezionare “Impostazione” e premere ENTER . 2. Premere il pulsante o per selezionare “Risp. energia” e premere ENTER .
Teletext Decoder La maggior parte dei canale del TV è dotata di “teletext”, ovvero di pagine di informazioni scritte, quali: O rari dei programmi televisivi. N otiziari e previsioni del tempo. R isultati sportivi. Sottotitoli per non udenti. Le pagine del teletext sono suddivise in sei categorie: Part Sommario A Numero della pagina selezionata. B Identità della stazione trasmittente. C Numero della pagina corrente o stato della ricerca. D Data e ora. E Testo. F Informazioni sullo stato.
Selezione di una pagina Teletext specifica Premere i tasti numerici sul telecomando per immettere il numero di pagina direttamente: 1. I mmettere il numero della pagina a tre cifre indicato nel sommario utilizzando i tasti numerici corrispondenti. 2. S e la pagina selezionata è collegata a diverse pagine secondarie, le pagine secondarie vengono mostrate in sequenza. Per bloccare il video su una pagina scelta, premere il tasto PIP( ). Premere nuovamente il tasto PIP( ) per riprendere la registrazione.
Configurazione del software per PC (basato su Windows XP) Di seguito vengono illustrate le impostazioni di visualizzazione di Windows per un PC tipico. Le schermate visualizzate sul proprio PC possono differire in base alla versione di Windows e alla scheda video installate. Nel caso le schermate risultassero differenti, le stesse informazioni di base per la configurazione sono applicabili praticamente in ogni caso.
Selezione del PC Regolazione della qualità dell’immagine (Blocco immagine): Lo scopo della regolazione della qualità dell’immagine è di rimuovere o ridurre i disturbi. Se il disturbo non viene eliminato mediante la semplice sintonizzazione fine, è necessario regolare al meglio la frequenza (sintonizzazione grossa) ed eseguire nuovamente la sintonizzazione fine. Dopo aver ridotti i disturbi, regolare nuovamente l’immagine in modo che sia allineata al centro dello schermo. 1.
Specifiche tecniche e ambientali Il catenaccio Kensington è utilizzato per fissare il sistema durante l’impiego in ambienti pubblici e deve essere acquistato separatamente. L’aspetto e il metodo di bloccaggio potrebbero differire dall’illustrazione a seconda del produttore. Per ulteriori informazioni relative all’uso corretto del catenaccio Kensington, fare riferimento al rispettivo manuale. 1.
Specifiche tecniche e ambientali Nome del modello Dimensione schermo (Diagonale) Alimentazione Consumo di energia PC Risoluzione Audio Uscita Dimensioni (Lar. x Pro. x Alt.) Corpo. Con supporto Peso Con supporto Considerazioni ambientali Temperatura di esercizio Umidità di esercizio Temperatura di stoccaggio Umidità di stoccaggio LE26R7 LE32R7 LE37R7 26 poll. 32 poll. 37 poll. LE40R7 40 poll.
Diagrammi a blocchi Italiano-27 BN68-00983A-01Ita.
Questa pagina è stata lasciata intenzionalmente vuota. BN68-00983A-01Ita.
Correct Disposal of This Product (Waste Electrical & Electronic Equipment) (Applicable in the European Union and other European countries with separate collection systems) This marking shown on the product or its literature, indicates that it should not be disposed with other household wastes at the end of its working life.