BN68-00860G-00Cover.qxd 7/23/05 1:49 PM Page 1 LCD TV - AFTER SALES SERVICE LE23T5 LE27T5 LE32T5 - Do not hesitate to contact your retailer or service agent if a change in the performance of your product indicates that a faulty condition may be present. Owner’s Instructions Before operating the unit, please read this manual thoroughly, and retain it for future reference.
Precautions When Displaying a Still Image A still image may cause permanent damage to the TV screen. • Do not display a still image on the LCD panel for more than 2 hours as it can cause screen image retention. This image retention is also known as "screen burn". To avoid such image retention, reduce the degree of brightness and contrast of the screen when displaying a still image.
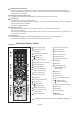
English Contents CONNECTING AND PREPARING YOUR TV List of Parts .............................................................. Installing the Stand .................................................. Installing the Wall Mount Kit ................................ Viewing the Control Panel ........................................ Viewing the Connection Panel.................................. Viewing the Remote Control .................................... Installing Batteries in the Remote Control ............
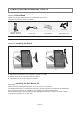
CONNECTING AND PREPARING YOUR TV List of Parts Please make sure the following items are included with your LCD TV. If any items are missing, contact your dealer. M4 X L16 Remote Control & Batteries (AAA x 2) Owner’s Instructions Power Cord Warranty card Cover-Bottom Service Network Card Stand Screw X 4 Safety Guide Registration Cards Installing the Stand <2> <3> 1. Place the TV faced down on a soft cloth or cushion on a table. 2. Put the stand into the hole at the bottom of the TV. 3.
Viewing the Control Panel The product colour and shape may vary depending on the model. SOURCE Toggles between all the available input sources (TV, Ext.1, Ext.2, AV, S-Video, Component, PC, DVI). In the on-screen menu, use this button as you use the ENTER button on the remote control. MENU Press to see an on-screen menu of your TV’s features. (HEADPHONE JACK) Connect a set of external headphones to this jack for private listening. (Power) Press to turn the TV on and off.
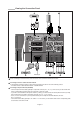
Viewing the Connection Panel Power Input Whenever you connect an external device to your TV, make sure that power on the unit is turned off. When connecting an external device, match the colour of the connection terminal to the cable.
Connecting External A/V Devices - Connect RCA (optional) or S-VIDEO cable (optional) to an appropriate external A/V device such as VCR, DVD or Camcorder. - Connect RCA audio cables (optional) to “R - AUDIO - L” on the rear of your set and the other ends to corresponding audio out connectors on the A/V device. Connecting Set-Top Box, VCR or DVD - Connect the VCR or DVD SCART cable (optional) to the SCART connector of the VCR or DVD. Connecting DVI - Connect the DVI connector to the DVD connector.
Installing Batteries in the Remote Control 1. Slide the cover out completely. 2. Install two AAA size batteries. 3. Replace the cover. Make sure to match the “+” and “–” ends of the batteries with the diagram inside the compartment. Remove the batteries and store them in a cool, dry place if you won’t be using the remote control for a long time. The remote control can be used up to about 23 feet from the TV. (Assuming typical TV usage, the batteries last for about one year.
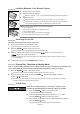
4. Select the appropriate country by pressing the or button. Press the ENTER button to confirm your choice. 5. The “Auto Store” menu is displayed with the “Start” selected. Press the ENTER button. The channel search will start and end automatically. After all the available channels are stored, the “Clock Set” menu appears. Press the ENTER button at any time to interrupt the memorization process. 6. Press the ENTER button. Select the “Hour” or “Minute” by pressing the or button.
Storing Channels Manually You can store up to 100 channels, including those received via cable networks. When storing channels manually, you can choose: Whether or not to store each of the channels found. The programme number of each stored channel which you wish to identify. 1. Press the MENU button to display the menu. Press the or button to select “Channel”, then press the ENTER 2. Press the or button to select “Manual Store”, then press the ENTER 3. Press the ENTER 4.
SETTING THE PICTURE Changing the Picture Standard You can select the type of picture which best corresponds to your viewing requirements. You can also press the P.MODE button on the remote control to select one of the picture settings. 1. Press the MENU button to display the menu. Press the or button to select “Picture”, then press the ENTER button. 2. Press the ENTER button again, to select “Mode”. 3. Press the ENTER button again, to select “Mode”. 4.
Changing the Colour Tone You can select the most comfortable colour tone to your eyes. 1. To select the desired picture effect, follow the “Changing the Picture Standard” instructions number 1 to 4 on page 9. 2. Press the or button to select “Colour Tone”, then press the ENTER button. 3. Press the or button to select the desired colour tone setting. Press the ENTER button. 4. Press the EXIT button to exit. Cool2: Makes the colour temperature bluer than “Cool1” menu.
Digital Noise Reduction / Dynamic Contrast Digital NR: If the broadcast signal received by your TV is weak, you can activate the Digital Noise Reduction feature to help reduce any static and ghosting that may appear on the screen. Dynamic Contrast: Dynamic Contrast detects the visual signal input and adjusts to create optimum contrast. 1. Press the MENU button to display the menu. Press the or button to select “Picture”, then press the ENTER button. 2.
SETTING THE SOUND Changing the Sound Standard You can select the type of the special sound effect to be used when watching a given broadcast. You can also select these options by simply pressing the S.MODE button on the remote control. 1. Press the MENU button to display the menu. Press the or button to select “Sound”, then press the ENTER button. 2. Press the ENTER 3. Select the required sound effect by pressing the or button repeatedly and then press the ENTER button. 4.
Listening to the Sound of the Sub Picture During the PIP feature is activating, you can listen to the sound of the sub picture. 1. Press the MENU button to display the menu. Press the or button to select “Sound”, then press the ENTER button. 2. Press the or button to select “Sound Select”, then press the ENTER button. 3. Press the or button to select “Sub”. Press the ENTER 4. Press the EXIT button to exit. button. Main: Used to listen to the sound of the main picture.
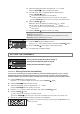
Switching the Television On and Off Automatically You can set the On/Off timers so that the set will: Switch on automatically and tune to the channel of your choice at the time you select. Switch off automatically at the time you select. 1. Press the MENU button to display the menu. Press the or button to select “Setup”, then press the ENTER button. 2. Press the or button to select “Time”, then press the ENTER button. 3. Press the or button to select “On Timer”, then press the ENTER button.
Using the Energy Saving Feature This feature adjusts the brightness of TV so as to reduce the power consumption. When you watching TV at night, set the "Energy Saving " mode option to "High" so as to reduce the dazzling of your eyes as well as the power consumption. 1. Press the MENU button to display the on-screen menu. Press the or button to select “Setup”, then press the ENTER button. 2. Press the or button to select “Energy Saving”, then press the ENTER button. 3.
Editing the Input Source Names Name the device connected to the input jacks to make your input source selection easier. 1. Press the MENU button to display the menu. Press the ENTER button, to select “Input”. 2. Press the or button to select “Edit Name”, then press the ENTER button. 3. Press the or button to select the device that you wish to edit. Press the ENTER button. 4. Press the or button to select the required device. Press the ENTER button. 5. Press the EXIT button to exit.
Displaying the Teletext Information You can display teletext information at any time, but signal reception must be good. Otherwise: Information may be missing. Some pages may not be displayed. To activate the teletext mode and display the contents page: 1. Using the P ( teletext service. ) or P 2. Press the TTX/MIX ( ( ) button, select the channel providing the ) button to activate the teletext mode. The contents page is displayed. It can be redisplayed at any time by pressing the MENU ( ) button.
Using Fastext to Select a Teletext Page The various topics included in the teletext pages are colour-coded, and can be selected by pressing the coloured buttons on the remote control. 1. Display the teletext contents page by pressing the TTX/MIX ( ) button. 2. Press the coloured button corresponding to the topic that you wish to select (The available topics are listed on the status information line). 3. Press the Red button to display the previous page. Press the Green button to display the next page.
Setting the PC Coarse and Fine Tuning of the Image (Image Lock): The purpose of picture quality adjustment is to remove or reduce picture noise. If the noise is not removed by Fine-tuning alone, then adjust the frequency as best as possible (coarse) and Fine-tune again. After the noise has been reduced, re-adjust the picture so that it is aligned on the center of screen. Press the PC button on the remote control to select the PC mode. 1. Preset: Press the PC button to select PC mode. 2.
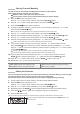
RECOMMENDATIONS FOR USE Troubleshooting: Before Contacting Service Personnel No sound or picture Normal picture but no sound Check the volume. Check whether the MUTE No picture or black and white picture Adjust the colour settings. Check that the broadcast system selected is correct. Sound and picture interference Try to identify the electrical appliance that is affecting the set and move it further away. Plug your set into a different mains socket.
Warning! Important Safety Instructions Please read the appropriate section that corresponds to the marking on your Samsung product before attempting to install the product. CAUTION RISK OF ELECTRIC SHOCK DO NOT OPEN CAUTION: TO REDUCE THE RISK OF ELECTRIC SHOCK, DO NOT REMOVE COVER (OR BACK). THERE ARE NO USER SERVICEABLE PARTS INSIDE. REFER ALL SERVICING TO QUALIFIED PERSONNEL. This symbol indicates that high voltage is present inside.
Wiring the Mains Power Supply Plug(UK Only) IMPORTANT NOTICE The mains lead on this equipment is supplied with a moulded plug incorporating a fuse. The value of the fuse is indicated on the pin face of the plug and, if it requires replacing, a fuse approved to BSI1362 of the same rating must be used. Never use the plug with the fuse cover omitted if the cover is detachable. If a replacement fuse cover is required, it must be of the same colour as the pin face of the plug.
MEMO
MEMO