Contact SAMSUNG WORLDWIDE If you have any questions or comments relating to Samsung products, please contact the SAMSUNG customer care centre. Country AUSTRIA BELGIUM CZECH REPUBLIC DENMARK EIRE FINLAND FRANCE GERMANY HUNGARY ITALIA LUXEMBURG NETHERLANDS NORWAY POLAND PORTUGAL SLOVAKIA SPAIN SWEDEN SWITZERLAND U.K TURKEY ESTONIA LATVIA LITHUANIA KAZAHSTAN KYRGYZSTAN RUSSIA TADJIKISTAN UKRAINE UZBEKISTAN Web Site Customer Care Centre 0800-SAMSUNG (726-7864) www.samsung.com/at 0032 (0)2 201 24 18 www.
Contact SAMSUNG WORLDWIDE If you have any questions or comments relating to Samsung products, please contact the SAMSUNG customer care centre. (See back cover for more information) Precautions When Displaying a Still Image A still image may cause permanent damage to the TV screen • Do not display a still image on the LCD panel for more than 2 hours as it can cause screen image retention. This image retention is also known as “screen burn”.
English Contents Connecting and Preparing Your TV Function Description ■ ■ ■ ■ ■ ■ ■ ■ ■ ■ ■ ■ ■ ■ ■ ■ ■ ■ ■ ■ ■ ■ ■ ■ List of Parts.........................................................................2 Installing the Stand.............................................................2 Installing the Wall Mount Kit...............................................2 Viewing the Control Panel..................................................3 Viewing the Connection Panel..................................
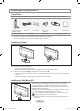
Connecting and Preparing Your TV List of Parts Please make sure the following items are included with your LCD TV. If any items are missing, contact your dealer. Remote Control & Batteries (AAA x 2) Power Cord • Owner’s Instructions Cover-Bottom • Warranty card Stand Screw (M4xL 16) • Safety Guide Stand Cleaning Cloth • Registration Cards ➣ Warranty card / Safety Guide / Registration Cards (Not available in all locations) ➣ The stand and stand screw may not be included depending on the model.
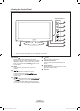
Viewing the Control Panel Side Panel buttons 1 2 3 4 5 6 8 8 7 ➣ The product colour and shape may vary depending on the model. 1 SOURCE Toggles between all the available input sources (TV, Ext.1, Ext.2, AV, S-Video, Component, PC, HDMI1, HDMI2/DVI, HDMI3). In the on-screen menu, use this button as you would use the ENTER button on the remote control. 2 MENU Press to see an on-screen menu of your TV’s features. 3 Press to decrease or increase the volume.
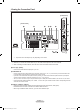
Viewing the Connection Panel [TV Side Panel] [TV Rear Panel] 1 7 2 3 4 5 6 3 8 9 Power Input 0 # @ ! ➣ The product colour and shape may vary depending on the model. ➣ Whenever you connect an external device to your TV, make sure that power on the unit is turned off. ➣ When connecting an external device, match the colour of the connection terminal to the cable. 1 PC IN [PC] / [AUDIO] - Connect to the video and audio output jack on your PC.
➣ What is HDMI? - “High Definition Multimedia interface” allows the transmission of high definition digital video data and multiple channels of digital audio. - The HDMI/DVI terminal supports DVI connection to an extended device with the appropriate cable (not supplied).
! Kensington Lock (depending on the model) - The Kensington lock (optional) is a device used to physically fix the system when used in a public place. - If you want to use a locking device, contact the dealer where you purchased the TV. - The location of the kensington lock may be different depending on its model. @ DIGITAL AUDIO OUT (OPTICAL) - Connect to a Digital Audio Component. ➣ When the HDMI IN jacks are connected, the DIGITAL AUDIO OUT (OPTICAL) jack on the TV outputs 2 channel audio only.
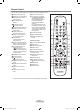
Remote Control You can use the remote control up to a distance of about 23 feet from the TV. 1 Television Standby button a Exit the on-screen menu 2S elects the TV mode directly b Use this when connecting a SAMSUNG DMA (Digital Media Adapter) device through an HDMI interface and switching to DMA mode.(The DMA button is optional.) For more information on the operating procedures, refer to the user manual of the DMA.
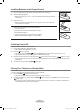
Installing Batteries in the Remote Control 1. 2. Lift the cover at the back of the remote control upward as shown in the figure. Install two AAA size batteries. ➣ Make sure to match the “+” and “–” ends of the batteries with the diagram inside the compartment. 3. Replace the cover. ➣ Remove the batteries and store them in a cool, dry place if you won’t be using the remote control for a long time. ➣ If the remote control doesn’t work, check the following: 1. Is the TV power on? 2.
Viewing the Menus Picture 1. With the power on, press the MENU button. The main menu appears on the screen. The menu’s left side has icons: Picture, Sound, Channel, Setup, Input, Application. 2. Press the ▲ or ▼ button to select one of the icons. Then press the ENTER button to access the icon’s sub-menu. 3. Press the EXIT button to exit. ➣ The on-screen menus disappear from the screen after about one minute.
4. Press the ◄ or ► button to select “Store Demo” or “Home Use”, then the ENTER button. ➣ We recommend setting the TV to “Home Use” mode for the best picture in your home environment. ➣ “Store Demo” mode is only intended for use in retail environments. ➣ If the unit is accidentally set to “Store Demo” mode and you want to return to “Home Use” (Standard): Press the Volume button on the TV. When the volume OSD is displayed, press and hold the MENU button on the TV for 5 seconds. 5.
Channel Control Storing Channels Automatically Channel You can scan for the frequency ranges available to you (and availability depends on your country). Automatically allocated programme numbers may not correspond to actual or desired programme numbers. However, you can sort numbers manually and clear any channels you do not wish to watch. 1. Press the MENU button to display the menu. Press the ▲ or ▼ button to select “Channel”, then press the ENTER button. Auto Store ► 2.
Analogue Channel Channel 3. Press the ▲ or ▼ button to select “Analogue Channel”, then press the ENTER button. ➣ If a channel is locked using the “Child Lock” function, the PIN input window appears (refer to page 22). 4. Press the ◄ or ► button to select the required item below. Press the ▲ or ▼ button to adjust to the setting satisfied. 5. Press the EXIT button to exit.
Viewing the EPG (Electronic Programme Guide) Information Channel The EPG (Electronic Programme Guide) information is provided by the broadcasters. Programme entries may appear blank or out of date as a result of the information broadcast on a given channel. The display will dynamically update as soon as new information becomes available. 1. Press the MENU button to display the menu. Auto Store Manual Store 2. Press the ▲ or ▼ button to select “Channel”, then press the ENTER button. Full Guide 3.
Setting the Default Guide Channel You can decide whether to display either the “Mini Guide” or the “Full Guide” when the GUIDE button on the remote control is pressed. 1. Press the MENU button to display the menu. Full Guide Press the ▲ or ▼ button to select “Channel”, then press the ENTER Mini Guide button. Default Guide : Mini Guide ► 2. Press the ▲ or ▼ button to select “Default Guide”, then press the ENTER Channel List button. Channel Mode : Added Ch.
Managing Channels Using this menu, you can Add/Delete or set Favourite channels and use the program guide for digital broadcasts. Viewing All Channels Mini Guide Channel Show all currently available channels. To use the Channel List function, operate the “Auto Store” first. 1. Press the MENU button. Press the ▲ or ▼ button to select “Channel”, then press the ENTER button. Press the ▲ or ▼ button to select “Channel List”, then press the ENTER button.
Erasing and Adding Channels Mini Guide Default Guide Channel : Mini Guide Channel List Channel Mode : Added Ch. Child Lock : On Fine Tune Signal Information LNA 824 825 All Channels You can delete or add a channel to display the channels you want. 1. Press the MENU button. Press the ▲ or ▼ button to select “Channel”, then press the ENTER button. Press the ▲ or ▼ button to select “Channel List”, then press the ENTER button. 2. Press the ◄ button to select “Added Channels”. 3.
Locking and Unlocking Channels button. 5. Press the ▲ or ▼ button to select “Lock”, then press the ENTER 6. Enter your 4 digit PIN number. ➣ The “ ” symbol will be displayed and the channel will be locked. ➣ The default PIN number of a new TV set is “0-0-0-0”. ➣ If you want to change PIN number, refer to 35 page. Default Guide Channel Mode : Added Ch.
Reserving a Program (Timer Viewing) If you reserve a program you want to watch, the channel is automatically switched to the reserved channel in the Channel List; even when you are watching another channel. To reserve a program, set the current time first. See pages 32~33. Mini Guide Channel 1. Press the MENU button. Press the ▲ or ▼ button to select “Channel”, then press the ENTER button. Press the ▲ or ▼ button to select “Channel List”, then press the ENTER button.
Confirming a Viewing Reservation Mini Guide Channel You can view, modify or delete a reservation. 1. Press the MENU button. Press the ▲ or ▼ button to select “Channel”, then press the ENTER button. Press the ▲ or ▼ button to select “Channel List”, then press the ENTER button. Default Guide : Mini Guide Channel List Channel Mode : Added Ch. Child Lock : On Fine Tune Signal Information LNA 2. Press the ◄ button to select “Added Channels”. Canceling a reservation 4.
Edit Channel Name-Analogue Mini Guide Default Guide Channel Channels can labeled so that their call letters appear whenever the channel is selected. 1. Press the MENU button. Press the ▲ or ▼ button to select “Channel”, then press the ENTER button. Press the ▲ or ▼ button to select “Channel List”, then press the ENTER button. : Mini Guide Channel List Channel Mode : Added Ch. Child Lock : On Fine Tune Signal Information LNA • • • • • Numeric buttons: You can enter numbers.
Editing the Channel Number-Digital Added Channels 1. Press the MENU button. Press the ▲ or ▼ button to select “Channel”, then press the ENTER button. Press the ▲ or ▼ button to select “Channel List”, then press the ENTER button. 2. Select the channel number that you wish to edit by pressing the ▲ or ▼ button repeatedly, then press the TOOLS button. 824 825 825 UKTV style Delete 2 C -A 3 ♥ C -A 4 C -A 5 C -A 6 C -A 7 C -A 8 C -A All Channel Type 3.
Setting the Channel Mode Channel You can display either the added channels list or the favourite channels list when the CH LIST button on the remote control is pressed. Default Guide : Mini Guide 1. Press the MENU button to display the menu. Channel List Press the ▲ or ▼ button to select “Channel”, then press the ENTER button. Channel Mode : Added Ch. ► Child Lock : On Fine Tune Signal Information : Off Default Guide : Mini Guide Channel List Channel 2.
Fine Tuning Analogue Channels Channel 1. Use the number buttons to directly select the channel that you want to fine tune. 2. Press the MENU button to display the menu. Press the ▲ or ▼ button to select “Channel”, then press the ENTER button. 3. Press the ▲ or ▼ button to select “Fine Tune”, then press the ENTER button. 4. Press the ◄ or ► button to adjust the fine tuning. Press the ENTER button. 5. Press the EXIT button to exit.
LNA (Low Noise Amplifier) Channel If the TV is operating in a weak-signal area, the LNA function can improve the reception (a low-noise preamplifier boosts the incoming signal). 1. Press the MENU button to display the menu. Fine Tune Press the ▲ or ▼ button to select “Channel”, then press the ENTER Signal Information button. LNA : Off ► 2. Press the ▲ or ▼ button to select “LNA”, then press the ENTER button. 3. Press the ▲ or ▼ button to select “Off” or “On”. Press the ENTER 4.
Picture Control Changing the Picture Standard Picture You can select the type of picture which best corresponds to your viewing requirements. 1. Press the MENU button to display the menu. Press the ENTER button to select “Picture”. Mode :Standard Backlight :7 Contrast : 95 Brightness : 45 Sharpness : 50 Colour : 50 Tint (G/R) : G50/R50 Detailed Settings 2. Press the ENTER button to select “Mode”. Press the ▲ or ▼ button to select “Dynamic”, “Standard” or “Movie”. Press the ENTER button.
Adjusting the Detailed Settings Samsung’s new TVs allow you to make even more precise picture settings than previous models. See below to adjust detailed picture settings. Activating Detailed Settings Picture 1. Press the MENU button to display the menu. Press the ENTER button to select “Picture”. 2. Press the ENTER button to select “Mode”. Press the ▲ or ▼ button to select “Standard” or “Movie”, then press the ENTER button. ➣ “Detailed Settings” is available in “Standard” or “Movie” mode. 3.
Configuring Picture Options Activating Picture Options Tint (G/R) Colour Tone: Cool2/Cool1/Normal/Warm1/Warm2 You can select the most comfortable colour tone to your eyes. ➣ The adjusted values are stored according to the selected “Picture” mode. ➣ “Warm1” or “Warm2” is only activated when the picture mode is “Movie”. Size: Auto Wide/16:9/Wide Zoom/Zoom/4:3/Just Scan You can select the picture size which best corresponds to your viewing requirements. • • • • • • Picture 1.
Digital NR: Off/Low/Medium/High/Auto If the broadcast signal received by your TV is weak, you can activate the Digital Noise Reduction feature to help reduce any static and ghosting that may appear on the screen. ➣ When the signal is weak, select one of the other options until the best picture is displayed. DNIe: Off/Demo/On This TV includes the DNIe function so as to provide a high visual quality. If you set DNIe to on, you can view the screen with the DNIe feature activated.
Sound Control Changing the Sound Standard Mode: Standard/Music/Movie/Speech/Custom You can select the type of special sound effect to be used when watching a given broadcast. Easy Setting 1. Press the TOOLS button on the remote control. 2. Press the ▲ or ▼ button to select “Sound Mode”. 3. Press the ◄ or ► button to select the required option. 4. Press the EXIT or TOOLS button to exit.
Audio Format: MPEG/Dolby Digital When sound is emitted from both the main speaker and the audio receiver, a around echo may occur due to the decoding speed difference between the main speaker and the audio receiver. In this case, use the TV Speaker function. ➣ While viewing a Digital channel, this function can be selected. ➣ You can only select the language among the actual languages being broadcast. Manufactured under license from Dolby Laboratories.
Selecting the Sound Mode You can set the sound mode in the “Tools” menu. When you set to “Dual I II”, the current sound mode is displayed on the screen. 1. Press the TOOLS button on the remote control. 2. Press the ▲ or ▼ button to select “Dual I II”. 3. Press the ◄ or ► button to select required option. 4. Press the ENTER button.
Time Setting Setting the Clock Setting the clock is necessary in order to use the various timer features of the TV. Also, you can check the time while watching the TV. (Just press the INFO button.) ➣ If you disconnect the power cord, you have to set the clock again. Option 1: Setting the Clock Manually button. button. Plug & Play Language Setup 1. Press the MENU button to display the menu.
Option 2: Setting the Clock Automatically Plug & Play button. button. Language Setup The Clock can be set automatically if you are receiving a digital signal. 1. Press the MENU button to display the menu. Press the ▲ or ▼ button to select “Setup”, then press the ENTER Press the ▲ or ▼ button to select “Time”, then press the ENTER : English Time ► Change PIN Parental Lock Subtitle Teletext Language : ---- Preference Wall-Mount Adjustment Melody 2.
Switching the Television On and Off Automatically button. button. Plug & Play Language Setup 1. Press the MENU button to display the menu. Press the ▲ or ▼ button to select “Setup”, then press the ENTER 2. Press the ▲ or ▼ button to select “Time”, then press the ENTER : English Time ► Change PIN Parental Lock Subtitle Teletext Language : ---- Preference Wall-Mount Adjustment Melody 3. Press the ▲ or ▼ button to select “Timer 1”, “Timer 2”, “Timer 3”, then press the ENTER button.
Function Description Selecting a Menu Language Plug & Play Setup 1. Press the MENU button to display the menu. Press the ▲ or ▼ button to select “Setup”, then press the ENTER button. Press the ▲ or ▼ button to select “Language”, then press the ENTER button. Language : English ► Time Change PIN 2. Select a particular language by pressing the ▲ or ▼ button repeatedly. Press the ENTER button. 3. Press the EXIT button to exit.
Setting up the Parental Lock This feature allows you to prevent unauthorized users, such as children, from watching unsuitable programmes by a 4-digit PIN (Personal Identification Number) code that is defined by the user. Press the MENU button to display the menu. Press the ▲ or ▼ button to select “Setup”, then press the ENTER Time button. Change PIN Setup 1. 2. Parental Lock ► Subtitle Teletext Language : ---- Preference Wall-Mount Adjustment 3.
Setting the Subtitle You can activate and deactivate the subtitles. Use this menu to set the Subtitle Mode. “Normal” under the menu is the basic subtitle and “Hard of hearing” is the subtitle for a hearing-impaired person. Change PIN button. Setup 1. Press the MENU button to display the menu. 2. Press the ▲ or ▼ button to select “Setup”, then press the ENTER 3. Press the ▲ or ▼ button to select “Subtitle”, then press the ENTER button.
Selecting a Teletext Language Parental Lock Setup You can set the Teletext language by selecting the language type. 1. Press the MENU button to display the menu. Press the ▲ or ▼ button to select “Setup”, then press the ENTER button. 2. Press the ▲ or ▼ button to select “Teletext Language”, then press the ENTER button. 3. Select a particular language by pressing the ▲ or ▼ button repeatedly. Press the ENTER button.
Melody/Entertainment/Energy Saving Preference Setup 1. Press the MENU button to display the menu. Press the ▲ or ▼ button to select “Setup”, then press the ENTER button. 2. Select the required option by pressing the ▲ or ▼ button, then press the ENTER button. 3. When you are satisfied with your setting, press the ENTER button. 4. Press the EXIT button to exit.
Upgrading the Software HDMI IN3 To keep your product up-to-date with new Digital Television features then software upgrades are periodically broadcast as part of the normal Television signal. It will automatically detect these signals and display the software upgrade banner. You are given the option to install the upgrade. 1. Insert a USB drive containing the firmware upgrade into the SERVICE port on TV Side Panel the side of the TV. 2. Press the MENU button to display the menu.
Viewing Common Interface ➣ The Application Info inserting is about the CI CARD. You can install the CAM anytime whether the TV is ON or OFF. 1. Purchase the CI CAM module by visiting your nearest dealer or by phone. 2. Insert the CI CARD into the CAM in the direction of the arrow until it fits. 3. Insert the CAM with the CI CARD installed into the common interface slot. (Insert the CAM in the direction of the arrow, right up to the end so that it is parallel with the slot.) 4.
To Select the Source Input Use to select TV or other external input sources such as DVD players or Cable Box/Satellite receivers (Set-Top Box) connected to the TV. Use to select the input source of your choice. 1. Press the MENU button to display the menu. Press the ▲ or ▼ button to select “Input”, then press the ENTER button. 2. Press the ENTER button to select “Source List”. Press the ▲ or ▼ button to select signal source, then press the ENTER button. ➣ Available signal sources: TV, Ext.1, Ext.
PC Display Using Your TV as a Computer (PC) Display Setting Up Your PC Software (Based on Windows XP) The Windows display-settings for a typical computer are shown below. The actual screens on your PC will probably be different, depending upon your particular version of Windows and your particular video card. However, even if your actual screens look different, the same basic set-up information will apply in almost all cases. (If not, contact your computer manufacturer or Samsung Dealer.) 1.
Setting up the TV with your PC Picture ➣ Preset: Press the SOURCE button to select PC mode. 1. Press the MENU button to display the menu. Press the ▲ or ▼ button to select “Picture”, then press the ENTER button. 2. Select the required option by pressing the ▲ or ▼ button, then press the ENTER button. 3. When you are satisfied with your setting, press the ENTER button. 4. Press the EXIT button to exit.
About Anynet+ What is Anynet+? Anynet+ is a function that enables you to control all connected Samsung devices that support Anynet+ with your Samsung TV’s remote. Connecting Anynet+ Devices The Anynet+ system can be used only with Samsung devices that have the Anynet+ feature. To be sure your Samsung device has this feature, check if there is an Anynet+ logo on it.
Setting Up Anynet+ The following settings help set the Anynet+ functions. To use the Anynet+ Function, Anynet+ (HDMI-CEC) must be set to On Application 1. Press the MENU button. Press the ▲ or ▼ button to select “Application”, then press the ENTER button. 2. Press the ▲ or ▼ button to select “Anynet+ (HDMI-CEC)”, then press the ENTER button. 3. Press the ENTER button to select “Anynet+ (HDMI-CEC)”. 4. Press the ▲ or ▼ button to select “On”, then press the ENTER button.
Anynet+ Menu The Anynet+ menu changes depending on the type and status of the Anynet+ devices connected to the TV. Anynet+ Menu View TV Device List Record Menu on Device Device Operation Timer Recording Stop Recording Receiver Setup Description Switches from Anynet+ to TV broadcast mode. Displays the Anynet+ device list. Starts a recording. (This menu works only for a device supporting recording.) Shows the menu of the connected device.
Listening through a Receiver (Home theater) You can listen to sound through a receiver instead of the TV speaker. Tools 1. Press the TOOLS button. Press the ▲ or ▼ button to select “Receiver”. Device List Record 2. Press the ◄ or ► button to select to “On”. Timer Recording Now you can listen to sound through the receiver. Receiver ◄ Off ► 3. Press the EXIT button to exit. Picture Mode : Standard Sound Mode : Custom ➣ If your receiver supports audio only, it may not appear in the device list.
Recommendations for Use Teletext Feature Most television stations provide written information services via Teletext. The index page of the teletext service gives you information on how to use the service. In addition, you can select various options to suit your requirements by using the remote control buttons. ➣ For teletext information to be displayed correctly, channel reception must be stable. Otherwise, information may be missing or some pages may not be displayed.
The teletext pages are organized according to six categories: Part A B C D E F Contents Selected page number. Broadcasting channel identity. Current page number or search indications. Date and time. Text. Status information. FASTEXT information.
Remembering the Position 2. 3. 4. 5. A��just to the ��esire�� position using the ��,��,��,�� buttons. ➣ If you press an arrow button when no OSD is displayed on the TV screen, the Adjustment screen appears. ➣ Press the INFO button to reset. Press the �� or �� button to select “Yes”, then press the ENTER button. The position is initialized to the default setting. Press the blue button.
Using the Anti-Theft Kensington Lock (depending on the model) The Kensington Lock is a device used to physically fix the system when using it in a public place. The appearance and locking method may differ from the illustration depending on the manufacturer. Refer to the manual provided with the Kensington Lock for proper use. The locking device has to be purchased separately. Cable Figure 2 Figure 1 ➣ The location of the Kensington Lock may be different depending on its model. 1.
경고 경고 주의 Securing the TV to the Wall Caution: Pulling, pushing, or climbing on the TV may cause the TV to fall. In particular, ensure your children do not hang over or destabilize the TV; doing so may cause the TV to tip over, causing serious injuries or death. Follow 주의 all safety precautions provided on the included Safety Flyer. For added stability, install the anti-fall device for safety purposes, as follows. To avoid the TV from falling: 1.
Troubleshooting: Before Contacting Service Personnel No sound or picture • • • • Check that the mains lead has been connected to a wall socket. Check that you have pressed the button on your set. Check the picture contrast and brightness settings. Check the volume. Normal picture but no sound • Check the volume. • Check whether the MUTE button has been pressed on the remote control. • Check if “TV Speaker” is on.
Specifications Model Name Screen Size (Diagonal) PC Resolution (Optimum) Sound Output Dimensions (WxDxH) Body With stand Weight With stand Environmental Considerations Operating Temperature Operating Humidity Storage Temperature Storage Humidity Stand Swivel (Left / Right) Model Name Screen Size (Diagonal) PC Resolution (Optimum) Sound Output Dimensions (WxDxH) Body With stand Weight With stand Environmental Considerations Operating Temperature Operating Humidity Storage Temperature Storage Humidity Stand S
Model Name Screen Size (Diagonal) PC Resolution (Optimum) Sound Output Dimensions (WxDxH) Body With stand Weight With stand Environmental Considerations Operating Temperature Operating Humidity Storage Temperature Storage Humidity Stand Swivel (Left / Right) Model Name Screen Size (Diagonal) PC Resolution (Optimum) Sound Output Dimensions (WxDxH) Body With stand Weight With stand Environmental Considerations Operating Temperature Operating Humidity Storage Temperature Storage Humidity Stand Swivel (Left / R
This page is intentionally left blank. BN68-01424E-02Eng-0514.
Comment contacter Samsung dans le monde Si vous avez des suggestions ou des questions concernant les produits Samsung, veuillez contacter le Service Consommateurs Samsung. (Voir la quatrième de couverture pour plus d’informations.) Précautions à prendre lors de l’affichage d’une image fixe Une image fixe peut causer des dommages irrémédiables à l’écran du téléviseur. • N’affichez pas une image fixe sur l’écran LCD plus de 2 heures. Cela pourrait provoquer une rémanence de l’image à l’écran.
Sommaire Description des fonctions ■ ■ ■ ■ ■ ■ ■ ■ ■ ■ ■ ■ ■ Sélection d’une langue de menu......................................35 ■ Réglage de votre numéro d’identification personnel (NIP)................................................................35 ■ Configuration du contrôle parental...................................36 ■ Configuration des sous-titres............................................37 ■ Sélection d’une langue de télétexte..................................
Branchement et installation de votre televiseur Liste des pièces Vérifiez que les éléments suivants sont inclus avec votre téléviseur LCD. S’il manque des éléments, contactez votre revendeur.
Présentation du panneau de comman Boutons du panneau latéral 1 2 3 4 5 6 8 8 7 ➣ La couleur et la forme du produit peuvent varier en fonction du modèle. 1 SOURCE 5 (Alimentation) Permet d’allumer et d’éteindre le téléviseur. Affiche un menu de toutes les sources d’entrée disponibles (TV, Ext.1, Ext.2, AV, S-Vidéo, Composant, 6 Témoin d’alimentation PC, HDMI1, HDMI2/DVI, HDMI3).
Présentation du panneau de branchement [Prises du panneau latéral] [Panneau arrière du téléviseur] 1 2 7 3 4 5 6 3 8 9 Entrée de l’alimentation 0 # @ ! ➣ La couleur et la forme du produit peuvent varier en fonction du modèle. ➣ Lorsque vous branchez un périphérique externe à votre téléviseur, assurez-vous que celui-ci est éteint. ➣ Lorsque vous branchez un périphérique externe, faites correspondre les couleurs de la borne de connexion et du câble.
➣ Qu’est-ce que HDMI ? - “High Definition Multimedia interface” permet la transmission de données vidéo numériques haute définition et plusieurs canaux de son numérique. - Le terminal HDMI/DVI prend en charge la connexion DVI vers un périphérique raccordé avec le câble adéquat (non fourni). La différence entre HDMI et DVI est que le périphérique HDMI est plus petit, est équipé de la fonction de codage HDCP (High Bandwidth Digital Copy Protection), et gère le son numérique multicanal.
! Verrouillage Kensington (en fonction du modèle) - Le verrouillage Kensington (en option) est un dispositif utilisé pour fixer physiquement le système dans le cas d’une utilisation dans un endroit public. - Si vous désirez utiliser un dispositif de verrouillage, contactez le revendeur où vous avez acheté le téléviseur. - L’emplacement du verrou Kensington peut varier en fonction du modèle. @ DIGITAL AUDIO OUT (OPTICAL) - A connecter à un composant audio numérique.
Télécommande Vous pouvez utiliser la télécommande à une distance maximale du téléviseur d’environ 7 m. 1 Bouton de mise en veille du téléviseur. Permet de quitter le menu a �������������������������� affiché à l’écran. 2 Permet de sélectionner directement le mode TV. b Permet de connecter un appareil SAMSUNG DMA (Digital Media Adapter) à l’aide d’une interface HDMI et de passer en mode DMA (le bouton DMA est facultatif).
Insertion des piles dans la télécommande 1. 2. Soulevez le couvercle situé à l’arrière de la télécommande comme indiqué sur la figure. Placez-y deux piles AAA. ➣ Assurez-vous que les pôles “+” et “-” des piles correspondent au schéma situé à l’intérieur du compartiment. 3. Remettez le couvercle en place. ➣ Retirez les piles et stockez-les dans un endroit frais et sec si vous n’utilisez pas la télécommande pendant longtemps. ➣ Si la télécommande ne fonctionne pas : 1.
Affichage des menus Image 1. Une fois l’appareil allumé, appuyez sur le bouton MENU. Le menu principal apparaît à l’écran. Plusieurs icônes s’affichent sur le côté gauche du menu: Image, Son, Canal, Configuration, Entrée, Application. 2. Appuyez sur le bouton ▲ ou ▼ pour sélectionner l’une des icônes. Appuyez ensuite sur le bouton ENTER pour accéder au sous-menu de l’icône. 3. Appuyez sur le bouton EXIT pour quitter le menu. ➣ Les menus disparaissent de l’écran après environ une minute.
4. Appuyez sur les boutons ◄ ou ► pour sélectionner “Enr. démo” ou “Util. domicile”, puis sur le bouton ENTER . ➣ Nous vous recommandons de régler le téléviseur sur le mode “Util. domicile” pour une meilleure qualité d’image dans votre environnement personnel ➣ Le mode “Enr. démo” n’est prévu que pour un usage en magasins. ➣ Si l’unité est accidentellement définie sur le mode “Enr. démo” et que vous souhaitez revenir au mode “Util. domicile” (Standard): Appuyez sur le bouton Volume du téléviseur.
Gestion des canaux Mémorisation automatique des canaux Canal Vous pouvez chercher les plages de fréquence disponibles par balayage (leur disponibilité dépend de votre pays). Il est possible que les numéros de programme attribués automatiquement ne correspondent pas aux numéros de programme souhaités ou réels. Vous pouvez toutefois trier les numéros manuellement et supprimer les canaux que vous ne souhaitez pas regarder. 1. Appuyez sur le bouton MENU pour afficher le menu.
Chaîne analogique Canal 3. Appuyez sur le bouton ▲ ou ▼ pour sélectionner “Chaîne analogique”, puis appuyez sur le bouton ENTER . ➣ Si une chaîne est verrouillée par la fonction “Verrouillage Enfant”, la fenêtre de saisie du code PIN s’affiche (voir page 22). 4. Appuyez sur le bouton ◄ ou ► pour sélectionner l’élément désiré cidessous. Appuyez sur le bouton ▲ ou ▼ pour valider le réglage. 5. Appuyez sur le bouton EXIT pour quitter le menu.
Affichage des informations relatives au Guide de programme électronique (GPE) Canal Les informations relatives au Guide de programme électronique (GPE) sont fournies par les émetteurs. Les entrées de programmes peuvent apparaître en blanc ou ne pas être à jour en raison de l’information diffusée sur un canal donné. L’affichage fera une mise à jour automatique dès qu’une nouvelle information sera disponible. 1. Appuyez sur le bouton MENU pour afficher le menu. Mémorisation Auto Mémorisation Manuelle 2.
Configurer le Guide par défaut Canal Vous pouvez choisir d’afficher soit le “Mini Guide” soit le “Guide Complet” lorsque vous appuyez sur le bouton GUIDE de la télécommande. 1. Appuyez sur le bouton MENU pour afficher le menu. Guide Complet Appuyez sur le bouton ▲ ou ▼ pour sélectionner “Canal”, puis appuyez sur Mini Guide le bouton ENTER . Par défaut : Mini Guide ► 2. Appuyez sur le bouton ▲ ou ▼ pour sélectionner “Par défaut”, puis appuyez Liste des chaînes sur le bouton ENTER .
Gestion des chaînes Ce menu permet d’ajouter/supprimer ou définir des chaînes favorites et d’utiliser le guide des programmes pour les émissions numériques. Affichage de toutes les chaînes Mini Guide Par défaut Canal Affiche toutes les chaînes actuellement disponibles. Pour utiliser la fonction “Liste des chaînes”, effectuez d’abord une mémorisation automatique des programmes (“Mémorisation Auto”). 1. Appuyez sur le bouton MENU.
Effacement et ajout de chaînes Canal Vous pouvez supprimer ou ajouter une chaîne afin d’afficher les chaînes de votre choix. 1. Appuyez sur le bouton MENU. Appuyez sur le bouton ▲ ou ▼ pour sélectionner “Canal”, puis appuyez sur le bouton ENTER . Appuyez sur le bouton ▲ ou ▼ pour sélectionner “Liste des chaînes”, puis appuyez sur le bouton ENTER . 2. Appuyez sur le bouton ◄ pour sélectionner “Chaînes ajoutées”. 3. Appuyez sur le bouton ▲ ou ▼ pour sélectionner “Tous les canaux”.
Verrouillage et déverrouillage de chaînes Cette fonction n’est disponible que lorsque la fonction “Verrouillage Enfant” est à “Marche”. (Voir page 22) 5. Appuyez sur le bouton ▲ ou ▼ pour sélectionner “Verrouil.”, puis appuyez sur le bouton ENTER . 6. Entrez votre code PIN à quatre chiffres. ➣ Le symbole “ ” s’affiche et la chaîne est verrouillée. ➣ Le code PIN par défaut d’un nouveau téléviseur est réglé sur “0-0-0-0”. ➣ Si vous souhaitez changer ce code PIN, reportez-vous à la page 35.
Réservation d’un programme (Ecoute programmée) Si vous réservez un programme que vous souhaitez regarder, la chaîne bascule automatiquement vers la chaîne réservée dans la liste de chaînes, même lorsque vous êtes en train de regarder une autre chaîne. Pour réserver un programme, réglez d’abord l’heure actuelle. (Voir pages 32~33) Mini Guide Canal 1. Appuyez sur le bouton MENU. Appuyez sur le bouton ▲ ou ▼ pour sélectionner “Canal”, puis appuyez sur le bouton ENTER .
Vérification d’une réservation Mini Guide Canal Vous pouvez voir, modifier ou supprimer une réservation. 1. Appuyez sur le bouton MENU. Appuyez sur le bouton ▲ ou ▼ pour sélectionner “Canal”, puis appuyez sur le bouton ENTER . Appuy ez sur le bouton ▲ ou ▼ pour sélectionner “Liste des chaînes”, puis appuyez sur le bouton ENTER . Par défaut : Mini Guide Liste des chaînes Mode Canal : Chaînes ajoutées Verrouillage Enfant : Marche Réglage fin Informations de signal LNA 2.
Modifier le nom d’une chaîne - Analogique Mini Guide Par défaut Canal Les chaînes peuvent recevoir un libellé qui s’affichera chaque fois que la chaîne est sélectionnée. 1. Appuyez sur le bouton MENU. Appuyez sur le bouton ▲ ou ▼ pour sélectionner “Canal”, puis appuyez sur le bouton ENTER . Appuyez sur le bouton ▲ ou ▼ pour sélectionner “Liste des chaînes”, puis appuyez sur le bouton ENTER .
Modification d’un numéro de chaîne - Numérique Chaînes ajoutées 1. Appuyez sur le bouton MENU. Appuyez sur le bouton ▲ ou ▼ pour sélectionner “Canal”, puis appuyez sur le bouton ENTER . Appuyez sur le bouton ▲ ou ▼ pour sélectionner “Liste des chaînes”, puis appuyez sur le bouton ENTER . 2. Sélectionnez le numéro de chaîne à modifier en appuyant plusieurs fois sur le bouton ▲ ou ▼, puis appuyez sur le bouton TOOLS.
Réglage du gestionnaire de chaînes Canal Vous pouvez afficher soit la liste des chaînes ajoutées, soit la liste des favoris lorsque vous appuyez sur le bouton CH LIST de la télécommande. Par défaut : Mini Guide 1. Appuyez sur le bouton MENU pour afficher le menu. Liste des chaînes Appuyez sur le bouton ▲ ou ▼ pour sélectionner “Canal”, puis appuyez sur le bouton ENTER .
Syntonisation fine des chaînes analogiques Canal 1. Utilisez le pavé numérique pour sélectionner directement le canal à régler. 2. Appuyez sur le bouton MENU pour afficher le menu. Appuyez sur le bouton ▲ ou ▼ pour sélectionner “Canal”, puis appuyez sur le bouton ENTER . 3. Appuyez sur le bouton ▲ ou ▼ pour sélectionner “Réglage fin”, puis appuyez sur le bouton ENTER . 4. Appuyez sur le bouton ◄ ou ► pour effectuer une syntonisation précise. Appuyez sur le bouton ENTER . 5.
LNA (Amplificateur à faible bruit) Canal Si le téléviseur fonctionne dans une zone où le signal est faible, la fonction LNA peut parfois améliorer la réception (un préamplificateur à faible bruit augmente le signal d’arrivée). 1. Appuyez sur le bouton MENU pour afficher le menu. Réglage fin Appuyez sur le bouton ▲ ou ▼ pour sélectionner “Canal”, puis appuyez sur Informations de signal le bouton ENTER . LNA : Arrêt 2.
Réglage de l’image Changement de la norme Image Image Vous pouvez sélectionner le type d’image qui correspond le mieux à vos exigences d’affichage. 1. Appuyez sur le bouton MENU pour afficher le menu. Appuyez sur le bouton ENTER pour sélectionner “Image”. pour sélectionner “Mode”. 2. Appuyez sur le bouton ENTER Appuyez sur le bouton ▲ ou ▼ pour sélectionner “Dynamique”, “Standard” ou “Film”. Appuyez sur le bouton ENTER .
Réglage des paramètres détaillés Les nouveaux téléviseurs Samsung permettent d’effectuer des réglages d’image encore plus précis que les modèles précédents. Ce qui suit explique comment régler les paramètres détaillés de l’image. Activation des paramètres détaillés Réglage des noirs: Arrêt/Bas/Moyen/Elevé Vous pouvez directement sélectionner le niveau de noir sur l’écran pour régler la profondeur de l’écran. Contraste Dynam.
Configuration des option d’image Activation des options d’image Teinte (V/R) Nuance Coul.: Froide2/Froide1/Normal/Chaude1/Chaude2 Vous pouvez sélectionner la nuance de couleur la plus agréable au regard. ➣ Les valeurs réglées sont mémorisées en fonction du mode “Image” sélectionné. ➣ “Chaude1” ou “Chaude2” est activé uniquement lorsque le mode d’image est défini sur “Film”.
NR numérique: Arrêt/Bas/Moyen/Elevé/Auto. Si le signal de radiodiffusion reçu est faible, vous pouvez activer la fonction Digital Noise Reduction pour favoriser la réduction d’images fantômes ou statiques qui peuvent apparaître à l’écran. ➣ Lorsque le signal est faible, sélectionnez une autre option jusqu’à obtention de la meilleure image possible. DNIe: Arrêt/Démo/Marche Pour offrir une grande qualité d’image, ce téléviseur est doté de la fonction DNIe.
Réglage du son Changement de la norme Son Mode: Standard/Musique/Film/Parole/Personnalisé/Divertissement Vous pouvez sélectionner le type d’effet sonore souhaité lorsque vous regardez un programme donné. Réglage simple 1. Appuyez sur le bouton TOOLS de la télécommande. 2. Appuyez sur le bouton ▲ ou ▼ pour sélectionner “Mode Son”. 3. Appuyez sur le bouton ◄ ou ► pour sélectionner l’option de votre choix. 4. Appuyez sur le bouton EXIT ou TOOLS pour quitter le menu.
Format Audio : MPEG/Dolby Digital Lorsque le son est émis à la fois par le haut-parleur principal et le récepteur audio, un effet d’écho peut se produire en raison de la différence de vitesse de décodage entre le haut-parleur principal et le récepteur audio. Dans ce cas, utilisez la fonction TV Speaker (Haut-parleur du téléviseur). ➣ Cette fonction peut être sélectionnée pendant que vous regardez une chaîne numérique.
Sélection du mode Son Vous pouvez configurer le mode sonore dans le menu “Outils”. Lorsque vous réglez cette option sur “Dual I II”, le mode sonore actuel est affiché à l’écran. 1. Appuyez sur le bouton TOOLS de la télécommande. 2. Appuyez sur le bouton ▲ ou ▼ pour sélectionner “Dual I II”. 3. Appuyez sur le bouton ◄ ou ► pour sélectionner l’option de votre choix. 4. Appuyez sur le bouton ENTER .
Réglage de l’heure Réglage de l’horloge Le réglage de l’horloge est nécessaire pour utiliser les différentes fonctions de la minuterie de la télévision. Vous pouvez aussi vérifier l’heure pendant que vous regardez la télévision. (Appuyez simplement sur le bouton INFO.) ➣ Si vous débranchez le cordon d’alimentation, vous devrez régler à nouveau l’horloge. Option 1 : Réglage manuel de l’horloge Plug & Play Langue Configuration 1. Appuyez sur le bouton MENU pour afficher le menu.
Option 2 : Réglage automatique de l’horloge Plug & Play Langue Configuration L’horloge peut être automatiquement réglée si vous recevez un signal numérique. 1. Appuyez sur le bouton MENU pour afficher le menu. Appuyez sur le bouton ▲ ou ▼ pour sélectionner “Configuration”, puis appuyez sur le bouton ENTER . Appuyez sur le bouton ▲ ou ▼ pour sélectionner “Horloge”, puis appuyez sur le bouton ENTER .
Mises en marche et arrêt automatiques de votre téléviseur Plug & Play Langue Configuration 1. Appuyez sur le bouton MENU pour afficher le menu. Appuyez sur le bouton ▲ ou ▼ pour sélectionner “Configuration”, puis appuyez sur le bouton ENTER . 2. Appuyez sur le bouton ▲ ou ▼ pour sélectionner “Horloge”, puis appuyez sur le bouton ENTER . : Français Horloge ► Modifier PIN Verrouillage parental Sous-titres Langue du télétexte : ---- Préférence Ajustement fixation murale Mélodie 3.
Description des fonctions Sélection d’une langue de menu Plug & Play Configuration 1. Appuyez sur le bouton MENU pour afficher le menu. Appuyez sur le bouton ▲ ou ▼ pour sélectionner “Configuration”, puis appuyez sur le bouton ENTER . Appuyez sur le bouton ▲ ou ▼ pour sélectionner “Langue”, puis appuyez sur le bouton ENTER . Langue : Français ► Horloge Modifier PIN Verrouillage parental 2. Sélectionnez la langue souhaitée en appuyant de façon répétée sur le bouton ▲ ou ▼.
Configuration du contrôle parental Cette fonction vous permet d’éviter toute utilisation non autorisée, par des enfants par exemple, qui pourraient visionner des programmes ne leur étant pas destinés par un code PIN à chiffres (Code d’identification personnelle) défini par l’utilisateur. Horloge Modifier PIN Configuration 1. Appuyez sur le bouton MENU pour afficher le menu. 2. Appuyez sur le bouton ▲ ou ▼ pour sélectionner “Configuration”, puis appuyez sur le bouton ENTER .
Configuration des sous-titres Vous pouvez activer ou désactiver la fonction sous-titres. Utilisez ce menu pour configurer le Mode sous-titres. Normal s’affiche sous le menu pour les sous-titres de base et “Hard of hearing” sont les sous-titres pour les personnes malentendantes. Modifier PIN Configuration 1. Appuyez sur le bouton MENU pour afficher le menu. 2. Appuyez sur le bouton ▲ ou ▼ pour sélectionner “Configuration”, puis appuyez sur le bouton ENTER . 3.
Sélection d’une langue de télétexte Verrouillage parental Configuration Vous pouvez définir la langue du télétexte en sélectionnant le type de langue. 1. Appuyez sur le bouton MENU pour afficher le menu. Appuyez sur le bouton ▲ ou ▼ pour sélectionner “Configuration”, puis appuyez sur le bouton ENTER . 2. Appuyez sur le bouton ▲ ou ▼ pour sélectionner “Langue du télétexte”, puis appuyez sur le bouton ENTER . 3. Sélectionnez la langue souhaitée en appuyant de façon répétée sur le bouton ▲ ou ▼.
Mélodie/Divertissement/Mode éco. Préférence Configuration 1. Appuyez sur le bouton MENU pour afficher le menu. Appuyez sur le bouton ▲ ou ▼ pour sélectionner “Configuration”, puis appuyez sur le bouton ENTER . 2. Sélectionnez l’option désirée en appuyant sur le bouton ▲ ou ▼, puis appuyez sur le bouton ENTER . 3. Lorsque vous êtes satisfait du réglage, appuyez sur le bouto ENTER . 4. Appuyez sur le bouton EXIT pour quitter le menu.
Mise à jour du logiciel HDMI IN3 Pour garder le produit à jour avec les options Digital Television, les mises à jour logiciel sont régulièrement diffusées dans le signal télévision normal. Le téléviseur détecte automatiquement ces signaux et affiche le bandeau de mise à jour logiciel. Vous avez le choix d’installer ou non la mise à jour. 1. Insérez un lecteur USB contenant la mise à niveau du micrologiciel dans le Panneau latéral du téléviseur port SERVICE sur le côté du téléviseur. 3.
Visualisation de l’interface commune ➣ L’application “Insertion d’informations” concerne la CI CARD.Vous pouvez installer la CAM que le téléviseur soit allumé ou éteint. 1. Achetez le module CI CAM en vous rendant chez le revendeur le plus proche ou par téléphone. 2. Insérez la CI CARD dans la CAM dans la direction indiquée par la flèche jusqu’à ce qu’elle soit emboîtée. 3. Insérez la CAM avec la CI CARD installée dans la fente de l’interface commune.
Sélection de la source Entrée Permet de sélectionner le téléviseur ou d’autres sources d’entrée externes comme les lecteurs DVD ou les décodeurs câble/récepteurs satellite (boîtiers décodeurs) connectés au téléviseur. Permet de sélectionner la source d’entrée de votre choix. 1. Appuyez sur le bouton MENU pour afficher le menu. Appuyez sur le bouton ▲ ou ▼ pour sélectionner “Entrée”, puis appuyez sur le bouton ENTER . 2. Appuyez sur le bouton ENTER pour sélectionner “Liste Source”.
Ecran du PC Utilisation de votre télévision comme écran PC Configuration de votre logiciel PC (basée sur Windows XP) Les paramètres d’affichage Windows indiqués ci-dessous sont ceux d’un ordinateur type. Les écrans réels de votre PC peuvent être différents, en fonction de votre propre version de Windows et de votre propre carte vidéo. Même si vos écrans réels apparaissent différents, les mêmes informations de base s’appliquent dans la plupart des cas.
Configuration du téléviseur avec le PC Image ➣ Appuyez sur le bouton SOURCE pour sélectionner le mode PC. 1. Appuyez sur le bouton MENU pour afficher le menu. Appuyez sur le bouton ▲ ou ▼ pour sélectionner “Image”, puis appuyez sur le bouton ENTER . 2. Sélectionnez l’option de votre choix en appuyant sur le bouton ▲ ou ▼, puis appuyez sur le bouton ENTER . 3. Lorsque vous êtes satisfait du réglage, appuyez sur le bouto ENTER . 4. Appuyez sur le bouton EXIT pour quitter le menu.
Annexe qu’est-ce que Anynet+? Anynet+ est une fonction qui vous permet de contrôler tous les appareils Samsung connectés compatibles Anynet+ avec votre télécommande Samsung. Connexion d’appareils Anynet+ Le système Anynet+ peut être utilisé uniquement avec les appareils Samsung disposant de la fonction Anynet+. Afin de vérifier que votre appareil Samsung dispose de cette fonction, assurez-vous qu’il comporte le logo Anynet+.
Configuration d’Anynet+ Les fonctions d’Anynet+ emploient les réglages suivants. Pour utiliser la fonction Anynet+, l’option Anynet+ (HDMI-CEC) doit être activée (Marche) Application 1. Appuyez sur le bouton MENU. Appuyez sur le bouton ▲ ou ▼ pour sélectionner “Application”, puis appuyez sur le bouton ENTER . 2. Appuyez sur le bouton ▲ ou ▼ pour sélectionner “Anynet+ (HDMI-CEC)”, puis appuyez sur le bouton ENTER . 3. Appuyez sur le bouton ENTER pour sélectionner “Anynet+ (HDMI-CEC)”. 4.
Menu Anynet+ Le menu Anynet+ varie selon le type et l’état des appareils Anynet+ connectés au téléviseur. Menu Anynet+ Voir télévision Liste d’appareils Enregistrer Menu du Périphérique Fonctionnement périph. Enr. Programmé Arrêter Enr. Récepteur Configuration Description Passe d’Anynet+ au mode de diffusion TV. Affiche la liste des appareils Anynet+. Démarre l’enregistrement (ce menu ne fonctionne qu’avec un appareil capable d’enregistrer). Affiche le menu de l’appareil connecté.
Ecoute via un récepteur (Home cinéma) Le son peut être émis par l’intermédiaire d’un récepteur au lieu de l’enceinte du téléviseur. Outils 1. Appuyez sur le bouton TOOLS. Liste d’appareils Appuyez sur le bouton ▲ ou ▼ pour sélectionner “Récepteur”. Enregistrer Enr. Programmé 2. Appuyez sur le bouton ◄ ou ► pour sélectionner “Marche”. Récepteur ◄ Arrêt ► Le son est désormais émis via le récepteur. Mode Image : Standard 3. Appuyez sur le bouton EXIT pour quitter.
Recommendations for UseConseils d’utilisation Fonction de télétexte La plupart des canaux de télévision proposent des services d’informations via le télétexte. La page d’index du télétexte contient des instructions sur l’utilisation de ce service. Vous pouvez en outre sélectionner différentes options à l’aide des boutons de la télécommande. ➣ Pour que l’affichage des informations de télétexte soit correct, la réception des chaînes doit être stable.
Les pages télétexte sont organisées en six catégories : Catégorie A B C D E F Sommaire Numéro de la page sélectionnée Identité du canal émetteur Numéro de la page actuelle ou indications de recherche Date et heure Texte Informations sur l’état Informations FASTEXT ➣ Les informations télétexte sont souvent réparties sur plusieurs pages qui s’affichent l’une après l’autre.
Mémorisation de la position 2. 3. 4. 5. Réglez à la position souhaitée à l’aide des boutons ▲, ▼, ◄, ►. ➣ Si vous appuyez sur une touche fléchée alors qu’aucun menu OSD n’est affiché sur l’écran du téléviseur, l’écran de réglage s’affiche. ➣ Appuyez sur le bouton INFO pour effectuer une réinitialisation. Appuyez sur le bouton ◄ ou ► pour sélectionner “Oui”, puis appuyez sur le bouton ENTER . La position est initialisée sur le réglage par défaut. Appuyez sur le bouton bleu.
Utilisation du verrouillage Kensington antivol (en fonction du modèle) Le verrouillage Kensington est un dispositif utilisé pour fixer physiquement le système dans le cas d’une utilisation dans un endroit public. L’aspect et la méthode de verrouillage peuvent différer de l’illustration en fonction du fabricant. Reportez-vous au manuel fourni avec le verrouillage Kensington pour une utilisation correcte. Le dispositif de verrouillage doit être acheté séparément.
경고 주의 Montage mural du téléviseur Attention: Si vous tirez, poussez ou grimpez sur le téléviseur, celui-ci peut tomber. Veillez, en particulier, à ce que vos 주의 enfants ne se pendent pas, ni ne déséquilibre le téléviseur. Ils pourraient le faire basculer et entraîner des blessures 경고 graves, voire la mort. Respectez toutes les précautions de sécurité indiquées dans la brochure relative à la sécurité. Pour une stabilité accrue, installez le dispositif anti-chute comme indiqué.
Dépannage : Avant de contacter le personnel du service d’assistance Aucune image ou aucun son. • • • • Vérifiez que le cordon d’alimentation est branché à une prise secteur. Vérifiez que vous avez appuyé sur le bouton de votre téléviseur. Vérifiez les paramètres de contraste et de luminosité. Vérifiez le volume. Image normale, mais aucun son. • Vérifiez le volume. • Vérifiez si le bouton MUTE de la télécommande a été actionné. • Vérifiez si le paramètre “TV Speaker” est défini sur Marche.
Spécifications techniques et environnementa Nom du modèle Taille de l’écr (diagonale) Résolution PC (Optimum) Son Sortie Dimensions (L x P x H) Corps Avec pied Poids avec support Considérations environnementales Température de fonctionnement Humidité au cours du fonctionnement Température de stockage Humidité sur le lieu de stockage Support pivotant (gauche/droite) Nom du modèle Taille de l’écr (diagonale) Résolution PC (Optimum) Son Sortie Dimensions (L x P x H) Corps Avec pied Poids avec support Considéra
Nom du modèle Taille de l’écr (diagonale) Résolution PC (Optimum) Son Sortie Dimensions (L x P x H) Corps Avec pied Poids avec support Considérations environnementales Température de fonctionnement Humidité au cours du fonctionnement Température de stockage Humidité sur le lieu de stockage Support pivotant (gauche/droite) Nom du modèle Taille de l’écr (diagonale) Résolution PC (Optimum) Son Sortie Dimensions (L x P x H) Corps Avec pied Poids avec support Considérations environnementales Température de fonct
Cette page est laissée intentionnellement en blanc. BN68-01424E-02Fre-0514.
Correct Disposal of This Product (Waste Electrical & Electronic Equipment) (Applicable in the European Union and other European countries with separate collection systems) This marking shown on the product or its literature, indicates that it should not be disposed with other household wastes at the end of its working life.