Contact SAMSUNG WORLDWIDE If you have any questions or comments relating to Samsung products, please contact the SAMSUNG customer care centre. Country Customer Care Centre Web Site AUSTRIA 0810 - SAMSUNG (7267864, € 0.07/min) www.samsung.com/at 02 201 2418 www.samsung.com/be www.samsung.com/be_fr 800 - SAMSUNG (800-726786) www.samsung.com/cz BELGIUM CZECH REPUBLIC Distributor pro Českou republiku: Samsung Zrt.
❑ Digital TV (DVB-T) Notice 1. Functionalities related to Digital TV(DVB) are only available in countries/areas where DVB-T (MPEG2 and MPEG4 AVC) digital terrestrial signals are broadcasted or where you are able to access to a compatible DVB-C(MPEG2 and MPEG4 AAC) cableTV service. Please check with your local dealer the possibility to receive DVB-T or DVB-C signal. 2.
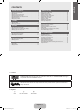
Media Play (USB) Setting up Your TV ■ Viewing the Control Panel.................................................................. 2 ■ Accessories........................................................................................ 3 ■ Viewing the Connection Panel............................................................ 4 ■ Viewing the Remote Control............................................................... 6 ■ Installing Batteries in the Remote Control..........................................
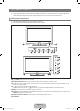
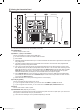
Setting up Your TV N Figures and illustrations in this User Manual are provided for reference only and may differ from actual product appearance. Product design and specifications may be changed without notice in order to enhance product performance. ¦ Viewing the Control Panel N The product colour and shape may vary depending on the model. N The front panel buttons can be activated by touching it with your finger. 8 8 7 6 5 4 3 2 1 6 5 4 3 2 1 8 78 1 P (POWER): Press to turn the TV on and off.
¦ Accessories Remote Control & Batteries (AAA x 2) Warranty Card / Safety Guide (Not available in all locations) Power Cord Stand Screw (M4 X L16) (Depending on the model) Cover-Bottom Cleaning Cloth Holder-Wire Cable (Depending on the model) N Please make sure the following items are included with your LCD TV. If any items are missing, contact your dealer. N The items colour and shape may vary depending on the model. English - BN68-01962K-Eng.
¦ Viewing the Connection Panel [TV Side Panel] 1 2 34 [TV Rear Panel] # 2 @ ! 0 9 8 7 6 5 Power Input N The product colour and shape may vary depending on the model. 1 COMPONENT IN Connects Component video / audio. 2 HDMI IN 1, 2, 3(DVI), 4 / DVI AUDIO IN Connects to the HDMI jack of a device with an HDMI output. N No sound connection is needed for an HDMI to HDMI connection.
6 H(HEADPHONE) Headphone may be connected to the headphone output on your set. While the head phone is connected, the sound from the built-in speakers will be disabled. N Using the sound function is restricted when connecting headphones to the TV. N Prolonged use of headphones at a high volume may damage your hearing. N You will not hear sound from the speakers when you connect headphones to the TV. N The headphone volume and TV volume are adjusted separately.
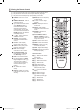
¦ Viewing the Remote Control N You can use the remote control up to a distance of about 23 feet from the TV. N The performance of the remote control may be affected by bright light. N The product colour and shape may vary depending on the model. 1 POWER : Turns the TV on and off. % MUTE M : Press to temporarily cut off the sound. 2 NUMERIC BUTTONS : Press to change the channel. ^ > P < : Press to change channels. 3 E : Performs the same function as the ENTERE button of the directional buttons.
¦ Installing Batteries in the Remote Control 1. Lift the cover at the back of the remote control upward as shown in the figure. 2. Install two AAA size batteries. N Make sure to match the ‘+’ and ‘–’ ends of the batteries with the diagram inside the compartment. 3. Replace the cover. N Remove the batteries and store them in a cool, dry place if you won’t be using the remote control for a long time.
¦ Plug & Play Feature When the TV is initially powered on, basic settings proceed automatically and subsequently. 1. Press the POWER button on the remote control. N You can also use the POWERP button on the TV. N The message Select Language of the OSD. is displayed. 2. Press the ENTERE button. Select the appropriate language by pressing the ▲ or ▼ button. Press the ENTERE button to confirm your choice. Plug & Play 3. Press the ◄ or ► button to select Store Demo or Home Use, then the ENTERE button.
CHANNEL ¦ Channel Menu ❑ Country ■ Analogue Channel You can change the country for analogue channels. Channel ■ Digital Channel You can change the country for digital channels. N The PIN number input screen appears. Enter your 4 digit PIN number. Country Auto Store Manual Store Cable Search Option Full Guide Mini Guide Default Guide Channel List ▶ : Full Guide ❑ Auto Store You can scan for the frequency ranges available to you (and availability depends on your country).
● ● Channel (When you know the number of the channel to be stored): Press the ▲ or ▼ button to select C (Air channel) or S (Cable channel). Press the ► button, then press the ▲, ▼ or number (0~9) buttons to select the required number. N You can also select the channel number directly by pressing the number (0~9) buttons. N If there is abnormal sound or no sound, reselect the sound standard required. N Search (When you do not know the channel numbers): Press the ▲ or ▼ button to start the search.
❑ Fine Tune If the reception is clear, you do not have to fine tune the channel, as this is done automatically during the search and store operation. If the signal is weak or distorted, you may have to fine tune the channel manually. N Fine tuned channels that have been saved are marked with an asterisk “*” on the right-hand side of the channel number in the channel banner. N To reset the fine-tuning, select Reset by pressing the ▲ or ▼ button and then press the ENTERE button.
¦ Managing Channels Using this menu, you can add / delete or set favourites channels and use the programme guide for digital broadcasts. All Channels Shows all currently available channels. ■ Added Channels Shows all added channels. ■ ■ Added Channels ■ 824 UKTV Gold 825 UKTV style A 1 C -A 2 C -A 3 C -A 4 C -- A 5 C -- Favourites Shows all favourite channels. O To select the favourites channels you have set up, press the FAV.
■ Timer Viewing If you reserve a programme you want to watch, the channel is automatically switched to the reserved channel in the Channel List; even when you are watching another channel. To reserve a programme, set the current time first. N Only memorized channels can be reserved. N You can set the channel, day, month, year, hour and minute directly by pressing the number buttons on the remote control. N Reserving a programme will be shown in the Programmed menu.
PICTURE ¦ Configuring the Picture Menu ❑ Mode ■ Dynamic Selects the picture for increased definition in a bright room. ■ Standard Selects the picture for the optimum display in a normal environment. ■ Natural Selects the picture for an optimum and eye-comfortable display. ■ Movie Selects the picture for viewing movies in a dark room. ❑ Backlight / Contrast / Brightness / Sharpness / Colour / Tint(G/R) Picture You can select the type of picture which best corresponds to your viewing requirements.
■ Colour Space Colour space is a colour matrix composed of red, green and blue colours. Select your favourites colour space to experience the most natural colour. ● Auto: Auto Colour Space automatically adjusts to the most natural colour tone based on program sources. ● Native: Native Colour Space offers deep and rich colour tone. ● Custom: Adjusts the colour range to suit your preference. N Changing the adjustment value will refresh the adjusted screen.
❑ Picture Options N In PC mode, you can only make changes to the Colour Tone and Size from among the items in Picture Options. ■ Colour Tone → Cool / Normal / Warm1 / Warm2 / Warm3 N Warm1, Warm2 or Warm3 is only activated when the picture mode is Movie. N Settings can be adjusted and stored for each external device you have connected to an input of the TV.
■ Film Mode → Off / Auto1 / Auto2 The TV can be set to automatically sense and process film signals from all sources and adjust the picture for optimum quality. N Film Mode is supported in TV, AV, COMPONENT(480i / 1080i) and HDMI(480i / 1080i). ● Off: Turn the Film Mode function off. ● Auto1: Automatically adjusts the picture for the best quality when watching a film. ● Auto2: Automatically optimizes the video text on the screen (not including closed captions) when watching a film.
¦ Using Your TV as a Computer (PC) Display Setting Up Your PC Software (Based on Windows XP) The Windows display-settings for a typical computer are shown below. The actual screens on your PC will probably be different, depending upon your particular version of Windows and your particular video card. However, even if your actual screens look different, the same basic set-up information will apply in almost all cases. (If not, contact your computer manufacturer or Samsung Dealer.) 1.
¦ Setting up the TV with your PC N Preset: Press the SOURCE button to select PC mode. ❑ Auto Adjustment Brightness Sharpness Picture Use the Auto Adjust function to have the TV automatically adjust the video signals it receives. The function also automatically fine-tunes the settings and adjusts the frequency values and positions. T Press the TOOLS button to display the Tools menu. You can also set the Auto Adjustment by selecting Tools → Auto Adjustment. N This function does not work in DVI-HDMI mode.
SOUND ¦ Configuring the Sound Menu ❑ Mode → Standard / Music / Movie / Clear Voice / Custom Sound T Press the TOOLS button to display the Tools menu. You can also set the sound mode by selecting Tools → Sound Mode. ● Standard: Selects the normal sound mode. ● Music: Emphasizes music over voices. ● Movie: Provides the best sound for movies. ● Clear Voice: Emphasizes voice over other sounds. ● Custom: Recalls your customized sound settings.
❑ Speaker Select When you watch TV with it connecting to a Home theatre, turn the TV speakers off so you can listen to sound from the Home theatre’s (external) speakers. ● External Speaker: Used to listen to the sound of the External (Home Theatre) Speakers. ● TV Speaker: Used to listen to the sound of the TV Speakers. N The volume and MUTE buttons do not operate when the Speaker Select is set to External Speaker.
SETUP ¦ Configuring the Setup Menu ❑ Language Plug & Play Setup You can set the menu language. ❑ Time For detailed procedures on setting up options, refer to the ‘Setting the Time’ instructions. ❑ Game Mode → Off / On Language Time Game Mode Child Lock Change PIN Parental Lock Subtitle Teletext Language : English ▶ : Off : On When connecting to a game console such as PlayStation™ or Xbox™, you can enjoy a more realistic gaming experience by selecting game menu.
❑ Subtitle You can activate and deactivate the subtitles. Use this menu to set the Subtitle Mode. Normal under the menu is the basic subtitle and Hard of hearing is the subtitle for a hearing-impaired person. ■ Subtitle → Off / On Switches subtitles on or off. ■ Mode → Normal / Hard of hearing Sets the subtitle mode. ■ Subtitle Language Set the subtitle language.
❑ Common Interface ■ CI Menu This enables the user to select from the CAM-provided menu. Select the CI Menu based on the menu PC Card. ■ Application Info. This contains information on CAM inserted in the CI slot and displays it. The Application Info inserting is about the CI CARD. You can install the CAM anytime whether the TV is ON or OFF. 1. Purchase the CI CAM module by visiting your nearest dealer or by phone. 2. Insert the CI CARD into the CAM in the direction of the arrow until it fits. 3.
■ Volume Set the desired volume level. ■ Source → TV / USB You can select the TV or USB device content to be played when the TV turns on automatically. Select TV or USB. (Make sure that an USB device is connected to your TV.) N When there is only one photo file in the USB, the Slide Show will not play. ■ Antenna (when Source is set to TV) Select ATV or DTV. ■ Channel (when Source is set to TV) Select the desired channel.
INPuT / SuPPorT ¦ Input Menu ❑ Source List ■ Input Use to select TV or other external input sources such as DVD / Blu-ray players / Cable Box / Satellite receivers (Set-Top Box) connected to the TV. Use to select the input source of your choice. O Press the SourCE button on the remote control to view an external signal source. TV mode can be selected by pressing the TV button, number buttons (0~9), and the P < / > button on the remote control. Source List Edit Name TV / Ext.1 / Ext.
■ Signal Information (digital channels only) Unlike analogue channels, which can vary in reception quality from ‘snowy’ to clear, digital (HDTV) channels have either perfect reception quality or you will not receive them at all. So, unlike analogue channels, you cannot fine tune a digital channel. You can, however, adjust your antenna to improve the reception of available digital channels.
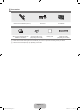
Media Play (USB) ¦ Connecting a USB Device 1. Press the POWER button to turn the TV on. TV Side Panel 2. Connect a USB device containing photo and/or music files to the USB jack on the side of the TV. 3. When the Application selection screen is displayed, press the ENTERE button to select Media Play (USB). USB Drive N MTP (Media Transfer Protocol) is not supported. N The file system supports FAT16, FAT32 and NTFS. N Certain types of USB Digital camera and audio devices may not be compatible with this TV.
¦ Media Play Function This function enables you to view and listen to photo and/or music files saved on a USB Mass Storage Class (MSC) device. Entering the Media Play (USB) Menu 1. Press the MENU button. Press the ▲ or ▼ button to select Application, then press the ENTERE button. SUM 851.86MB/993.02MB Free PHOTO 2. Press the ▲ or ▼ button to select Media Play (USB), then press the ENTERE button. N The Media Play (USB) menu is displayed. Photo Music Setup R Return Device SUM O Press the MEDIA.
1 View Groups: The sort group where the currently selected file is contained is highlighted. 2 Currently selected file: The selected file is the file you can now control. Photo file are displayed as thumbnail images. 3 Current Device: Shows the currently selected device name. Press the Red button to select a device. Red (Device) button: Selects a connected device. 4 Item Selection Information: Shows the number of files that are selected by pressing the Yellow button.
¦ Viewing a Photo or Slide Show Viewing a Slide Show 1. Press the ▼ button to select the File List Section. 1 2 5/15 2. Press the TOOLS button. 1231.jpg 3. Press the ▲ or ▼ button to select Slide Show, then press the ENTERE button. N All files in the photo list will be used for the Slide Show. 1232.jpg 1233.jpg Slide Show Play Current Group Information Remove Safely 1235.jpg 1234.jpg 1236.jpg 1237.jpg ..
● Alternatively 1. In the Photo List, press the Yellow buttons to select the desired photos. 2. Press the TOOLS button. 3. Press the ▲ or ▼ button to select Slide Show, then press the ENTERE button. N The selected files will be used for the Slide Show. ¦ Slide Show Option Menu 1. During a slide show (or when viewing a photo), press the TOOLS button to set the option. 2. Press the ▲ or ▼ button to select the desired option, then press the ENTERE button.
¦ Music List Option Menu 1. Press the MEDIA.P button. 2. Press the ◄ or ► button to select Music, then press the ENTERE button. 4 3. Press the ▲ button to move to the File List Section. 4. Press the ◄ or ► button to select the desired Music file. N Selecting Multiple Music Files Press the ◄ or ► button to select the desired music file. Then press the Yellow button. Repeat the above operation to select multiple music files. The mark c appears to the selected music file.
¦ Playing a Music Playing a music file 1. Press the ▼ button to select the File List Section. ▶ 00:00:04 / 00:04:04 3/37 2. Press the ◄ or ► button to select a music file to be played. Way I Love You HaHaHa 3. Press the ∂ (Play)/ENTERE button. N This menu only shows files with the MP3 file extension. Files with other file extensions are not displayed, even if they are saved on the same USB device.
¦ Music Play option Menu Music Play Option Menu Tools ❑ Repeat Mode → On / Off Repeat Mode ◀ On ▶ Picture Setting You can play music files repeatedly. Sound Setting Information Remove Safely ❑ Picture Setting / Sound Setting You can configure the picture and sound settings. U Move L Adjust e Exit ❑ Information The music file information is displayed. ❑ Remove Safely You can remove the device safely from the TV.
ANYNET+ ¦ Connecting Anynet+ Devices What is Anynet+? Anynet+ is a function that enables you to control all connected Samsung devices that support Anynet+ with your Samsung TV’s remote. The Anynet+ system can be used only with Samsung devices that have the Anynet+ feature. To be sure your Samsung device has this feature, check if there is an Anynet+ logo on it. To connect to a TV TV Anynet+ Device 1 HDMI 1.3 Cable Anynet+ Device 2 HDMI 1.3 Cable Anynet+ Device 3 HDMI 1.
¦ Setting Up Anynet+ Media Play (USB) Application T Press the TOOLS button to display the Tools menu. You can also display Anynet+ menu by selecting Tools → Anynet+ (HDMI-CEC). Anynet+ (HDMI-CEC) ❑ Setup ■ ■ Anynet+ (HDMI-CEC) → Off / On To use the Anynet+ Function, Anynet+ (HDMI-CEC) must be set to On. N When the Anynet+ (HDMI-CEC) function is disabled, all the Anynet+ related operations are deactivated.
TV Remote Control Buttons Available in Anynet+ Mode Device Type Operating Status Anynet+ Device After switching to the device, when the menu of the corresponding device is displayed on the screen.
¦ Troubleshooting for Anynet+ Problem Anynet+ does not work. ● Possible Solution Check if the device is an Anynet+ device. The Anynet+ system supports Anynet+ devices only. Connect only one receiver (home theatre). Check if the Anynet+ device power cord is properly connected. Check the Anynet+ device’s Video/Audio/HDMI 1.3 cable connections. Check whether Anynet+ (HDMI-CEC) is set to On in the Anynet+ setup menu. Check whether the TV remote control is in TV mode.
RECOMMENDATIONS ¦ Teletext Feature Most television stations provide written information services via Teletext. The index page of the Teletext service gives you information on how to use the service. In addition, you can select various options to suit your requirements by using the remote control buttons. N For Teletext information to be displayed correctly, channel reception must be stable. Otherwise, information may be missing or some pages may not be displayed.
The Teletext pages are organized according to six categories: Part A B C D E F Contents Selected page number. Broadcasting channel identity. Current page number or search indications. Date and time. Text. Status information. FASTEXT information.
¦ Disconnecting the Stand 1. Remove four screws from the back of the TV. 2. Separate the stand from the TV. N Two or more people should carry the TV. 3. Cover the bottom hole with the cover. ¦ Installing the Wall Mount Kit Wall mount items (sold separately) allow you to mount the TV on the wall. For detailed information on installing the wall mount, see the instructions provided with the Wall Mount items. Contact a technician for assistance when installing the wall mounted bracket.
¦ Securing the TV to the Wall Caution: Pulling, pushing, or climbing on the TV may cause the TV to fall. In particular, ensure your children do not hang over or destabilize the TV; doing so may cause the TV to tip over, causing serious injuries or death. Follow all safety precautions provided on the included Safety Flyer. For added stability, install the anti-fall device for safety purposes, as follows. ■ To avoid the TV from falling: 1. Put the screws into the clamps and firmly fasten them onto the wall.
¦ Troubleshooting: Before Contacting Service Personnel No sound or picture Check that the mains lead has been connected to a wall socket. Check that you have pressed the button on your set. Check the picture contrast and brightness settings. Check the volume. Normal picture but no sound Check the volume. Check whether the MUTEM button has been pressed on the remote control. Check the Speaker Select settings.
¦ Specifications Model Name Screen Size (Diagonal) PC Resolution (Optimum) Sound (Output) Dimensions (WxDxH) Body With stand Weight With Stand Environmental Considerations Operating Temperature Operating Humidity Storage Temperature Storage Humidity Stand Swivel (Left / Right) Model Name Screen Size (Diagonal) PC Resolution (Optimum) Sound (Output) Dimensions (WxDxH) Body With stand Weight With Stand Environmental Considerations Operating Temperature Operating Humidity Storage Temperature Storage Humidity S
● ● ● This product uses parts of the software from the Independent JPEG Group. This product uses parts of the software owned by the Freetype Project (www.freetype.org). This product uses some software programs which are distributed under the GPL/LGPL license. Accordingly, the following GPL and LGPL software source codes that have been used in this product can be provided after asking to vdswmanager@ samsung.com.
A “covered work” means either the unmodified Program or a work based on the Program. To “propagate” a work means to do anything with it that, without permission, would make you directly or secondarily liable for infringement under applicable copyright law, except executing it on a computer or modifying a private copy. Propagation includes copying, distribution (with or without modification), making available to the public, and in some countries other activities as well.
5. Conveying Modified Source Versions. You may convey a work based on the Program, or the modifications to produce it from the Program, in the form of source code under the terms of section 4, provided that you also meet all of these conditions: a) The work must carry prominent notices stating that you modified it, and giving a relevant date. b) The work must carry prominent notices stating that it is released under this License and any conditions added under section 7.
The requirement to provide Installation Information does not include a requirement to continue to provide support service, warranty, or updates for a work that has been modified or installed by the recipient, or for the User Product in which it has been modified or installed. Access to a network may be denied when the modification itself materially and adversely affects the operation of the network or violates the rules and protocols for communication across the network.
10. Automatic Licensing of Downstream Recipients. Each time you convey a covered work, the recipient automatically receives a license from the original licensors, to run, modify and propagate that work, subject to this License. You are not responsible for enforcing compliance by third parties with this License. An “entity transaction” is a transaction transferring control of an organization, or substantially all assets of one, or subdividing an organization, or merging organizations.
14. Revised Versions of this License. The Free Software Foundation may publish revised and/or new versions of the GNU General Public License from time to time. Such new versions will be similar in spirit to the present version, but may differ in detail to address new problems or concerns. Each version is given a distinguishing version number.
¦ GNU Lesser General Public License (LGPL) Version 3, 29 June 2007 Copyright (C) 2007 Free Software Foundation, Inc. Everyone is permitted to copy and distribute verbatim copies of this license document, but changing it is not allowed. Preamble The GNU General Public License is a free, copyleft license for software and other kinds of works. The licenses for most software and other practical works are designed to take away your freedom to share and change the works.
1. Source Code. The “source code” for a work means the preferred form of the work for making modifications to it. “Object code” means any non-source form of a work. A “Standard Interface” means an interface that either is an official standard defined by a recognized standards body, or, in the case of interfaces specified for a particular programming language, one that is widely used among developers working in that language.
A compilation of a covered work with other separate and independent works, which are not by their nature extensions of the covered work, and which are not combined with it such as to form a larger program, in or on a volume of a storage or distribution medium, is called an “aggregate” if the compilation and its resulting copyright are not used to limit the access or legal rights of the compilation’s users beyond what the individual works permit.
When you convey a copy of a covered work, you may at your option remove any additional permissions from that copy, or from any part of it. (Additional permissions may be written to require their own removal in certain cases when you modify the work.) You may place additional permissions on material, added by you to a covered work, for which you have or can give appropriate copyright permission.
11. Patents. A “contributor” is a copyright holder who authorizes use under this License of the Program or a work on which the Program is based. The work thus licensed is called the contributor’s “contributor version”.
15. Disclaimer of Warranty. THERE IS NO WARRANTY FOR THE PROGRAM, TO THE EXTENT PERMITTED BY APPLICABLE LAW. EXCEPT WHEN OTHERWISE STATED IN WRITING THE COPYRIGHT HOLDERS AND/OR OTHER PARTIES PROVIDE THE PROGRAM “AS IS” WITHOUT WARRANTY OF ANY KIND, EITHER EXPRESSED OR IMPLIED, INCLUDING, BUT NOT LIMITED TO, THE IMPLIED WARRANTIES OF MERCHANTABILITY AND FITNESS FOR A PARTICULAR PURPOSE. THE ENTIRE RISK AS TO THE QUALITY AND PERFORMANCE OF THE PROGRAM IS WITH YOU.
¦ LICENSE ISSUES The OpenSSL toolkit stays under a dual license, i.e. both the conditions of the OpenSSL License and the original SSLeay license apply to the toolkit. See below for the actual license texts. Actually both licenses are BSD-style Open Source licenses. In case of any license issues related to OpenSSL please contact openssl-core@openssl.org. OpenSSL License Copyright (c) 1998-2007 The OpenSSL Project. All rights reserved.
❑ Hinweis zu Digitalfernsehgeräten (DVB-T) 1. Die Funktionalitäten für Digital TV (DVB) stehen nur in Ländern/Regionen zur Verfügung, in denen digitale terrestrische DVBT-Signale (MPEG2 und MPEG4 AVC) gesendet werden oder in denen Sie Zugang zu einem kompatiblen Kabelfernsehdienst mit DVB-C (MPEG2 und MPEG4 AAC) haben. Fragen Sie Ihren örtlichen Händler, wenn Sie Informationen über die Verfügbarkeit von DVB-T oder DVB-C in Ihrer Gegend benötigen. 2.
❑ Hinweis zu Digitalfernsehgeräten (DVB-T) 1. Die Funktionalitäten für Digital TV (DVB) stehen nur in Ländern/Regionen zur Verfügung, in denen digitale terrestrische DVBT-Signale (MPEG2 und MPEG4 AVC) gesendet werden oder in denen Sie Zugang zu einem kompatiblen Kabelfernsehdienst mit DVB-C (MPEG2 und MPEG4 AAC) haben. Fragen Sie Ihren örtlichen Händler, wenn Sie Informationen über die Verfügbarkeit von DVB-T oder DVB-C in Ihrer Gegend benötigen. 2.
Inhalt Medienwiedergabe (USB) Einrichten Ihres Fernsehgeräts ■ Bedienfeld........................................................................................... 2 ■ Zubehör.............................................................................................. 3 ■ Anschlussfeld..................................................................................... 4 ■ Fernbedienung...................................................................................
Einrichten Ihres Fernsehgeräts N Die Abbildungen und Illustrationen in diesem Handbuch dienen nur zur Information und können vom tatsächlichen Aussehen des Geräts abweichen. Technische Änderungen und Änderungen am Design des Geräts, insbesondere zur Verbesserung der Leistungsfähigkeit des Geräts, sind jederzeit vorbehalten. ¦ Bedienfeld N Form und Farbe des Geräts können sich je nach Modell unterscheiden. N Die Tasten auf der Frontblende können Sie durch Berühren mit einem Finger bedienen.
¦ Zubehör Fernbedienung und 2 Batterien (Typ AAA) Garantiekarte / Sicherheitshinweise (nicht überall verfügbar) Netzkabel Schraube für Standfuß (M4 X L16) (je nach Modell) Untere Abdeckung Reinigungstuch Kabelschlauch (je nach Modell) N Überprüfen Sie die Verpackung Ihres LCD-Fernsehgeräts auf Vollständigkeit. Falls Komponenten fehlen sollten, setzen Sie sich bitte mit Ihrem Händler in Verbindung. N Die Farbe und die Form der Teile kann je nach Modell unterschiedlich sein.
¦ Anschlussfeld [Seitenverkleidung des Fernsehgeräts] [Rückseite des Fernsehgeräts] 1 2 34 # 2 @ ! 0 9 8 7 6 5 Netzanschluss N Form und Farbe des Geräts können sich je nach Modell unterscheiden. 1 COMPONENT IN Zum Anschließen mit Component-Video / -Audio. 2 HDMI IN 1, 2, 3(DVI), 4 / DVI AUDIO IN Zum Anschließen an die HDMI-Buchse von Geräten mit HDMI-Ausgang. N Beim Anschluss von Geräten über HDMI-Schnittstelle ist keine zusätzliche Audioverbindung erforderlich.
6 H(KOPFHÖRER) Kopfhörer können an den Kopfhörerausgang des Geräts angeschlossen werden. Wenn Kopfhörer angeschlossen sind, ist die Tonwiedergabe über die eingebauten Lautsprecher abgeschaltet. N Wenn Sie Kopfhörer an das Fernsehgerät anschließen, sind die Möglichkeiten zur Nutzung der Tonfunktion eingeschränkt. N Das Verwenden von Kopfhörern bei hoher Lautstärke über einen längeren Zeitraum kann zu Hörschäden führen.
¦ Fernbedienung N Die Reichweite der Fernbedienung beträgt ca. 7 m. N Die Leistungsfähigkeit der Fernbedienung kann durch starke Lichteinstrahlung beeinträchtigt werden. N Form und Farbe des Geräts können sich je nach Modell unterscheiden. 1 POWER: Ein- und Ausschalten des Fernsehgeräts. 2 ZIFFERNTASTEN: Hiermit wechseln Sie den Kanal. 3 E : Die Funktion dieser Taste entspricht der Taste ENTERE bei den Navigationstasten.
¦ Batterien in die Fernbedienung einsetzen 1. Heben Sie die Abdeckung auf der Rückseite der Fernbedienung an, wie in der Abbildung dargestellt. 2. Legen Sie zwei AAA-Batterien ein. N Achten Sie darauf, dass die Pole der Batterien wie im Batteriefach angezeigt ausgerichtet sind. 3. Schieben Sie die Abdeckung wieder auf die Fernbedienung. N Wenn die Fernbedienung für einen längeren Zeitraum nicht verwendet wird, nehmen Sie die Batterien heraus, und lagern Sie sie an einem kühlen, trockenen Ort.
¦ Plug & Play-Funktion Wenn das Fernsehgerät zum ersten Mal eingeschaltet wird, werden automatisch die Grundeinstellungen vorgenommen. 1. Drücken Sie die Taste POWER auf der Fernbedienung. N Sie können auch die Netztaste (POWERP) des Fernsehgeräts verwenden. N Die Meldung Select the OSD Language. wird angezeigt. 2. Drücken Sie die Taste ENTERE. Wählen Sie die gewünschte Sprache mit den Tasten ▲ oder ▼ aus. Drücken Sie die Taste ENTERE, um Ihre Auswahl zu bestätigen. Plug & Play 3.
Kanal ¦ Kanalmenü ❑ Land ■ Kanal ■ Analog Sender Sie können das Land für Analogsender ändern. Digitaler Sender Sie können das Land für Digitalsender ändern. N Der Eingabebildschirm für die PIN wird geöffnet. Geben Sie nun Ihre vierstellige PIN ein. Land ▶ Autom. speichern Sender manuell speichern Suchoptionen für Kabel Ausführlich Übersicht Standard : Ausführlich Senderliste ❑ Autom.
● ● Kanal (Wenn Ihnen die Nummer des zu speichernden Senders bekannt ist) Wählen Sie durch Drücken der Tasten ▲ oder ▼ die Option C (terrestrischer Kanal) oder S (Kabelkanal). Drücken Sie zuerst die Taste ► und dann die Tasten ▲, ▼ oder eine Zifferntaste (0 - 9) , um die gewünschte Nummer auszuwählen. N Die Kanalnummer können Sie auch direkt durch Drücken der Zifferntasten (0 - 9) auswählen. N Falls kein oder nur schlechter Ton zu hören sein sollte, wählen Sie einen anderen Audiostandard aus.
❑ Feinabstimmung Bei klarem Empfang ist keine Feinabstimmung nötig, da diese automatisch während der Sendersuche erfolgt. Falls das Signal jedoch schwach oder das Bild verzerrt ist, müssen Sie unter Umständen eine manuelle Feinabstimmung durchführen. N Gespeicherte feinabgestimmte Kanäle werden mit einem Sternchen „*“ auf der rechten Seite der Kanalnummer im KanalBanner markiert.
¦ Verwalten von Kanälen Mit diesem Menübefehl können Sie Favoriten hinzufügen, löschen oder einstellen und den digitalen Programmführer für Digitalsendungen verwenden. ■ Hinzugefügte Sender ■ Alle Sender Hiermit zeigen Sie alle verfügbaren Kanäle an. Hinzugefügte Sender Hiermit zeigen Sie alle hinzugefügten Kanäle an.
■ Sperren / Freigabe Sie können einen Kanal sperren, sodass er nicht ausgewählt und angezeigt werden kann. N Diese Funktion ist nur verfügbar, wenn die Kindersicherung aktiviert ist Ein. N Der Eingabebildschirm für die PIN wird geöffnet. Geben Sie nun Ihre vierstellige PIN ein. N Der Standard-PIN-Code eines neuen Fernsehgeräts lautet 0000. Sie können die PIN ändern, indem Sie im Menü den Befehl PIN ändern wählen. N Das Symbol \ wird angezeigt, und der Kanal wird gesperrt.
Bild ¦ Konfigurieren des Bildmenüs ❑ Modus Bild Sie können den Bildstandard auswählen, der für Ihre Sehgewohnheiten am besten geeignet ist. T Drücken Sie die Taste TOOLS, um das Menü Extras anzuzeigen. Sie können den Bildmodus durch Auswahl von Extras → Bildmodus einstellen. Modus : Standard Hinter.
■ Farbraum Der Farbraum ist eine Farbmatrix bestehend aus den Farben Rot, Grün und Blau. Wählen Sie Ihren bevorzugten Farbraum, um die Welt in den natürlichsten Farben zu erfahren. ● Auto: Bei automatischer Einstellung des Farbraums wird, je nach Programmquelle, der natürlichste Farbton eingestellt. ● Nativ: Der native Farbraum ermöglicht tiefe und lebhafte Farbtöne. ● Benutzerd.: Hiermit stellen Sie den Farbbereich wunschgemäß ein.
❑ Bildoptionen N Im PC-Modus können von den Bildoptionen nur Farbtemp. und Größe eingestellt werden. ■ Farbtemp. → Kalt / Normal / Warm1 / Warm2 / Warm3 N Warm1, Warm2 oder Warm3 nur aktiviert, wenn der Bildmodus auf Film eingestellt ist. N Sie können die Einstellungen für jedes externe Gerät festlegen und speichern, das Sie an einen Eingang des Fernsehgeräts angeschlossen haben. Bildoptionen Farbtemp. : Normal Größe : Auto Breit Bildschirmmodus : 16:9 Digitale RM : Auto HDMI-Schwarzp.
■ Filmmodus → Aus / Auto1 / Auto2 Sie können das Fernsehgerät so einstellen, dass eine Filmsignal aus allen Quellen automatisch empfangen und verarbeitet und das Bild auf die optimale Qualität eingestellt werden kann. N Filmmodus wird bei TV, AV, COMPONENT(480i / 1080i) und HDMI(480i / 1080i). unterstützt. ● Aus: Deaktiviert den Filmmodus. ● Auto1: Hiermit wird das Bild bei Filmanzeige automatisch auf die beste Qualität eingestellt.
¦ Verwenden Ihres Computers als Computerbildschirm (PC) Konfigurieren Ihrer PC-Software (unter Windows XP) Im Folgenden sind die typischen Anzeigeeinstellungen für einen Windows-Computer aufgeführt. Die von Ihrem PC angezeigten Fenster entsprechen je nach installierter WindowsVersion und verwendeter Grafikkarte möglicherweise nicht genau der Abbildung. Dennoch sind die hier nachfolgenden grundlegenden Konfigurationsinformationen in fast allen Fällen anwendbar.
¦ Fernsehgerät mithilfe des PCs einstellen N Voreinstellung: Drücken Sie die Taste SOURCE, um den Modus PC einzustellen. ❑ Autom. Einstellung Helligkeit Schärfe Bild Verwenden Sie die Funktion zum automatischen Einstellen, damit sich das Fernsehgerät automatisch auf das empfangene Videosignal einstellt. Bei dieser Funktion erfolgt auch automatisch eine Feineinstellung sowie die Anpassung der Frequenzwerte und Positionen. T Drücken Sie die Taste TOOLS, um das Menü Extras anzuzeigen.
Ton ¦ Konfigurieren des Tonmenüs ❑ Modus → Standard / Musik / Film / Sprache / Benutzerd. Ton T Drücken Sie die Taste TOOLS, um das Menü Extras anzuzeigen. Sie können den Tonmodus durch Auswahl von Extras → Tonmodus konfigurieren. ● Standard: Auswahl des normalen Tonmodus. ● Musik: Betont die Musik im Verhältnis zu Stimmen. ● Film: Ermöglicht optimale Tonwiedergabe für Filme. ● Sprache: Betont Stimmen im Verhältnis zu anderen Tönen. ● Benutzerd.: Abrufen ihrer benutzerdefinierten Toneinstellungen.
❑ Lautsprecherauswahl Wenn Sie fernsehen, während das Gerät an ein Heimkinosystem angeschlossen ist, schalten Sie die Fernsehlautsprecher aus, damit Sie nur den Ton der (externen) Lautsprecher des Heinkinosystems hören. ● Ext. Lautsprecher: Tonwiedergabe über die externen Lautsprecher (Heimkinosystem). ● TV-Lautsprecher: Verwenden Sie diese Option, um den Ton über die Fernsehlautsprecher wiederzugeben. N Die Lautstärketasten und MUTE sind deaktiviert, wenn Lautsprecherauswahl auf Ext.
EINSTELLUNGEN ¦ Konfigurieren der Menüeinstellungen ❑ Sprache Sie können die Menüsprache festlegen. Plug & Play Genaue Beschreibungen für die Verfahren zum Einstellen der Optionen finden Sie im Kapitel "Einstellen der Uhrzeit".
❑ Untertitel Sie können Untertitel aktivieren und deaktivieren. Mit diesem Menü legen Sie den Untertitelmodus fest. Die Menüoption Normal ist die Grundeinstellung für Untertitel, und die Option Schwerhörig ist für hörgeschädigte Personen bestimmt. ■ Untertitel → Aus / Ein Untertitel aktivieren oder deaktivieren. ■ Modus → Normal / Schwerhörig Hiermit können Sie den Modus der Untertitelfunktion einstellen. ■ Untertitelsprache Hiermit können Sie die Untertitelsprache festlegen.
❑ Common Interface ■ CI-Menü Hiermit kann der Benutzer seine Auswahl in dem vom CAM-Modul bereitgestellten Menü treffen. Wählen Sie das CI-Menü ausgehend vom Menü "PC Card" (PC-Karte). ■ Anwendungsinformationen Die folgenden Erklärungen gelten für den Fall, dass ein CAM-Modul in den CI-Schlitz gesteckt ist und angezeigt wird. In den Anwendungsinformationen wird die CI-Karte beschrieben. Sie können das CAM-Modul unabhängig davon anschließen, ob das Fernsehgerät angeschaltet ist oder nicht. 1.
■ Lautst. Stellen Sie die gewünschte Lautstärke ein. ■ Quelle → TV / USB Sie können den Inhalt vom TV oder USB-Gerät einstellen, der beim Anschalten des Fernsehers automatisch wiedergegeben wird. Wählen Sie TV oder USB. (Stellen Sie sicher, dass ein USB-Gerät an das Fernsehgerät angeschlossen ist.) N Wenn auf dem USB-Gerät nur eine Fotodatei gespeichert ist, wird die Diashow nicht wiedergegeben. ■ TV-Empfang (wenn Quelle auf TV eingestellt ist) Wählen Sie ATV oder DTV.
SignALQUELLEn / SUPPorT ¦ Menü "Eingang" ❑ Quellen ■ Eingang Hiermit wählen Sie, ob das Fernsehgerät mit einem Fernsehsignal versorgt wird oder an andere externe Signaleingänge wie DVD- bzw. Blu-Ray-Player oder an einen Kabelreceiver / Satellitenreceiver (Set-Top Box) angeschlossen ist. Stellen Sie die gewünschte Signalquelle ein. O Drücken Sie die Taste SoUrcE auf der Fernbedienung, um eine externe Signalquelle anzuzeigen.
Im Gegensatz zu analogen Kanälen, deren Empfangsqualität von "verregnet" bis ungestört variieren kann, zeichnen sich digitale Kanäle (HDTV) dadurch aus, dass sie entweder perfekte Empfangsqualität bieten oder gar keinen Empfang ermöglichen. Deshalb können Sie anders als bei Analogkanälen keine Feinabstimmung vornehmen. Sie können aber Ihre Antenne so einstellen, dass der Empfang der verfügbaren Digitalkanäle besser wird.
Medienwiedergabe (USB) ¦ Anschließen eines USB-Geräts 1. Drücken Sie zum Einschalten des Computers die POWER-Taste. Seitenverkleidung des Fernsehgeräts 2. Schließen Sie ein USB-Gerät mit Foto-, Musik und/oder Filmdateien an die USB seitlich am Fernsehgerät an. 3. Wenn das Fenster zur Auswahl der Anwendung angezeigt wird, drücken Sie auf die Taste ENTERE, um Media Play (USB) zu wählen. USB-Laufwerk N MTP (Media Transfer Protocol) wird nicht unterstützt.
¦ Medienwiedergabefunktion Mit dieser Funktion können Sie auf einem USB-Speichermedium (MSC) gespeicherte Foto-, Musik und/oder Filmdateien anzeigen bzw. wiedergeben. Starten des Modus Media Play (USB). 1. Drücken Sie die Taste MENU. Wählen Sie durch Drücken der Tasten ▲ oder ▼ die Option Anwendung, und drücken Sie dann die Taste ENTERE. SUM 851,86 MB/993,02 MB Frei PHOTO 2. Wählen Sie durch Drücken der Tasten ▲ oder ▼ die Option Media Play (USB), und drücken Sie dann die Taste ENTERE .
1 Anzeigegruppen: Zeigt die detaillierten Dateigruppen sortiert nach dem gewählten Sortierschlüssel an. Die Sortiergruppe mit der ausgewählten Musikdatei wird hervorgehoben. 2 Ausgewählte Datei: Die gewählte Datei können Sie nun steuern. Foto- und Filmdateien werden als Miniaturbilder angezeigt. 3 Aktuelles Gerät: Zeigt den Namen des aktuell ausgewählten Geräts an. Wählen Sie mit der roten Taste ein Gerät. • Rote Taste (Gerät): Dient zur Auswahl eines angeschlossenen Geräts.
¦ Anzeigen eines Fotos oder einer Diashow Anzeigen von Diashows 1. Drücken die Taste ▼, um den Dateilistenabschnitt zu wählen. 2. Drücken Sie die Taste TOOLS. 3. Wählen Sie durch Drücken der Tasten ▲ oder ▼ die Option Diashow, und drücken Sie dann die Taste ENTERE . N Alle Dateien in der Fotoliste werden für die Diashow verwendet. 1 2 5/15 1231.jpg 1232.jpg 1233.jpg Diashow Gruppe abspielen Information Sicher entfernen 1235.jpg 1234.jpg 1236.jpg 1237.jpg ..
5. Drücken Sie die Taste ∂ (Wiedergabe)/ENTERE . N Die ausgewählten Dateien werden für die Diashow verwendet. ● Alternative 1. Wählen Sie die gewünschten Fotos mit der gelben Taste aus der Fotoliste aus. 2. Drücken Sie die Taste TOOLS. 3. Wählen Sie durch Drücken der Tasten ▲ oder ▼ die Option Diashow, und drücken Sie dann die Taste ENTERE . N Die ausgewählten Dateien werden für die Diashow verwendet. ¦ Menü der Optionen für Diashows 1.
¦ Menü der Optionen für Fotolisten 1. Drücken Sie die Taste MEDIA.P. 2. Wählen Sie durch Drücken der Tasten ◄ oder ► die Option Music, und drücken Sie dann die Taste ENTERE. 4 5 3. Drücken Sie die Taste ▼, um zum Abschnitt mit der Dateiliste zu wechseln. 4. Drücken Sie die Taste ◄ oder ►, um die gewünschte Musikdatei zu wählen. N Wählen mehrerer Musikdateien Wählen Sie mit den Tasten ◄ oder ► die gewünschte Musikdatei. Drücken Sie dann die gelbe Taste.
¦ Wiedergeben von Musik Wiedergeben einer Musikdatei 1. Drücken die Taste ▼, um den Dateilistenabschnitt zu wählen. 2. Drücken Sie die Taste ◄ oder ►, um eine Musikdatei zu wählen, die abgespielt werden soll. ▶ 00:00:04 / 00:04:04 3/37 Way I Love You HaHaHa 3. Drücken Sie die Taste ∂ (Wiedergabe)/ENTERE . N Dieses Menü zeigt nur Dateien mit der Dateinamenserweiterung MP3.
¦ Menü der Optionen für die Musikwiedergabe Menü der Optionen für die Musikwiedergabe Extras Wiederhol-M. ❑ Wiederhol-M. → Ein / Aus ◀ Ein ▶ Bildeinstellungen Toneinstellungen Sie können Musikdateien wiederholt abspielen. Information Sicher entfernen ❑ Bildeinstellungen / Toneinstellungen U Navig. L Einst. e Beenden Sie können die Bild- und Toneinstellungen konfigurieren. ❑ Information Die Informationen zur Musikdatei werden angezeigt.
AnYnET+ ¦ Anschließen von Anynet+ geräten was ist Anynet+? Bei Anynet+ handelt es sich um eine Funktion, mit der Sie alle angeschlossenen Samsung-Geräte, die Anynet+ unterstützen, mit der Fernbedienung für Ihr Samsung-Fernsehgerät steuern können. Das Anynet+-System unterstützt nur Anynet+-fähige SamsungGeräte. Wenn Sie wissen möchten, ob Ihr Samsung-Gerät diese Funktion unterstützt, suchen Sie das Anynet+ auf Ihrem Gerät. Anschließen an ein Fernsehgerät TV Anynet+ Gerät 1 HDMI 1.
¦ Einrichten von Anynet+ ❑ Einstellungen ■ ■ Anynet+ (HDMI-CEC) → Aus / Ein Damit Sie die Funktionen von Anynet+ nutzen können, muss Anynet+ (HDMI-CEC) aktiviert Ein sein. N Wenn die Funktion Anynet+ (HDMI-CEC) deaktiviert ist, sind auch alle Funktionen in Verbindung mit Anynet+ deaktiviert. Autom. Ausschalten → Nein / Ja Automatisches Abschalten von Anynet+-Geräten durch Abschalten des Fernsehgeräts N Damit Sie Anynet+ verwenden können, muss die Geräteauswahl der Fernbedienung auf TV eingestellt sein.
Im Anynet+-Modus verfügbare Tasten der TV-Fernbedienung Gerätetyp Betriebsstatus Anynet+-Gerät Nach dem Wechseln zum Gerät wird das Menü des entsprechenden Geräts auf dem Bildschirm angezeigt.
¦ Fehlerbehebung für Anynet+ Problem Anynet+ funktioniert nicht. ● ● ● ● ● ● ● ● ● Ich möchte Anynet+ starten. ● ● ● Ich möchte Anynet+ beenden. ● ● ● Die Meldung "Verbinden ● mit Anynet+-Gerät..." wird angezeigt. ● Keine Wiedergabe mit dem Anynet+-Gerät. Das angeschlossene Gerät wird nicht angezeigt. ● ● Prüfen Sie, ob das Gerät die Anynet+-Funktionen unterstützt. Prüfen Sie, ob das HDMI 1.3-Kabel ordnungsgemäß angeschlossen wurde.
RECOMMENDATIONS ¦ Videotextfunktion Die meisten Fernsehsender bieten über Videotext Informationen an. Auf der Videotext-Indexseite finden Sie Verwendungshinweise zum Videotext. Darüber hinaus können Sie über die Tasten der Fernbedienung nach Bedarf verschiedene Optionen einstellen. N Für die korrekte Anzeige von Videotextinformationen muss der Senderempfang einwandfrei sein. Andernfalls können Informationen unvollständig sein oder einige Seiten nicht angezeigt werden.
Die Videotextseiten sind in sechs Kategorien unterteilt: Sportergebnisse A B C D E F Inhalt Gewählte Seitennummer Senderkennung Aktuelle Seitenzahl oder Suchhinweise Datum und Uhrzeit Text Statusinformation FASTEXT-Informationen N Videotextinformationen sind oft auf mehrere, aufeinander folgende Seiten verteilt, die wie folgt aufgerufen werden können: Eingabe der Seitennummer Auswahl eines Titels in einer Liste Auswahl einer farbigen Überschrift (FASTEXT-System) N Das Fernsehgerät unterstützt Videot
¦ Lösen des Standfußes 1. Entfernen Sie die vier Schrauben von der Rückseite des Fernsehgerätes. 2. Lösen Sie den Standfuß vom Fernsehgerät. N Der Fernseher sollte von mindestens zwei Personen getragen werden. 3. Decken Sie die Aussparung an der Unterseite des Fernsehgeräts mit der Abdeckung ab. ¦ Anbringen der Wandhalterung Mit der separat erhältlichen Wandhalterung können Sie das Fernsehgerät an einer Wand befestigen.
¦ Befestigen des Fernsehgeräts an der wand Achtung: Das Fernsehgerät kann hinfallen, wenn Sie daran ziehen, es schieben oder darauf klettern. Stellen Sie insbesondere sicher, dass sich keine Kinder an das gerät hängen oder es aus dem gleichgewicht bringen. Anderenfalls könnte das gerät umkippen und schwere Verletzungen oder den Tod verursachen. Beachten Sie alle Anweisungen der beigefügten Sicherheitshinweise. noch mehr Stabilität erreichen Sie, wenn Sie den Kippschutz installieren.
¦ Fehlerbehebung: Vor der Kontaktaufnahme mit dem Kundendienst Kein Ton oder Bild Stellen Sie sicher, dass das Netzkabel an eine Steckdose angeschlossen ist. Stellen Sie sicher, dass Sie auf der Fernbedienung die Taste gedrückt haben. Überprüfen Sie die Einstellungen für Kontrast und Helligkeit. Überprüfen Sie die Lautstärke. Normales Bild, aber kein Ton Überprüfen Sie die Lautstärke. Überprüfen Sie, ob die Taste MUTEM auf der Fernbedienung gedrückt wurde.
Correct Disposal of This Product (Waste Electrical & Electronic Equipment) (Applicable in the European Union and other European countries with separate collection systems) This marking on the product, accessories or literature indicates that the product and its electronic accessories (e.g. charger, headset, USB cable) should not be disposed of with other household waste at the end of their working life.