Contact SAMSUNG WORLDWIDE If you have any questions or comments relating to Samsung products, please contact the SAMSUNG customer care centre. Country Customer Care Centre Web Site EIRE U.K 0818 717 100 0845 SAMSUNG (7267864) www.samsung.com/ie www.samsung.com/uk LCD TV user manual imagine the possibilities Thank you for purchasing this Samsung product. To receive more complete service, please register your product at www.samsung.com/register Model Serial No. BN68-01900J-00 BN68-01900J-Cover.
❑ Precautions When Displaying a Still Image A still image may cause permanent damage to the TV screen. ■ WARNINGS: Image retention, commonly known as screen burn-in, can occur on most types of television if the same image is displayed continuously. The most common causes of image retention are logos that remain stationary on the TV screen. These logos are common on many programmes received via a Setop Box.
Contents Setting up Your TV Media Play-DLNA ■ Viewing the Control Panel.................................................................. 2 ■ Accessories........................................................................................ 3 ■ Viewing the Connection Panel............................................................ 4 ■ Viewing the Remote Control............................................................... 6 ■ Installing Batteries in the Remote Control...................................
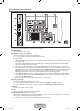
Setting up Your TV N Figures and illustrations in this User Manual are provided for reference only and may differ from actual product appearance. Product design and specifications may be changed without notice in order to enhance product performance. ¦ Viewing the Control Panel N The product colour and shape may vary depending on the model. N The front panel buttons can be activated by touching it with your finger.
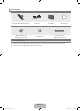
¦ Accessories Remote Control & Batteries (AAA x 2) Stand Screw (M4 X L16) (Depending on the model) ● Power Cord Programme CD Cover-Bottom Cleaning Cloth Holder-Wire Cable (Depending on the model) Owner's Instructions N Please make sure the following items are included with your LCD TV. If any items are missing, contact your dealer. N The items colour and shape may vary depending on the model. English - BN68-01900J-Eng-1.
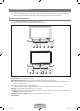
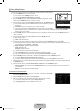
¦ Viewing the Connection Panel [TV Side Panel] [TV Rear Panel] 1 2 34 5 $ # 2 # @ ! 0 9 8 7 6 Power Input N The product colour and shape may vary depending on the model. 1 COMPONENT IN Connects Component video / audio. 2 HDMI IN 1, 2, 3(DVI), 4 / DVI AUDIO IN Connects to the HDMI jack of a device with an HDMI output. N No sound connection is needed for an HDMI to HDMI connection.
H(HEADPHONE) Headphone may be connected to the headphone output on your set. While the head phone is connected, the sound from the built-in speakers will be disabled. N Using the sound function is restricted when connecting headphones to the TV. N Prolonged use of headphones at a high volume may damage your hearing. N You will not hear sound from the speakers when you connect headphones to the TV. N The headphone volume and TV volume are adjusted separately.
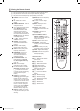
¦ Viewing the Remote Control N You can use the remote control up to a distance of about 23 feet from the TV. N The performance of the remote control may be affected by bright light. N The product colour and shape may vary depending on the model. 1 POWER : Turns the TV on and off. ^ MUTE M : Press to temporarily cut off the sound. 2 TV : Selects the TV mode directly. & > P < : Press to change channels. 1 3 NUMERIC BUTTONS : Press to change the channel. * MENU : Displays the main on-screen menu.
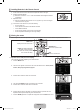
¦ Installing Batteries in the Remote Control 1. Lift the cover at the back of the remote control upward as shown in the figure. 2. Install two AAA size batteries. N Make sure to match the ‘+’ and ‘–’ ends of the batteries with the diagram inside the compartment. 3. Replace the cover. N Remove the batteries and store them in a cool, dry place if you won’t be using the remote control for a long time.
¦ Plug & Play Feature When the TV is initially powered on, basic settings proceed automatically and subsequently. 1. Press the POWER button on the remote control. N You can also use the POWERP button on the TV. N The message Select the OSD Language. is displayed. 2. Press the ENTERE button. Select the appropriate language by pressing the ▲ or ▼ button. Press the ENTERE button to confirm your choice. Plug & Play 3. Press the ◄ or ► button to select Store Demo or Home Use, then the ENTERE button.
CHANNEL ¦ Channel Menu ❑ Country ■ Analogue Channel You can change the country for analogue channels. Channel ■ Digital Channel You can change the country for digital channels. N The PIN number input screen appears. Enter your 4 digit PIN number. Country Auto Store Manual Store Cable Search Option Full Guide Mini Guide Default Guide Channel List ▶ : Full Guide ❑ Auto Store You can scan for the frequency ranges available to you (and availability depends on your country).
● ● Channel (When you know the number of the channel to be stored): Press the ▲ or ▼ button to select C (Air channel) or S (Cable channel). Press the ► button, then press the ▲, ▼ or number (0~9) buttons to select the required number. N You can also select the channel number directly by pressing the number (0~9) buttons. N If there is abnormal sound or no sound, reselect the sound standard required. N Search (When you do not know the channel numbers): Press the ▲ or ▼ button to start the search.
❑ Fine Tune If the reception is clear, you do not have to fine tune the channel, as this is done automatically during the search and store operation. If the signal is weak or distorted, you may have to fine tune the channel manually. N Fine tuned channels that have been saved are marked with an asterisk “*” on the right-hand side of the channel number in the channel banner. N To reset the fine-tuning, select Reset by pressing the ▲ or ▼ button and then press the ENTERE button.
¦ Managing Channels Using this menu, you can add / delete or set favourites channels and use the programme guide for digital broadcasts. All Channels Shows all currently available channels. ■ Added Channels Shows all added channels. ■ ■ Added Channels ■ 824 UKTV Gold 825 UKTV style A 1 C -A 2 C -A 3 C -A 4 C -- A 5 C -- Favourites Shows all favourite channels. O To select the favourites channels you have set up, press the FAV.
■ Lock / Unlock You can lock a channel so that the channel cannot be selected and viewed. N This function is available only when the Child Lock is set to On. N The PIN number input screen appears. Enter your 4 digit PIN number. N The default PIN number of a new TV set is “0-0-0-0”. You can change the PIN, by selecting Change PIN from the menu. N The “\” symbol will be displayed and the channel will be locked.
PICTURE ¦ Configuring the Picture Menu ❑ Mode ■ Dynamic Selects the picture for increased definition in a bright room. ■ Standard Selects the picture for the optimum display in a normal environment. ■ Natural Selects the picture for an optimum and eye-comfortable display. ■ Movie Selects the picture for viewing movies in a dark room. Picture You can select the type of picture which best corresponds to your viewing requirements. T Press the TOOLS button to display the Tools menu.
■ Colour Space Colour space is a colour matrix composed of red, green and blue colours. Select your favourites colour space to experience the most natural colour. ● Auto: Auto Colour Space automatically adjusts to the most natural colour tone based on program sources. ● Native: Native Colour Space offers deep and rich colour tone. ● Custom: Adjusts the colour range to suit your preference. N Changing the adjustment value will refresh the adjusted screen.
❑ Picture Options N In PC mode, you can only make changes to the Colour Tone and Size from among the items in Picture Options. ■ Colour Tone → Cool / Normal / Warm1 / Warm2 / Warm3 N Warm1, Warm2 or Warm3 is only activated when the picture mode is Movie. N Settings can be adjusted and stored for each external device you have connected to an input of the TV.
■ Film Mode → Off / Auto1 / Auto2 The TV can be set to automatically sense and process film signals from all sources and adjust the picture for optimum quality. N Film Mode is supported in TV, AV, COMPONENT(480i / 1080i) and HDMI(480i / 1080i). ● Off: Turn the Film Mode function off. ● Auto1: Automatically adjusts the picture for the best quality when watching a film. ● Auto2: Automatically optimizes the video text on the screen (not including closed captions) when watching a film.
¦ Viewing Picture-in-Picture Main picture Component HDMI1, HDMI2, HDMI3/DVI, HDMI4 PC Melody Energy Saving Setup You can use the PIP feature to simultaneously watch the TV tuner and one external video source. This product has one built-in tuner, which does not allow PIP to function in the same mode. Please see ‘PIP Settings’ below for details. T Press the TOOLS button to display the Tools menu. You can also configure PIP related settings by selecting Tools → PIP.
¦ Using Your TV as a Computer (PC) Display Setting Up Your PC Software (Based on Windows XP) The Windows display-settings for a typical computer are shown below. The actual screens on your PC will probably be different, depending upon your particular version of Windows and your particular video card. However, even if your actual screens look different, the same basic set-up information will apply in almost all cases. (If not, contact your computer manufacturer or Samsung Dealer.) 1.
¦ Setting up the TV with your PC N Preset: Press the SOURCE button to select PC mode. ❑ Auto Adjustment Brightness Sharpness Picture Use the Auto Adjust function to have the TV automatically adjust the video signals it receives. The function also automatically fine-tunes the settings and adjusts the frequency values and positions. T Press the TOOLS button to display the Tools menu. You can also set the Auto Adjustment by selecting Tools → Auto Adjustment. N This function does not work in DVI-HDMI mode.
❑ Audio Language You can change the default value for audio languages. Displays the language information for the incoming stream. N While viewing a digital channel, this function can be selected. N You can only select the language among the actual languages being broadcast. ❑ Audio Format → MPEG / Dolby Digital When sound is emitted from both the main speaker and the audio receiver, a sound echo may occur due to the decoding speed difference between the main speaker and the audio receiver.
¦ Selecting the Sound Mode You can set the sound mode in the Tools menu. When you set to Dual l ll, the current sound mode is displayed on the screen. A2 Stereo NICAM Stereo Audio Type Mono Stereo Dual Mono Stereo Dual Dual 1 / 2 MONO STEREO ↔ MONO DUAL 1 ↔ DUAL 2 MONO MONO ↔ STEREO MONO ↔ DUAL 1 DUAL 2 Default Automatic change DUAL 1 Automatic change DUAL 1 N If the stereo signal is weak and an automatic switching occurs, then switch to the mono.
❑ Child Lock → Off / On This feature allows you to prevent unauthorized users, such as children, from watching unsuitable programme by muting out video and audio. N Before the setup screen appears, the PIN number input screen appears. Enter your 4 digit PIN number. N The default PIN number of a new TV set is 0-0-0-0. You can change the PIN by selecting Change PIN from the menu. N You can lock some channels in Channel List. N Child Lock is available only in TV mode.
❑ Digital Text → Disable / Enable If the programme is broadcast with digital text, this feature is enabled. N MHEG (Multimedia and Hypermedia Information Coding Experts Group) An International standard for data encoding systems used in multimedia and hypermedia. This is at a higher level than the MPEG system which includes data-linking hypermedia such as still images, character service, animation, graphic and video files as well as multimedia data.
■ Clock Set You can set the current time manually. N This function is only available when Clock Mode is set to Manual. N You can set the day, month, year, hour and minute directly by pressing the number buttons on the remote control. ❑ Sleep Timer The sleep timer automatically shuts off the TV after a preset time (30, 60, 90, 120, 150 and 180 minutes). T Press the TOOLS button to display the Tools menu. You can also set the sleep timer by selecting Tools → Sleep Timer.
¦ Network Connection You can set up the Internet Protocol so that you can communicate with various connected networks. ❑ Network Connection - Cable ■ LAN Connection for a DHCP Environment The procedures to set up the network using Dynamic Host Configuration Protocol (DHCP) are described below. Since an IP address, subnet mask, gateway, and DNS are automatically allocated when DHCP is selected, you do not have to enter them manually. 1.
■ LAN Connection for Static IP Environment The procedures to set up the network using a static IP address are described below. You have to manually enter the IP address, subnet mask, gateway, and DNS that are provided by your Internet Service Provider (ISP). 1. Connect the LAN port on the rear panel of the TV and the LAN port on the wall using the LAN cable. TV Rear Panel The LAN Port on the Wall 1 LAN Cable You can connect the LAN via a Sharer (Router).
❑ Network Connection - Wireless You can connect to the network wirelessly through a wireless IP sharer. TV Side Panel The LAN Port on the Wall Wireless IP sharer Samsung Wireless LAN Adapter or LAN Cable 1. Connect the ‘Samsung Wireless LAN Adapter’ into the USB1(HDD) or USB2 terminal of the TV. N You must use the ‘Samsung Wireless LAN Adapter’(WIS09ABGN) to use a wireless network. N Samsung’s Wireless LAN adapter is sold separately.
¦ Setting the Network ❑ Network Type ■ Cable Connect to the network using a cable. ■ Wireless Connect to the network wirelessly. Setup Select Cable or Wireless as the method to connect to the network. N The menu is activated only if the ‘Samsung Wireless LAN Adapter’ is connected.
N When unable to connect to an AP(Access Point) Your TV may fail to locate an AP(Access Point) that is configured as a private SSID type. In this case, please change the AP settings and try again. If your Internet service provider has registered the MAC address of the device used to connect to the Internet for the first time and authenticates the MAC address each time you connect to the Internet, your TV may not be able to connect to the Internet as the MAC address differs from that of the device (PC).
Ad-hoc: You can connect to a mobile device without an access point through the ‘Samsung Wireless LAN Adapter’ by using a peer to peer network. How to connect to new Ad-hoc 1. Choose Select a network, then a device list is displayed. 2. While in the device list, press the Blue button on the remote or select Adhoc. N The message The existing network system may have limited functionality. Do you want to change the network connection? is displayed.
INPUT / SUPPORT ¦ Input Menu ❑ Source List ■ Input Use to select TV or other external input sources such as DVD / Blu-ray players / Cable Box / Satellite receivers (Set-Top Box) connected to the TV. Use to select the input source of your choice. O Press the SOURCE button on the remote control to view an external signal source. TV mode can be selected by pressing the TV button, number buttons (0~9), and the P < / > button on the remote control. Source List Edit Name TV / Ext.1 / Ext.
Using the Remote Control Buttons in the Product Guide Menu Button Yellow Button ◄/► ENTERE RETURN EXIT Operations Shows the contents of the Product Guide sequentially. (Auto Play) Move the cursor and select an item. Select the currently selected item. Return to the previous menu. Stop the current function and return to the Product Guide main menu. ❑ Self Diagnosis ■ Picture Test Self Diagnosis If you think you have a picture problem, perform the picture test.
■ Standby Mode Upgrade To continue software upgrade with master power on, Select On by pressing the ▲ or ▼ button. 45 minutes after entering standby mode, a manual upgrade is automatically conducted. Since the power of the unit is turned on internally, the screen may be on slightly for the LCD product. This phenomenon may continue for more than 1 hour until the software upgrade is completed.
Media Play (USB & DLNA) ¦ Connecting a USB Device 1. Press the POWER button to turn the TV on. TV Side Panel 2. Connect a USB device containing photo, music and/or movie files to the USB1(HDD) or USB2 jack on the side of the TV. 3. When the Application selection screen is displayed, press the ENTERE button to select or Media Play (USB & DLNA). N MTP (Media Transfer Protocol) is not supported. N The file system supports FAT16, FAT32 and NTFS.
¦ Media Play Function This function enables you to view and listen to photo, music and/or movie files saved on a USB Mass Storage Class (MSC) device. Entering the Media Play (USB & DLNA) Menu 1. Press the MENU button. Press the ▲ or ▼ button to select Application, then press the ENTERE button. SUM 851.86MB/993.02MB Free PHOTO 2. Press the ▲ or ▼ button to select Media Play (USB & DLNA), then press the ENTERE button. N The Media Play (USB & DLNA) menu is displayed.
1 Current Sort key: This field shows the current standard for sorting files. Press the ◄ or ► button to change the standard for sorting files. 2 View Groups: Shows the detailed groups of the files sorted according the selected Sort key. The sort group where the currently selected file is contained is highlighted. 3 Currently selected file: The selected file is the file you can now control. Photo and movie files are displayed as thumbnail images. 4 Current Device: Shows the currently selected device name.
¦ Photo List Option Menu 1. Press the MEDIA.P button. 2. Press the ◄ or ► button to select Photo, then press the ENTERE button. 3. Press the ▼ button to move to the File List Section. 4. Press the ◄ or ► button to select the desired photo file. N Selecting Multiple Photos Press the ◄ or ► button to select the desired photo file. Then press the Yellow button. Repeat the above operation to select multiple photo files. The mark c appears to the selected photo file. 5. Press the TOOLS button.
¦ Viewing a Photo or Slide Show Viewing a Slide Show Colour Preference Folder Basic View Timeline 1. Press the ▼ button to select the File List Section. 2. Press the TOOLS button. Slide Show Copy Play Current Group Copy Current Group 1236.jpg 1237.jpg 1235.jpg Information Remove Safely 5/15 3. Press the ▲ or ▼ button to select Slide Show, then press the ENTERE button. N All files in the photo list will be used for the Slide Show. 1231.jpg 1232.jpg SUM 1233.jpg 1234.
5. Press the ∂ (Play)/ENTERE button. N The selected files will be used for the Slide Show. ● Alternatively 1. In the Photo List, press the Yellow buttons to select the desired photos. 2. Press the TOOLS button. 3. Press the ▲ or ▼ button to select Slide Show, then press the ENTERE button. N The selected files will be used for the Slide Show. ¦ Slide Show Option Menu 1. During a slide show (or when viewing a photo), press the TOOLS button to set the option. 2.
❑ Picture Setting / Sound Setting You can select the picture and sound settings. ❑ Information The photo file information is displayed. ❑ Remove Safely You can remove the device safely from the TV. ¦ Sorting the Music List You can sort music files in the Music List by a particular standard. 1. Press the MEDIA.P button. Genre Folder 2. Press the ◄ or ► button to select Music, then press the ENTERE button. 3. Press the ▲ button to move to the Sort key Section. 4.
¦ Music List Option Menu 1. Press the MEDIA.P button. 2. Press the ◄ or ► button to select Music, then press the ENTERE button. Genre Folder Preference Basic View Title 3. Press the ▲ button to move to the File List Section. 4. Press the ◄ or ► button to select the desired Music file. N Selecting Multiple Music Files Press the◄ or ► button to select the desired music file. Then press the Yellow button. Repeat the above operation to select multiple music files.
¦ Playing a Music Playing a music file 1. Press the ▼ button to select the File List Section. ▶ 00:00:04 / 00:04:04 3/37 2. Press the ◄ or ► button to select a music file to be played. Way I Love You HaHaHa 3. Press the ∂ (Play)/ENTERE button. N This menu only shows files with the MP3 file extension. Files with other file extensions are not displayed, even if they are saved on the same USB device.
¦ Music Play option Menu Music Play Option Menu Tools ❑ Repeat Mode → On / Off Repeat Mode ◀ On ▶ Picture Setting You can play music files repeatedly. Sound Setting Information Remove Safely ❑ Picture Setting / Sound Setting You can configure the picture and sound settings. U Move L Adjust e Exit ❑ Information The music file information is displayed. ❑ Remove Safely You can remove the device safely from the TV.
¦ Movie List Option Menu 1. Press the MEDIA.P button. Title 2. Press the ◄ or ► button to select Movie, then press the ENTERE button. Folder Preference Basic View Timeline 3. Press the ▲ button to move to the File List Section. 4. Press the ◄ or ► button to select the desired Movie file. N Selecting Multiple Movie Files Press the◄ or ► button to select the desired movie file. Then press the Yellow button. Repeat the above operation to select multiple movie files.
N Supported Subtitle Formats Name MPEG-4 time-based text SAMI SubRip SubViewer Micro DVD N Supported Video Formats File extention .ttxt .smi .srt .sub .sub or .txt File Extention Container *.avi AVI *.mkv MKV *.asf ASF *.wmv (VC1) *.mp4 MP4 (SMP4) *.3gp 3GPP *.vro (ps) VRO / VOB *.mpg *.mpeg (ps) others (ts) Video Decoder Divx 3.11 Divx 4.x Divx 5.1 Divx 6.0 XviD H.264 BP H.264 MP H.264 HP MPEG-4 SP MPEG-4 ASP Motion JPEG Divx 3.11 Divx 4.x Divx 5.1 Divx 6.0 XviD H.264 BP H.264 MP H.
N Video Play Control Buttons Button ENTERE ∂ ∑ TOOLS ∫ ◄/► ▲/▼ μ Operations Play/Pause the movie file Play the movie file Pause the movie file Run various functions from the Movie menus. Exit play mode and return to the movie list. Skip forwards or backwards through the movie file. Move to the first/last of the file. Play the file at double speed. This function may not be supported depending on the codec. Playing the movie group 1. Press the ▲ button to move to the Sort key Section. 2.
❑ Caption Setting You can set the captions for the movie. ■ Caption → On / Off You can turn the captions for the movie on or off. ■ Caption Language You can set the caption language. ■ Caption Size → Small / Standard / Large You can change the font size of the captions. ■ Caption Sync You can adjust the caption sync. ■ Caption Sync Reset You can reset the adjusted caption sync. ❑ Information The movie file information is displayed. ❑ Remove Safely You can remove the device safely from the TV.
Media Play-DLNA ¦ Setting the DLNA Network DLNA allows you to watch pictures, musics and videos saved on your PC or on your TV through a network connection in Media Play mode. This removes the need to copy them to a USB storage device and then connect the device to your TV. To use DLNA, the TV must be connected to the network and the DLNA application must be installed on your PC.
¦ Installing the DLNA Application To play content on the PC on the TV, you have to first install the application. To use the DLNA function smoothly, use the program in the CD-ROM supplied with the TV or use the Samsung PC Share Manager program corresponding to the TV model that can be downloaded from the Samsung web site. System Requirements 1. Insert the Programme CD supplied with this TV into your PC. 2. 30MB of free hard disk space is needed for the programme installation.
¦ Using the DLNA Application The Programme Screen Layout 1 2 3 4 5 6 7 1. Menus: The following application menus are provided : File, Share, Server, and Help. 2. Click to share the selected PC server folder. 3. Click to cancel sharing. 4. Click to refresh the PC folder and files. 5. Click to synchronize the share status. 6. The folders and files of the PC to be shared are listed. 7. Folders shared by the user are listed. ❑ File ■ Property Shows information on the selected file or folder.
❑ Share ■ Sharing a Folder You can share a folder from your PC to the TV. The maximum number of folders that can be shared is 32. N Your PC will operate as a server to the TV. ● Method 1: Select a folder in My Computer, select the Share menu and then select the Share Folder sub-menu. ● Method 2: Select a folder in My Computer, right-click over the selected folder and then select Share Folder from the popup menu.
■ Setting the Access Permission To enable the TV to find your PC, the TV must be set to Set Device Policy in the Access Permission Settings window. In addition, the PC server and the TV must be on the same subnet. ● Method: Select the Share menu and select Set Device Policy. Rejected items are represented in gray. You can change the access permissions by using the Allow Accept / Deny button. To delete an item, select the item and select Delete Item.
ANYNET+ ¦ Connecting Anynet+ Devices What is Anynet+? Anynet+ is a function that enables you to control all connected Samsung devices that support Anynet+ with your Samsung TV’s remote. The Anynet+ system can be used only with Samsung devices that have the Anynet+ feature. To be sure your Samsung device has this feature, check if there is an Anynet+ logo on it. To connect to a TV TV Anynet+ Device 1 HDMI 1.3 Cable Anynet+ Device 2 HDMI 1.3 Cable Anynet+ Device 3 HDMI 1.
¦ Setting Up Anynet+ Media Play (USB & DLNA) Application T Press the TOOLS button to display the Tools menu. You can also display Anynet+ menu by selecting Tools → Anynet+ (HDMI-CEC). Anynet+ (HDMI-CEC) Content Library Internet@TV Home Network Centre ❑ Setup ■ ■ Anynet+ (HDMI-CEC) → Off / On To use the Anynet+ Function, Anynet+ (HDMI-CEC) must be set to On. N When the Anynet+ (HDMI-CEC) function is disabled, all the Anynet+ related operations are deactivated.
TV Remote Control Buttons Available in Anynet+ Mode Device Type Operating Status Anynet+ Device After switching to the device, when the menu of the corresponding device is displayed on the screen.
¦ Troubleshooting for Anynet+ Problem Anynet+ does not work. ● Possible Solution Check if the device is an Anynet+ device. The Anynet+ system supports Anynet+ devices only. Connect only one receiver (home theatre). Check if the Anynet+ device power cord is properly connected. Check the Anynet+ device’s Video/Audio/HDMI 1.3 cable connections. Check whether Anynet+ (HDMI-CEC) is set to On in the Anynet+ setup menu. Check whether the TV remote control is in TV mode.
CONTENT LIBRARY ¦ Using the Content Library Using the Content Library Menu Media Play (USB & DLNA) Anynet+ (HDMI-CEC) Application The Content Library allows you to enjoy various content on your TV. You can use the default content stored in the TV memory or you can enjoy new content using a USB device or via the Internet. Content Library Internet@TV Home Network Centre 1. Press the MENU button. Press the ▲ or ▼ button to select Application, then press the ENTERE button. 2.
¦ Using the TV Memory Contents You can use enjoy content stored in the TV memory. You can add/delete content to/from the TV memory. To add/delete content, select Content Management. N To return to Content Library main menu, press the EXIT button. ❑ Gallery This function plays a SlideShow with high resolution images and background music and produces various atmospheres. Using the Gallery function of the TV, you can change your home atmosphere.
¦ Using the Content Management ❑ Content Management You can add or delete contents using the Content Management. N You can select multiple content items by selecting content items repeatedly and pressing the Yellow button. ■ ■ My Contents You can check the content saved in the TV memory for each subitem of the Content Library. ● Select a content item and press the ENTERE button. You can play or delete the selected content item.
Internet@TV N This function may not be supported depending on your country. ¦ Getting Started with Internet@TV Internet@TV provides Yahoo’s widget services through a network connection. You can access various information such as world weather, stock news, as well as the latest news through the Internet@TV service. N If Network condition is unstable, this function may not work. Then, TV would be turned off automatically. Otherwise turn off the TV using power button.
❑ Screen display ■ Dock mode 1 Welcome banner: The current selected profile is displayed. N The banner disappears after 5 seconds automatically. 1 2 2 Help Items • Blue (Viewport) button: Configure the viewport. • Yellow (Edit Snippet) button: You can rearrange or delete a widget by pressing the Yellow button. 3 Snippet dock: The Snippets are displayed. You can select the desired widget by pressing the ◄ or ► button on the remote control. 3 3 N It may take a few seconds to load the snippet.
❑ Configuring the Viewport Configure the viewport by pressing the Blue button on the remote control. The viewport is a small TV screen that displays the original TV screen at a reduced size while maintaining the aspect ratio. N This prevents a widget or setup screen of the Internet@TV from hiding part of the TV screen.
■ Limit Profile You can restrict the installation of the widget for the profile. N The Owner PIN must be set to use this function. To set the Owner PIN, refer to ‘Administrative Controls’. ■ Limit Profile You can restrict the installation of the widget for the profile. N The Owner PIN must be set to use this function. To set the Owner PIN, refer to ‘Administrative Controls’.
¦ Using the Weather Widget Your TV allows you to view the weather information for multiple cities of the world provided by a website. You can view the current weather and weather forecast using the remote control. ❑ Selecting a City WEATHER 51° Sunnyvale Cloudy You can add or delete a city for which you want to view weather information. Configure the Weather Settings by pressing the Green button. ■ Add new city Enter the name of the city you want to add.
¦ Using the Flickr Widget You can use Flickr which allows you to manage and share photos online. You and your family can use the TV to enjoy files uploaded by users or recently updated photos on a website. N Most Flickr widget functions can only be used if you have a Yahoo! account. If you have no Yahoo! account, visit www.yahoo.com and create an account. N For detailed procedures on log in, refer to the ‘Using the Profile Widget’ instructions. N For more information on Flickr, visit www.flickr.com.
¦ Using the Finance Widget YYou can view stock information and the latest stock news provided by a website on your TV. ❑ Setting up My Stocks FINANCE You can add or delete a stock. Press the Green button to begin setting up My Stocks. ■ ■ ■ My Stocks Add New Symbol... Enter the name of the stock to add. You can enter only a part of the name of the stock to search for it automatically. Select the stock you want to add from the list and press Add Symbol to add it.
❑ Widget Gallery Settings WIDGET GALLERY Press the Green button. Settings ■ About Yahoo! Widget Gallery... You can view brief information for the Widget Gallery, Copyright Policy, Terms of Service, and Privacy Policy. ■ Developer Settings You can make your own widget. For more information, Please visit our developer site at http://connectedtv.yahoo.com/ with the developer code. If you set Show My Test Widgets to On, you can access the widgets you created in the Widget Gallery.
Internet@TV N This function may not be supported depending on your country. ¦ Getting Started with Internet@TV Internet@TV provides SAMSUNG’s widget services through a network connection. You can access various information such as YouTube, as well as the latest news through the Internet@TV service. N The configuration of Widgets and their provided services may differ according to the selected country. For more information on how to configure your country, refer to the ‘Channel Menu’ instructions.
¦ Using the Internet@TV service In a widget that provides multiple category menus, you can view the contents of the category menus using the ◄ and ► buttons. Account Login 1. Press the Red button. 2. Select desired User account, then press the ENTERE button. 3. Input the password. N When login succeeds, User account will be displayed on the screen. N Before login, at least one and more account should be registered. If you want to create account, refer to ‘Setting up Internet@TV’.
Home Network Centre ¦ Home Network Centre About the Home Network Centre The Home Network Centre connects the TV and mobile phones through a network. You can view call arrivals, text message contents, and schedules set on the mobile phone on the TV using the Home Network Centre. In addition, you can play the media contents saved on the mobile phones such as videos, photos and music by importing them onto the TV via the network.
¦ Setting Up the Home Network Centre ❑ Message Shows a list of mobile phones which have been set up with this TV to use the message function (the call arrivals, text message contents and schedules set on the mobile phone). ■ ■ ■ Allowed Allows the mobile phone. ■ 111-1234-5671 : Allowed Media 111-1234-5672 : Allowed Setup 111-1234-5673 : Denied 111-1234-5674 : Denied R Return e Exit Delete Deletes the mobile phone from the list. N This function just deletes the name from the list.
¦ Using the Message Function Using this function, you can view the call arrivals, text message contents and schedules set on the mobile phone through the alarm window while watching TV. N To disable this Message alarm window, set Message to Off in Setup of the Home Network Centre. N The alarm window appears for 20 seconds. If no key is pressed or if Cancel is selected, it appears up to three times at 5 minute intervals.
¦ Using the Media Function An alarm window appears informing the user that the media contents (videos, photos, music) sent from the mobile phone will be displayed on the TV. The contents are played automatically 3 seconds after the alarm window appears. If you press the RETURN or EXIT button when the alarm window appears, the Media Contents are not played. N To turn off the media contents transmission from the mobile phone, set Media to Off in Setup of the Home Network Centre.
RECOMMENDATIONS ¦ Teletext Feature Most television stations provide written information services via Teletext. The index page of the Teletext service gives you information on how to use the service. In addition, you can select various options to suit your requirements by using the remote control buttons. N For Teletext information to be displayed correctly, channel reception must be stable. Otherwise, information may be missing or some pages may not be displayed. 1 : (exit) Exit from the Teletext display.
The Teletext pages are organized according to six categories: Part A B C D E F Contents Selected page number. Broadcasting channel identity. Current page number or search indications. Date and time. Text. Status information. FASTEXT information.
¦ Disconnecting the Stand 1. Remove four screws from the back of the TV. 2. Separate the stand from the TV. N Two or more people should carry the TV. 3. Cover the bottom hole with the cover. ¦ Installing the Wall Mount Kit Wall mount items (sold separately) allow you to mount the TV on the wall. For detailed information on installing the wall mount, see the instructions provided with the Wall Mount items. Contact a technician for assistance when installing the wall mounted bracket.
¦ Securing the TV to the Wall Caution: Pulling, pushing, or climbing on the TV may cause the TV to fall. In particular, ensure your children do not hang over or destabilize the TV; doing so may cause the TV to tip over, causing serious injuries or death. Follow all safety precautions provided on the included Safety Flyer. For added stability, install the anti-fall device for safety purposes, as follows. ■ To avoid the TV from falling: 1. Put the screws into the clamps and firmly fasten them onto the wall.
¦ Troubleshooting: Before Contacting Service Personnel No sound or picture Check that the mains lead has been connected to a wall socket. Check that you have pressed the button on your set. Check the picture contrast and brightness settings. Check the volume. Normal picture but no sound Check the volume. Check whether the MUTEM button has been pressed on the remote control. Check the Speaker Select settings.
¦ Specifications Model Name Screen Size (Diagonal) Power Consumption Standby PC Resolution (Optimum) Sound (Output) Dimensions (WxDxH) Body With stand Weight With Stand Environmental Considerations Operating Temperature Operating Humidity Storage Temperature Storage Humidity Stand Swivel (Left / Right) Model Name Screen Size (Diagonal) Power Consumption Standby PC Resolution (Optimum) Sound (Output) Dimensions (WxDxH) Body With stand Weight With Stand Environmental Considerations Operating Temperature Opera
Warning! Important Safety Instructions Please read the appropriate section that corresponds to the marking on your Samsung product before attempting to install the product. CAUTION RISK OF ELECTRIC SHOCK DO NOT OPEN This symbol indicates that high voltage is present inside. It is dangerous to make any kind of contact with any internal part of this product. CAUTION: TO REDUCE THE RISK OF ELECTRIC SHOCK, DO NOT REMOVE COVER (OR BACK). THERE ARE NO USER SERVICEABLE PARTS INSIDE.
Wiring the Mains Power Supply Plug (UK Only) IMPORTANT NOTICE The mains lead on this equipment is supplied with a moulded plug incorporating a fuse. The value of the fuse is indicated on the pin face of the plug and, if it requires replacing, a fuse approved to BSI1362 of the same rating must be used. Never use the plug with the fuse cover omitted if the cover is detachable. If a replacement fuse cover is required, it must be of the same colour as the pin face of the plug.
Correct Disposal of This Product (Waste Electrical & Electronic Equipment) (Applicable in the European Union and other European countries with separate collection systems) This marking on the product, accessories or literature indicates that the product and its electronic accessories (e.g. charger, headset, USB cable) should not be disposed of with other household waste at the end of their working life.