
User Manual


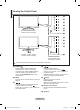
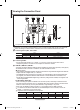
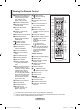
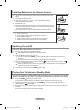
Table Of Contents
- Contents
- Connecting and Preparing Your TV
- Setting the Channels
- Setting the Picture
- Changing the Picture Standard
- Adjusting the Custom Picture
- Changing the Colour Tone
- Activating Backlight
- Configuring Detailed Settings on the Picture
- Changing the Picture Size
- Freezing the Current Picture
- Selecting the Screen Mode
- Resetting the Picture Settings to the Factory Defaults
- Digital NR / Active Colour / DNIe / Movie Plus
- Viewing the Picture In Picture (PIP)
- HDMI Black Level
- Setting the Sound
- Setting the Time
- Function Description
- Using the Teletext Feature
- Setting the PC
- About Anynet+
- Recommendations For Use

English - 3
Viewing the Control Panel
1 SOURCE
Toggles between all the available input
sources (TV, Ext.1, Ext.2, AV, S-Video,
Component, PC, HDMI1, HDMI2, HDMI3).
In the on-screen menu, use this button
as you use the ENTER/OK button on the
remote control.
2 MENU
Press to see an on-screen menu of your TV’s
features.
3
Press to decrease or increase the volume.
In the on-screen menu, use the
buttons as you use the
and
buttons on
the remote control.
4
Press to change channels.
In the on-screen menu, use the
buttons as you use the
5
and
6
buttons on
the remote control.
(Without the Remote Control, you can turn on
the TV by using the Channel buttons.)
5 (Power)
Press to turn the TV on and off.
Power Indicator
Blinks and turns off when the power is on and
lights up in stand-by mode.
6 Remote Control Sensor
Aim the remote control towards this spot on
the TV.
7 Speakers
The product colour and shape may vary depending on the model.
Front Panel buttons
Touch the right side of
each button to operate.
1
2
3
4
5
6
7
[LE32R81, LE37R81, LE40R81,
LE32R83, LE37R83, LE40R83]
1
2
3
4
5,6
7
[LE32R82, LE37R82, LE40R82,
LE32R84, LE37R84, LE40R84]
BN68-01166A-00Eng-0307.indd 3 2007-03-07 �� 8:06:04