LCD TV Contact SAMSUNG WORLD-WIDE If you have any questions or comments relating to Samsung products, please contact the SAMSUNG customer care centre. LE26S8 LE32S8 LE37S8 LE40S8 LE46S8 Comment contacter Samsung dans le monde Si vous avez des suggestions ou des questions concernant les produits Samsung, veuillez contacter le Service Consommateurs Samsung. Kontakt zu Samsung Falls Sie Fragen oder Anregungen zu Samsung-Produkten haben, wenden Sie sich bitte an den Samsung-Kundendienst.
Precautions When Displaying a Still Image A still image may cause permanent damage to the TV screen. • Do not display a still image on the LCD panel for more than 2 hours as it can cause screen image retention. This image retention is also known as "screen burn". To avoid such image retention, reduce the degree of brightness and contrast of the screen when displaying a still image.
English Contents Connecting and Preparing Your TV List of Parts......................................................... 3 Installing the Stand.............................................. 3 Installing the Wall Mount Kit................................ 3 Viewing the Control Panel................................... 4 Viewing the Connection Panel............................ 5 Viewing the Remote Control................................ 7 Installing Batteries in the Remote Control...........
USING The DTV FeATuRe Using the Teletext Feature Previewing the DTV Menu System................... 32 Updating the Channel List Automatically........... 33 Updating the Channel List Manually................. 33 Editing Your Favourite Channels....................... 34 Selecting Channel List...................................... 36 Displaying Programme Information................... 36 Viewing the EPG (Electronic Programme Guide) Information....... 37 Using the Scheduled List............
List of Parts Please make sure the following items are included with your LCD TV. If any items are missing, contact your dealer. M4 X L16 Remote Control & Batteries (AAA x 2) Power Cord Owner’s Instructions Stand Screw X4 Cover-Bottom Warranty card Stand Safety Guide Cleaning Cloth Registration Cards Warranty card / Safety Guide / Registration Cards (Not available in all locations) The stand and stand screw may not be included depending on the model. Installing the Stand <3> <2> 1.
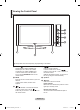
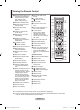
Viewing the Control Panel The product colour and shape may vary depending on the model. 1 SOURCE Toggles between all the available input sources (TV, Ext.1, Ext.2, AV, S-Video, Component, PC, HDMI1, HDMI2, DTV). In the on-screen menu, use this button as you use the ENTER/OK button on the remote control. 4 2 MENU Press to see an on-screen menu of your TV’s features. In case of DTV mode, the DTV menu appears. 5 Speakers 3 6 Press to decrease or increase the volume.
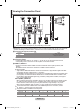
Viewing the Connection Panel 1 2 3 4 5 6 @ ! Power Input 09 8 7 The product colour and shape may vary depending on the model. Whenever you connect an external device to your TV, make sure that power on the unit is turned off. When connecting an external device, match the colour of the connection terminal to the cable. 1 Connecting Set-Top Box, VCR or DVD Connector Input Output EXT 1 EXT 2 Video o o Audio (L/R) o o RGB o Video + Audio (L/R) Only TV or DTV output is available.
4 Connecting an Aerial or Cable Television Network To view television channels correctly, a signal must be received by the set from one of the following sources: - An outdoor aerial / A cable television network / A satellite network 5 Connecting CI (Common Interface) CARD - When not inserting "CI CARD" in some channels,"Scrambled Signal" is displayed on the screen.
Viewing the Remote Control 1 Selects a target device to be controlled by the Samsung remote control (TV, DVD, STB, CABLE, VCR) (Refer to page 49~51) 2 Television Standby button 3 Number buttons for direct channel access 4 One/Two-digit channel selection 5 It display "Channel List" on the screen. 6 Selects the TV and DTV mode directly 7 VCR/DVD Functions Rewind, Stop, Play/Pause, Fast/Forward 8 Volume increase Volume decrease 9 Temporary sound switch-off a Selects the HDMI mode directly.
Installing Batteries in the Remote Control 1. Lift the cover at the back of the remote control upward as shown in the figure. 2. Install two AAA size batteries. Make sure to match the "+" and "–" ends of the batteries with the diagram inside the compartment. 3. Replace the cover. Remove the batteries and store them in a cool, dry place if you won’t be using the remote control for a long time. The remote control can be used up to about 23 feet from the TV.
Plug & Play When the TV is initially powered on, several basic settings proceed automatically and subsequently. The following settings are available. Any functions related to Digital TV (DVB) will only work in countries or areas where DVB-T (MPEG2) digital terrestrial signals are broadcasted. Please confirm with your local dealer if you can receive DVB-T signals.
If you want to reset this feature... TV 1. Press the MENU button to display the menu. Press the ▲ or ▼ button to select "Setup", then press the ENTER/OK button. 2. Press the ENTER/OK button again, to select "Plug & Play". 3. The message "Start Plug & Play" is displayed. (Refer to page 9) Setup Plug & Play Language : English Time Game Mode : Off Blue Screen : Off Melody : Off PC Home Theater PC : Off More Move Enter Return Plug & Play Start Plug & Play.
Storing Channels Manually You can store up to 100 channels, including those received via cable networks. When storing channels manually, you can choose: Whether or not to store each of the channels found. The programme number of each stored channel which you wish to identify. 1. Press the MENU button to display the menu. Press the ▲ or ▼ button to select "Channel", then press the ENTER/OK button. 2. Press the ▲ or ▼ button to select "Manual Store", then press the ENTER/OK button. 3.
Setting the Channel Lists Set the channels according to your preference. You can easily delete, add, or lock the channel you want. 1. 2. Press the MENU button to display the menu. Press the ▲ or ▼ button to select "Channel", then press the ENTER/OK button. Channel List P 1 C3 1 / 10 Prog. Press the ▲ or ▼ button to select "Channel Manager", then press the ENTER/OK button. 0 C-- 1 C3 2 BBC 1 3 C74 3. Press the ENTER/OK button again, to select "Channel List". 4.
Sorting the Stored Channels You can exchange the numbers of two channels, in order to: TV Modify the numeric order in which the channels have been automatically stored. Give easily remembered numbers to the channels that you watch most often. 1. Press the MENU button to display the menu. Press the ▲ or ▼ button to select "Channel", then press the ENTER/OK button. 2. Press the ▲ or ▼ button to select "Sort", then press the ENTER/OK button.
Fine Tuning Channel Reception Use fine tuning to manually adjust a particular channel for optimal reception. 1. Use the number buttons to directly select the channel that you want to fine tune. 2. Press the MENU button to display the menu. Press the ▲ or ▼ button to select "Channel", then press the ENTER/OK button. 3. Press the ▲ or ▼ button to select "Fine Tune", then press the ENTER/OK button. 4. Press the ◄ or ► button to adjust the fine tuning. Press the ENTER/OK button. 5.
Changing the Picture Standard You can select the type of picture which best corresponds to your viewing requirements. 1. Press the MENU button to display the menu. Press the ENTER/OK button, to select "Picture". 2. Press the ENTER/OK button again, to select "Mode". 3. Press the ▲ or ▼ button to select the desired picture effect. Press the ENTER/OK button. 4. Press the EXIT button to exit.
Changing the Colour Tone You can select the most comfortable colour tone to your eyes. 1. To select the desired picture effect, follow the "Changing the Picture Standard" instructions number 1 to 3. (On page 15) 2. Press the or button to select "Colour Tone", then press the ENTER/OK button. 3. Press the or button to select the desired colour tone setting. Press the ENTER/OKbutton. 4.
Configuring Detailed Settings on the Picture You can set detailed picture settings. TV 1. Press the MENU button to display the menu. 2. Press the ENTER/OK button, to select "Picture". 3. Press the ▲ or ▼ button to select "Detailed Settings", then press the ENTER/OK button. 4. Select the required option by pressing the ▲ or ▼ button, then press the ENTER/OK button. Available options: Black Adjust, Dynamic Contrast, Gamma, White Balance, My Colour Control, Edge Enhancement, Colour Space 5. 6.
Changing the Picture Size You can select the picture size which best corresponds to your viewing requirements. 1. Press the MENU button to display the menu. Press the ENTER/OK button, to select "Picture". 2. Press the ▲ or ▼ button to select "Size", then press the ENTER/OK button. 3. Select the required option by pressing the ▲ or ▼ button. Press the ENTER/OK button. 4. TV Picture rMore Size Screen Mode Digital NR Active Colour DNle Reset Move TV Press the EXIT button to exit.
Freezing the Current Picture Press the STILL button to freeze a moving picture into a still one. Press again to cancel. Selecting the Screen Mode When setting the picture size to Auto Wide in a 16:9 wide TV, you can determine the picture size you want to see the 4:3 WSS (Wide Screen Service) image or nothing. Each individual European country requires different picture size so this function is intended for users to select it. 1. Press the MENU button to display the menu.
Digital NR / Active Colour / DNIe If the broadcast signal received by your TV is weak, you can activate the Digital Noise Reduction feature to help reduce any static and ghosting that may appear on the screen. 1. Press the MENU button to display the menu. Press the ENTER/OK button, to select “Picture”. 2. Select the required option by pressing the ▲ or ▼ button, then press the ENTER/OK button. Available options: Digital NR, Active Colour, DNIe. 3.
Viewing the Picture In Picture (PIP) You can display a sub picture within the main picture of set programme or video input. In this way, you can watch the picture of set programme or video input from any connected equipment while watching the main picture. 1. Press the MENU button to display the menu. Press the ▲ or ▼ button to select "Setup", then press the ENTER/OK button. 2. Press the ▲ or ▼ button to select "PIP", then press the ENTER/OK button. 3. Press the ENTER/OK button again.
HDMI Black Level You can directly select the black level on the screen to adjust the screen depth. 1. Press the MENU button to display the menu. Press the ▲ or ▼ button to select "Setup", then press the ENTER/OK button. 2. Press the ▲ or ▼ button to select "HDMI Black Level", then press the ENTER/OK button. 3. 4. Press the ▲ or ▼ button to select "Normal" or "Low", then press the ENTER/OK button.
Adjusting the Sound Settings The sound settings can be adjusted to suit your personal preferences. 1. Press the MENU button to display the menu. Press the ▲ or ▼ button to select "Sound", then press the ENTER/OK button. 2. Press the ▲ or ▼ button to select "Equalizer", then press the ENTER/OK button. 3. Press the ◄ or ► button to select a particular item. Press the ENTER/OK button. 4. 5.
Connecting Headphones You can connect a set of headphones to your set if you wish to watch a TV programme without disturbing the other people in the room. When you insert the head set jack into the corresponding port, you can operate only "SRS TS XT" and "Auto Volume" in Sound menu. Prolonged use of headphones at a high volume may damage your hearing. You will not receive sound from the speakers when you connect headphones to the system. The headphone volume and TV volume are adjusted differently.
Selecting the Internal Mute If you want to hear the sound through separate speakers, cancel the internal amplifier. 1. Press the MENU button to display the menu. Press the ▲ or ▼ button to select "Sound", then press the ENTER/OK button. 2. Press the ▲ or ▼ button to select "Internal Mute", then press the ENTER/OK button. 3. Press the ▲ or ▼ button to select "On" or "Off". Press the ENTER/OK button. 4.
Resetting the Sound Settings to the Factory Defaults If Game Mode is On, the Reset Sound function is activated. Selecting the Reset function after setting the equalizer resets the equalizer setting to the factory defaults. 1. Press the MENU button to display the menu. Press the ▲ or ▼ button to select "Sound", then press the ENTER/OK button. 2. Press the ▲ or ▼ button to select "Reset", then press the ENTER/OK button. 3. Press the EXIT button to exit.
Setting the Sleep Timer You can select a time period of between 30 and 180 minutes after which the television automatically switches to standby mode. 1. Press the MENU button to display the menu. Press the ▲ or ▼ button to select "Setup", then press the ENTER/OK button. 2. Press the ▲ or ▼ button to select "Time", then press the ENTER/OK button. 3. Press the ▲ or ▼ button to select "Sleep Timer", then press the ENTER/OK button. 4.
Choosing Your Language When you start using your set for the first time, you must select the language which will be used for displaying menus and indications. 1. Press the MENU button to display the on-screen menu. Press the ▲ or ▼ button to select "Setup", then press the ENTER/OK button. 2. Press the ▲ or ▼ button to select "Language", then press the ENTER/OK button. 3. Select a particular language by pressing the ▲ or ▼ button repeatedly. Press the ENTER/OK button. You can choose one of 17 languages.
Setting the Blue Screen Mode / Selecting the Melody Blue Screen: If no signal is being received or the signal is very weak, a blue screen automatically replaces the noisy picture background. If you wish to continue viewing the poor picture, you must set the "Blue Screen" mode to "Off". TV Melody: You can hear melody sound when the television is powered on or off. 1. Press the MENU button to display the menu. Press the ▲ or ▼ button to select "Setup", then press the ENTER/OK button. 2.
Using the Energy Saving Feature This function adjusts the brightness of the TV so as to reduce power consumption. When you watching TV at night, set the "Energy Saving " mode option to "High" so as to reduce the dazzling of your eyes as well as the power consumption. 1. Press the MENU button to display the on-screen menu. Press the ▲ or ▼ button to select "Setup", then press the ENTER/OK button. 2. Press the ▲ or ▼ button to select "Energy Saving", then press the ENTER/OK button. 3.
Selecting the Source You can select among external sources connected to your TV’s input jacks. 1. TV Press the MENU button to display the menu. Press the ▲ or ▼ button to select "Input", then press the ENTER/OK button. 2. Press the ENTER/OK button again, to select "Source List". When no external device is connected to your set, only "TV", "Ext.1", "Ext.2" are activated in the "Source List".
Previewing the DTV Menu System The company does not guarantee the normal operation of the DTV menu for countries other than the 6 supported countries (England, Germany, France, Italy, Spain, Austria) because only these country standards are supported. In addition, when the country of the broadcast stream differs from the country selected by the current user, the string appearing in the channel banner, Info, Guide, Channel Manager, etc. may not be displayed properly.
Updating the Channel List Automatically You can update the channel list when the broadcaster adds new Services or if you move the TV to a new location. 1. Press the D.MENU button to display the DTV menu. 2. Press the ▲ or ▼ button to select "Channel", then press the ENTER/OK button. Mode Auto: Custom Store Equalizer SRS TS XT : Off Auto Volume : Off Scanning for digital services... Internal Mute : Off 35% Reset Services found: 24 Channel: 38 Stop Move Enter 3.
Editing Your Favourite Channels You can edit your favourite channels using the four colour buttons. 1. Press the D.MENU button to display the DTV menu. 2. Press the ▲ or ▼ button to select "Channel", then press the ENTER/OK button. 3. Press the ▲ or ▼ button to select "Edit Favourite Channels", then press the ENTER/OK button. 4. Press the red button to display all currently stored channels. 5. Press the ▲ or ▼ button to select a channel you want. Press the ENTER/OK button.
Move 1. Press the D.MENU button to display the DTV menu. 2. Press the ▲ or ▼ button to select "Channel", then press the ENTER/OK button. 3. Press the ▲ or ▼ button to select "Edit Favourite Channels", then press the ENTER/OK button. 4. Select the required channel using the or button. 5. Press the green button. A " " icon is displayed on the left side of the channel name. 6. Press the ▲ or ▼ button to select the channel that you want to move, and press the green or ENTER/OK button. 7.
Selecting Channel List You can exclude the channels you have chosen from the Channel List All Channels Test Card M' v2.0 channels you have scanned.When you scan through the 1/2 23 bid-up.tv 60 Television X 1 Test Card M' stored channels, those you have chosen to skip are not 25 TCM 70 BBC Radio 1 3 Vida003b displayed. All channels that you do not specifically choose to 26 UKTV Style 72 BBC Radio 2 4 Vida004b 27 Discovery 73 BBC Radio 3 5 vida005b skip are displayed during scanning.
Viewing the EPG (Electronic Programme Guide) Information The EPG (Electronic Programme Guide) information is provided by the broadcasters. Programme entries may appear blank or out of date as a result of the information broadcast on a given channel. The display will dynamically update as soon as new information becomes available. Now & Next Guide For the six channels indicated in the left-hand column, displays the Current programme and the Next programme information.
Using the Scheduled List If you make a scheduled viewing list of programs you may like to see, the channel will be automatically switched to the scheduled program at the scheduled time even if you are watching another program. 1. Press the D.MENU button to display the DTV menu. 2. Press the ENTER/OK button, to select "Guide". 3. Press the ▲ or ▼ button to select "Scheduled List", then press the ENTER/OK button. 4. Press the red button. The channel will be switched to the scheduled program. 5.
Viewing All Channels and Favourite Channels In the EPG menu, you can display all channels or favourite channels. 1. Press the D.MENU button to display the DTV menu. 2. Press the ENTER/OK button again, to select "Guide". 3. Select the your required guide ("Now & Next Guide" or "Full Guide") by pressing the ▲ or ▼ button. 4. Press the ENTER/OK button. 5. Press the green button. All the channel lists and the favorite channel lists will be toggled. 6.
Adjusting the Menu Translucency You can set the translucency of the menu. 1. Press the D.MENU button to display the DTV menu. 2. Press the ▲ or ▼ button to select "Setup", then press the ENTER/OK button. 3. Press the ▲ or ▼ button to select "Menu Transparency" then press the ENTER/OK button. 4. Select the required option ("High", "Medium", "Low", or "Opaque") by pressing the ▲ or ▼ button, and press the ENTER/OK button to change the setting. 5. Press the EXIT button to exit.
Setting the Subtitle You can activate and deactivate the subtitles. 1. Press the D.MENU button to display the DTV menu. 2. Press the ▲ or ▼ button to select "Setup", then press the ENTER/OK button. 3. Press the ▲ or ▼ button to select "Subtitle ", then press the ENTER/OK button. 4. Select "On" by pressing the ▲ or ▼ button. Press the ENTER/OK button. 5. Press the EXIT button to exit.
Selecting the Digital Text (UK only) If the programme is broadcast with digital text, this feature is Setup enabled. Digital Text : Enable Disable 1. Press the D.MENU button to display the DTV menu. Time Zone Enable System 2. Press the ▲ or ▼ button to select "Setup", then press the ENTER/OK button. 3. Press the ▲ or ▼ button to select "Digital Text", then press the ENTER/OK button. Move Enter Return 4. Press the ▲ or ▼ button to select "Disable" or "Enable". Press the ENTER/OK button. 5.
Checking the Signal Information You can get information about the signal status. 1. Press the D.MENU button to display the DTV menu. 2. Press the ▲ or ▼ button to select "Setup", then press the ENTER/OK button. 3. Press the ▲ or ▼ button to select "System", then press the ENTER/OK button. 4. Press the ▲ or ▼ button to select "Signal Information", then press the ENTER/OK button. 5. Press the EXIT button to exit. If the signal status is poor, the "No signal." message is displayed.
Viewing Common Interface This contains information on CAM inserted in the CI slot and displays it. 1. Press the D.MENU button to display the DTV menu. 2. Press the ▲ or ▼ button to select "Setup", then press the ENTER/OK button. 3. Press the ▲ or ▼ button to select "System", then press the ENTER/OK button. 4. Press the ▲ or ▼ button to select "Common Interface", then press the ENTER/OK button. 5. Press the ENTER/OK button to display the information for your application. 6. Press the EXIT button to exit.
Resetting You can reset the values stored to the factory default values. The Reset operation deletes all channel information and user preferences returningall values to their default factory state. 1. Press the D.MENU button to display the DTV menu. 2. Press the ▲ or ▼ button to select "Setup", then press the ENTER/OK button. 3. Press the ▲ or ▼ button to select "System", then press the ENTER/OK button. 4. Press the ▲ or ▼ button to select "Reset", then press the ENTER/OK button. 5.
Preference This menu consists of 6 sub-menus: Primary Subtitle Language, Secondary Subtitle Language, Primary Audio Language, Secondary Audio Language, Primary Teletext Language, and Secondary Teletext Language. Using this feature, users can select one of the languages (English, German, Italian, Swedish, French, Welsh, Gaelic, Irish, Danish, Finnish, Norwegian, Spanish, Czech, and Greek). The language selected here is the default when the user selects a channel.
Displaying the Teletext Information You can display teletext information at any time, but signal reception must be good. Otherwise: Information may be missing. Some pages may not be displayed. To activate the teletext mode and display the contents page: 1. Using the P ( ) or P the teletext service. ( ) button, select the channel providing 2. Press the TEXT/MIX ( ) button to activate the teletext mode. The contents page is displayed.
Using Fastext to Select a Teletext Page The various topics included in the teletext pages are colour-coded, and can be selected by pressing the coloured buttons on the remote control. 1. Display the teletext contents page by pressing the TEXT/MIX ( button. 2. Press the coloured button corresponding to the topic that you wish to select (The available topics are listed on the status information line). 3. Press the Red button to display the previous page. Press the Green button to display the next page.
Remote Control Codes VCR Brand SAMSUNG ADMIRAL AIWA AKAI AUDIO DYNAMICS BELL&HOWELL BROKSONIC CANDLE CANON CITIZEN COLORTYME CRAIG CURTIS MATHES DAEWOO DB DIMENSIA DYNATECH ELECTROHOME EMERSON FISHER FUNAI GENERAL ELECTRIC GO VIDEO HARMAN KARDON HITACHI INSTANT REPLAY JC PENNEY JCL JVC KENWOOD KLH KONIA LG(Goldstar) LIOYD LOGIK LXI MAGNAVOX MARANTZ MARTA MEI MEMOREX MGA MIDLAND MINOLTA MITSUBISHI Code 000 001 002 003 004 005 077 078 079 020 025 004 027 032 007 026 018 022 002 003 006 008 015 055 021 056 00
CABLE BOX Brand SAMSUNG GI HAMLIN HITACHI JERROLD MACOM MAGNAVOX OAK PANASONIC PHILIPS PIONEER RCA REGAL Code 000 001 041 003 024 025 030 038 039 025 030 019 023 026 003 022 019 021 004 018 014 022 003 Brand REGENCY SA SCIENTIFIC ATLAN SPRUCER STARGATE 2000 SYLVANIA TEXSCAN TOCOM UNIVERSAL VIEWSTAR WAMER AMEX ZENITH 002 003 004 005 006 007 031 028 027 037 044 023 028 020 044 040 Code 015 023 042 043 042 043 022 036 016 016 032 033 034 019 021 023 028 046 017 029 035 037 045 SAMSUNG DVD Product DVD DVD
DVD Brand PANASONIC PHILIPS ROTEL RIO RCA RAITE ROWA SAMPO SONY SHERWOOD SVA SYLVANIA SHARP SANSUI SANYO SHINSONIC Code 024 034 124 134 136 137 138 036 076 117 118 120 023 035 074 075 131 132 073 038 104 026 029 126 127 128 129 130 141 039 041 042 043 093 140 062 062 090 094 Brand THOMSON TOSHIBA TECHNICS TVIEW TOKAI TEAC TECHWOOD TREDEX URBAN CONCEPTS VENTURER VOCOPRO YAMAHA YAMAKAWA XWAVE ZENITH Code 145 028 062 076 139 072 073 096 097 098 099 101 076 075 102 032 063 040 073 103 076 121 SAMSUNG SET-TO
Setting up Your PC Software (Based on Windows XP) The Windows display-settings for a typical computer are shown below. The actual screens on your PC may be different depending upon your particular version of Windows and your particular video card. Even if your actual screens look different, the same, basic set-up information will apply in almost all cases. (If not, contact your computer manufacturer or Samsung Dealer.) 1. 2. First, click on "Control Panel" on the Windows start menu.
Setting the PC Coarse and Fine Tuning of the Image (Image Lock): The purpose of picture quality adjustment is to remove or reduce picture noise. If the noise is not removed by Fine-tuning alone, then adjust the frequency as best as possible (coarse) and Fine-tune again. After the noise has been reduced, re-adjust the picture so that it is aligned on the center of screen.
Wall-Mount Adjustment (LE40S8, LE46S8) (Sold separately) Once the wall mount is installed, the position of your TV can be easily adjustable. TV 1. Press the MENU button to display the menu. Press the ▲ or ▼ button to select “Setup”, then press the ENTER/OK button. 2. Press the ▲ or ▼ buttons to select “Wall-Mount Adjustment”, then press the ENTER/OK button. 3. Adjust to the desired position using the ▲,▼,◄,► buttons. 4. Press the EXIT button to exit.
Using the Anti-Theft Kensington Lock The Kensington lock is a device used to physically fix the system when using it in a public place. The locking device has to be purchased separately. The appearance and locking method may differ from the illustration depending on the manufacturer. Please refer to the manual provided with the Kensington lock for proper use. 1. Insert the locking device into the Kensington slot on the LCD TV (Figure 1), and turn it in the locking direction (Figure 2). 2.
Technical and Environmental Specifications Model Name LE26S8 LE32S8 LE37S8 Screen Size (Diagonal) 26 inch 32 inch 37 inch Power Consumption 120 W 150 W 170 W 1360 x 768 @ 60 Hz 1360 x 768 @ 60 Hz 1360 x 768 @ 60 Hz 5WX2 10 W X 2 10 W X 2 744 X 81 X 447 mm 744 X 232 X 507 mm 874 X 81 X 531 mm 874 X 291 X 577 mm 1013 X 93 X 602 mm 1013 X 300 X 652 mm 11 kg 15 kg 21 kg 10 °C to 40 °C (50 °F to 104 °F) 10 % to 80 %, non-condensing -20 °C to 45 °C (-4 °F to 113 °F) 5 % to 95 %, non-conden
This page is intentionally left blank. BN68-01182B-Eng-0312.
Précautions à prendre lors de l’affichage d’une image fixe Une image fixe peut causer des dommages irrémédiables à l’écran du téléviseur. • N’affichez pas une image fixe sur l’écran LCD plus de 2 heures. Cela pourrait provoquer une rémanence de l’image à l’écran. Cette rémanence de l’image est également appelée “brûlure de l’écran”. Pour éviter une telle rémanence de l’image à l’écran, réduisez la luminosité et le contraste de l’écran lorsque vous laissez une image fixe affichée.
Sommaire BRANCHEMENT ET INSTALLATION DE VOTRE TELEVISEUR REGLAGE DES CANAUX Mémorisation automatique des canaux............ 10 Mémorisation manuelle des canaux...................11 Réglage des listes des chaînes........................ 12 Activation du verrouillage parental.................... 12 Organisation des canaux mémorisés................ 13 Attribution de noms aux canaux........................ 13 Réception des canaux grâce à la syntonisation fine......................................
UTILISATION DE LA FONCTION DTV UTILISATION DE LA FONCTION TELETEXTE Aperçu du Système Menu DTV......................... 32 Mise à jour automatique de la liste des chaînes....................................................... 33 Mise à jour manuelle de la liste des chaînes.... 33 Modification de vos canaux favoris................... 34 Sélection de la liste des chaînes....................... 36 Affichage des informations relatives aux programmes...........................................
Liste des pièces Vérifiez que les éléments suivants sont inclus avec votre téléviseur LCD. S’il manque des éléments, contactez votre revendeur.
Présentation du panneau de commande ➣ La couleur et la forme du produit peuvent varier en fonction du modèle. 1 SOURCE 4 Affiche un menu de toutes les sources d’entrée Permet de changer de canal. disponibles Dans le menu à l’écran, utiliser les boutons (TV, Ext.1, Ext.2, AV, S-Vidéo (S-Video), de la même façon que les boutons Composant (Component), PC, HDMI1, HDMI2 et et de la télécommande. DTV).
Présentation du panneau de branchement 1 2 3 4 5 6 @ ! Entrée de l’alimentation 09 8 7 ➣ La couleur et la forme du produit peuvent varier en fonction du modèle. ➣ Lorsque vous branchez un périphérique externe à votre téléviseur, assurez-vous que celui-ci est éteint. ➣ Lorsque vous branchez un périphérique externe, faites correspondre les couleurs de la borne de connexion et du câble.
4 Branchement à un réseau de télévision câblée ou hertzienne Afin de retransmettre correctement les canaux de télévision, le téléviseur doit recevoir un signal depuis l’une des sources suivantes : - une antenne extérieure, un réseau de télévision câblée ou un réseau par satellite. 5 Branchement de la CI CARD (carte d’interface commune) - Si vous n’insérez pas la carte d’interface commune dans certains canaux, “Signal brouillé” s’affiche sur l’écran.
Présentation de la télécommande 1 Sélectionne un dispositif cible qui sera commandé par la télécommande Samsung (TV, DVD, STB, CABLE, VCR) (Reportez-vous aux pages 49~51�) 2 Bouton de mise en veille du téléviseur 3 Pavé numérique pour l’accès direct aux canaux 4 Sélection de canaux à 1 ou 2 chiffres 5 Affiche le menu “Liste des chaînes” à l’écran.
Insertion des piles dans la télécommande 1. Soulevez le couvercle situé à l’arrière de la télécommande comme indiqué sur la figure. 2. Placez-y deux piles AAA. ➣ Assurez-vous que les pôles “+” et “-” des piles correspondent au schéma situé à l’intérieur du compartiment. 3. Remettez le couvercle en place. ➣ Retirez les piles et stockez-les dans un endroit frais et sec si vous n’utilisez pas la télécommande pendant longtemps. La télécommande peut être utilisée jusqu’à environ 7 mètres du téléviseur.
Plug & Play Lorsque vous allumez le téléviseur pour la première fois, plusieurs Plug & Play réglages de base s’effectuent l’un après l’autre de manière automatique. Les réglages disponibles sont les suivants : ➣ Toute fonction relative à la télévision numérique (DVB) ne peut fonctionner que dans un pays ou une région où des signaux terrestres numériques Start Plug & Play. de type DVB-T (MPEG2) sont diffusés. Consultez votre revendeur pour savoir si vous pouvez recevoir des signaux DVB-T.
Si vous souhaitez réinitialiser cette fonction... 1. Appuyez sur le bouton MENU pour afficher le menu. Appuyez sur le bouton ou pour sélectionner “Configuration” puis appuyez sur le bouton ENTER/OK. 2. Appuyez de nouveau sur le bouton ENTER/OK pour sélectionner le mode “Plug & Play”. 3. Le message “Démarrer Plug & Play” s’affiche.
Mémorisation manuelle des canaux Vous pouvez mémoriser jusqu’à 100 canaux, y compris ceux reçus via les réseaux câblés. Lors de la mémorisation manuelle des canaux, vous pouvez choisir : de mémoriser ou non chaque canal trouvé ; le numéro du programme qui vous servira à identifier chaque canal mémorisé. 1. Appuyez sur le bouton MENU pour afficher le menu. Appuyez sur le bouton ou pour sélectionner “Canal” puis appuyez sur le bouton ENTER/OK. 2.
Réglage des listes des chaînes Réglez les canaux selon vos préférences. Vous pouvez facilement supprimer, ajouter ou verrouiller des canaux. 1. Appuyez sur le bouton MENU pour afficher le menu. Appuyez sur le bouton ou pour sélectionner “Canal” puis appuyez sur le bouton ENTER/OK. 2. Appuyez sur le bouton ou pour sélectionner “Gestionnaire de Chaînes” puis appuyez sur le bouton ENTER/OK. 3. Appuyez à nouveau sur le bouton ENTER/OK pour sélectionner “Liste des chaînes”. 4.
Organisation des canaux mémorisés Vous pouvez intervertir les numéros de deux canaux pour : TV Canal Changer l’ordre numérique dans lequel ces canaux ont Pays : Belgique Mémorisation Auto été mémorisés automatiquement. Mémorisation Manuelle Gestionnaire de Chaînes Attribuer des numéros facilement mémorisables aux Tri des canaux canaux que vous regardez le plus souvent. Nom station Réglage fin 1. Appuyez sur le bouton MENU pour afficher le menu.
Réception des canaux grâce à la syntonisation fine Utilisez la syntonisation précise pour régler manuellement un canal spécifique en vue d’une réception optimale. 1. Utilisez le pavé numérique pour sélectionner directement le canal à régler. 2. Appuyez sur le bouton MENU pour afficher le menu. Appuyez sur le bouton ou pour sélectionner “Canal” puis appuyez sur le bouton ENTER/OK. 3. Appuyez sur le bouton ou pour sélectionner “Réglage fin” puis appuyez sur le bouton ENTER/OK. 4.
Changement de la norme Image Vous pouvez sélectionner le type d’image qui correspond le mieux à vos exigences d’affichage. 1. Appuyez sur le bouton MENU pour afficher le menu. Appuyez sur le bouton ENTER/OK pour sélectionner “Image”. 2. Appuyez de nouveau sur le bouton ENTER/OK pour sélectionner “Mode”. 3. Appuyez sur le bouton ou pour sélectionner l’effet d’image souhaité. Appuyez sur le bouton ENTER/OK. 4. Appuyez sur le bouton EXIT pour quitter le menu.
Changement de la nuance couleur Vous pouvez sélectionner la nuance de couleur la plus agréable au regard. 1. Pour sélectionner l’effet d’image requis, suivez les instructions 1 à 3 du chapitre “Changement de la norme Image” (à la page 15). 2. Appuyez sur le bouton ou pour sélectionner “Nuance Coul.” puis appuyez sur le bouton ENTER/OK. 3. Appuyez sur le bouton ou pour sélectionner la nuance de couleurs souhaitée. Appuyez sur le bouton ENTER/OK. 4. Appuyez sur le bouton EXIT pour quitter le menu.
Réglages des détails de l’image Vous pouvez sélectionner la nuance de couleur la plus TV Image agréable au regard. Mode : Cinéma Contraste 100 1. Appuyez sur le bouton MENU pour afficher le menu. Luminosité 50 Netteté 75 2. Appuyez sur le bouton ENTER/OK pour sélectionner “Image”. Couleur 55 Teinte G50 R50 3. Appuyez sur le bouton ou pour sélectionner “Réglages Nuance Coul : Froide1 Réglages des détails des détails” puis appuyez sur le bouton ENTER/OK.
Changement de la taille de l’image Vous pouvez sélectionner la taille d’image qui correspond le mieux à vos besoins d’affichage. 1. Appuyez sur le bouton MENU pour afficher le menu. Appuyez sur le bouton ENTER/OK pour sélectionner “Image”. 2. Appuyez sur le bouton ou pour sélectionner “Taille” puis appuyez sur le boutonENTER/OK. 3. Sélectionnez l’option requise en appuyant sur le bouton ou . Appuyez sur le bouton ENTER/OK. 4. Appuyez sur le bouton EXIT pour quitter le menu.
Arrêt sur image Appuyez sur le bouton STILL pour transformer une image mouvante en une image fixe. Appuyez de nouveau pour annuler. Sélection du mode d’affichage Lorsque vous fixez la taille de l’image à 16/9 auto sur un TV téléviseur 16:9, vous pouvez déterminer la taille selon laquelle vous voulez afficher une image 4:3 WSS (Wide Screen Service, service d’écran large) ou rien. Chaque pays européen emploie une taille d’image ; cette fonction permet aux utilisateurs de sélectionner la leur 1.
NR numérique / Couleur active / DNIe Si le signal de radiodiffusion reçu est faible, vous pouvez TV activer la fonction Réduction du bruit numérique pour favoriser la réduction d’images fantômes ou statiques qui peuvent apparaître à l’écran. 1. Appuyez sur le bouton MENU pour afficher le menu. Appuyez sur le bouton ENTER/OK pour sélectionner “Image”. 2. Sélectionnez l’option requise en appuyant sur le bouton ou puis appuyez sur le bouton ENTER/OK.
Affichage Picture In Picture (PIP) Vous pouvez afficher une image secondaire dans l’image Mode : Custom Configuration TV Equalizer principale du programme télévisé ou de l’entrée vidéo. De cette Plus SRS TS XT : Off manière, vous pouvez regarder ou surveiller le programme Auto Volume : Off Mode éco :: Arrêt télévisé ou l’entrée vidéo depuis n’importe quel équipement Internal Mute Off Niveau noir HDMI: Bas Reset branché tout en regardant l’image principale. PIP 1.
Niveau de noir HDMI Vous pouvez directement choisir le niveau de noir sur l’écran pour régler la profondeur de l’écran. 1. Appuyez sur le bouton MENU pour afficher le menu. Appuyez sur le bouton ou pour sélectionner “Configuration” puis appuyez sur le bouton ENTER/OK. 2. Appuyez sur le bouton ou pour sélectionner “Niveau noir HDMI” puis appuyez sur le bouton ENTER/OK. 3. Appuyez sur le bouton ou pour sélectionner “Normal” ou “Bas” puis appuyez sur le bouton ENTER/OK. 4.
Réglage des paramètres du son Les paramètres du son peuvent être réglés selon vos préférences personnelles. 1. Appuyez sur le bouton MENU pour afficher le menu. Appuyez sur le bouton ou pour sélectionner “Son” puis appuyez sur le bouton ENTER/OK. 2. Appuyez sur le bouton ou pour sélectionner “Egaliseur” puis appuyez sur le bouton ENTER/OK. 3. Appuyez sur le bouton ou pour sélectionner un élément spécifique. Appuyez sur le bouton ENTER/OK. 4.
Branchement du casque Vous pouvez brancher un casque à votre téléviseur, si vous souhaitez regarder un programme sur votre téléviseur sans déranger les autres personnes présentes dans la pièce. ➣ Lorsque vous insérez la prise casque dans le port correspondant, vous pouvez utiliser uniquement les options “SRS TS XT” et “Volume auto” dans le menu “Son”. ➣ L’utilisation prolongée d’un casque à un niveau sonore élevé peut endommager l’ouïe.
Sélection de Silence Int. Pour entendre le son par l’intermédiaire de haut-parleurs séparés, désactivez l’amplificateur interne. 1. Appuyez sur le bouton MENU pour afficher le menu. Appuyez sur le bouton ou pour sélectionner “Son” puis appuyez sur le bouton ENTER/OK. 2. Appuyez sur le bouton ou pour sélectionner “Silence Int.” puis appuyez sur le bouton ENTER/OK. 3. Appuyez sur le bouton ou pour sélectionner “Marche” ou “Arrêt”. Appuyez sur le bouton ENTER/OK. 4.
Reinitialisation des paramètres de son à leur valeur par défaut Si le mode Jeu est activé, la fonction Réinitialiser est activée. TV Son Sélectionner la fonction Réinitialiser après avoir réglé Mode : Personnalisé Egaliseur l’égaliseur rétablit ses paramètres par défaut. SRS TS XT : Arrêt 1. Appuyez sur le bouton MENU pour afficher le menu.
Réglage du minuteur de mise en veille Vous pouvez sélectionner une durée (entre 30 et 180 minutes) à l’issue de laquelle le téléviseur passe automatiquement en mode veille. 1. Appuyez sur le bouton MENU pour afficher le menu. Appuyez sur le bouton ou pour sélectionner “Configuration” puis appuyez sur le bouton ENTER/OK. 2. Appuyez sur le bouton ou pour sélectionner “Horloge” puis appuyez sur le boutonENTER/OK. 3.
Choix de la langue Lorsque vous utilisez le téléviseur/moniteur pour la première fois, vous devez sélectionner la langue utilisée pour afficher les menus et les indications. 1. Appuyez sur le bouton MENU pour afficher le menu à l’écran. Appuyez sur le bouton or pour sélectionner “Configuration” puis appuyez sur le bouton ENTER/OK. 2. Appuyez sur le bouton ou pour sélectionner “Langue” puis appuyez sur le bouton ENTER/OK. 3.
Sélection du mode d’écran bleu / Sélection de la mélodie Ecran bleu : Lorsque le signal est très faible ou inexistant, un écran bleu remplace automatiquement l’image brouillée. Si vous souhaitez continuer à visionner une image de médiocre qualité, vous devez régler le mode “Ecran Bleu” sur “Arrêt”. Mélodie : Cette fonction vous permet d’entendre une mélodie à la mise sous ou hors tension de votre téléviseur. 1. Appuyez sur le bouton MENU pour afficher le menu.
Utilisation de la fonction d’économie d’énergie Cette fonction règle la luminosité du téléviseur afin de réduire la consommation d’énergie. Lorsque vous regardez la télévision la nuit, définissez l’option “Mode éco.” sur “Elevé” pour réduire la fatigue des yeux et la consommation d’énergie. 1. Appuyez sur le bouton MENU pour afficher le menu à l’écran. Appuyez sur le bouton ou pour sélectionner “Configuration” puis appuyez sur le bouton ENTER/OK. 2.
Sélection de la source Vous pouvez sélectionner parmi les sources extérieures connectées aux prises d’entrée du téléviseur. 1. Appuyez sur le bouton MENU pour afficher le menu. Appuyez sur le bouton ou pour sélectionner “Input” puis appuyez sur ENTER/OK. 2. Appuyez à nouveau sur le bouton ENTER/OK pour sélectionner “Liste Source”. ➣ Lorsque aucun périphérique externe n’est connecté, seules les options “TV”, “Ext.1”, “Ext.2” sont activées dans la “Liste sources”.
Aperçu du Système Menu DTV ➣ La société ne peut pas garantir l’utilisation normale du menu DTV pour les pays autres que les 6 pays pris en charge (Royaume-Uni, Allemagne, France, Italie, Espagne, Autriche) car seules les normes de ces pays sont prises en charge. De plus, lorsque le pays du flot d’émission diffère du pays sélectionné par l’utilisateur, la bande apparaissant dans la bannière des canaux, Info, Guide, Gestionnaire de Chaînes, etc. ne peut être affichée correctement.
Mise à jour automatique de la liste des chaînes Vous pouvez mettre à jour la liste des chaînes lorsque Mode : Custom Mémorisation Auto Equalizer l’émetteur ajoute de nouveaux services ou si vous déplacez SRS TS XT : Off votre téléviseur. Auto Volume : Off Balayage pour services numériques... Internal Mute : Off 1. Appuyez sur le bouton D.MENU pour afficher le menu DTV. 35% Reset Service trouvé: 24 Canal: 38 2.
Modification de vos canaux favoris Vous pouvez modifier vos canaux favoris à l’aide des quatre boutons de couleur. 1. Appuyez sur le bouton D.MENU pour afficher le menu DTV. 2. Appuyez sur le bouton ou pour sélectionner “Canal”, puis appuyez sur le bouton ENTER/OK. 3. Appuyez sur le bouton ou pour sélectionner “Modif. les canaux favoris” puis appuyez sur le bouton ENTER/OK. 4. Appuyez sur le bouton rouge pour afficher l’ensemble des canaux actuellement mémorisés. 5.
Déplacer 1. Appuyez sur le bouton D.MENU pour afficher le menu DTV. 2. Appuyez sur le bouton ou pour sélectionner “Canal”, puis appuyez sur le bouton ENTER/OK. 3. Appuyez sur le bouton ou pour sélectionner “Modif. les canaux favoris” puis appuyez sur le bouton ENTER/OK. 4. Sélectionnez le canal souhaité en appuyant sur le bouton ou . 5. Appuyez sur le bouton vert. ➣ L’icône “ ” s’affiche à gauche du nom du canal. 6.
Sélection de la liste des chaînes Vous pouvez exclure les canaux que vous avez choisis Liste des chaînes Tous les canaux Test Card M' v2.0 des canaux que vous avez balayés. Lors du balayage des 1/2 23 bid-up.tv 60 Television X 1 Test Card M' canaux mémorisés, ceux que vous avez choisi d’ignorer ne 25 TCM 70 BBC Radio 1 3 Vida003b 26 UKTV Style 72 BBC Radio 2 4 Vida004b s’affichent pas.
Affichage des informations relatives au Guide de programme électronique (GPE) Les informations relatives au Guide de programme électronique (GPE) sont fournies par les émetteurs. Les entrées de programmes peuvent apparaître en blanc ou ne pas être à jour en raison de l’information diffusée sur un canal donné. L’affichage fera une mise à jour automatique dès qu’une nouvelle information sera disponible.
Utilisation de la liste réglée Si vous créez une liste réglée de visionnage de programmes que vous souhaitez regarder, le canal passera automatiquement au programme programmé à l’heure programmée même si vous en regardez un autre. 1. Appuyez sur le bouton D.MENU pour afficher le menu DTV. 2. Appuyez sur le bouton ENTER/OK pour sélectionner “Guide”. 3. Appuyez sur le bouton ou pour sélectionner “Liste en annexe”, puis appuyez sur le bouton ENTER/OK. 4. Press the red button rouge.
Visualisation de tous les canaux et des canaux favoris Dans le menu EPG, vous pouvez afficher tous les canaux ou les canaux favoris. 1. Appuyez sur le bouton D.MENU pour afficher le menu DTV. Guide Now & Next 2. Appuyez sur le bouton ENTER/OK pour sélectionner “Guide”. 13:28 Mer 16 Fév 3. Sélectionnez l’option requise (“Guide Now & Next” ou “Guide Extreme Machines: Armoured Cars All Channels complet”) en appuyant sur le bouton ou . Information 4. Appuyez de nouveau sur le bouton ENTER/OK.
Réglage de la transparence du menu Vous pouvez régler la transparence du menu. 1. Appuyez sur le bouton D.MENU pour afficher le menu DTV. 2. Appuyez sur le bouton ou pour sélectionner “Configuration” puis appuyez sur le bouton ENTER/OK. 3. Appuyez sur le bouton ou pour sélectionner “Transp. menu” puis appuyez sur le bouton ENTER/OK. 4.
Configuration des sous-titres Vous pouvez activer ou désactiver la fonction sous-titres. 1. Appuyez sur le bouton D.MENU pour afficher le menu DTV. 2. Appuyez sur le bouton ou pour sélectionner “Configuration” puis appuyez sur le bouton ENTER/OK. 2. Appuyez sur le bouton ou pour sélectionner “Sous-titres” puis appuyez sur le bouton ENTER/OK. 4. Sélectionnez “Marche” en appuyant sur le bouton ou . Appuyez sur le bouton ENTER/OK. 5. Appuyez sur le bouton EXIT pour quitter le menu.
Sélection du texte numérique (Royaume-Uni uniquement) Si le programme est diffusé avec du texte numérique, cette Configuration fonction est activée. 1. Appuyez sur le bouton D.MENU pour afficher le menu DTV. Texte numérique : Désactiver Enable Fuseau Horaire 2. Appuyez sur le bouton ou pour sélectionner Activer Système “Configuration” puis appuyez sur le bouton ENTER/OK. 3. Appuyez sur le bouton ou pour sélectionner “Texte numérique” puis appuyez sur le bouton ENTER/OK.
Vérification des informations relatives au signal Vous pouvez obtenir des informations relatives à l’état du signal. 1. Appuyez sur le bouton D.MENU pour afficher le menu DTV. 2. Appuyez sur le bouton ou pour sélectionner “Configuration” puis appuyez sur le bouton ENTER/OK. 3. Appuyez sur le bouton ou pour sélectionner “Système” puis appuyez sur le bouton ENTER/OK. 4. Appuyez sur le bouton ou pour sélectionner “Informations de signal” puis appuyez sur le bouton ENTER/OK. 5.
Visualisation de l’interface commune Contient des informations relatives à la CAM insérée dans la fente CI et les affiche. 1. Appuyez sur le bouton D.MENU pour afficher le menu DTV. 2. Appuyez sur le bouton ou pour sélectionner “Configuration” puis appuyez sur le bouton ENTER/OK. 3. Appuyez sur le bouton ou pour sélectionner “Système” puis appuyez sur le bouton ENTER/OK. 4. Appuyez sur le bouton ou pour sélectionner “Interface commune”, puis appuyez sur le bouton ENTER/OK. 5.
Réinitialisation Vous pouvez ramener tous les réglages mémorisés à leur valeur par défaut.. ➣ La réinitialisation supprime toutes les informations relatives aux canaux et les préférences de l’utilisateur. 1. Appuyez sur le bouton D.MENU pour afficher le menu DTV. 2. Appuyez sur le bouton ou pour sélectionner “Configuration” puis appuyez sur le bouton ENTER/OK. 3. Appuyez sur le bouton ou pour sélectionner “Système” puis appuyez sur le bouton ENTER/OK. 4.
Préférence Ce menu compte 6 sous-menus : Langue Première Langue de Sous-titres, Deuxième langue de SousLangue audio titres, Première Langue Audio, Deuxième Langue Audio, Langue des sous-titres Première Langue Télétexte, Deuxième Langue Télétexte. Langue du télétexte A l’aide de cette fonction, les utilisateurs peuvent sélectionner Préférence une de ces langues (anglais, allemand, italien, français, gallois, gaélique, irlandais, danois, finnois, norvégien, espagnol, tchèque Move Enter Return et grec).
Affichage des informations télétexte Vous pouvez afficher des informations télétexte à tout moment, mais la réception du signal doit être bonne. Dans le cas contraire : des informations peuvent manquer certaines pages peuvent ne pas s’afficher Pour activer le mode télétexte et afficher les informations télétexte : 1. Sélectionnez le canal qui propose le service télétexte grâce aux boutons P ( ) ou P ( ). 2. Appuyez sur le bouton TEXT/MIX ( ) pour activer le mode télétexte.
Utilisation de Fastext pour sélectionner une page télétexte Les différents sujets inclus dans les pages télétexte disposent d’un code de couleur et peuvent être sélectionnés à l’aide des boutons colorés de la télécommande. 1. Affichez les informations télétexte en appuyant sur le bouton TEXT/MIX ( ). 2. Appuyez sur le bouton coloré correspondant au sujet que vous voulez sélectionner (les sujets disponibles sont listés sur la ligne d’informations d’état). 3.
Codes de télécommande Magnétoscope Marque SAMSUNG ADMIRAL AIWA AKAI AUDIO DYNAMICS BELL&HOWELL BROKSONIC CANDLE CANON CITIZEN COLORTYME CRAIG CURTIS MATHES DAEWOO DB DIMENSIA DYNATECH ELECTROHOME EMERSON FISHER FUNAI GENERAL ELECTRIC GO VIDEO HARMAN KARDON HITACHI INSTANT REPLAY JC PENNEY JCL JVC KENWOOD KLH KONIA LG(Goldstar) LIOYD LOGIK LXI MAGNAVOX MARANTZ MARTA MEI MEMOREX MGA MIDLAND MINOLTA MITSUBISHI Code 000 001 002 003 004 005 077 078 079 020 025 004 027 032 007 026 018 022 002 003 006 008 015 055
DECODEUR D’EMISSIONS CABLEES Marque SAMSUNG GI HAMLIN HITACHI JERROLD MACOM MAGNAVOX OAK PANASONIC PHILIPS PIONEER RCA REGAL Code 000 001 041 003 024 025 030 038 039 025 030 019 023 026 003 022 019 021 004 018 014 022 003 Marque REGENCY SA SCIENTIFIC ATLAN SPRUCER STARGATE 2000 SYLVANIA TEXSCAN TOCOM UNIVERSAL VIEWSTAR WAMER AMEX ZENITH Code 015 023 042 043 042 043 022 036 016 016 032 033 034 019 021 023 028 046 017 029 035 037 045 Code 000 001 002 003 004 005 006 007 008 009 010 011 012 013 Produit Ho
LECTEUR DVD Marque PANASONIC PHILIPS ROTEL RIO RCA RAITE ROWA SAMPO SONY SHERWOOD SVA SYLVANIA SHARP SANSUI SANYO SHINSONIC Code 024 034 124 134 136 137 138 036 076 117 118 120 023 035 074 075 131 132 073 038 104 026 029 126 127 128 129 130 141 039 041 042 043 093 140 062 062 090 094 Marque THOMSON TOSHIBA TECHNICS TVIEW TOKAI TEAC TECHWOOD TREDEX URBAN CONCEPTS VENTURER VOCOPRO YAMAHA YAMAKAWA XWAVE ZENITH Code 145 028 062 076 139 072 073 096 097 098 099 101 076 075 102 032 063 040 073 103 076 121 BOIT
Configuration de votre logiciel PC (basée sur Windows XP) Les paramètres d’affichage Windows indiqués ci-dessous sont ceux d’un ordinateur type. Les écrans réels de votre PC peuvent être différents, en fonction de votre propre version de Windows et de votre propre carte vidéo. Même si vos écrans réels apparaissent différents, les mêmes informations de base s’appliquent dans la plupart des cas. (Dans le cas contraire, contactez le fabricant de votre ordinateur ou votre revendeur Samsung.) 1.
Configuration du PC Réglage de base et réglage précis de l’image (Verrouillage Mode : Custom TV Verrouillage Image Equalizer Image) : SRS TS XT : Off Regl. Base 50 Lorsque vous réglez la qualité de l’image, l’objectif est Auto Volume : Off Regl. Prec 50 d’éliminer ou de réduire les parasites visuels.
Réglage de la fixation murale (LE40S8, LE46S8) (vendue séparément) Grâce à l’installation d’une fixation murale, vous pouvez régler facilement la position de votre téléviseur. 1. Appuyez sur le bouton MENU pour afficher le menu. Appuyez sur le bouton ▲ ou ▼ pour sélectionner “Configuration” puis appuyez sur le bouton ENTER/OK. 2. Appuyez sur le bouton ▲ or ▼ pour sélectionner “Ajustement fixation murale” puis appuyez sur le bouton ENTER/OK. 3.
Utilisation du verrouillage Kensington antivol Le verrouillage Kensington est un dispositif utilisé pour fixer physiquement le système dans le cas d’une utilisation dans un endroit public. Le dispositif de verrouillage doit être acheté séparément. L’aspect et la méthode de verrouillage peuvent différer de l’illustration en fonction du fabricant. Reportez-vous au manuel fourni avec le verrouillage Kensington pour une utilisation correcte. 1.
Spécifications techniques et environnementales Nom du modèle Taille de l’écran (diagonale) Consommation électrique Résolution PC Son Sortie Dimensions (L x P x H) Corps Avec pied Poids (avec support) Considérations environnementales Température de fonctionnement Humidité au cours du fonctionnement Température de stockage Humidité sur le lieu de stockage Nom du modèle Taille de l’écran (diagonale) Consommation électrique Résolution PC Son Sortie Dimensions (L x P x H) Corps Avec pied Poids (avec support) Co
Cette page est laissée intentionnellement en blanc. BN68-01182B-Fre-0312.
Vorsichtsmaßnahmen beim Anzeigen von Standbildern Ein Standbild kann zu einer dauerhaften Beschädigung des Fernsehbildschirms führen. • Zeigen Sie kein Standbild länger als 2 Stunden auf dem LCD-Monitor an, da das Bild auf diese Weise einbrennen kann. Das Einbrennen von Standbildern wird auch als “Bildkonservierung” bezeichnet. Sie können das Einbrennen vermeiden, indem Sie die Helligkeit und den Kontrast des Monitors beim Anzeigen von Standbildern verringern.
Inhalt ANSCHLIESSEN UND VORBEREITEN DES FERNSEHGERÄTS Lieferumfang....................................................... 3 Anbringen des Fußes.......................................... 3 Anbringen der Wandhalterung............................ 3 Bedienfeld........................................................... 4 Anschlussfeld...................................................... 5 Fernbedienung.................................................... 7 Batterien in die Fernbedienung einsetzen..
DTV BENUTZEN VERWENDEN DER VIDEOTEXT-FUNKTION Vorschau des DTV-Menüsystems .................... 32 Kanalliste automatisch aktualisieren................. 33 Kanalliste manuell aktualisieren........................ 33 Bevorzugte Kanäle bearbeiten.......................... 34 Auswählen der Kanalliste.................................. 36 Programminformationen anzeigen.................... 36 EPG-Informationen (Elektronischer Programmführer) anzeigen...... 37 Verwenden der Vormerkliste.......
Lieferumfang Überprüfen Sie die Verpackung Ihres LCD-Fernsehgeräts auf Vollständigkeit. Falls Komponenten fehlen sollten, setzen Sie sich bitte mit Ihrem Händler in Verbindung.
Bedienfeld ➣ Die Produktfarbe und -form kann je nach Modell unterschiedlich sein. 1 SOURCE 4 Schaltet zwischen allen verfügbaren Signalquellen um (TV, Ext.1, Ext.2, AV, S-Video, Komp., PC, HDMI1, HDMI2, DTV). Im Bildschirmmenü können Sie diese Schaltfläche wie die ENTER/OK auf der Fernbedienung verwenden. 2 MENU 5 Drücken Sie diese Taste, um ein Bildschirmmenü 6 zu den Funktionen des Fernsehgeräts einzublenden. Im DTV-Modus wird das DTV-Menü angezeigt.
Anschlussfeld 1 2 3 4 5 6 @ ! Netzkabelbuchse 09 8 7 ➣ Die Produktfarbe und -form kann je nach Modell unterschiedlich sein. ➣ Wenn Sie ein externes Gerät an das Fernsehgerät anschließen möchten, muss das Gerät unbedingt ausgeschaltet sein. ➣ Achten Sie beim Anschließen eines externen Geräts auf die Farbcodierung: Stecker und Buchse müssen die gleiche Farbe aufweisen.
4 Antenne oder Fernsehkabel anschließen Damit die Fernsehkanäle korrekt empfangen werden, muss das Fernsehgerät an eine der folgenden Signalquellen angeschlossen sein: - Außenantenne / Kabelfernsehanschluss / Satellitenempfänger 5 Anschließen einer CI-Karte - Ohne eingelegte “CI-Karte” zeigt das Fernsehgerät auf einigen Kanälen ein “gestörtes Signal” an. - Die Verbindungsinformationen mit Telefonnummer, Kennung der CI-Karte, Hostkennung und anderen Angaben wird in ungefähr 2 bis 3 Minuten angezeigt.
Fernbedienung 1 Wählt ein Zielgerät aus, das mit der Samsung-Fernbedienung (TV, DVD, STB, CABLE, VCR) gesteuert werden soll. (Informationen hierzu finden Sie auf den Seiten 49~51.
Batterien in die Fernbedienung einsetzen 1. Heben Sie die Abdeckung auf der Rückseite der Fernbedienung an, wie in der Abbildung dargestellt. 2. Legen Sie zwei AAA-Batterien ein. ➣ Achten Sie darauf, dass die Pole der Batterien wie im Batteriefach angezeigt ausgerichtet sind. 3. Schieben Sie die Abdeckung wieder auf die Fernbedienung. ➣ Wenn die Fernbedienung für einen längeren Zeitraum nicht verwendet wird, nehmen Sie die Batterien heraus, und lagern Sie sie an einem kühlen, trockenen Ort.
Plug & Play Wenn das Fernsehgerät zum ersten Mal eingeschaltet wird, werden Plug & Play automatisch einige Grundeinstellungen vorgenommen. Die folgenden Einstellungen sind verfügbar. ➣ Funktionen für Digitalfernsehen (DVB) funktionieren nur in Ländern und Regionen, in denen digitale DVB-T-Signale (MPEG2) terrestrisch Start Plug & Play. gesendet werden. Fragen Sie bei Ihrem örtlichen Händler nach, ob Sie dort DVB-T empfangen können.
So setzen Sie diese Funktion zurück: 1. Drücken Sie zum Anzeigen des Menüs die Taste MENU. Drücken Sie die Taste oder , um “Einstellungen” auszuwählen, und drücken Sie anschließend die Taste ENTER/ OK. 2. Drücken Sie die Taste ENTER/OK erneut, um “Plug & Play” auszuwählen. 3. Die Meldung zum “Starten von Plug & Play” wird angezeigt.
Sender manuell speichern Sie können bis zu 100 Kanäle, einschließlich Kabelkanälen, speichern. Bei der manuellen Senderspeicherung sind folgende Optionen verfügbar: Gefundene Sender speichern. Die Programmnummer der einzelnen Sender, die Sie festlegen möchten. 1. Drücken Sie zum Anzeigen des Menüs die Taste MENU. Drücken Sie die Taste oder , um “Kanal” auszuwählen, und drücken Sie anschließend die Taste ENTER/OK. 2. Drücken Sie die Taste oder , um “Man.
Einstellen der Kanallisten Stellen Sie die Kanäle wie gewünscht ein. Sie können den gewünschten Sender auf einfache Weise löschen, hinzufügen oder sperren. 1. Drücken Sie zum Anzeigen des Menüs die Taste MENU. Drücken Sie die Taste oder , um “Kanal” auszuwählen, und drücken Sie anschließend die Taste ENTER/OK. 2. Drücken Sie die Taste oder , um “Programmverwaltung” auszuwählen, und drücken Sie dann die Taste ENTER/OK. 3. Drücken Sie die Taste ENTER/OK, um “Kanalliste” auszuwählen. 4.
Gespeicherte Sender sortieren Sie können die Nummern von zwei Kanälen austauschen, um: TV Kanal Die numerische Reihenfolge zu ändern, in der die Kanäle Land : Belgien Autom. speichern automatisch gespeichert wurden. Man. speichern Programmverwaltung Den Kanälen, die Sie am häufigsten sehen, einfach zu merkende Sortieren Nummern zuzuweisen. Name Feinabstimmung 1. Drücken Sie die Taste MENU, um das Menü anzuzeigen.
Senderfeinabstimmung durchführen Verwenden Sie die Feinabstimmung, um für bestimmte Kanäle TV Kanal die Empfangseinstellungen manuell zu optimieren. Land : Belgien Autom. speichern 1. Verwenden Sie die Zifferntasten, um den Kanal, den Sie fein Man. speichern Programmverwaltung abstimmen möchten, direkt auszuwählen. Sortieren Name 2. Drücken Sie zum Anzeigen des Menüs die Taste MENU.
Bildstandard ändern Sie können den Bildstandard auswählen, der für Ihre Sehgewohnheiten am besten geeignet ist. 1. Drücken Sie die Taste MENU, um das Menü anzuzeigen. Drücken Sie die Taste ENTER/OK, um “Bild” auszuwählen. 2. Drücken Sie die Taste ENTER/OK erneut, um “Modus” auszuwählen. 3. Drücken Sie dann die Taste oder , um den gewünschten Bildeffekt auszuwählen. Drücken Sie die Taste ENTER/OK. 4. Drücken Sie zum Beenden die Taste EXIT.
Farbtemperatur einstellen Sie können den für Ihre Augen angenehmsten Farbton auswählen. 1. Um den gewünschten Bildeffekt zu erzielen, befolgen Sie die Anweisungen 1 bis 3 unter “Bildstandard ändern” (auf Seite 15). 2. Drücken Sie die Taste oder , um “Farbtemp.” auszuwählen, und drücken Sie dann die Taste ENTER/OK. 3. Drücken Sie die Taste oder , um die gewünschte Farbtoneinstellung auszuwählen. Drücken Sie die Taste ENTER/OK. 4. Drücken Sie zum Beenden die Taste EXIT.
Konfigurieren detaillierter Bildeinstellungen Sie können den für Ihre Augen angenehmsten Farbton TV Bild auswählen. Mode : Dynamisch 1. Drücken Sie die Taste MENU, um das Menü anzuzeigen. Kontrast 100 Helligkeit 50 2. Drücken Sie die Taste ENTER/OK, um “Bild” auszuwählen. Schärfe 75 Farbe 55 3. Drücken Sie die Taste ▲ oder ▼, um “Detaileinstellungen” Farbton G50 R50 auszuwählen, und drücken Sie dann die Taste ENTER/OK. Farbtemp : Kalt1 Detaileinstellungen 4.
Bildformat wählen Sie können ein Bildformat auswählen, das Ihren Sehgewohnheiten am besten entspricht. 1. Drücken Sie die Taste MENU, um das Menü anzuzeigen. Drücken Sie die Taste ENTER/OK, um “Bild” auszuwählen. 2. Drücken Sie die Taste oder , um “Format” auszuwählen, und drücken Sie dann die Taste ENTER/OK. 3. Wählen Sie mit der Taste oder die gewünschte Option aus. Drücken Sie die Taste ENTER/OK. 4. Drücken Sie zum Beenden die Taste EXIT. Autom.
Aktuelles Bild einfrieren Drücken Sie die Taste STILL, um das aktuelle Bild zum Standbild zu machen. Drücken Sie erneut die Taste, um den Vorgang abzubrechen. Auswählen des Bildschirmmodus Wenn Sie die Bildgröße bei einem Fernsehgerät im 16:9TV Format auf Automatisch einstellen, können Sie bestimmen, dass das Bild als 4:3 WSS (Breitbilddienst) oder gar nicht sehen angezeigt werden soll. Da jedes europäische Land eine andere Bildgröße verwendet, können die Benutzer sie damit einstellen. 1.
Digitale RM / Farbverstärkung / DNIe Wenn das vom Fernsehgerät empfangene Übertragungssignal Bild TV schwach ist, können Sie diese Rauschminderungsfunktion rMehr aktivieren, um ggf. statische Aufladungen oder Geistereffekte Format : Autom.Breit Bildschirmmodus: 16 : 9 auf dem Bildschirm zu verringern. Digitale RM : Aus Farbverstärkung : Aus 1. Drücken Sie die Taste MENU, um das Menü anzuzeigen. DNle : Aus Reset : Ok Drücken Sie die Taste ENTER/OK, um “Bild” auszuwählen. 2.
Bild-in-Bild-Funktion (PIP) verwenden Sie können innerhalb des Hauptbildes (Fernsehsendung Mode : Custom Einstellungen TV Equalizer oder Video) ein PIP-Bild einblenden. Dadurch können Sie Mehr SRS TS XT : Off gleichzeitig eine Fernsehsendung oder ein Video von einem Auto Volume : Off Energiesparmod :: Aus Internal Mute Off angeschlossenen Gerät im Auge behalten. HDMI-Schwarzwert : Gering Reset PIP 1. Drücken Sie die Taste MENU, um das Menü anzuzeigen.
HDMI-Schwarzwert Sie können direkt auf dem Bildschirm den Schwarzwert auswählen, um die Bildschirmtiefe anzupassen. 1. Drücken Sie die Taste MENU, um das Menü anzuzeigen. Drücken Sie die Taste oder , um “Einstellungen” auszuwählen, und drücken Sie dann die Taste ENTER/OK. 2. Drücken Sie die Taste oder , um “HDMI-Schwarzwert” auszuwählen, und drücken Sie dann die Taste ENTER/OK. 3. Drücken Sie die Taste oder , um “Normal” oder “Gering” auszuwählen, und drücken Sie dann die Taste ENTER/OK. 4.
Ton (Equalizer) einstellen Sie können den Ton Ihrem persönlichen Geschmack anpassen. 1. Drücken Sie die Taste MENU, um das Menü anzuzeigen. Drücken Sie die Taste oder , um “Ton” auszuwählen, und drücken Sie dann die Taste ENTER/OK. 2. Drücken Sie die Taste oder , um “Equalizer” auszuwählen, und drücken Sie dann die Taste ENTER/OK. 3. Wählen Sie mit den Tasten oder ein bestimmtes Element aus. Drücken Sie die Taste ENTER/OK. 4.
Kopfhörer anschließen “Sie können Kopfhörer an das Fernsehgerät anschließen, wenn Sie ein Fernsehprogramm ansehen möchten, ohne andere Personen im selben Raum zu stören.” ➣ Wenn Sie den Kopfhörerstecker an den entsprechenden Anschluss anschließen, können Sie im Audiomenü nur “SRS TS XT” und “Auto. Lautst.” auswählen. ➣ Das Verwenden von Kopfhörern bei hoher Lautstärke über einen längeren Zeitraum kann zu Hörschäden führen.
Auswählen der internen Stummschaltung Wenn Sie den Ton über separate Lautsprecher hören möchten, deaktivieren Sie den internen Verstärker. 1. Drücken Sie die Taste MENU, um das Menü anzuzeigen. Drücken Sie die Taste oder , um “Ton” auszuwählen, und drücken Sie dann die Taste ENTER/OK. 2. Drücken Sie die Taste oder , um “Int. Ton aus” auszuwählen, und drücken Sie dann die Taste ENTER/OK. 3. Drücken Sie erneut die Taste oder , um “Ein” oder “Aus” auszuwählen. Drücken Sie die Taste ENTER/OK. 4.
Zurücksetzen der Toneinstellungen auf die werkseitig festgelegten Standardwerte Im Spielemodus ist die Funktion zum Zurücksetzen TV Ton der Audioeinstellungen aktiviert. Durch Auswählen der Modus : Custom Equalizer Reset-Funktion nach dem Einstellen des Equalizers wird SRS TS XT : Aus die Equalizer-Einstellung auf die Werkseinstellungen Auto. Lautst : Aus Int. Ton aus : Aus zurückgesetzt. Ton wählen : Hauptsender 1. Drücken Sie die Taste MENU, um das Menü anzuzeigen.
Sleep-Timer einstellen Sie können ein Intervall zwischen 30 und 180 Minuten auswählen, nach dessen Ablauf das Fernsehgerät automatisch in den Standby-Modus geschaltet wird. 1. Drücken Sie die Taste MENU, um das Menü anzuzeigen. Drücken Sie die Taste oder , um “Einstellungen” auszuwählen, und drücken Sie dann die Taste ENTER/OK. 2. Drücken Sie die Taste oder , um “Zeit” auszuwählen, und drücken Sie dann die Taste ENTER/OK. 3.
Sprache auswählen Wenn Sie das Gerät das erste Mal verwenden, müssen Sie die Sprache auswählen, die für die Menüs und Hinweise verwendet wird. 1. Drücken Sie die Taste MENU, um das Bildschirmmenü anzuzeigen. Drücken Sie die Taste oder , um “Einstellungen” auszuwählen, und drücken Sie dann die Taste ENTER/OK. 2. Drücken Sie die Taste oder , um “Sprache” auszuwählen, und drücken Sie dann die Taste ENTER/OK. 3. Wählen Sie eine bestimmte Sprache aus, indem Sie wiederholt die Taste oder drücken.
Blaues Bild anzeigen / Melodie auswählen Blaues Bild: Wenn kein Signal empfangen wird oder das Signal sehr schwach ist, wird der rauschende Bildhintergrund automatisch durch ein blaues Bild ersetzt. Falls Sie das schlechte Bild trotz gestörten Empfangs sehen möchten, müssen Sie die Option “Blaues Bild” auf “Aus” stellen. Melodie: Sie können das Fernsehgerät so einstellen, dass beim Einbzw. Ausschalten des Geräts eine Melodie ertönt. 1. Drücken Sie die Taste MENU, um das Menü anzuzeigen.
Verwenden der Energiesparfunktion Mit dieser Funktion stellen Sie die Helligkeit des Fernsehgeräts ein, um den Stromverbrauch zu senken. Wenn Sie nachts fernsehen, stellen Sie “Energiesparmod.” auf “Hoch” ein, um sowohl den Blendeffekt als auch den Stromverbrauch zu senken. 1. Drücken Sie die Taste MENU, um das Bildschirmmenü anzuzeigen. Drücken Sie die Taste oder , um “Einstellungen” auszuwählen, und drücken Sie dann die Taste ENTER/OK. 2. Drücken Sie die Taste oder , um “Energiesparmod.
Signalquelle auswählen Sie können zwischen den an den Eingangsbuchsen des Fernsehgeräts angeschlossenen externen Quellen auswählen. 1. Drücken Sie die Taste MENU, um das Menü anzuzeigen. Drücken Sie die Taste ▲ oder ▼, um “Eingang” auszuwählen, und drücken Sie dann die Taste ENTER/OK. 2. Drücken Sie die Taste ENTER/OK, um “Quelle” auszuwählen. ➣ Wenn keine externen Geräte mit dem Fernsehgerät verbunden sind, werden in der Liste “Quellen” nur “TV”, “EXT.1” und “EXT.2” aktiviert. “AV”, “S-Video”, “Komp.
Vorschau des DTV-Menüsystems ➣ Das Unternehmen garantiert nur für die sechs unterstützten Länder (GB, Deutschland, Frankreich, Italien, Spanien und Österreich) die einwandfreie Funktionsweise des DTV-Menüs, weil nur diese Länderstandards unterstützt werden. Wenn das Land des Senders von dem Land abweicht, das vom Benutzer gewählt wurde, werden außerdem möglicherweise die Zeichen, die im Kanal-Banner, in der Info, in der Anleitung, Programmverwaltung usw. zu sehen sind, nicht korrekt angezeigt.
Kanalliste automatisch aktualisieren Sie können die Kanalliste aktualisieren, wenn der Anbieter Mode Custom Autom.:speichern Equalizer neue Sender hinzufügt oder wenn Sie das Fernsehgerät an SRS TS XT : Off einen neuen Standort bringen. Auto Volume : Off Digitale Dienste werden gesucht… Internal Mute : Off 1. Drücken Sie die Taste D.MENU, um das Menü DTV 35% Reset anzuzeigen. Dienste gefunden: 24 Kanal: 38 2.
Bevorzugte Kanäle bearbeiten Sie können Ihre bevorzugten Kanäle mit den vierfarbigen Tasten bearbeiten. 1. Drücken Sie die Taste D.MENU, um das Menü DTV anzuzeigen. 2. Drücken Sie die Taste oder , um “Kanal” auszuwählen, und drücken Sie dann die Taste ENTER/OK. 3. Drücken Sie die Taste oder , um “Favoriten bearbeiten” auszuwählen, und drücken Sie dann die Taste ENTER/OK. 4. Drücken Sie die rote Taste, um die gespeicherten Kanäle anzuzeigen. 5.
Wechseln Favoriten bearbeiten 1. Drücken Sie die Taste D.MENU, um das Menü DTV 2 BBC TWO ★ anzuzeigen. 7 BBC THREE ★ 2. Drücken Sie die Taste oder , um “Kanal” auszuwählen, 15 abc1 ★ und drücken Sie dann die Taste ENTER/OK. 3. Drücken Sie die Taste oder , um “Favoriten bearbeiten” Move Enter Return auszuwählen, und drücken Sie dann die Taste ENTER/OK. Zufüg Navig Vorschau Löschen Navig Select Zurück 4. Wählen Sie mit der Taste oder den gewünschten Kanal aus. 5.
Auswählen der Kanalliste Sie können von den durchsuchten Kanälen die ausgewählten Kanalliste Alle Kanäle Test Card M' v2.0 Kanäle ausschließen. Wenn Sie die gespeicherten Kanäle 1/2 23 bid-up.tv 60 Television X 1 Test Card M' durchsuchen, werden die Kanäle, die übersprungen werden 25 TCM 70 BBC Radio 1 3 Vida003b 26 UKTV Style 72 BBC Radio 2 4 Vida004b sollen, nicht angezeigt. Alle Sender, die nicht ausdrücklich 27 Discovery 73 BBC Radio 3 5 vida005b übersprungen werden sollen, werden angezeigt.
EPG-Informationen (Elektronischer Programmführer) anzeigen Die Informationen des elektronischen Programmführers werden von den Sendern zur Verfügung gestellt. Es kann sein, dass Programmeinträge leer oder veraltet sind. Dies ist auf die für einen bestimmten Kanal übertragenen Informationen zurückzuführen. Die Anzeige wird dynamisch aktualisiert, sobald neue Informationen verfügbar sind.
Verwenden der Vormerkliste Wenn Sie eine Vormerkliste der Sendungen angelegt haben, die Sie gern sehen möchten, wird das Gerät zur vorgemerkten Zeit automatisch auch dann auf das vorgemerkte Programm umgeschaltet, wenn Sie gerade eine andere Sendung sehen. 1. Drücken Sie die Taste D.MENU, um das Menü DTV anzuzeigen. 2. Drücken Sie die Taste ENTER/OK, um “TV-Programm” auszuwählen. 3. Drücken Sie die Taste oder , um “Programmiert” auszuwählen, und drücken Sie dann die Taste ENTER/OK. 4.
Anzeigen aller Kanäle und der bevorzugten Kanäle Im Menü des elektronischen Programmführers können Sie alle Kanäle oder die bevorzugten Kanäle anzeigen. 1. Drücken Sie die Taste D.MENU, um das Menü DTV anzuzeigen. Heute & Morgen 13:28 Mi 16 Feb 2. Drücken Sie die Taste ENTER/OK, um “TV-Programm” Extreme Machines: Armoured Cars auszuwählen. All Channels Information 3. Drücken Sie die Taste oder , um den gewünschten Aktuell Demnächst Programmführer (“Heute & Morgen” oder “Ausführlich”) auszuwählen. 4.
Einstellen der Menütransparenz Die Transparenz des Menüs ist einstellbar. 1. Drücken Sie die Taste D.MENU, um das Menü DTV anzuzeigen. 2. Drücken Sie die Taste oder , um “Einstellungen” auszuwählen, und drücken Sie dann die Taste ENTER/OK. 3. Drücken Sie die Taste oder , um “Menütransparenz” auszuwählen, und drücken Sie dann die Taste ENTER/OK. 4.
Einrichten von Untertiteln Sie können Untertitel aktivieren und deaktivieren. 1. Drücken Sie die Taste D.MENU, um das Menü DTV anzuzeigen. 2. Drücken Sie die Taste oder , um “Einstellungen” auszuwählen, und drücken Sie dann die Taste ENTER/OK. 3. Drücken Sie die Taste oder , um “Untertitel” auszuwählen, und drücken Sie dann die Taste ENTER/OK. 4. Wählen Sie “Ein” mit der Taste oder . Drücken Sie die Taste ENTER/OK. 5. Drücken Sie zum Beenden die Taste EXIT.
Digitaltext einstellen (Nur Großbritannien) Wenn das Programm mit Digitaltext gesendet wird, ist diese Einstellungen Funktion aktiviert. 1. Drücken Sie die Taste D.MENU, um das Menü DTV Digitaltext : Deaktivieren Enable Zeitzone anzuzeigen. Aktivieren System 2. Drücken Sie die Taste oder , um “Einstellungen” auszuwählen, und drücken Sie dann die Taste ENTER/OK. 3. Drücken Sie die Taste oder , um “Digitaltext” auszuwählen, Move Enter Return und drücken Sie dann die Taste ENTER/OK.
Überprüfen der Signalinformation Sie können Informationen über den Signalstatus erhalten. 1. Drücken Sie die Taste D.MENU, um das Menü DTV anzuzeigen. 2. Drücken Sie die Taste oder , um “Einstellungen” auszuwählen, und drücken Sie dann die Taste ENTER/OK. 3. Drücken Sie die Taste oder , um “System” auszuwählen, und drücken Sie dann die Taste ENTER/OK. 4. Drücken Sie die Taste oder , um “Signalinformation” auszuwählen, und drücken Sie dann die Taste ENTER/OK. 5.
Anzeigen der Gemeinsamen Schnittstelle Die folgenden Erklärungen gelten für den Fall, dass ein CAMAnwendungsinformationen Typ : CA Modul in den CI-Schlitz gesteckt ist und angezeigt wird. Hersteller : Channel Plus 1. Drücken Sie die Taste D.MENU, um das Menü DTV Info : Top Up TV anzuzeigen. 2. Drücken Sie die Taste oder , um “Einstellungen” auszuwählen, und drücken Sie dann die Taste ENTER/OK. 3. Drücken Sie die Taste oder , um “System” auszuwählen, Zurück und drücken Sie dann die Taste ENTER/OK. 4.
Zurücksetzen Sie können alle gespeicherten Werte wieder auf die Reset Ausgangswerte zurücksetzen. PIN eingeben ➣ Beim Zurücksetzen werden alle Kanalinformationen sowie die Einstellungen des Benutzers wieder auf die werkseitigen Standardwerte zurückgesetzt. 1. Drücken Sie die Taste D.MENU, um das Menü DTV anzuzeigen. 2. Drücken Sie die Taste oder , um “Einstellungen” PIN eingeben Zurück auszuwählen, und drücken Sie dann die Taste ENTER/OK. Reset 3.
Voreinstellung Das Menü umfasst die 6 folgenden Untermenüs: Sprache Primäre Untertitelsprache, Sekundäre Untertitelsprache, Wiedergabesprache Primäre Audiosprache, Sekundäre Audiosprache, Primäre Untertitelsprache Teletextsprache, Sekundäre Teletextsprache. Teletext-Sprache Bei dieser Funktion kann eine der folgenden Sprachen gewählt Voreinstellung werden (Englisch, Deutsch, Italienisch, Schwedisch, Französisch, Walis., Galisch, Irisch, Dänisch, Finnisch, Norweg.
Teletext anzeigen Sie können jederzeit Teletextinformationen anzeigen, aber ein guter Signalempfang ist Voraussetzung. Andernfalls können: Informationen fehlen; einige Seiten nicht angezeigt werden. So aktivieren Sie den Teletext und zeigen die Indexseite an: 1. Drücken Sie die Taste P ( ) oder P ( ), um den gewünschten Kanal (mit Teletext) auszuwählen. 2. Drücken Sie zum Aufrufen des Teletextmodus die Taste TEXT/MIX ( ). ➣ Die Indexseite wird angezeigt.
Auswählen einer Teletextseite mit Fastext Die verschiedenen Themen auf den Teletextseiten sind farbig gekennzeichnet und lassen sich über die Farbtasten auf der Fernbedienung anwählen. 1. Drücken Sie die Taste TEXT/MIX ( ), um die Teletext-Startseite anzuzeigen. 2. Drücken Sie die Farbtaste, die dem Thema entspricht, das Sie anzeigen möchten. (Die verfügbaren Themen werden in der Statuszeile angezeigt.) 3. Drücken Sie die rote Taste, um die vorherige Seite anzuzeigen.
Fernbedienungscodes Videorecorder Marke SAMSUNG ADMIRAL AIWA AKAI AUDIO DYNAMICS BELL&HOWELL BROKSONIC CANDLE CANON CITIZEN COLORTYME CRAIG CURTIS MATHES DAEWOO DB DIMENSIA DYNATECH ELECTROHOME EMERSON FISHER FUNAI GENERAL ELECTRIC GO VIDEO HARMAN KARDON HITACHI INSTANT REPLAY JC PENNEY JCL JVC KENWOOD KLH KONIA LG(Goldstar) LIOYD LOGIK LXI MAGNAVOX MARANTZ MARTA MEI MEMOREX MGA MIDLAND MINOLTA MITSUBISHI Code 000 001 002 003 004 005 077 078 079 020 025 004 027 032 007 026 018 022 002 003 006 008 015 055 0
KABELRECEIVER Marke SAMSUNG GI HAMLIN HITACHI JERROLD MACOM MAGNAVOX OAK PANASONIC PHILIPS PIONEER RCA REGAL Code 000 001 041 003 024 025 030 038 039 025 030 019 023 026 003 022 019 021 004 018 014 022 003 Marke REGENCY SA SCIENTIFIC ATLAN SPRUCER STARGATE 2000 SYLVANIA TEXSCAN TOCOM UNIVERSAL VIEWSTAR WAMER AMEX ZENITH Code 015 023 042 043 042 043 022 036 016 016 032 033 034 019 021 023 028 046 017 029 035 037 045 Code 000 001 002 003 004 005 006 007 008 009 010 011 012 013 Produkt Home Theater VCR CO
DVD Marke PANASONIC PHILIPS ROTEL RIO RCA RAITE ROWA SAMPO SONY SHERWOOD SVA SYLVANIA SHARP SANSUI SANYO SHINSONIC Code 024 034 124 134 136 137 138 036 076 117 118 120 023 035 074 075 131 132 073 038 104 026 029 126 127 128 129 130 141 039 041 042 043 093 140 062 062 090 094 Marke THOMSON TOSHIBA TECHNICS TVIEW TOKAI TEAC TECHWOOD TREDEX URBAN CONCEPTS VENTURER VOCOPRO YAMAHA YAMAKAWA XWAVE ZENITH Code 145 028 062 076 139 072 073 096 097 098 099 101 076 075 102 032 063 040 073 103 076 121 SAMSUNG SET-TO
PC-Software installieren (unter Windows XP) Im Folgenden sind die Windows-Anzeigeeinstellungen für die meisten Computer aufgeführt. Die tatsächlich auf dem Computer angezeigten Fenster variieren je nach Version von Windows und der jeweiligen Videokarte. Selbst wenn das angezeigte Fenster abweicht, gelten in den meisten Fällen die gleichen Grundinformationen für die Einstellung. (Wenden Sie sich andernfalls an den Computerhersteller oder Samsung-Händler.) 1.
Einstellungen für PC vornehmen Mode : Custom Grob- und Feinabstimmung des Bilds vornehmen TV Bildjustierung Equalizer (Bildjustierung) SRS TS XT : Off Grob 50 Durch Einstellung der Bildqualität können Bildstörungen und Auto Volume : Off Fein 50 Rauschen beseitigt oder verringert werden. Internal Mute : Off Reset Falls sich Bildrauschen durch die Feinabstimmung allein nicht beheben lässt, stellen Sie zunächst die Frequenz möglichst genau ein (Grob).
Verstellbare Wandhalterung (LE40S8, LE46S8) (gesondert lieferbar) Nachdem Sie die Wandhalterung montiert haben, können Sie die Position Ihres Fernsehgeräts einfach justieren. 1. Drücken Sie die MENU, um das Menü anzuzeigen. Drücken Sie die Taste ▲ oder ▼, um “Einstellungen” auszuwählen, und drücken Sie dann die ENTER/OK. 2. Drücken Sie ▲ oder ▼ so oft, bis “Einstellung für Wandmontage” erscheint, und drücken Sie dann die ENTER/OK. 3. Stellen Sie mit den Tasten ▲,▼,◄ oder ► die gewünschte Position ein. 4.
Kensington-Schloss als Diebstahlsicherung Ein Kensington-Schloss dient zur physischen Sicherung des Systems bei Verwendung in öffentlichen Bereichen. Das Schloss muss separat erworben werden. Je nach Hersteller können Aussehen und Verriegelungsverfahren von der Abbildung abweichen. Informationen zur richtigen Anwendung entnehmen Sie bitte der Bedienungsanleitung des Kensington-Schlosses. 1.
Spezifikationen Modell Bildgröße (Diagonal) Leistungsaufnahme Vertikal PC-Auflösung Ton Ausgang Abmessungen (B x T x H) Gehäuse Mit Fuß Gewicht (mit Fuß) Umgebungsbedingungen Betriebstemperatur Luftfeuchtigkeit (bei Betrieb) Lagerungstemperatur Luftfeuchtigkeit (Lagerung) Modell Bildgröße (Diagonal) Leistungsaufnahme Vertikal PC-Auflösung Ton Ausgang Abmessungen (B x T x H) Gehäuse Mit Fuß Gewicht (mit Fuß) Umgebungsbedingungen Betriebstemperatur Luftfeuchtigkeit (bei Betrieb) Lagerungstemperatur Luftfeuch
Diese Seite wurde absichtlich leer belassen. BN68-01182B-Ger-0313.
Voorzorgsmaatregelen bij weergave van stilstaand beeld Stilstaande beelden kunnen permanente schade aan uw TV-scherm toebrengen. • Laat niet langer dan 2 uur een stilstaand beeld op het LCD-scherm staan, dat kan namelijk beeldretentie veroorzaken. Beeldretentie wordt ook wel inbranden genoemd. Verlaag bij de weergave van een stilstaand beeld de helderheid en het contrast om beeldretentie te voorkomen.
Inhoud UWTV/MONITOR AANSLUITEN EN GEBRUIKSKLAAR MAKEN Lijst met onderdelen............................................ 3 De voet installeren.............................................. 3 De muurbevestiging installeren........................... 3 Overzicht van het bedieningspaneel................... 4 Overzicht van het aansluitpaneel........................ 5 Overzicht van de afstandsbediening................... 7 Batterijen in de afstandsbediening plaatsen....... 8 In- en uitschakelen....
DTV GEBRUIKEN TELETEKSTFUNCTIE GEBRUIKEN Het DTV-menusysteem bekijken....................... 32 De kanaallijst automatisch bijwerken................ 33 De kanaallijst handmatig bijwerken................... 33 Uw voorkeurkanalen bewerken......................... 34 De kanaallijst selecteren................................... 36 Programma-informatie weergeven.................... 36 De EPG-informatie (elektronische programmagids) weergeven...... 37 De lijst met geplande programma’s........
Lijst met onderdelen Controleer of de volgende onderdelen bij uw LCD-tv zijn geleverd. Neem contact op met uw verkoper als er onderdelen ontbreken.
Overzicht van het bedieningspaneel ➣ De vorm en kleur van het product kunnen variëren, afhankelijk van het model. 1 SOURCE 4 Schakelt tussen alle beschikbare invoerbronnen (TV, Ext.1, Ext.2, AV, S-Video, Component, PC, HDMI1, HDMI2, DTV). Gebruik deze toets in het schermmenu zoals u de toets ENTER/OK op de afstandsbediening gebruikt. Druk hierop om het kanaal te wijzigen. Gebruik de toetsen in het schermmenu zoals u de toetsen en op de afstandsbediening gebruikt.
Overzicht van het aansluitpaneel 1 2 3 4 5 6 @ ! Netvoeding 09 8 7 ➣ De vorm en kleur van het product kunnen variëren, afhankelijk van het model. ➣ Controleer of de tv is uitgeschakeld wanneer u hierop een extern apparaat aansluit. ➣ Zorg bij het aansluiten van een extern apparaat ervoor dat de kleuren van de aansluiting en de kabel overeenkomen.
4 Aansluiten op antenne of kabeltelevisienetwerk Voor de juiste weergave van kanalen moet de tv een signaal ontvangen via een van de volgende bronnen: - Buitenantenne, kabeltelevisienetwerk of satellietnetwerk 5 Een CI-kaart (Common Interface) aansluiten - Wanneer u bij sommige kanalen geen “CI-kaart” hebt geplaatst, wordt “Vervormd signaal” op het scherm weergegeven.
Overzicht van de afstandsbediening 1 Hiermee selecteert u het apparaat dat moet worden bediend met de Samsungafstandsbediening (TV, DVD, STB, CABLE, VCR). (Zie pagina 49~51.) 2 Stand-bytoets voor de tv 3 Cijfertoetsen voor directe kanaalkeuze 4 Kanaal kiezen met één of twee cijfers 5 Hiermee geeft u Kanalenlijst weer op het scherm. 6 Hiermee selecteert u direct de tv- en DTV-modus.
Batterijen in de afstandsbediening plaatsen 1. Open het klepje achter op de afstandsbediening met een opwaartse beweging zoals aangegeven in de afbeelding. 2. Plaats twee AAA-batterijen. ➣ Zorg ervoor dat de plus- en minpolen van de batterijen overeenkomen met de afbeelding in het vakje. 3. Schuif het klepje weer terug. ➣ Verwijder de batterijen en bewaar ze op een koele, droge plaats als u de afstandsbediening langere tijd niet gebruikt.
Plug & Play Wanneer u de tv voor het eerst inschakelt, worden enkele Plug & Play basisinstellingen automatisch achtereenvolgens uitgevoerd. De volgende instellingen zijn beschikbaar. ➣ Alle functies voor digitale tv (DVB) werken alleen in landen of gebieden waar digitale televisiesignalen per zendmast Start Plug & Play. [DVB-T (MPEG2)] worden uitgezonden. Vraag aan uw plaatselijke OK leverancier of u DVB-T-signalen kunt ontvangen.
Als u deze functie wilt resetten... 1. Druk op de toets MENU om het menu weer te geven. Druk op de toets of om “Instellingen” te selecteren en druk op de toets ENTER/OK. 2. Druk nogmaals op de toets ENTER/OK om “Plug & Play” te selecteren. 3. Het bericht “Plug & Play starten” wordt weergegeven.
Kanalen handmatig opslaan U kunt maximaal 100 kanalen opslaan, waaronder kanalen die via kabelnetwerken worden ontvangen. Bij het handmatig opslaan van kanalen kunt u het volgende kiezen: Of u een gevonden kanaal al dan niet opslaat. Het nummer van ieder opgeslagen kanaal waaraan u een naam wilt toewijzen. 1. Druk op de toets MENU om het menu weer te geven. Druk op de toets of om “Kanaal” te selecteren en druk op de toets ENTER/OK. 2. Druk op de toets of om “Handm.
De kanaallijsten instellen Stel de kanalen in overeenkomstig uw wensen. U kunt het gewenste kanaal gemakkelijk verwijderen, toevoegen of vergrendelen. 1. Druk op de toets MENU om het menu weer te geven. Druk op de toets of om “Kanaal” te selecteren en druk op de toets ENTER/OK. 2. Druk op de toets of om “Kanaalbeheer” te selecteren en druk op de toets ENTER/OK. 3. Druk nogmaals op de toets ENTER/OK om “Kanalenlijst” te selecteren. 4. Druk op de toets om “ ” te selecteren. 5.
Opgeslagen kanalen rangschikken U kunt de nummers van twee kanalen uitwisselen om: TV Kanaal De numerieke volgorde waarin de kanalen automatisch Land : België Automatisch opslaan zijn opgeslagen, te wijzigen. Handm. opslaan Gemakkelijk te onthouden nummers toe te wijzen aan Kanaalbeheer Sorteren de kanalen die u het vaakst bekijkt. Naam Fijnafstemming 1. Druk op de toets MENU om het menu weer te geven.
Kanalen fijn afstemmen U kunt kanalen handmatig nauwkeurig instellen voor een optimale ontvangst. 1. Gebruik de cijfertoetsen om direct het kanaal te selecteren dat u fijner wilt instellen. 2. Druk op de toets MENU om het menu weer te geven. Druk op de toets of om “Kanaal” te selecteren en druk op de toets ENTER/OK. 3. Druk op de toets of om “Fijnafstemming” te selecteren en druk op de toets ENTER/OK. 4. Druk op de toets of om de fijnafstemming aan te passen. Druk op de toets ENTER/OK. 5.
De beeldstandaard wijzigen U kunt het beeld selecteren dat het beste overeenkomt met uw wensen. 1. Druk op de toets MENU om het menu weer te geven. Druk op de toets ENTER/OK om “Beeld” te selecteren. 2. Druk nogmaals op de toets ENTER/OK om “Modus” selecteren. 3. Druk op de toets of om het gewenste beeldeffect te selecteren. Druk op de toets ENTER/OK. 4. Druk op de toets EXIT om het menu te verlaten. Dynamisch: hiermee stelt u het beeld in voor hoge definitie in een lichte ruimte.
De kleurnuance wijzigen U kunt zelf kiezen welke kleurtint u het prettigst vindt. 1. Als u het gewenste beeldeffect wilt selecteren, volgt u de instructies 1 tot en met 3 onder “De beeldstandaard aanpassen” (op pagina 15). 2. Druk op de toets of om “Kleur tint” te selecteren en druk op de toets ENTER/OK. 3. Druk op de toets of om de gewenste instelling voor de kleurtint te selecteren. Druk op de toets ENTER/OK. 4. Druk op de toets EXIT om het menu te verlaten.
Gedetailleerde beeldinstellingen configureren U kunt zelf kiezen welke kleurtint u het prettigst vindt. 1. Druk op de toets MENU om het menu weer te geven. 2. Druk op de toets ENTER/OK om “Beeld” te selecteren. 3. Druk op de toets ▲ of ▼ om “Detailinstellingen” te selecteren en druk op de toets ENTER/OK. 4. Selecteer de gewenste optie door op de toets of te drukken en druk op de toets ENTER/OK. Beschikbare opties: Zwartaanpassing, Dynamisch contrast, Gamma, Witbalans, Pers. kleurinst.
Beeldformaat wijzigen U kunt het beeldformaat selecteren dat het beste overeenkomt met uw wensen. 1. Druk op de toets MENU om het menu weer te geven. Druk op de toets ENTER/OK om “Beeld” te selecteren. 2. Druk op de toets of om “Formaat” te selecteren en druk op de toets ENTER/OK. 3. Selecteer de gewenste optie door op de toets of te drukken. Druk op de toets ENTER/OK. 4. Druk op de toets EXIT om het menu te verlaten.
Het beeld stilzetten Druk op de toets STILL om het bewegende beeld stil te zetten. Druk nogmaals op deze toets om het stilzetten te annuleren. De schermmodus selecteren Wanneer u het beeldformaat op een tv met een breedte van TV 16:9 instelt op Auto-breed, kunt u het gewenste beeldformaat instellen op 4:3 WSS (Wide Screen Service) of niets. Omdat er voor elk land in Europa een ander beeldformaat geldt, is deze functie bedoeld om het juiste beeldformaat te kiezen.
Dig. ruisfilter/Actieve kleuren/DNIe Als het ontvangen tv-signaal zwak is, kunt u de functie Digitaal ruisfilter activeren om statische ruis en echobeelden te reduceren die mogelijk op het scherm verschijnen. 1. Druk op de toets MENU om het menu weer te geven. Druk op de toets ENTER/OK om “Beeld” te selecteren. 2. Selecteer de gewenste optie door op de toets of te drukken en druk op de toets ENTER/OK. Beschikbare opties: Dig. ruisfilter/Actieve kleuren/DNIe. 3.
Picture in Picture (PIP) Binnen het beeld van een tv-programma of het beeld dat Mode : Custom Instellingen TV Equalizer afkomstig is van een extern apparaat, zoals een videorecorder Meer SRS TS XT : Off of dvd-speler, kunt u een subbeeld weergeven.
HDMI-zwartniveau U kunt direct het zwartniveau op het scherm selecteren om de schermdiepte aan te passen. 1. Druk op de toets MENU om het menu weer te geven. Druk op de toets of om “Instellingen” te selecteren en druk op de toets ENTER/OK. 2. Druk op de toets of om “HDMI-zwartniveau” te selecteren en druk op de toets ENTER/OK. 3. Druk op de toets of om “Normaal” of “Laag” te selecteren en druk op de toets ENTER/OK. 4. Druk op de toets EXIT om het menu te verlaten.
De geluidsinstellingen aanpassen U kunt de geluidsinstellingen aanpassen aan uw persoonlijke voorkeuren. 1. Druk op de toets MENU om het menu weer te geven. Druk op de toets of om “Geluid” te selecteren en druk op de toets ENTER/OK. 2. Druk op de toets of om “Toonregeling” te selecteren en druk op de toets ENTER/OK. 3. Druk op de toets of om een bepaald item te selecteren. Druk op de toets ENTER/OK. 4. Druk op de toets of voor de gewenste instelling. Druk op de toets ENTER/OK. 5.
De hoofdtelefoon aansluiten U kunt een hoofdtelefoon op de tv aansluiten als u naar een programma wilt kijken zonder de andere aanwezigen in de kamer te storen. ➣ Wanneer u de stekker van de hoofdtelefoon in de betreffende poort steekt, kunt u alleen “SRS TS TX” en “Auto Volume” kiezen in het menu Geluid. ➣ Langdurig gebruik van een hoofdtelefoon met een hoog volume kan het gehoor beschadigen. ➣ Wanneer een hoofdtelefoon op het systeem is aangesloten, komt er geen geluid uit de luidsprekers.
De interne mute selecteren Indien u het geluid door aparte luidsprekers wilt horen, annuleert u de interne versterker. 1. Druk op de toets MENU om het menu weer te geven. Druk op de toets of om “Geluid” te selecteren en druk op de toets ENTER/OK. 2. Druk op de toets of om “Interne mute” te selecteren en druk op de toets ENTER/OK. 3. Druk nogmaals op de toets of om “Aan” of “Uit” te selecteren. Druk op de toets ENTER/OK. 4. Druk op de toets EXIT om het menu te verlaten.
De standaard-geluidsinstellingen herstellen Als Spelmodus is ingeschakeld, wordt de functie Geluid TV resetten geactiveerd. Als u de functie Reset selecteert na het instellen van de toonregeling, worden de standaardinstellingen van de toonregeling hersteld. 1. Druk op de toets MENU om het menu weer te geven. Druk op de toets of om “Geluid” te selecteren en druk op de toets ENTER/OK. 2. Druk op de toets of om “Reset” te selecteren en druk op de toets ENTER/OK. 3.
De slaaptimer instellen U kunt een tijdsduur tussen 30 en 180 minuten instellen waarna de tv automatisch overschakelt op stand-by. 1. Druk op de toets MENU om het menu weer te geven. Druk op de toets of om “Instellingen” te selecteren en druk op de toets ENTER/OK. 2. Druk op de toets of om “Tijd” te selecteren en druk op de toets ENTER/OK. 3. Druk op de toets of om “Slaaptimer” te selecteren en druk op de toets ENTER/OK. 4.
Uw taal kiezen Wanneer u de tv voor het eerst gebruikt, moet u de taal selecteren voor het weergeven van menu’s en aanwijzingen. 1. Druk op de toets MENU om het schermmenu weer te geven. Druk op de toets of om “Instellingen” te selecteren en druk op de toets ENTER/OK. 2. Druk op de toets of om “Taalkeuze” te selecteren en druk op de toets ENTER/OK. 3. Selecteer een bepaalde taal door herhaaldelijk op de toets of te drukken. Druk op de toets ENTER/OK. ➣ U kunt één van de 17 talen selecteren. 4.
De modus Blauw scherm instellen en de melodie selecteren Blauw scherm: als er geen of slechts een zwak signaal wordt ontvangen, wordt het wazige beeld vervangen door een blauw beeld. Als u het slechte beeld wilt blijven zien, stelt u de modus “Blauw scherm” in op “Uit”. Melodie: u hoort een melodie als u de televisie in- of uitschakelt. 1. Druk op de toets MENU om het menu weer te geven. Druk op de toets of om “Instellingen” te selecteren en druk op de toets ENTER/OK. 2.
De functie Spaarstand Met deze functie kunt u de helderheid van de tv aanpassen om het energieverbruik te verminderen. Als u ‘s avonds tv kijkt, kunt u de modus “Spaarstand” instellen op “Hoog”. Zo kunt u de glinstering in uw ogen tegengaan en tevens besparen op het energieverbruik. 1. Druk op de toets MENU om het schermmenu weer te geven. Druk op de toets of om “Instellingen” te selecteren en druk op de toets ENTER/OK. 2.
De bron selecteren U kunt een keuze maken uit externe bronnen die op de ingangen van de tv zijn aangesloten. 1. Druk op de toets MENU om het menu weer te geven. Druk op de toets ▲ of ▼ om “Invoer” te selecteren en druk op de toets ENTER/OK. 2. Druk nogmaals op de toets ENTER/OK om “Bronlijst” te selecteren. ➣ Wanneer u geen externe apparaten hebt aangesloten op de tv, zijn alleen “TV”, “Ext.1” en “Ext.2” geactiveerd in de bronlijst.
Het DTV-menusysteem bekijken ➣ Het bedrijf garandeert alleen dat het DTV-menu normaal werkt in de zes landen die worden ondersteund (Ver. Koninkrijk, Duitsland, Frankrijk, Italië, Spanje, Oostenrijk). Alleen deze landstandaarden worden namelijk ondersteund. Wanneer het land van de uitgezonden beelden bovendien verschilt van het land dat de huidige gebruiker heeft geselecteerd, wordt de tekst in bijvoorbeeld de kanaalbalk, informatie, de programmagids en Kanaalbeheer mogelijk niet goed weergegeven.
De kanaallijst automatisch bijwerken U kunt de kanaallijst bijwerken wanneer de kabelaanbieder Mode Automatisch : Custom opslaan Equalizer nieuwe services toevoegt of u de tv in een andere regio neerzet. SRS TS XT : Off Auto Volume 1. Druk op de toets D.MENU om het DTV-menu weer te geven. Zoekt naar digitale: Off diensten… Internal Mute : Off 2. Druk op de toets of om “Kanaal” te selecteren en druk op 35% Reset Gevonden diensten: 24 Kanaal 38 de toets ENTER/OK. 3.
Uw voorkeurkanalen bewerken U kunt uw voorkeurkanalen bewerken met de vier gekleurde toetsen. 1. Druk op de toets D.MENU om het DTV-menu weer te geven. 2. Druk op de toets of om “Kanaal” te selecteren en druk op de toets ENTER/OK. 3. Druk op de toets of om “Favorieten bewerken” te selecteren en druk op de toets ENTER/OK. 4. Druk op de rode knop om alle opgeslagen kanalen weer te geven. 5. Druk op de toets of om het gewenste kanaal te selecteren. Druk op de toets ENTER/OK.
Verplaatsen 1. Druk op de toets D.MENU om het DTV-menu weer te geven. 2. Druk op de toets of om “Kanaal” te selecteren en druk op de toets ENTER/OK. 3. Druk op de toets of om “Favorieten bewerken” te selecteren en druk op de toets ENTER/OK. 4. Selecteer het gewenste kanaal door op de toets of te drukken. 5. Druk op de groene toets. ➣ Links van de kanaalnaam wordt het pictogram “ ” weergegeven. 6.
De kanaallijst selecteren U kunt de gekozen kanalen uitsluiten van de kanalen die u Kanalenlijst Alle kanalen Test Card M' v2.0 hebt gescand. Wanneer u door de opgeslagen kanalen bladert, 1/2 23 bid-up.tv 60 Television X 1 Test Card M' worden de kanalen die u wilt overslaan, niet weergegeven. Alle 25 TCM 70 BBC Radio 1 3 Vida003b 26 UKTV Style 72 BBC Radio 2 4 Vida004b kanalen die u niet wilt overslaan, worden tijdens het scannen 27 Discovery 73 BBC Radio 3 5 vida005b weergegeven.
De EPG-informatie (elektronische programmagids) weergeven De EPG-informatie (elektronische programmagids) wordt verstrekt door de kabelaanbieders. Programmavermeldingen kunnen leeg of verouderd zijn ten gevolge van de informatie die voor een bepaald kanaal wordt uitgezonden. De weergave wordt dynamisch bijgewerkt zodra nieuwe informatie beschikbaar komt. Gids voor Nu en Morgen Voor de zes kanalen in de linkerkolom wordt informatie over het huidige en volgende programma weergegeven.
De lijst met geplande programma’s Als u een lijst maakt met geplande programma’s die u wilt bekijken, wordt automatisch het geplande programma weergegeven op het geplande tijdstip, ook als u naar een ander programma zit te kijken. 1. Druk op de toets D.MENU om het DTV-menu weer te geven. 2. Druk op de toets ENTER/OK om “Gids” te selecteren. 3. Druk op de toets of om “Programmalijst” te selecteren en druk op de toets ENTER/OK. 4. Druk op de rode toets. Het kanaal schakelt naar het geplande programma. 5.
Alle kanalen en voorkeurkanalen weergeven In het EPG-menu kunt u alle kanalen of voorkeurkanalen weergeven. 1. Druk op de toets D.MENU om het DTV-menu weer te geven. 2. Druk op de toets ENTER/OK om “Gids” te selecteren. Gids voor Nu en Morgen 13:28 Wo16 Feb 3. Selecteer de gewenste gids (“Gids voor Nu en Morgen” of Extreme Machines: Armoured Cars “Volledige gids”) door op de toets of te drukken. All Channels Informatie 4. Druk op de toets ENTER/OK. Actueel Volgende 5. Druk op de groene toets.
De transparantie van het menu aanpassen U kunt de transparantie van het menu instellen. 1. Druk op de toets D.MENU om het DTV-menu weer te geven. 2. Druk op de toets of om “Instellingen” te selecteren en druk op de toets ENTER/OK. 3. Druk op de toets of om “Transparantie menu” te selecteren en druk op de toets ENTER/OK. 4. Selecteer de gewenste optie (“Hoog”, “Middel”, “Laag” of “Ondoorzichtig”) door op de toets of te drukken en druk op de toets ENTER/OK om de instelling te wijzigen. 5.
De ondertiteling instellen U kunt de ondertiteling activeren en deactiveren. 1. Druk op de toets D.MENU om het DTV-menu weer te geven. 2. Druk op de toets of om “Instellingen” te selecteren en druk op de toets ENTER/OK. 3. Druk op de toets of om “Ondertiteling” te selecteren en druk op de toets ENTER/OK. 4. Selecteer “Aan” door op de toets of te drukken. Druk op de toets ENTER/OK. 5. Druk op de toets EXIT om het menu te verlaten.
Digitale tekst selecteren (uitsluitend Verenigd Koninkrijk) Als het programma wordt uitgezonden met digitale tekst, is Instellingen deze functie ingeschakeld. Digitale tekst : Deactiveren Enable 1. Druk op de toets D.MENU om het DTV-menu weer te geven. Tijdzone Activeren 2. Druk op de toets of om “Instellingen” te selecteren en druk Systeem op de toets ENTER/OK. 3. Druk op de toets of om “Digitale tekst” te selecteren en druk op de toets ENTER/OK. Move Enter 4.
De signaalinformatie controleren U kunt informatie over de signaalstatus weergeven. Signaalinformatie Service: ? 1. Druk op de toets D.MENU om het DTV-menu weer te geven. Service ID:0000 2. Druk op de toets of om “Instellingen” te selecteren en druk Multiplex: ? (TSID 0000, ONID 0000) Network: ? (ID 0000) op de toets ENTER/OK. Bit error level: 10 3. Druk op de toets of om “Systeem” te selecteren en druk op Signal Strength: 0 de toets ENTER/OK. Move Enter Return 4.
Algemene interface weergeven Met deze optie geeft u informatie over een CAM in de CI-sleuf Algemene interface weer. Type : CA Fabrikant: Channel Plus 1. Druk op de toets D.MENU om het DTV-menu weer te geven. Info : Top Up TV 2. Druk op de toets of om “Instellingen” te selecteren en druk op de toets ENTER/OK. 3. Druk op de toets of om “Systeem” te selecteren en druk op de toets ENTER/OK. Terug 4. Druk op de toets of om “Algemene interface” te selecteren en druk op de toets ENTER/OK. 5.
Resetten U kunt de opgeslagen waarden weer wijzigen in de fabrieksinstellingen. ➣ Met Reset verwijdert u alle kanaalinformatie en gebruikersvoorkeuren en worden alle fabrieksinstellingen hersteld. 1. Druk op de toets D.MENU om het DTV-menu weer te geven. 2. Druk op de toets of om “Instellingen” te selecteren en druk op de toets ENTER/OK. 3. Druk op de toets of om “Systeem” te selecteren en druk op de toets ENTER/OK. 4. Druk op de toets of om “Reset” te selecteren en druk op de toets ENTER/OK. 5.
Voorkeur Dit menu bevat zes submenu’s: Taalkeuze Eerste taal ondertitel, Tweede taal ondertitel, Eerste taal voor Gesproken taal audio, Tweede taal voor audio, Eerste taal teletekst en Tweede Ondertitelingstaal taal teletekst. Teleteksttaal Met deze functie kunt u een van de talen selecteren (Engels, Voorkeur Duits, Italiaans, Zweeds, Frans, Welsh, Gaelic, Iers, Deens, Fins, Noors, Spaans, Tsjechisch en Grieks).
Teletekstinformatie weergeven U kunt de teletekstinformatie altijd weergeven, mits de signaalontvangst goed is. Anders: Ontbreekt er mogelijk informatie. Worden bepaalde pagina’s niet weergegeven. De teletekstmodus activeren en de inhoudspagina weergeven: 1. Selecteer met de toets P ( ) of P ( ) het kanaal dat de teletekstservice biedt. 2. Druk op de toets TEXT/MIX ( ) om teletekst te activeren. ➣ De inhoudspagina verschijnt.
Teletekstpagina selecteren via Fastekst De verschillende onderwerpen in de teletekstpagina’s zijn met een kleur gecodeerd. U kunt deze onderwerpen selecteren door op de gekleurde toetsen op de afstandsbediening te drukken. 1. Druk op de toets TEXT/MIX ( ) om de teletekstinhoudspagina weer te geven. 2. Druk op de gekleurde toets voor het gewenste onderwerp. (De beschikbare onderwerpen worden weergegeven op de regel met statusinformatie.) 3. Druk op de rode knop om de vorige pagina weer te geven.
Codes afstandsbediening VCR Merk SAMSUNG ADMIRAL AIWA AKAI AUDIO DYNAMICS BELL&HOWELL BROKSONIC CANDLE CANON CITIZEN COLORTYME CRAIG CURTIS MATHES DAEWOO DB DIMENSIA DYNATECH ELECTROHOME EMERSON FISHER FUNAI GENERAL ELECTRIC GO VIDEO HARMAN KARDON HITACHI INSTANT REPLAY JC PENNEY JCL JVC KENWOOD KLH KONIA LG(Goldstar) LIOYD LOGIK LXI MAGNAVOX MARANTZ MARTA MEI MEMOREX MGA MIDLAND MINOLTA MITSUBISHI Code 000 001 002 003 004 005 077 078 079 020 025 004 027 032 007 026 018 022 002 003 006 008 015 055 021 056
AFTAKDOOS Merk SAMSUNG GI HAMLIN HITACHI JERROLD MACOM MAGNAVOX OAK PANASONIC PHILIPS PIONEER RCA REGAL Code 000 001 041 003 024 025 030 038 039 025 030 019 023 026 003 022 019 021 004 018 014 022 003 Merk REGENCY SA SCIENTIFIC ATLAN SPRUCER STARGATE 2000 SYLVANIA TEXSCAN TOCOM UNIVERSAL VIEWSTAR WAMER AMEX ZENITH Code 015 023 042 043 042 043 022 036 016 016 032 033 034 019 021 023 028 046 017 029 035 037 045 Code 000 001 002 003 004 005 006 007 008 009 010 011 012 013 Product Home Theater VCR COMBO HD
DVD Merk PANASONIC PHILIPS ROTEL RIO RCA RAITE ROWA SAMPO SONY SHERWOOD SVA SYLVANIA SHARP SANSUI SANYO SHINSONIC Code 024 034 124 134 136 137 138 036 076 117 118 120 023 035 074 075 131 132 073 038 104 026 029 126 127 128 129 130 141 039 041 042 043 093 140 062 062 090 094 Merk THOMSON TOSHIBA TECHNICS TVIEW TOKAI TEAC TECHWOOD TREDEX URBAN CONCEPTS VENTURER VOCOPRO YAMAHA YAMAKAWA XWAVE ZENITH Code 145 028 062 076 139 072 073 096 097 098 099 101 076 075 102 032 063 040 073 103 076 121 SAMSUNG SET-TOP
Software configureren (gebaseerd op Windows XP) Hieronder ziet u de Windows-beeldscherminstellingen voor een standaardcomputer. De vensters op uw computer kunnen enigszins afwijken, afhankelijk van de versie van Windows en de geïnstalleerde videokaart. Ook dan zijn echter in de meeste gevallen dezelfde basisinstallatiegegevens van toepassing. (Neem contact op met de computerfabrikant of Samsung-leverancier als dit niet het geval is.) 1. Klik op “Configuratiescherm” in het menu Start van Windows. 2.
De pc instellen Mode : Custom Grovere of fijnere afstelling van het beeld (Beeld vergrendelen): TV Beeld vergrendelen Equalizer U past de beeldkwaliteit aan om beeldruis te verwijderen of te SRS TS XT : Off Grof 50 verminderen. Auto Volume : Off Fijn 50 Internal Mute : Off Als de ruis niet verdwijnt door het kanaal nauwkeurig af te Reset stemmen, stel dan de frequentie zo goed mogelijk in (Grof) en voer opnieuw een nauwkeurige instelling uit.
Aanpassen van muurbevestiging (LE40S8, LE46S8) (apart verkrijgbaar) Wanneer de muurbevestiging is gemonteerd, kunt u eenvoudig de positie van uw tv aanpassen. 1. Druk op de toets MENU om het menu weer te geven. Druk op de toets ▲ of ▼ om “Instellingen” te selecteren en druk vervolgens op de toets ENTER/OK. 2. Druk op de toets ▲ of ▼ om “Aanpassen van muurbevestiging” te selecteren en druk vervolgens op de toets ENTER/OK. 3. Stel de gewenste positie in door op de knoppen ▲,▼,◄ of ► te drukken. 4.
Diefstal voorkomen met het Kensington-slot Het Kensington-slot is een vergrendeling waarmee u het systeem fysiek kunt vastzetten voor gebruik in het openbaar. De vergrendeling moet apart worden aangeschaft. Afhankelijk van de fabrikant, kan het uiterlijk en de vergrendelingsmethode enigszins afwijken van de afbeelding. Raadpleeg de handleiding bij het Kensington-slot voor correct gebruik. 1.
Technische specificaties en milieu Modelnaam Schermformaat (diagonaal) Energieverbruik Pc-resolutie Geluid Uitgang Afmetingen (b x d x h) Behuizing Met voet Gewicht (met voet) Omgevingsvereisten Gebruikstemperatuur Gebruiksvochtigheid Opslagtemperatuur: Opslagvochtigheid Modelnaam Schermformaat (diagonaal) Energieverbruik Pc-resolutie Geluid Uitgang Afmetingen (b x d x h) Behuizing Met voet Gewicht (met voet) Omgevingsvereisten Gebruikstemperatuur Gebruiksvochtigheid Opslagtemperatuur: Opslagvochtigheid LE
Deze pagina is met opzet leeg gelaten. BN68-01182B-Dut-0313.
Precauzioni da adottare quando si visualizza un’immagine fissa Un’immagine fissa può causare danni permanenti allo schermo TV. • Non visualizzare un’immagine fissa sul pannello LCD per oltre 2 ore poiché può causare la ritenzione dell’immagine sullo schermo. Il fenomeno di ritenzione dell’immagine è anche noto come “bruciatura dello schermo”. Per evitare il fenomeno di ritenzione dell’immagine, ridurre il grado di luminosità e di contrasto dello schermo quando si visualizza un’immagine fissa.
Contenuto COLLEGAMENTO E PREPARAZIONE DEL TELEVISORE Elenco dei componenti........................................ 3 Installazione del piedistallo................................. 3 Installazione del Kit di montaggio a parete......... 3 Pannello di controllo............................................ 4 Pannello dei collegamenti................................... 5 Telecomando....................................................... 7 Installazione delle batterie nel telecomando.......
USO DELLA FUNZIONE DTV USO DELLA FUNZIONE TELETEXT Anteprima del sistema di menu DTV................. 32 Aggiornamento automatico dell’elenco dei canali........................................................... 33 Aggiornamento manuale dell’elenco dei canali........................................................... 33 Modifica dei canali preferiti................................ 34 Selezione dell’elenco dei canali........................
Elenco dei componenti Controllare che nella confezione del TV LCD siano contenuti i seguenti componenti. Se qualsiasi componente risulta mancante, contattare il rivenditore.
Pannello di controllo ➣ La forma e il colore del prodotto possono variare in base al modello. 1 SOURCE 4 Alterna tutte le sorgenti d’ingresso disponibili (TV, Est.1, Est.2, AV, S-Video, Component, PC, HDMI1, HDMI2, DTV). Nel menu a video, utilizzare questo tasto come si usa il tasto ENTER/OK del telecomando. Premere per cambiare canale. Nel menu a video, utilizzare questi tasti così come si usano i tasti e del telecomando.
Pannello dei collegamenti 1 2 3 4 5 6 @ ! Ingresso alimentazione 09 8 7 ➣ La forma e il colore del prodotto possono variare in base al modello. ➣ Quando si collega un dispositivo esterno al televisore, assicurarsi che l’alimentazione dell’unità sia scollegata. ➣ Quando si collega un dispositivo esterno, far corrispondere il colore del terminale di collegamento a quello del cavo.
4 Collegamento a un’antenna aerea o a una rete televisiva via cavo Per visualizzare correttamente i canali televisivi, è necessario che l’apparecchio televisivo riceva il segnale da una delle seguenti fonti: - un’antenna esterna / Una rete televisiva via cavo / Una rete satellitare. 5 Collegamento della SCHEDA IC (interfaccia comune) - Se per alcuni canali non si inserisce la “Scheda IC”, il messaggio “Scramble Signal” (Segnale criptato) viene visualizzato sullo schermo.
Telecomando 1 Seleziona l’apparecchio di destinazione da controllare con il telecomando Samsung (TV, DVD, STB, CABLE, VCR) (Vedere pagina 49~51) 2 Tasto di standby del televisore 3 Tasti numerici per selezionare direttamente i canali 4 Selezione dei canali memorizzati con una/due cifre 5 Visualizza il Elenco canali.
Installazione delle batterie nel telecomando 1. Sollevare il coperchio sul retro del telecomando come mostrato in figura. 2. Installare le due batterie AAA. ➣ Fare corrispondere i poli “+” e “–” delle batterie con lo schema riportato all’interno del vano. 3. Riposizionare il coperchio. ➣ Se si prevede di non utilizzare il telecomando per un periodo di tempo prolungato, rimuovere le batterie e riporle in un luogo asciutto e fresco.
Plug & Play Se il televisore viene acceso per la prima volta, alcune impostazioni di base vengono visualizzate automaticamente e in sequenza. Sono disponibili le seguenti impostazioni. ➣ Funzioni relative alla televisione digitale (DVB) possono essere utilizzate solo nelle nazioni o aree dove vengono trasmessi i segnali terrestri digitali DVB-T (MPEG2). Si prega di chiedere al proprio rivenditore se nella propria nazione o area è possibile ricevere i segnali DVB-T.
Per reimpostare questa funzione... 1. Premere il tasto MENU per visualizzare il menu. Premere il tasto o per selezionare “Impostazione”, quindi premere il tasto ENTER/OK. 2. Premere nuovamente il tasto ENTER/OK per selezionare “Plug & Play”. 3. Viene visualizzato il messaggio “Avvio Plug & Play”.
Memorizzazione manuale dei canali È possibile memorizzare fino a 100 canali televisivi, compresi quelli ricevuti via cavo. Quando si memorizzano manualmente i canali, è possibile scegliere: Se memorizzare o meno ogni canale trovato. Il numero di programma di ogni canale memorizzato che si desidera identificare. 1. Premere il tasto MENU per visualizzare il menu. Premere il tasto o per selezionare “Canale”, quindi premere il tasto ENTER/OK. 2.
Impostazione degli elenchi dei canali I canali possono essere impostati in base alle proprie preferenze. È possibile eliminare, aggiungere o bloccare facilmente il canale desiderato. 1. Premere il tasto MENU per visualizzare il menu. Premere il tasto o per selezionare “Canale”, quindi premere il tasto ENTER/OK. 2. Premere il tasto o per selezionare “Gestore canale”, quindi premere il tasto ENTER/OK. 3. Premere nuovamente il tasto ENTER/OK per selezionare “Elenco canali”. 4.
Ordinamento dei canali memorizzati È possibile scambiare i numeri di due canali, in modo da: Modifica l’ordine numerico assegnato automaticamente ai canali. Assegnare numeri facili da ricordare ai canali utilizzati più spesso. 1. Premere il tasto MENU per visualizzare il menu. Premere il tasto o per selezionare “Canale”, quindi premere il tasto ENTER/OK. 2. Premere il tasto o per selezionare “Ordina”, quindi premere il tasto ENTER/OK. 3.
Sintonia fine dei canali Utilizzare la sintonia fine per regolare manualmente un canale la cui ricezione non è ottimale. 1. Utilizzare i tasti numerici per selezionare direttamente il canale da sintonizzare. 2. Premere il tasto MENU per visualizzare il menu. Premere il tasto o per selezionare “Canale”, quindi premere il tasto ENTER/OK. 3. Premere il tasto o per selezionare “Sintonia fine”, quindi premere il tasto ENTER/OK. 4. Premere il tasto o per regolare la sintonia fine.
Modifica dello standard dell’immagine È possibile selezionare il tipo di immagine che più corrisponde alle proprie esigenze. 1. Premere il tasto MENU per visualizzare il menu. Premere il tasto ENTER/OK per selezionare “Immagine”. 2. Premere di nuovo ENTER/OK per selezionare “Modalità”. 3. Premere il tasto o per selezionare l’effetto desiderato. Premere il tasto ENTER/OK. 4. Al termine, premere il tasto EXIT. Dinamica: Imposta l’immagine da visualizzare in alta definizione in un ambiente luminoso.
Modifica del tono del colore È possibile selezionare il tono del colore ottimale per la propria vista. 1. Per selezionare l’effetto desiderato, seguire le istruzioni da 1 a 3 fornite nella sezione “Modifica dello standard dell’immagine” (pagina 15). 2. Premere il tasto o per selezionare “Toni colore”, quindi premere il tasto ENTER/OK. 3. Premere il tasto o per selezionare il tono del colore desiderato. Premere il tasto ENTER/OK. 4. Al termine, premere il tasto EXIT.
Configurazione delle impostazioni dettagliate dell’immagine È possibile selezionare il tono del colore ottimale per la propria vista. 1. Premere il tasto MENU per visualizzare il menu. 2. Premere il tasto ENTER/OK per selezionare “Immagine”. 3. Premere ▲ o ▼ per selezionare “Impostazioni dettaglio”, quindi premere il tasto ENTER/OK. 4. Selezionare l’opzione desiderata premendo il tasto o , quindi premere il tasto ENTER/OK.
Modifica delle dimensioni dell’immagine È possibile impostare le dimensioni dell’immagine che più si adattano alle proprie esigenze. 1. Premere il tasto MENU per visualizzare il menu. Premere il tasto ENTER/OK per selezionare “Immagine”. 2. Premere il tasto o per selezionare “Formato”, quindi premere il tasto ENTER/OK. 3. Selezionare l’opzione desiderata premendo il tasto o . Premere il tasto ENTER/OK. 4. Al termine, premere il tasto EXIT.
Fermo immagine corrente Premere il tasto STILL per fermare un’immagine in movimento. Premere nuovamente il tasto per annullare il comando. Selezione della modalità schermo Quando si imposta il formato dell’immagine su Automatico TV su un televisore con formato 16:9, è possibile determinare le dimensioni dell’immagine da visualizzare nel formato 4:3 WSS (Wide Screen Service). Ogni nazione europea richiede un formato dell’immagine diverso e questa funzione deve essere quindi selezionata dall’utente. 1.
Digital NR / Active Colour / DNIe Se il segnale ricevuto dal televisore è debole, è possibile attivare la funzione Digital Noise Reduction per ridurre i disturbi statici e l’effetto “ghosting” sullo schermo. 1. Premere il tasto MENU per visualizzare il menu. Premere il tasto ENTER/OK per selezionare “Immagine”. 2. Selezionare l’opzione desiderata premendo il tasto o , quindi premere il tasto ENTER/OK. Le opzioni disponibili sono: Digital NR, Active Colour, DNIe. 3.
Visualizzazione in modalità PIP (Picture in Picture) Questa funzione consente di visualizzare un’immagine secondaria all’interno dell’immagine principale del programma o della sorgente video impostata. In questo modo, è possibile visualizzare l’immagine di un programma o di una sorgente video esterna mentre si guarda l’immagine principale. 1. Premere il tasto MENU per visualizzare il menu. Premere il tasto o per selezionare “Impostazione”, quindi premere il tasto ENTER/OK. 2.
Livello di nero HDMI Consente di selezionare direttamente il livello di nero sullo schermo per regolarne la profondità. 1. Premere il tasto MENU per visualizzare il menu. Premere il tasto o per selezionare “Impostazione”, quindi premere il tasto ENTER/OK. 2. Premere il tasto o per selezionare “Livello di nero HDMI”, quindi premere il tasto ENTER/OK. 3. Premere il tasto o per selezionare “Normale” o “Bassa”, quindi premere il tasto ENTER. 4. Al termine, premere il tasto EXIT.
Regolazione delle impostazioni audio Le impostazioni audio possono essere regolate in base alle proprie preferenze personali. 1. Premere il tasto MENU per visualizzare il menu. Premere il tasto o per selezionare “Suono”, quindi premere il tasto ENTER/OK. 2. Premere il tasto o per selezionare “Equalizzatore”, quindi premere ENTER/OK. 3. Premere il tasto o per selezionare una voce. Premere il tasto ENTER/OK. 4. Premere il tasto o fino a raggiungere l’impostazione desiderata.
Collegamento delle cuffie È possibile collegare le cuffie al televisore se si desidera guardare un programma televisivo senza disturbare le altre persone presenti nella stanza. ➣ Quando si inserisce il jack della cuffia nella porta corrispondente, nel menu Suono sono disponibili solo le opzioni “SRS TS XT” e “Volume auto”. ➣ L’uso prolungato delle cuffie ad alto volume può causare danni all’udito. ➣ Quando si collega la cuffia al sistema, gli altoparlanti vengono disattivati.
Selezione di Mute interno Se si desidera ascoltare l’audio da altoparlanti separati, annullare l’amplificatore interno. 1. Premere il tasto MENU per visualizzare il menu. Premere il tasto o per selezionare “Suono”, quindi premere il tasto ENTER/OK. 2. Premere il tasto o per selezionare “Mute interno”, quindi premere ENTER/OK. 3. Premere il tasto o per selezionare “Acceso” o “Spento”. Premere il tasto ENTER/OK. 4. Al termine, premere il tasto EXIT.
Ripristino delle impostazioni audio predefinite Se la modalità Gioco è Acceso, la funzione di reimpostazione TV Suono dell’audio è attiva. Selezionando la funzione Reset dopo aver Modalità : Personalizzata effettuato l’impostazione, l’equalizzatore viene reimpostato ai Equalizzatore TS XT SRS : Spento valori di fabbrica. Volume auto : Spento Mute interno : Spento 1. Premere il tasto MENU per visualizzare il menu.
Impostazione del timer di spegnimento È possibile selezionare un intervallo di tempo compreso tra 30 e 180 minuti per impostare il passaggio automatico del televisore in modalità standby. 1. Premere il tasto MENU per visualizzare il menu. Premere il tasto o per selezionare “Impostazione”, quindi premere il tasto ENTER/OK. 2. Premere il tasto o per selezionare “Ora”, quindi premere ENTER/OK. 3. Premere il tasto o per selezionare “Timer stand-by”, quindi premere ENTER/OK. 4.
Scelta della lingua Quando si utilizza il televisore per la prima volta, è necessario selezionare la lingua dei menu e degli indicatori. 1. Premere il tasto MENU per visualizzare il menu a video. Premere il tasto o per selezionare “Impostazione”, quindi premere ENTER/OK. 2. Premere il tasto o per selezionare “Lingua”, quindi premere ENTER/OK. 3. Selezionare la lingua desiderata premendo ripetutamente il tasto o . Premere il tasto ENTER/OK. ➣ È possibile scegliere fra 17 lingue diverse. 4.
Impostazione della modalità Pagina blu / Selezione della melodia Pagina blu: Se il segnale non viene ricevuto o è molto debole, una schermata blu sostituisce automaticamente lo sfondo dell’immagine disturbata. Se si desidera continuare a visualizzare l’immagine di qualità scadente, è necessario impostare la modalità “Pagina blu” su “Spento”. Melodia: È possibile impostare una melodia da riprodurre quando si accende o si spegne il televisore. 1. Premere il tasto MENU per visualizzare il menu.
Utilizzo della funzione Risp. energia Questa funzione regola la luminosità del televisore in modo da ridurre il consumo di energia. Quando si guarda il televisore di notte, impostare la modalità “Risp. energia“ su “Alto” in modo da ridurre l’affaticamento degli occhi e il consumo di corrente. 1. Premere il tasto MENU per visualizzare il menu a video. Premere il tasto o per selezionare “Impostazione”, quindi premere il tasto ENTER/OK. 2. Premere il tasto o per selezionare “Risp.
Selezione della sorgente È possibile selezionare una delle sorgenti esterne collegate al jack di ingresso del televisore. 1. Premere il tasto MENU per visualizzare il menu. Premere il tasto ▲ o ▼ per selezionare “Inserisci”, quindi premere il tasto ENTER/OK. 2. Premere il tasto ENTER/OK per selezionare “Elenco sorgenti”. ➣ Se all’apparecchiatura non sono collegati dispositivi esterni, nell’elenco sorgenti sono attivate solo le opzioni “TV”, “Est.1”, “Est.2”.
Anteprima del sistema di menu DTV ➣ ◆ La società non garantisce il nomale funzionamento del menu DTV in paesi diversi dai 6 supportati (Regno Unito, Germania, Francia, Italia, Spagna, Austria), poiché sono supportati solo gli standard di queste nazioni. Inoltre, se il paese della stazione emittente è diverso da quello selezionato dall>utente, la stringa che appare nella finestra informazioni del canale, Info, Guida, Gestore canali, ecc., potrebbe non essere visualizzata correttamente.
Aggiornamento automatico dell’elenco dei canali È possibile aggiornare l’elenco dei canali ogniqualvolta Mode Memorizzazione : Custom automatica Equalizer l’emittente aggiunge nuovi servizi oppure quando si sposta il SRS TS XT : Spento televisore in un altro luogo. Auto Volume Scansione dei servizi: Spento digitali in corso… Internal Mute : Spento 1. Premere il tasto D.MENU per visualizzare il menu DTV. 35% Reset Servizi trovati: 24 Canale 38 2.
Modifica dei canali preferiti È possibile modificare i canali preferiti utilizzando i tasti colorati. 1. Premere il tasto D.MENU per visualizzare il menu DTV. 2. Premere il tasto o per selezionare “Canale”, quindi premere ENTER/OK. 3. Premere il tasto o per selezionare “Modifica Canali Preferiti”, quindi premere il tasto ENTER/OK. 4. Premere il tasto rosso per visualizzare tutti i canali attualmente memorizzati. 5. Premere il tasto o per selezionare il canale desiderato.
Sposta 1. Premere il tasto D.MENU per visualizzare il menu DTV. 2. Premere il tasto o per selezionare “Canale”, quindi premere ENTER/OK. 3. Premere il tasto o per selezionare “Modifica Canali Preferiti”, quindi premere il tasto ENTER/OK. 4. Selezionare il canale desiderato premendo il tasto o . 5. Premere il tasto verde. ➣ Un’icona “ ” viene visualizzata a sinistra del nome del canale. 6. Premere il tasto o per selezionare il canale da spostare, quindi premere il tasto verde o ENTER/OK. 7.
Selezione dell’elenco dei canali È possibile escludere i canali desiderati dalla scansione dei Elenco canali Tutti i Canali Test Card M' v2.0 canali. Quando si effettua la scansione, questi canali vengono 1/2 23 bid-up.tv 60 Television X 1 Test Card M' saltati e non appaiono. Vengono invece visualizzati tutti i canali 25 TCM 70 BBC Radio 1 3 Vida003b 26 UKTV Style 72 BBC Radio 2 4 Vida004b non esclusi dalla scansione. 27 Discovery 73 BBC Radio 3 5 vida005b 28 DiscoveryH&L 74 BBC Radio 4 6 vida006b 1.
Visualizzazione delle informazioni EPG Le informazioni EPG (Electronic Programme Guide, Guida elettronica dei programmi) sono fornite dall’emittente. Le voci relative ai programmi potrebbero risultare vuote o non aggiornate, a seconda delle informazioni trasmesse dall’emittente su un determinato canale. La schermata viene aggiornata automaticamente non appena sono disponibili le nuove informazioni.
Uso della funzione Elenco programmato Se si crea un elenco di visione programmata, il programma desiderato viene avviato automaticamente all’ora impostata, anche se si sta seguendo un altro programma. 1. Premere il tasto D.MENU per visualizzare il menu DTV. 2. Premere il tasto ENTER/OK per selezionare “Guida”. 3. Premere il tasto o per selezionare “Elenco programmato”, quindi premere ENTER/OK. 4. Premere il tasto rosso. Viene attivata la finestra di programmazione. 5.
Visualizzazione di tutti i canali e dei canali preferiti Nel menu EPG, è possibile visualizzare tutti i canali oppure solo i canali preferiti. 1. Premere il tasto D.MENU per visualizzare il menu DTV. 2. Premere il tasto ENTER/OK per selezionare “Guida”. Guida Oggi e Domani 13:28 Mer 16 Feb 3. Selezionare la guida desiderata (“Guida “Oggi e Domani” o Extreme Machines: Armoured Cars “Guida Completa”) premendo il tasto o . All Channels Informazioni 4. Premere il tasto ENTER/OK. Attuale Successivo 5.
Regolazione della trasparenza del menu È possibile impostare il livello di trasparenza del menu. 1. Premere il tasto D.MENU per visualizzare il menu DTV. 2. Premere il tasto o per selezionare “Impostazione”, quindi premere ENTER/OK. 3. Premere il tasto o per selezionare “Trasparenza menu”, quindi premere ENTER/OK. 4. Selezionare l’opzione desiderata (“Alta”, “Media”, “Bassa” o “Opaco”) premendo il tasto o , quindi premere il tasto ENTER/OK per modificare l’impostazione. 5.
Impostazione dei sottotitoli È possibile attivare e disattivare i sottotitoli. 1. Premere il tasto D.MENU per visualizzare il menu DTV. 2. Premere il tasto o per selezionare “Impostazione”, quindi premere ENTER/OK. 3. Premere il tasto o per selezionare “Sottotitolo”, quindi premere ENTER/OK. 4. Selezionare “Acceso” premendo il tasto o . Premere ENTER/OK. 5. Al termine, premere il tasto EXIT.
Selezione del testo digitale (Solo GB) Se il programma è trasmesso con testo digitale, questa Impostazione funzione è attivata. Testo digitale : Enable Disattiva 1. Premere il tasto D.MENU per visualizzare il menu DTV. Fuso orario Attiva 2. Premere il tasto o per selezionare “Impostazione”, quindi Sistema premere ENTER/OK. 3. Premere il tasto o per selezionare “Testo digitale”, quindi premere ENTER/OK. Sposta Conferma Ritorno 4. Premere il tasto o per selezionare “Disattiva” o “Attiva”.
Controllo delle informazioni sul segnale È possibile visualizzare informazioni sullo stato del segnale. Informazioni sul segnale Servizio ? 1. Premere il tasto D.MENU per visualizzare il menu DTV. ID assistenza:0000 2. Premere il tasto o per selezionare “Impostazione”, quindi Multiplex: ? (TSID 0000, ONID 0000) Rete: ? (ID 0000) premere ENTER/OK. Livello errore bit: 10 3. Premere il tasto o per selezionare “Sistema”, quindi Potenza del segnale: 0 premere il tasto ENTER/OK. Move Enter Return 4.
Visualizzazione dell’interfaccia comune Contiene informazioni sulla CAM inserita nello slot IC e le visualizza. 1. Premere il tasto D.MENU per visualizzare il menu DTV. 2. Premere il tasto o per selezionare “Impostazione”, quindi premere ENTER/OK. 3. Premere il tasto o per selezionare “Sistema”, quindi premere il tasto ENTER/OK. 4. Premere il tasto o per selezionare “Interfaccia comune”, quindi premere ENTER/OK. 5. Premere il tasto ENTER/OK per visualizzare le informazioni sull’applicazione. 6.
Azzeramento È possibile azzerare i valori memorizzati e ripristinare i valori di fabbrica. ➣ Questa operazione azzera tutte le informazioni sui canali e tutte le preferenze dell’utente ripristinando i valori predefiniti. 1. Premere il tasto D.MENU per visualizzare il menu DTV. 2. Premere il tasto o per selezionare “Impostazione”, quindi premere ENTER/OK. 3. Premere il tasto o per selezionare “Sistema”, quindi premere il tasto ENTER/OK. 4.
Preferenza Il menu è costituito da 6 sottomenu: Lingua Lingua princip sottotitoli, Lingua second sottotitoli, Lingua Lingua dell’audio principale audio, Lingua secondaria audio, Lingua principale Lingua del Sottotitolo Teletext e Lingua secondaria Teletext.
Visualizzazione delle informazioni Teletext È possibile visualizzare le informazioni teletext in qualsiasi momento, purché la ricezione del segnale sia buona. In caso contrario: Le informazioni potrebbero non apparire. Alcune pagine potrebbero non essere visualizzate. Per attivare la modalità Teletext e visualizzare il contenuto delle pagine: 1. Selezionare il canale che fornisce il servizio Teletext utilizzando il tasto P ( ) o P ( ). 2. Premere il tasto TEXT/MIX ( ) per attivare la modalità Teletext.
Utilizzo della modalità Fastext per selezionare una pagina Teletext I vari argomenti inclusi nelle pagine Teletext sono contrassegnati da diversi colori e possono essere selezionati premendo i tasti colorati corrispondenti sul telecomando. 1. Visualizzare il contenuto delle pagine Teletext premendo il tasto TEXT/MIX ( ). 2. Premere il pulsante colorato corrispondente all’argomento desiderato. Gli argomenti disponibili sono elencati nella riga di stato. 3.
Codici del telecomando Videoregistratore Marca SAMSUNG ADMIRAL AIWA AKAI AUDIO DYNAMICS BELL&HOWELL BROKSONIC CANDLE CANON CITIZEN COLORTYME CRAIG CURTIS MATHES DAEWOO DB DIMENSIA DYNATECH ELECTROHOME EMERSON FISHER FUNAI GENERAL ELECTRIC GO VIDEO HARMAN KARDON HITACHI INSTANT REPLAY JC PENNEY JCL JVC KENWOOD KLH KONIA LG(Goldstar) LIOYD LOGIK LXI MAGNAVOX MARANTZ MARTA MEI MEMOREX MGA MIDLAND MINOLTA MITSUBISHI Codice 000 001 002 003 004 005 077 078 079 020 025 004 027 032 007 026 018 022 002 003 006 008
CABLE BOX Marca SAMSUNG GI HAMLIN HITACHI JERROLD MACOM MAGNAVOX OAK PANASONIC PHILIPS PIONEER RCA REGAL Codice 000 001 041 003 024 025 030 038 039 025 030 019 023 026 003 022 019 021 004 018 014 022 003 Marca REGENCY SA SCIENTIFIC ATLAN SPRUCER STARGATE 2000 SYLVANIA TEXSCAN TOCOM UNIVERSAL VIEWSTAR WAMER AMEX ZENITH Codice 015 023 042 043 042 043 022 036 016 016 032 033 034 019 021 023 028 046 017 029 035 037 045 Codice 000 001 002 003 004 005 006 007 008 009 010 011 012 013 Prodotto Home Theater VCR
DVD Marca PANASONIC PHILIPS ROTEL RIO RCA RAITE ROWA SAMPO SONY SHERWOOD SVA SYLVANIA SHARP SANSUI SANYO SHINSONIC Codice 024 034 124 134 136 137 138 036 076 117 118 120 023 035 074 075 131 132 073 038 104 026 029 126 127 128 129 130 141 039 041 042 043 093 140 062 062 090 094 Marca THOMSON TOSHIBA TECHNICS TVIEW TOKAI TEAC TECHWOOD TREDEX URBAN CONCEPTS VENTURER VOCOPRO YAMAHA YAMAKAWA XWAVE ZENITH Codice 145 028 062 076 139 072 073 096 097 098 099 101 076 075 102 032 063 040 073 103 076 121 SET TOP BO
Impostazione del software del PC (basato su Windows XP) Di seguito vengono illustrate le impostazioni di visualizzazione di Windows per un PC tipico. Le schermate visualizzate sul proprio PC possono differire in base alla versione di Windows e alla scheda video installate. Nel caso le schermate risultassero differenti, le stesse informazioni di base per la configurazione sono applicabili praticamente in ogni caso.
Impostazione del PC Mode : Custom Regolazione grossa e fine dell’immagine (blocco immagine): TV Blocco immagine Equalizer Lo scopo della regolazione della qualità dell’immagine è quello SRS TS XT : Spento Grossa 50 Auto Volume : Spento di eliminare o ridurre eventuali disturbi di visualizzazione.
Regolazione montaggio a parete (LE40S8, LE46S8) (kit venduto separatamente) Una volta installato il supporto a parete, è possibile regolare la posizione del televisore. 1. Premere il tasto MENU per visualizzare il menu. Premere il tasto ▲ o ▼ per selezionare “Impostazione”, quindi premere ENTER/OK. 2. Premere il tasto ▲ o ▼ per selezionare “Regolazione montaggio a parete”, quindi premere ENTER/OK. 3. Regolare fino a raggiungere la posizione desiderata mediante il tasto ▲,▼,◄ o ►. 4.
Uso del blocco Kensington antifurto Il blocco Kensington è un dispositivo usato per assicurare fisicamente il sistema quando viene utilizzato in un luogo pubblico. Il dispositivo di blocco è in vendita separatamente. L’aspetto del dispositivo e il metodo di blocco possono variare, a seconda della marca. Per informazioni sull’uso, consultare il manuale fornito insieme al blocco Kensington. 1.
Specifiche tecniche e ambientali Nome del modello Dimensione schermo (Diagonale) Consumo di energia Risoluzione PC Uscita Audio Dimensioni (Lar x Pro x Alt) Corpo Con supporto Peso (con supporto) Caratteristiche ambientali Temperatura di esercizio Umidità di esercizio Temperatura di stoccaggio Umidità di stoccaggio Nome del modello Dimensione schermo (Diagonale) Consumo di energia Risoluzione PC Uscita Audio Dimensioni (Lar x Pro x Alt) Corpo Con supporto Peso (con supporto) Caratteristiche ambientali Tempe
Diagrammi a blocchi Input Jack PCMCIA DDR 32MB STi5105 FLASH 4MB CPUI DEMUX MPEG A/VDECODER PAL ENCODER HOSTINTERFACE PERIPHERALS TS S/W LCX16244 ANT DVB NIM Tuner TS SIF Xtal CVBS 27MHz Y,Pb,Pr,CVBS SPDIF DTV R/L HDMI S/W Sil9185CTU 74HC4052 MUX SVP- UX68 (336-FPGA) SC1:RGB SC1:CVBS,FB SC2:CVBS PC R,G,B,Hsync,Vsync BA7657F Y,Pb,Pr MMS Option BA7657F VIDEO CVBS S-VIDEO Rx,Tx I2C DVI Audio COMPONENT MAIN Part AUDIO DAC CS4340 HDMI 1,2 EXT 1/2 DTV Part FILTER ME/MC 3D Comb
Precauciones al mostrar en la pantalla una imagen fija La imagen fija puede causar daños permanentes en la pantalla del televisor. • No deje una imagen fija en la pantalla LCD durante más de dos horas ya que se podría producir una retención de la imagen en la pantalla. Este fenómeno de retención de imágenes también se denomina “quemadura de pantalla”. Para evitar que se produzca esa persistencia de la imagen, reduzca el nivel de luminosidad y de contraste de la pantalla cuando muestre imágenes fijas.
Contenido CONEXIÓN Y PREPARACIÓN DEL TV AJUSTE DEL SONIDO Lista de componentes......................................... 3 Instalación del soporte........................................ 3 Instalación del equipo de montaje en la pared.... 3 Aspecto general del panel de control.................. 4 Aspecto general del panel de conexiones.......... 5 Vista del mando a distancia................................ 7 Instalación de las pilas en el mando a distancia..................................
USO DE LA FUNCIÓN DE DTV USO DE LA FUNCIÓN DE TELETEXTO Previsualización del sistema de menús del DTV............................................................. 32 Actualización automática de la lista de canales.............................................................. 33 Actualización manual de la lista de canales...... 33 Edición de canales favoritos............................. 34 Selección de la lista de canales........................
Lista de componentes Asegúrese de que los siguientes elementos se incluyen con el televisor de pantalla LCD. Si falta alguno, póngase en contacto con su distribuidor.
Aspecto general del panel de control ➣ El color y la forma del producto pueden variar según el modelo. 1 SOURCE 4 Cambia entre todas las fuentes de entrada disponibles (TV, Ext.1, Ext.2, AV, S-Vídeo, Componente, PC, HDMI1, HDMI2 y DTV.) En el menú en pantalla, utilice este botón de igual modo que los botones ENTER/OK del mando a distancia. 2 MENU Púlselo para ver un menú en pantalla con las opciones del televisor. En el modo DTV, aparece el menú DTV. Permiten cambiar de canal.
Aspecto general del panel de conexiones 1 2 3 4 5 6 @ ! Entrada eléctrica 09 8 7 ➣ El color y la forma del producto pueden variar según el modelo. ➣ Cada vez que conecte un dispositivo externo al televisor, compruebe que la unidad esté desconectada de la alimentación. ➣ Cuando conecte un dispositivo externo, debe hacer coincidir los colores del terminal de conexión y del cable.
4 Conexión a la antena o a la red de televisión por cable Para ver correctamente los canales de televisión, el aparato debe recibir una señal de alguna de las siguientes fuentes: - Una antena exterior / Una red de televisión por cable / Una red por satélite 5 Conexión de la TARJETA CI (Interfaz común) - Si no se inserta una “TARJETA CI” con algunos canales, en la pantalla aparece “Señal codificada”.
Vista del mando a distancia 1 Selecciona un dispositivo de destino para controlar con el mando a distancia Samsung (TV, DVD, STB, CABLE, VCR). (Consulte la página 49~51.) 2 Botón de suspensión del televisor 3 Botones numéricos para acceso directo a los canales 4 Selección de canal de uno/dos dígitos 5 Muestra el “Lista de canales ” en la pantalla.
Instalación de las pilas en el mando a distancia 1. Levante la tapa de la parte posterior del mando a distancia, como se muestra en la ilustración. 2. Inserte dos pilas de tamaño AAA. ➣ Respete los extremos “+” y “–” de las pilas que se indican en el diagrama del interior del compartimiento. 3. Vuelva a colocar la tapa. ➣ Saque las pilas y guárdelas en un lugar fresco y seco si no va a utilizar el mando a distancia durante un período de tiempo prolongado.
Plug & Play Cuando el televisor se enciende por primera vez, algunos Plug & Play valores se establecen de forma automática y correlativa: Están disponibles los ajustes siguientes. ➣ Cualquier función relacionada con la televisión digital (DVB) sólo estará activa en los países o las regiones donde se emitan Start Plug & Play. señales terrestres digitales DVB-T (MPEG2). Deberá consultar OK a su distribuidor local si puede recibir señales DVB-T.
Si desea reiniciar esta función... 1. Pulse el botón MENU para ver el menú. Pulse los botones o para seleccionar “Configuración” y, a continuación, pulse el botón ENTER/OK. 2. Pulse de nuevo el botón ENTER/OK para seleccionar “Plug & Play”. 3. Aparece el mensaje “Iniciar Plug & Play”. (Consulte las páginas 9.
Memorización manual de canales Puede memorizar hasta 100 canales, incluidos aquellos que se reciben mediante redes por cable. Al almacenar canales de forma manual, puede elegir: Si se memoriza o no cada canal que se encuentre. El número con el que desea identificar cada canal memorizado. 1. Pulse el botón MENU para ver el menú. Pulse los botones o para seleccionar “Canal” y, a continuación, pulse el botón ENTER/OK. 2.
Configuración de las listas de canales Configure los canales como prefiera. Puede borrar, añadir o bloquear fácilmente el canal que desee. 1. Pulse el botón MENU para ver el menú. Pulse los botones o para seleccionar “Canal” y, a continuación, pulse el botón ENTER/OK. 2. Pulse los botones o para seleccionar “Gestor de canales” y, a continuación, pulse el botón ENTER/OK. 3. Pulse el botón ENTER/OK para seleccionar “Lista de canales ”. 4. Pulse el botón para seleccionar “ ”. 5.
Orden de los canales memorizados Puede intercambiar los números de dos canales: TV Canal Para modificar el orden numérico en el que se han País :Bélgica Guardado automático memorizado automáticamente los canales Guardado manual Gestor de canales Para recordar con facilidad los números de los canales que Ordenar ve con más frecuencia. Nombre Sintonización fina 1. Pulse el botón MENU para ver el menú.
Sintonización precisa de la recepción de canales Utilice la sintonización fina para ajustar manualmente un TV Canal determinado canal a fin de que la recepción sea óptima. País :Bélgica Guardado automático 1. Use los botones numéricos para seleccionar directamente el Guardado manual Gestor de canales canal que desee ajustar con precisión. Ordenar Nombre 2. Pulse el botón MENU para ver el menú.
Cambio del formato de la imagen Puede seleccionar el tipo de imagen que mejor cumpla sus requisitos de visualización. 1. Pulse el botón MENU para ver el menú. Pulse el botón ENTER/OK para seleccionar “Imagen”. 2. Pulse el botón ENTER/OK para seleccionar “Modo”. 3. Pulse los botones o para seleccionar el efecto de imagen deseado. Pulse el botón ENTER/OK. 4. Pulse el botón EXIT para salir. Dinámico: Selecciona la alta definición en la imagen, en una habitación luminosa.
Cambio del tono del color Puede seleccionar el tono de color que le resulte más cómodo para la vista. 1. Para seleccionar el efecto de imagen deseado, siga las instrucciones 1 a 3 de “Cambio del formato de la imagen” (en la página 15). 2. Pulse los botones o para seleccionar “Tono de color” y, a continuación, pulse el botón ENTER/OK. 3. Pulse los botones o para seleccionar el ajuste del tono de color deseado. Pulse el botón ENTER/OK. 4. Pulse el botón EXIT para salir.
Configuración detallada de los valores de la imagen Puede seleccionar el tono de color que le resulte más cómodo TV Imagen Modo : Dinámico para la vista. Contraste 100 Brillo 50 1. Pulse el botón MENU para ver el menú. Nitidez 75 2. Pulse el botón ENTER/OK para seleccionar “Imagen”. Color 55 Matiz G50 R50 3. Pulse los botones ▲ o ▼ para seleccionar “Configuración Tono de color : Frío1 Configuración detallada detallada” y, a continuación, pulse el botón ENTER/OK.
Cambio del tamaño de la imagen Puede seleccionar el tamaño de imagen que mejor se adapte a sus requisitos de visualización. 1. Pulse el botón MENU para ver el menú. Pulse el botón ENTER/OK para seleccionar “Imagen”. 2. Pulse los botones o para seleccionar “Tamaño” y, a continuación, pulse el botón ENTER/OK. 3. Seleccione la opción adecuada pulsando los botones o . Pulse el botón ENTER/OK. 4. Pulse el botón EXIT para salir. Ancho automát.
Congelación de la imagen actual Pulse el botón STILL para congelar la imagen en movimiento. Pulse de nuevo para cancelar. Selección del Modo Pantalla Cuando se configura el tamaño de la imagen como Ancho TV Imagen automát. (Auto Wide) en un televisor panorámico 16:9, se rMás Tamaño : Ancho automát. puede determinar el tamaño de la imagen para ver una imagen Modo Pantalla : 16 : 9 en pantalla panorámica 4:3 WSS o ninguna.
Digital NR/Color activo/DNIe Si la señal de emisión que recibe el televisor es débil, puede activarse la función de reducción digital del ruido (Digital Noise Reduction) para reducir la estática y las imágenes superpuestas que pueden aparecer en la pantalla. 1. Pulse el botón MENU para ver el menú. Pulse el botón ENTER/OK para seleccionar “Imagen”. 2. Seleccione la opción adecuada pulsando los botones o y, a continuación, pulse el botón ENTER/OK. Opciones disponibles: Digital NR, Color activo, DNIe. 3.
Visualización de imagen sobre imagen (PIP) Mode : Custom Puede mostrar una imagen secundaria dentro de la imagen Configuración TV Equalizer principal de un programa de TV o entrada de vídeo. De esta Más SRS TS XT : Off forma puede ver una imagen del programa de TV o de la Auto Volume : Off Ahorro :: Desactivado Internalenergía Mute Off entrada de vídeo desde cualquier equipo conectado mientras N.neg : Bajo Reset HDMI PIP ve la imagen principal. 1.
Nivel de negro de HDMI Se puede seleccionar directamente el nivel de negro en la pantalla para ajustar la profundidad de ésta. 1. Pulse el botón MENU para ver el menú. Pulse los botones o para seleccionar “Configuración” y, a continuación, pulse el botón ENTER/OK. 2. Pulse los botones o para seleccionar “N.neg HDMI” y, a continuación, pulse el botón ENTER/OK. 3. Pulse los botones o para seleccionar “Normal” o “Bajo” y, a continuación, pulse el botón ENTER/OK. 4.
Ajuste de los valores del sonido Es posible ajustar los parámetros del sonido según las preferencias personales. 1. Pulse el botón MENU para ver el menú. Pulse los botones o para seleccionar “Sonido” y, a continuación, pulse el botón ENTER/OK. 2. Pulse los botones o para seleccionar “Ecualizador” y, a continuación, pulse el botón ENTER/OK. 3. Pulse los botones o para seleccionar un elemento en concreto. Pulse el botón ENTER/OK. 4. Pulse los botones o para alcanzar el valor necesario.
Conexión de auriculares Puede conectar unos auriculares al equipo si desea ver un programa de televisión sin molestar a las personas que están en la misma habitación. ➣ Cuando se inserta el conector del conjunto del cabezal en el puerto correspondiente, se puede trabajar sólo con las opciones “SRS TS XT” y “Volumen autom.” del menú Sonido. ➣ El uso continuado de auriculares a un volumen elevado puede dañar la capacidad auditiva.
Selección del silencio interno Si desea usar unos altavoces independientes, cancele el amplificador interno. 1. Pulse el botón MENU para ver el menú. Pulse los botones o para seleccionar “Sonido” y, a continuación, pulse el botón ENTER/OK. 2. Pulse los botones o para seleccionar “Silencio interno” y, a continuación, pulse el botón ENTER/OK. 3. Pulse los botones o para seleccionar “Activado” o “Desactivado”. Pulse el botón ENTER/OK. 4. Pulse el botón EXIT para salir.
Reajuste de los valores del sonido a los valores predefinidos de fábrica Si Modo Juego está activado, la función Restablecer del menú TV Sonido Sonido se activa. Si, tras configurar el ecualizador, selecciona Modo :Personal Ecualizador la función Restablecer, se restauran los parámetros de fábrica SRS TS XT : Desactivado de la configuración del ecualizador. Volumen autom : Desactivado Silencio interno : Desactivado 1. Pulse el botón MENU para ver el menú.
Ajuste del temporizador de desconexión Puede seleccionar un período de tiempo entre 30 y 180 minutos para que, una vez transcurridos, el televisor pase automáticamente al modo de espera. 1. Pulse el botón MENU para ver el menú. Pulse los botones o para seleccionar “Configuración” y, a continuación, pulse el botón ENTER/OK. 2. Pulse los botones o para seleccionar “Hora” y, a continuación, pulse el botón ENTER/OK. 3. Pulse los botones o para seleccionar “Temp. de desc.
Elección del idioma Cuando utilice el aparato por primera vez, debe seleccionar el idioma que se utilizará para visualizar menús e indicaciones. 1. Pulse el botón MENU para ver el menú en pantalla. Pulse los botones o para seleccionar “Configuración” y, a continuación, pulse el botón ENTER/OK. 2. Pulse los botones o para seleccionar “Idioma” y, a continuación, pulse el botón ENTER/OK. 3. Seleccione el idioma apropiado pulsando los botones o varias veces. Pulse el botón ENTER/OK.
Configuración del modo de pantalla azul/Selección de la melodía Pantalla azul: Si no se recibe ninguna señal o ésta es muy débil, una pantalla azul sustituye de forma automática la imagen con interferencias. Si desea continuar viendo la imagen deficiente, debe definir el modo “Pantalla azul” como “Desactivado”. Melodía: Es posible oír una melodía cuando el televisor se enciende o apaga. 1. Pulse el botón MENU para ver el menú.
Uso de la función de ahorro de energía Esta función ajusta el brillo del televisor, lo cual reduce el consumo de energía. Si desea ver la televisión por la noche, ajuste la opción del modo “Ahorro energía” en “Alto”; sus ojos se lo agradecerán y, además, reducirá el consumo de energía. 1. Pulse el botón MENU para ver el menú en pantalla. Pulse los botones o para seleccionar “Configuración” y, a continuación, pulse el botón ENTER/OK. 2.
Selección de la fuente Puede elegir entre varias fuentes externas conectadas a las tomas de entrada del televisor. 1. Pulse el botón MENU para ver el menú. Pulse los botones▲ o ▼ para seleccionar “Entrada” y, a continuación, pulse el botón ENTER/OK. 2. Pulse de nuevo el botón ENTER/OK para seleccionar “Fuentes”. ➣ Cuando no hay ningún dispositivo externo conectado al equipo, sólo están activas las opciones “TV”, “Ext.1 ”, “Ext.2” en “Fuentes”.
Previsualización del sistema de menús del DTV ➣ La empresa sólo garantiza el funcionamiento normal del menú DTV en los seis países (Reino Unido, Alemania, Francia, Italia, España, Austria) que disponen de estándares compatibles. Además, cuando el país de un canal de emisión difiere del país seleccionado por el usuario actual, la cadena que aparece en el rótulo del canal, la información, la guía, el gestor de canales, etc., quizás no se muestre correctamente. ➣ Disponible en modo DTV.
Actualización automática de la lista de canales Mode Guardado: Custom Se puede actualizar la lista de canales cuando el emisor añade automático Equalizer nuevos servicios o si se desplaza el televisor a una nueva SRS TS XT : Off Auto Volume : Off localidad. Explorando los servicios digitales… Internal Mute : Off 1. Pulse el botón D.MENU para ver el menú DTV. 35% Reset Servicios encontr: 24 Canal: 38 2.
Edición de canales favoritos Mediante los cuatro botones de colores se pueden editar los canales favoritos. 1. Pulse el botón D.MENU para ver el menú DTV. 2. Pulse los botones o para seleccionar “Canal” y, a continuación, pulse el botón ENTER/OK. 3. Pulse los botones o para seleccionar “Editar canales favoritos” y, a continuación, pulse el botón ENTER/OK. 4. Pulse el botón rojo para ver todos los canales almacenados actualmente. 5. Pulse los botones o para seleccionar un canal.
Mover 1. Pulse el botón D.MENU para ver el menú DTV. 2. Pulse los botones o para seleccionar “Canal” y, a continuación, pulse el botón ENTER/OK. 3. Pulse los botones o para seleccionar “Editar canales favoritos” y, a continuación, pulse el botón ENTER/OK. 4. Seleccione el canal pulsando los botones o . 5. Pulse el botón verde. ➣ Se muestra un icono de bloqueo “ ” en la parte izquierda del nombre del canal. 6.
Selección de la lista de canales Puede excluir los canales seleccionados que no le interesen de Lista de canales Todos los canales Test Card M' v2.0 los canales explorados. Al explorar los canales memorizados, 1/2 23 bid-up.tv 60 Television X 1 Test Card M' no aparecerán los que haya decidido excluir.
Visualización de la información de la Guía electrónica de programas (EPG) La información de la Guía electrónica de programas (EPG) la proporcionan las emisoras. Las entradas de los programas pueden aparecer vacías u obsoletas, según la información proporcionada por un canal determinado. La pantalla se actualiza dinámicamente tan pronto como la información está disponible. Guía actual y próxima Se muestra la información del programa actual y siguiente de los seis canales señalados en la columna izquierda.
Uso de la lista programada Si ha elaborado una lista de visualización planificada de programas que desea ver, el canal se cambiará automáticamente al programa planificado a la hora planificada aunque esté viendo otro programa. 1. Pulse el botón D.MENU para ver el menú DTV. 2. Pulse el botón ENTER/OK para seleccionar “Guía”. 3. Pulse los botones o para seleccionar “Lista programada” y, a continuación, pulse el botón ENTER/OK. 4. Pulse el botón rojo. El canal se cambiará a la programación planificada.
Visualización de todos los canales y los favoritos En el menú EPG puede ver todos los canales o sólo los favoritos. 1. Pulse el botón D.MENU para ver el menú DTV. 2. Pulse el botón ENTER/OK para seleccionar “Guía”. Guía actual y próxima 13:28 Mié 16 Feb 3. Seleccione la guía que desee (“Guía actual y próxima” o “Guía Extreme Machines: Armoured Cars All Channels completa”) pulsando los botones o . Información 4. Pulse el botón ENTER/OK. Actual Siguiente 5. Pulse el botón verde.
Ajuste de la transparencia de los menús Puede definir la transparencia de los menús. 1. Pulse el botón D.MENU para ver el menú DTV. 2. Pulse los botones o para seleccionar “Configuración” y, a continuación, pulse el botón ENTER/OK. 3. Pulse los botones o para seleccionar “Transparencia de menús” y, a continuación, pulse el botón ENTER/OK. 4. Seleccione una opción (“Alto”, “Medio”, “Bajo” u “Opaco”) pulsando los botones o y, a continuación, pulse el botón ENTER/OK para cambiar la configuración.
Configuración de los subtítulos Se pueden activar o desactivar los subtítulos. 1. Pulse el botón D.MENU para ver el menú DTV. 2. Pulse los botones o para seleccionar “Configuración” y, a continuación, pulse el botón ENTER/OK. 2. Pulse los botones o para seleccionar “Subtítulos” y, a continuación, pulse el botón ENTER/OK. 4. Seleccione “Act.” pulsando los botones o . Pulse el botón ENTER/OK. 5. Pulse el botón EXIT para salir.
Selección del texto digital (Sólo Reino Unido) Si el programa se emite con texto digital esta opción está Configuración activada. Texto digital : Inhabilitar Enable 1. Pulse el botón D.MENU para ver el menú DTV. Zona horaria Habilitar 2. Pulse los botones o para seleccionar “Configuración” y, a Sistema continuación, pulse el botón ENTER/OK. 3. Pulse los botones o para seleccionar “Texto digital” y, a continuación, pulse el botón ENTER/OK. Move Enter Re4.
Comprobación de la información de la señal Se puede obtener información acerca del estado de la señal. 1. Pulse el botón D.MENU para ver el menú DTV. 2. Pulse los botones o para seleccionar “Configuración” y, a continuación, pulse el botón ENTER/OK. 3. Pulse los botones o para seleccionar “Sistema” y, a continuación, pulse el botón ENTER/OK. 4. Pulse los botones o para seleccionar “Información de señal” y, a continuación, pulse el botón ENTER/OK. 4. Pulse el botón EXIT para salir.
Visualización de la interfaz común La interfaz común contiene y muestra información acerca del Info. sobre la aplicación CAM insertado en la ranura CI. Tipo : CA Fabricante : Channel Plus 1. Pulse el botón D.MENU para ver el menú DTV. Inf : Top Up TV 2. Pulse los botones o para seleccionar “Configuración” y, a continuación, pulse el botón ENTER/OK. 3. Pulse los botones o para seleccionar “Sistema” y, a continuación, pulse el botón ENTER/OK. Volver 4.
Reconfiguraciones Pude restablecer los valores almacenados de acuerdo con la configuración predeterminada de fábrica. ➣ Esta operación borra toda la información de los canales y las preferencias del usuario ya que restablece los valores de acuerdo con la configuración predeterminada de fábrica. 1. Pulse el botón D.MENU para ver el menú DTV. 2. Pulse los botones o para seleccionar “Configuración” y, a continuación, pulse el botón ENTER/OK. 3.
Preferencias Este menú incluye 6 submenús: Idioma Idioma principal de los subtítulos, Idioma secundario de los Idioma de audio subtítulos, Idioma principal audio, Idioma secundario audio, Idioma de los subtídtulos Idioma principal del teletexto e Idioma secundario del teletexto. Idioma del teletexto Con esta función los usuarios pueden elegir entre estos idiomas: Preferencia Inglés, Alemán, Italiano, Sueco, Francés, Galés, Gaélico, Irlandés, Danés, Finés, Noruego, Español, Checo y Griego).
Visualización de la información de teletexto Puede visualizar la información del teletexto en cualquier momento, pero la recepción de la señal debe ser buena. Si no es así: Puede faltar información. Puede que algunas páginas no aparezcan. Para activar el modo de teletexto y visualizar la página de índice: 1. Seleccione el canal que ofrece el servicio de teletexto mediante los botones P ( ) o P ( ). 2. Pulse el botón TEXT/MIX ( ) para activar el modo de teletexto. ➣ Aparece el contenido de la página.
Uso de Fastext para seleccionar una página del teletexto Los distintos temas que se incluyen en las páginas de teletexto disponen de un código de color y se pueden seleccionar pulsando lo botones de colores del mando a distancia. 1 Acceda a la página de contenido de teletexto pulsando el botón TEXT/MIX ( ). 2. Pulse el botón del color correspondiente para el tema que desear seleccionar (los temas disponibles se enumeran en la línea de información de estado). 3.
Códigos del mando a distancia REPRODUCTOR DE VÍDEO Marca SAMSUNG ADMIRAL AIWA AKAI AUDIO DYNAMICS BELL&HOWELL BROKSONIC CANDLE CANON CITIZEN COLORTYME CRAIG CURTIS MATHES DAEWOO DB DIMENSIA DYNATECH ELECTROHOME EMERSON FISHER FUNAI GENERAL ELECTRIC GO VIDEO HARMAN KARDON HITACHI INSTANT REPLAY JC PENNEY JCL JVC KENWOOD KLH KONIA LG(Goldstar) LIOYD LOGIK LXI MAGNAVOX MARANTZ MARTA MEI MEMOREX MGA MIDLAND MINOLTA MITSUBISHI Código 000 001 002 003 004 005 077 078 079 020 025 004 027 032 007 026 018 022 002 00
DECODIFICADOR DE CABLE Marca SAMSUNG GI HAMLIN HITACHI JERROLD MACOM MAGNAVOX OAK PANASONIC PHILIPS PIONEER RCA REGAL Código 000 001 041 003 024 025 030 038 039 025 030 019 023 026 003 022 019 021 004 018 014 022 003 Marca REGENCY SA SCIENTIFIC ATLAN SPRUCER STARGATE 2000 SYLVANIA TEXSCAN TOCOM UNIVERSAL VIEWSTAR WAMER AMEX ZENITH Código 015 023 042 043 042 043 022 036 016 016 032 033 034 019 021 023 028 046 017 029 035 037 045 Código 000 001 002 003 004 005 006 007 008 009 010 011 012 013 Producto Hom
DVD Marca PANASONIC PHILIPS ROTEL RIO RCA RAITE ROWA SAMPO SONY SHERWOOD SVA SYLVANIA SHARP SANSUI SANYO SHINSONIC Código 024 034 124 134 136 137 138 036 076 117 118 120 023 035 074 075 131 132 073 038 104 026 029 126 127 128 129 130 141 039 041 042 043 093 140 062 062 090 094 Marca THOMSON TOSHIBA TECHNICS TVIEW TOKAI TEAC TECHWOOD TREDEX URBAN CONCEPTS VENTURER VOCOPRO YAMAHA YAMAKAWA XWAVE ZENITH Código 145 028 062 076 139 072 073 096 097 098 099 101 076 075 102 032 063 040 073 103 076 121 RECEPTOR D
Configuración del software del PC (basado en Windows XP) A continuación se muestra la configuración de visualización de Windows para un ordenador típico. Probablemente la pantalla real de su PC sea distinta; dependerá de la versión concreta de Windows y de la tarjeta de vídeo que tenga. Aunque las pantallas reales tengan un aspecto diferente, se aplicarán los mismos ajustes básicos y la misma información en la mayoría de los casos.
Ajustes del ordenador Mode : Custom Ajuste fino y grueso de la imagen (Bloqueo de Imagen): TV Bloqueo de Imagen Equalizer El objetivo del ajuste de la calidad de imagen es eliminar o SRS TS XT : Off Grueso 50 Auto Volume : Off reducir las interferencias. Fino 50 Internal Mute : Off Si éstas no se eliminan mediante la sintonización fina, ajuste Reset la frecuencia lo mejor que pueda (gruesa) y vuelva a realizar la sintonización fina.
Ajuste de montaje en la pared (LE40S8, LE46S8) (se vende por separado) Tras instalar el montaje en la pared, puede ajustar fácilmente la posición del televisor. 1. Pulse el botón MENU para ver el menú. Pulse los botones ▲ o ▼ para seleccionar “Configuración” y, a continuación, pulse el botón 2. Pulse los botones ▲ o ▼ para seleccionar “Ajuste del montaje mural” y, a continuación, pulse el botón ENTER/OK. 3. Ajuste la posición deseada mediante los botones ▲,▼,◄ o ►. 4. Pulse el botón EXIT para salir.
Utilización del bloqueo Kensington antirrobo El bloqueo Kensington es un dispositivo que se utiliza para fijar físicamente el sistema cuando se utiliza en un sitio público. El dispositivo de bloqueo debe adquirirse por separado. El aspecto y método de bloqueo puede ser diferente al que se muestra en la ilustración dependiendo del fabricante. Consulte el manual que acompaña al bloqueo Kensington para utilizarlo correctamente. 1.
Especificaciones técnicas y medioambientales Nombre del modelo Tamaño de pantalla (diagonal) Consumo de energía Resolución del PC Sonido Salida Dimensiones (An x Pr x Al) Cuerpo principal Con soporte Peso (con soporte) Consideraciones medioambientales Temperatura de funcionamiento Humedad de funcionamiento Temperatura de almacenamiento Humedad en almacenamiento Nombre del modelo Tamaño de pantalla (diagonal) Consumo de energía Resolución del PC Sonido Salida Dimensiones (An x Pr x Al) Cuerpo principal Con s
Esta página se ha dejado en blanco expresamente. BN68-01182B-Spa-0312.
Precauções a ter quando se vêem imagens fixas Uma imagem fixa pode danificar permanentemente o ecrã do televisor. • Uma imagem fixa não deve permanecer no painel LCD durante mais de 2 horas ecrã porque pode provocar o efeito de retenção de imagem no ecrã. Esta retenção de imagem também é conhecida como “queimadura de ecrã”. Para evitar a retenção de imagem, diminua o grau de luminosidade e de contraste do ecrã quando visualizar uma imagem fixa.
Índice LIGAR E PREPARAR O TELEVISOR REGULAR O SOM Lista de acessórios............................................. 3 Instalar a base..................................................... 3 Instalar o kit de montagem na parede................. 3 Apresentação do painel de controlo.................... 4 Apresentação do painel de ligação..................... 5 Apresentação do telecomando........................... 7 Colocar pilhas no telecomando........................... 8 Ligar e desligar....
UTILIZAR A FUNÇÃO DTV UTILIZAR A FUNÇÃO DE TELETEXTO Pré-visualizar o sistema do menu DTV............. 32 Actualizar automaticamente a lista de canais... 33 Actualizar manualmente a lista de canais......... 33 Editar os seus canais favoritos......................... 34 Seleccionar a lista de canais............................. 36 Ver informações sobre programas.................... 36 Ver as informações do EPG (guia de programação electrónico)...................
Lista de acessórios Verifique se recebeu os seguintes acessórios com o televisor LCD. Se faltar algum dos acessórios, contacte o revendedor.
Apresentação do painel de controlo ➣ A cor e a forma do produto podem variar consoante o modelo. 1 SOURCE 4 Alterna entre todas as fontes de entrada Carregue neste botão para mudar de canal. disponíveis (TV, Ext.1, Ext.2, AV, S-Vídeo, No menu no ecrã, utilize os botões tal Componente, PC, HDMI1, HDMI2, DTV). como utiliza os botões e do telecomando. No menu no ecrã, utilize este botão tal como utiliza o (Se não utilizar o telecomando, pode ligar o botão ENTER/OK do telecomando.
Apresentação do painel de ligação 1 2 3 4 5 6 @ ! Fonte de alimentação 09 8 7 ➣ A cor e a forma do produto podem variar consoante o modelo. ➣ Antes de ligar um dispositivo externo ao televisor, tem de desligar este último. ➣ Quando ligar um dispositivo externo, faça a correspondência de cores entre o terminal e o respectivo cabo.
4 Ligar uma antena ou rede de televisão por cabo Para ver os canais de televisão correctamente, o televisor tem de receber um sinal de uma das seguintes fontes: - Antena externa / Rede de televisão por cabo / Rede de satélite 5 Ligar um CI (Common Interface) CARD - Se não introduzir o “CI CARD” em determinados canais, ”Sinal codificado” aparece no ecrã. - As informações de associação incluindo um número de telefone, ID do CI CARD, ID do anfitrião e outras informações aparecem cerca de 2 a 3 minutos depois.
Apresentação do telecomando 1 Selecciona um dispositivo de destino que será controlado pelo telecomando da Samsung (TV, DVD, STB, CABLE, VCR). (Consulte as páginas 49 a 51) 2 Botão Ligar/Desligar televisor 3 Botões numéricos para acesso directo aos canais 4 Selecção de canais de um/dois dígitos 5 Aparece “Lista canais” no ecrã. 6 Selecciona directamente os modos TV e DTV.
Colocar pilhas no telecomando 1. Levante a tampa na parte de trás do telecomando como se mostra na figura. 2. Coloque duas pilhas de tamanho AAA. ➣ Faça corresponder os pólos “+” e “–” das pilhas com o diagrama existente no compartimento. 3. Coloque novamente a tampa. ➣ Se não tencionar utilizar o telecomando durante muito tempo, retire as pilhas e guarde-as num local fresco e seco. Pode utilizar o telecomando a uma distância máxima de aproximadamente 7 metros do televisor.
Plug & Play Quando ligar o televisor pela primeira vez, ocorrem várias Plug & Play programações básicas, automática e subsequentemente. Estão disponíveis as seguintes definições. ➣ Qualquer função relacionada com televisão digital (DVB) só funciona nos países ou regiões em que são transmitidos Start Plug & Play. sinais terrestres digitais DVB-T (MPEG2). Confirme com o OK revendedor local se consegue receber sinais DVB-T.
Se quiser reiniciar esta função... 1. Carregue no botão MENU para aceder ao menu. Carregue no botão ou para seleccionar “Configurar” e depois no botão ENTER/OK. 2. Carregue novamente no botão ENTER/OK para seleccionar “Plug & Play”. 3. Aparece a mensagem para “Iniciar Plug & Play”. (Consulte da página 9) TV Configurar Plug & Play Idioma : Português Tempo Modo Jogo : Deslig. Ecrã azul : Deslig. Melodia : Deslig.
Memorizar canais manualmente Pode memorizar até 100 canais, incluindo os canais recebidos através de televisão por cabo. Quando memorizar canais manualmente, pode escolher: Se pretende memorizar ou não os canais encontrados. O número de programa de cada canal memorizado que pretende identificar. 1. Carregue no botão MENU para aceder ao menu. Carregue no botão ou para seleccionar “Canal” e depois no botão ENTER/OK. 2. Carregue no botão ou para seleccionar “Memor.
Definir as listas de canais Defina os canais de acordo com as suas preferências. Pode apagar, adicionar ou bloquear facilmente o canal pretendido. 1. Carregue no botão MENU para aceder ao menu. Carregue no botão ou para seleccionar “Canal” e depois no botão ENTER/OK. 2. Carregue no botão ou para seleccionar “Lista canais” e depois no botão ENTER/OK. 3. Carregue novamente no botão ENTER/OK para seleccionar “Lista canais”. 4. Carregue no botão para seleccionar “ ”. 5.
Ordenar os canais memorizados Pode trocar os números de dois canais para: Modificar a ordem numérica em que os canais foram automaticamente memorizados. Atribuir nomes fáceis de decorar aos canais que costuma ver mais vezes. 1. Carregue no botão MENU para aceder ao menu. Carregue no botão ou para seleccionar “Canal” e depois no botão ENTER/OK. 2. Carregue no botão ou para seleccionar “Ordenar” e depois no botão ENTER/OK. 3.
Sintonização fina da recepção de canais Utilize a sintonização fina para obter uma óptima recepção de um determinado canal. 1. Utilize os botões numéricos para seleccionar directamente o canal em que pretende fazer uma sintonização fina. 2. Carregue no botão MENU para aceder ao menu. Carregue no botão ou para seleccionar “Canal” e depois no botão ENTER/OK. 3. Carregue no botão ou para seleccionar “Sintonia fina” e depois no botão ENTER/OK. 4.
Alterar o padrão de imagem Pode seleccionar o tipo de imagem que melhor corresponde aos seus requisitos de visualização. 1. Carregue no botão MENU para aceder ao menu. Carregue no botão ENTER/OK para seleccionar “Imagem”. 2. Carregue novamente no botão ENTER/OK para seleccionar “Modo”. 3. Carregue no botão ou para seleccionar o efeito de imagem pretendido. Carregue no botão ENTER/OK. 4. Carregue no botão EXIT para sair.
Alterar a tonalidade Pode seleccionar a tonalidade que mais lhe agrada. 1. Para seleccionar o efeito de imagem pretendido, siga as instruções 1 a 3 de “Alterar o padrão de imagem”. (na página 15) 2. Carregue no botão ou para seleccionar “Tonalidade” e depois no botão ENTER/OK. 3. Carregue no botão ou para seleccionar a definição de tonalidade pretendida. Carregue no botão ENTER/OK. 4. Carregue no botão EXIT para sair. torna a temperatura da cor mais azulada do que no menu “Cores frias1”.
Configurar definições detalhadas na imagem Pode seleccionar a tonalidade que mais lhe agrada. 1. Carregue no botão MENU para aceder ao menu. 2. Carregue no botão ENTER/OK para seleccionar “Imagem”. 3. Carregue no botão ▲ ou ▼ para seleccionar “Definições detalhadas” e depois no botão ENTER/OK. 4. Seleccione a opção pretendida carregando no botão ou e depois carregue no botão ENTER/OK. Opções disponíveis: Ajustar preto, Contraste dinâm., Gama, Equilíbrio do branco, O meu cont.
Alterar o tamanho da imagem Pode seleccionar o tamanho de imagem que melhor corresponde às suas necessidades de visualização. 1. Carregue no botão MENU para aceder ao menu. Carregue no botão ENTER/OK para seleccionar “Imagem”. 2. Carregue no botão ou para seleccionar “Tamanho” e depois no botão ENTER/OK. 3. Seleccione a opção pretendida carregando no botão ou . Carregue no botão ENTER/OK. 4. Carregue no botão EXIT para sair. Wide Automático: ajusta automaticamente a imagem para o formato “16:9”.
Fixar a imagem actual Carregue no botão STILL para tornar uma imagem em movimento fixa. Carregue novamente para cancelar. Seleccionar o Modo de ecrã Se definir o tamanho da imagem para Wide Automático (Auto TV Wide) num televisor panorâmico 16:9, pode determinar o tamanho que pretende ver: a imagem 4:3 WSS (Wide Screen Service) ou nenhuma. Cada país europeu requer um tamanho de imagem diferente pelo que esta função permite aos utilizadores seleccionar o tamanho. 1.
NR Digital / Cor activa / DNIe Se o sinal de transmissão recebido pelo televisor for fraco, pode activar a função Digital Noise Reduction (Redução de ruído digital) para ajudar a reduzir estática ou o efeito de fantasma que possa aparecer no ecrã. 1. Carregue no botão MENU para aceder ao menu. Carregue no botão ENTER/OK para seleccionar “Imagem”. 2. Seleccione a opção pretendida carregando no botão ou e depois carregue no botão ENTER/OK. Opções disponíveis: NR Digital, Cor activa, DNIe. 3.
Ver a imagem na imagem (PIP) Pode ver uma imagem secundária na imagem principal de Mode : Custom Configurar TV Equalizer um programa de televisão ou de um vídeo. Desta forma, pode Mais SRS TS XT : Off ver a imagem de um programa de televisão ou de um vídeo a Auto Volume : Off Poupança energ :: Deslig. Internal Mute Off partir de qualquer equipamento ligado enquanto vê a imagem Nv.pr.HDMI : Baixa Reset PIP principal. 1. Carregue no botão MENU para aceder ao menu.
Nível de preto HDMI Pode seleccionar directamente o nível de preto no ecrã para ajustar a intensidade do ecrã. 1. Carregue no botão MENU para aceder ao menu. Carregue no botão ou para seleccionar “Configurar” e depois no botão ENTER/OK. 2. Carregue no botão ou para seleccionar “Nv.pr.HDMI” e depois no botão ENTER/OK. 3. Carregue no botão ou para seleccionar “Normal” ou “Baixa” e depois no botão ENTER/OK. 4. Carregue no botão EXIT para sair.
Regular as definições de som Pode regular as definições de som de acordo com as suas preferências pessoais. 1. Carregue no botão MENU para aceder ao menu. Carregue no botão ou para seleccionar “Som” e depois no botão ENTER/OK. 2. Carregue no botão ou para seleccionar “Equalizador” e depois no botão ENTER/OK. 3. Carregue no botão ou para seleccionar uma determinada opção. Carregue no botão ENTER/OK. 4. Carregue no botão ou para ir para a definição pretendida. Carregue no botão ENTER/OK. 5.
Ligar auscultadores Se quiser ver um programa de televisão sem incomodar as pessoas que o rodeiam, pode ligar uns auscultadores ao televisor. ➣ Se introduzir a tomada dos auscultadores na porta correspondente, só pode utilizar “SRS TS XT” e “Volume auto.” no menu Som. ➣ O uso prolongado dos auscultadores com o volume muito alto pode provocar lesões auditivas. ➣ Se ligar os auscultadores ao sistema, não ouve o som dos altifalantes. ➣ O volume dos auscultadores e o do televisor regulam-se de forma diferente.
Seleccionar a opção Sil. interno Se quiser ouvir som em de colunas separadas, cancele o amplificador interno. 1. Carregue no botão MENU para aceder ao menu. Carregue no botão ou para seleccionar “Som” e depois no botão ENTER/OK. 2. Carregue no botão ou para seleccionar “Sil. interno” e depois no botão ENTER/OK. 3. Carregue no botão ou para seleccionar “Lig.” ou “Deslig.”. Carregue no botão ENTER/OK. 4. Carregue no botão EXIT para sair. ➣ Se a opção “Sil. interno” estiver definida para “Lig.
Repor as predefinições de som Se o Modo Jogo estiver definido para Lig., a função Reiniciar TV Sound do menu Som é activada. Se seleccionar a função Reiniciar Modo : Personalizar depois de definir o equalizador, repõe as respectivas Equalizador SRS TS XT : Deslig. predefinições. Volume auto : Deslig. 1. Carregue no botão MENU para aceder ao menu. Sil. interno : Deslig. Seleção do Som : Principal Carregue no botão ou para seleccionar “Som” e depois no Reiniciar botão ENTER/OK. 2.
Programar o temporizador Pode seleccionar um intervalo de tempo entre 30 e 180 minutos, após o qual o televisor muda automaticamente para o modo de espera. 1. Carregue no botão MENU para aceder ao menu. Carregue no botão ou para seleccionar “Configurar” e depois no botão ENTER/OK. 2. Carregue no botão ou para seleccionar “Tempo” e depois no botão ENTER/OK. 3. Carregue no botão ou para seleccionar “Temporizador” e depois no botão ENTER/OK. 4.
Seleccionar o idioma Quando utilizar o aparelho pela primeira vez, tem de seleccionar o idioma dos menus e indicações mostrados no ecrã. 1. Carregue no botão MENU para aceder ao menu no ecrã. Carregue no botão ou para seleccionar “Configurar” e depois no botão ENTER/OK. 2. Carregue no botão ou para seleccionar “Idioma” e depois no botão ENTER/OK. 3. Seleccione um determinado idioma carregando várias vezes no botão ou . Carregue no botão ENTER/OK. ➣ Pode escolher um de 17 idiomas. 4.
Definir o modo Ecrã azul / Seleccionar a Melodia Ecrã azul: Se o televisor não estiver a receber sinal ou se o sinal for muito fraco, um ecrã azul substitui automaticamente o fundo da imagem com ruído. Se quiser continuar a ver a imagem de má qualidade, tem de definir o modo “Ecrã azul” para “Deslig.”. Melodia: Pode ouvir um som melódico quando ligar/desligar o televisor. 1. Carregue no botão MENU para aceder ao menu. Carregue no botão ou para seleccionar “Configurar” e depois no botão ENTER/OK. 2.
Utilizar a função Poupança energ. Esta função ajusta a luminosidade do televisor de maneira a reduzir o consumo de energia. Quando estiver a ver televisão à noite, defina a opção do modo “Poupança energ.” para “Alto” de maneira a reduzir o reflexo e o consumo de energia. 1. Carregue no botão MENU para aceder ao menu no ecrã. Carregue no botão ou para seleccionar “Configurar” e depois no botão ENTER/OK. 2. Carregue no botão ou para seleccionar “Poupança energ.” e depois no botão ENTER/OK. 3.
Seleccionar a fonte Pode fazer uma selecção das fontes externas ligadas às tomadas de entrada do televisor. 1. Carregue no botão MENU para aceder ao menu. Carregue no botão ▲ ou ▼ para seleccionar “Entrada” e depois no botão ENTER/OK. 2. Carregue novamente no botão ENTER/OK para seleccionar “Lista de fontes”. ➣ Se não estiver ligado nenhum dispositivo externo ao televisor, só as opções “TV”, “Ext.1” e “Ext.2” estão activadas na “Lista de fontes”.
Pré-visualizar o sistema do menu DTV ➣ A empresa não garante o funcionamento normal do menu DTV em países sem ser 6 países (Reino Unido, Alemanha, França, Itália, Espanha, Áustria) porque só as normas destes países são suportadas. Além disso, se o país da transmissão for diferente do país seleccionado pelo utilizador actual, a cadeia de texto mostrado na faixa do canal, em Info, Guia, Gestor canais, etc. pode não aparecer correctamente. ➣ Disponível no modo DTV.
Actualizar automaticamente a lista de canais Pode actualizar a lista de canais quando a estação emissora Mode : Custom Memor. auto Equalizer adicionar novos serviços ou se levar o televisor para um novo SRS TS XT : Off local. Auto Volume Off Procurar serviços: digitais… Internal Mute : Off 1. Carregue no botão D.MENU para aceder ao menu DTV. 35% Reset 2. Carregue no botão ou para seleccionar “Canal” e depois Serviços encontrad: 24 Canal: 38 no botão ENTER/OK. Parar 3.
Editar os seus canais favoritos Pode editar os seus canais favoritos com os quatro botões coloridos. 1. Carregue no botão D.MENU para aceder ao menu DTV. 2. Carregue no botão ou para seleccionar “Canal” e depois no botão ENTER/OK. 3. Carregue no botão ou para seleccionar “Editar canais favoritos” e depois no botão ENTER/OK. 4. Carregue no botão vermelho para ver todos os canais actualmente memorizados. 5. Carregue no botão ou para seleccionar o canal pretendido. Carregue no botão ENTER/OK.
Mover 1. Carregue no botão D.MENU para aceder ao menu DTV. 2. Carregue no botão ou para seleccionar “Canal” e depois no botão ENTER/OK. 3. Carregue no botão ou para seleccionar “Editar canais favoritos” e depois no botão ENTER/OK. 4. Seleccione o canal pretendido com o botão ou . 5. Carregue no botão verde. ➣ Aparece o ícone “ ” à esquerda do nome do canal. 6. Carregue no botão ou para seleccionar o canal que pretende mover e depois no botão verde ou ENTER/OK. 7.
Seleccionar a lista de canais Pode excluir canais à escolha entre os canais que encontrar. Lista canais Quando fizer uma procura nos canais memorizados, os que Todos os canais Test Card M' v2.0 1/2 tiver optado por ignorar não aparecem no ecrã. Todos os 23 bid-up.tv 60 Television X 1 Test Card M' 25 TCM 70 BBC Radio 1 3 Vida003b canais que não excluiu aparecem durante a procura. 26 UKTV Style 72 BBC Radio 2 4 Vida004b 27 Discovery 73 BBC Radio 3 5 vida005b 1. Carregue no botão D.
Ver as informações do EPG (guia de programação electrónico) As informações do EPG (guia de programação electrónico) são fornecidas pelas estações emissoras. Pode haver entradas de programas em branco ou desactualizadas em consequência da transmissão de informações num determinado canal. O ecrã é actualizado de forma dinâmica à medida que ficam disponíveis novas informações. Guia act.
Utilizar a lista de visualização planeada Se criar uma lista de visualização planeada de programas aos quais pretende assistir, o televisor muda automaticamente para o canal do programa planeado à hora planeada mesmo se estiver a ver outro programa. 1. Carregue no botão D.MENU para aceder ao menu DTV. 2. Carregue no botão ENTER/OK para seleccionar “Guia”. 3. Carregue no botão ou para seleccionar “Lista planeada” e depois no botão ENTER/OK. 4. Carregue no botão vermelho.
Ver todos os canais e os canais favoritos No menu do EPG, pode ver todos os canais ou os canais favoritos. 1. Carregue no botão D.MENU para aceder ao menu DTV. 2. Carregue no botão ENTER/OK para seleccionar “Guia”. 3. Seleccione o guia pretendido (“Guia act. e posterior” ou “Guia completo”) carregando no botão ou . 4. Carregue no botão ENTER/OK. 5. Carregue no botão verde. As listas de todos os canais e dos canais favoritos são alternadas. 6. Seleccione um programa carregando no botão , , ou . 7.
Ajustar a transparência de menu Pode definir a transparência do menu. 1. Carregue no botão D.MENU para aceder ao menu DTV. 2. Carregue no botão ou para seleccionar “Configurar” e depois no botão ENTER/OK. 3. Carregue no botão ou para seleccionar “Transparência de menu” e depois no botão ENTER/OK. 4. Seleccione a opção pretendida (“Alto”, “Médio”, “Baixa” ou “Opaco”) carregando no botão ou e carregue no botão ENTER/OK para alterar a definição. 5. Carregue no botão EXIT para sair.
Definir as legendas Pode activar e desactivar as legendas. 1. Carregue no botão D.MENU para aceder ao menu DTV. 2. Carregue no botão ou para seleccionar “Configurar” e depois no botão ENTER/OK. 3. Carregue no botão ou para seleccionar “Legenda” e depois no botão ENTER/OK. 4. Seleccione “Lig.” carregando no botão ou . Carregue no botão ENTER/OK. 5. Carregue no botão EXIT para sair.
Seleccionar o texto digital (Reino Unido apenas) Se o programa for transmitido com texto digital, esta função é Configurar activada. ▲ 1. Carregue no botão D.MENU para aceder ao menu DTV. Texto digital: Enable Disable Fuso horário Enable 2. Carregue no botão ou para seleccionar “Configurar” e Sistema depois no botão ENTER/OK. 3. Carregue no botão ou para seleccionar “Texto digital” e depois no botão ENTER/OK. 4. Carregue no botão ou para seleccionar “Desactivar” ou Mover Enter Volver “Activar”.
Verificar as informações sobre o sinal Pode obter informações sobre o estado do sinal. 1. Carregue no botão D.MENU para aceder ao menu DTV. 2. Carregue no botão ou para seleccionar “Configurar” e depois no botão ENTER/OK. 3. Carregue no botão ou para seleccionar “Sistema” e depois no botão ENTER/OK. 4. Carregue no botão ou para seleccionar “Informações sobre o sinal” e depois no botão ENTER/OK. 5. Carregue no botão EXIT para sair. ➣ Se o sinal for fraco, aparece a mensagem “Sem sinal”.
Ver a interface comum Contém informações sobre o CAM introduzido na ranhura CI e apresenta-as no ecrã. 1. Carregue no botão D.MENU para aceder ao menu DTV. 2. Carregue no botão ou para seleccionar “Configurar” e depois no botão ENTER/OK. 3. Carregue no botão ou para seleccionar “Sistema” e depois no botão ENTER/OK. 4. Carregue no botão ou para seleccionar “Interface comum” e depois no botão ENTER/OK. 5. Carregue no botão ENTER/OK para ver as informações sobre a sua aplicação. 6.
Reiniciar Pode reiniciar os valores memorizados repondo os valores predefinidos. ➣ A operação Reiniciar apaga as informações de todos os canais e as preferências do utilizador, repondo todos os valores predefinidos. 1. Carregue no botão D.MENU para aceder ao menu DTV. 2. Carregue no botão ou para seleccionar “Configurar” e depois no botão ENTER/OK. 3. Carregue no botão ou para seleccionar “Sistema” e depois no botão ENTER/OK. 4.
Preferência Este menu é composto por 6 submenus: Idioma Idioma principal das legendas, Idioma secundário das Idioma de áudio legendas, Idioma principal, Idioma secundário, Idioma Idioma das legendas principal do teletexto e Idioma secundário do teletexto. Idioma teletexto Com esta função, os utilizadores podem seleccionar um dos Preferência idiomas (Inglês, Alemão, Italiano, Sueco, Francês, Galês, Gaélico, Irlandês, Dinamarquês, Finlandês, Norueguês, Esp., Checo e Grego).
Ver as informações de teletexto Pode ver as informações de teletexto em qualquer altura, mas a recepção do sinal tem de ser boa. Caso contrário: Podem faltar informações. Podem não aparecer algumas páginas. Para activar o modo de teletexto e ver a página de índice: 1. Com o botão P ( ) ou P ( ), seleccione o canal que fornece o serviço de teletexto. 2. Carregue no botão TEXT/MIX ( ) para activar o modo de teletexto. ➣ Aparece a página de índice.
Utilizar a opção Fastext para seleccionar uma página de teletexto Os vários tópicos incluídos nas páginas de teletexto têm códigos de cores e podem ser seleccionados com os botões coloridos do telecomando. 1. Aceda à página de índice do teletexto carregando no botão TEXT/MIX ( ). 2. Carregue no botão colorido que corresponde ao tópico que pretende seleccionar (os tópicos disponíveis aparecem na linha de informações sobre o estado). 3. Carregue no botão vermelho para aceder à página anterior.
Códigos do telecomando Videogravador Marca SAMSUNG ADMIRAL AIWA AKAI AUDIO DYNAMICS BELL&HOWELL BROKSONIC CANDLE CANON CITIZEN COLORTYME CRAIG CURTIS MATHES DAEWOO DB DIMENSIA DYNATECH ELECTROHOME EMERSON FISHER FUNAI GENERAL ELECTRIC GO VIDEO HARMAN KARDON HITACHI INSTANT REPLAY JC PENNEY JCL JVC KENWOOD KLH KONIA LG(Goldstar) LIOYD LOGIK LXI MAGNAVOX MARANTZ MARTA MEI MEMOREX MGA MIDLAND MINOLTA MITSUBISHI Código 000 001 002 003 004 005 077 078 079 020 025 004 027 032 007 026 018 022 002 003 006 008 015
Caixa de televisão por cabo Marca SAMSUNG GI HAMLIN HITACHI JERROLD MACOM MAGNAVOX OAK PANASONIC PHILIPS PIONEER RCA REGAL Código 000 001 041 003 024 025 030 038 039 025 030 019 023 026 003 022 019 021 004 018 014 022 003 Marca REGENCY SA SCIENTIFIC ATLAN SPRUCER STARGATE 2000 SYLVANIA TEXSCAN TOCOM UNIVERSAL VIEWSTAR WAMER AMEX ZENITH Código 015 023 042 043 042 043 022 036 016 016 032 033 034 019 021 023 028 046 017 029 035 037 045 Código 000 001 002 003 004 005 006 007 008 009 010 011 012 013 Produto
DVD Marca PANASONIC PHILIPS ROTEL RIO RCA RAITE ROWA SAMPO SONY SHERWOOD SVA SYLVANIA SHARP SANSUI SANYO SHINSONIC Código 024 034 124 134 136 137 138 036 076 117 118 120 023 035 074 075 131 132 073 038 104 026 029 126 127 128 129 130 141 039 041 042 043 093 140 062 062 090 094 Marca THOMSON TOSHIBA TECHNICS TVIEW TOKAI TEAC TECHWOOD TREDEX URBAN CONCEPTS VENTURER VOCOPRO YAMAHA YAMAKAWA XWAVE ZENITH Código 145 028 062 076 139 072 073 096 097 098 099 101 076 075 102 032 063 040 073 103 076 121 SET-TOP BO
Configurar o software do PC (com base no Windows XP) As definições de visualização do Windows num computador normal são apresentadas abaixo. Os ecrãs que aparecem no monitor do PC podem ser diferentes consoante a sua versão do Windows e a sua placa de vídeo. Mesmo que os ecrãs pareçam diferentes, são aplicadas, em quase todos os casos, as mesmas informações de configuração básicas. (Se tal não acontecer, contacte o fabricante do computador ou um revendedor Samsung.) 1.
Definir o PC Sintonização grossa e fina da imagem (Bloq. imagem): Mode : Custom TV Bloq. imagem Equalizer a regulação da qualidade da imagem permite remover ou SRS TS XT : Off Grosso 50 reduzir o ruído da imagem. Auto Volume : Off Fino 50 Se não conseguir remover o ruído apenas com a sintonização Internal Mute : Off Reset fina, regule a frequência o melhor possível (grosso) e volte a fazer a sintonização fina.
Ajuste do suporte de montagem na parede (LE40S8, LE46S8) (vendido em separado) Quando instalar o suporte de montagem na parede, pode facilmente ajustar a posição do seu televisor. 1. Carregue no botão MENU para este aparecer. Carregue nos botões ▲ ou ▼ para seleccionar “Configurar”, depois carregue no botão ENTER/OK. 2. Carregue nos botões ▲ ou ▼ para seleccionar “Ajuste montagem na parede”, depois carregue no botão ENTER/OK. 3. Ajuste na posição desejada utilizando os botões ▲,▼,◄ ou ►. 4.
Utilizar o cadeado Kensington anti-roubo O cadeado Kensington é um dispositivo que serve para fixar fisicamente o sistema quando utilizado em locais públicos. O dispositivo de bloqueio tem de ser adquirido separadamente. O aspecto e o método de bloqueio podem ser diferentes do que mostra a figura; tudo depende do fabricante. Consulte o manual fornecido com o cadeado Kensington para o utilizar correctamente. 1.
Características técnicas e ambientais Nome do modelo Tamanho do ecrã (na diagonal) Consumo de energia Resolução de PC Som Saída Dimensões (L x P x A) Televisor apenas Com base Peso (com base) Características ambientais Temperatura de funcionamento Humidade de funcionamento Temperatura de armazenamento Humidade de armazenamento Nome do modelo LE26S8 LE32S8 LE37S8 26 polegadas 120 W 1360 x 768 @ 60 Hz 32 polegadas 150 W 1360 x 768 @ 60 Hz 37 polegadas 170 W 1360 x 768 @ 60 Hz 5WX2 10 W X 2 10 W X 2
Esta página foi intencionalmente deixada em branco BN68-01182B-Por-0312.
Varnostni ukrepi pri prikazu mirujoče slike Mirujoča slika lahko trajno poškoduje TV-zaslon. • Mirujoče slike ne prikazujte na LCD-zaslonu dlje kot 2 uri, saj lahko povzroči zadrževanje slike na zaslonu. Tako zadrževanje slike se imenuje tudi "ožig zaslona". Da bi se izognili takemu zadrževanju slike, pri prikazovanju mirujoče slike zmanjšajte stopnjo svetlosti in kontrasta zaslona.
Vsebina PRIKLJUČITEV IN PRIPRAVA TV-JA NASTAVITEV ZVOKA Seznam delov..................................................... 3 Nameščanje stojala............................................. 3 Namestitev kompleta za pritrditev na steno........ 3 Ogled nadzorne plošče....................................... 4 Ogled plošče s priključki...................................... 5 Ogled daljinskega upravljalnika........................... 7 Vstavljanje baterij v daljinski upravljalnik............
UPORABA FUNKCIJE DTV-JA UPORABA FUNKCIJE TELETEKSTA Predogled sistema menijev DTV....................... 32 Samodejna posodobitev seznama kanalov....... 33 Ročna posodobitev seznama kanalov.............. 33 Urejanje priljubljenih kanalov............................ 34 Izbira seznama kanalov.................................... 36 Prikaz informacij o programu............................ 36 Ogled informacij EPG (elektronski programski vodič)..........................
Seznam delov Preverite, ali ste z LCD-televizorjem dobili naslednje predmete. Če kateri predmet manjka, se obrnite na prodajalca.
Ogled nadzorne plošče ➣ Barva in oblika izdelka sta odvisni od modela. 1 SOURCE (VIR) 4 Preklaplja med vsemi razpoložljivimi vhodnimi viri (TV, Ext.1, Ext.2, AV, S-Video, komponentno, PC, HDMI1, HDMI2, DTV). Ta gumb v meniju na zaslonu uporabljajte kot gumb ENTER/OK (ENTER/V REDU) na daljinskem upravljalniku. Pritisnite za menjavo kanala. Na meniju na zaslonu uporabljajte gumba kot gumba in na daljinskem upravljalniku. (Brez daljinskega upravljalnika lahko televizor vklopite z gumbi za kanale.
Ogled plošče s priključki 1 2 3 4 5 6 @ ! Napajalni vhod 09 8 7 ➣ Barva in oblika izdelka sta odvisni od modela. ➣ Vsakič ko na televizor priključite zunanjo napravo, mora biti napajanje enote izklopljeno. ➣ Ko priključujete zunanjo napravo, mora biti barva priključka enaka barvi kabla. 1 Povezava sprejemnika, videorekorderja ali DVD-predvajalnika EXT 1 Video O Vhod Avdio (L/R (L/D)) O EXT 2 O O Spojnik Izhodna moč Video + Avdio (L/R (L/D)) Na voljo je le TV- ali DTV-izhod.
4 Priključitev antene ali kabelskega televizijskega omrežja Za pravilno gledanje televizijskih kanalov mora televizor signal sprejemati iz enega izmed naslednjih virov: - Zunanja antena/kabelsko televizijsko omrežje/satelitsko omrežje 5 Povezava kartice za splošni vmesnik - Če pri nekaterih kanalih ni vstavljena “kartica za splošni vmesnik”, se na zaslonu prikaže sporočilo ”Scrambled Signal” (Moten signal).
Ogled daljinskega upravljalnika 1 Izberite ciljno napravo, ki jo želite upravljati z daljinskim upravljalnikom Samsung (TV, DVD, STB, CABLE, VCR) (oglejte si strani 49~51) 2 Gumb za televizor v stanju pripravljenosti 3 Številski gumbi za neposreden dostop do kanalov 4 Izbira med eno- in dvomestnimi kanali 5 Na zaslonu prikaže “Channel List” (Seznam kanalov).
Vstavljanje baterij v daljinski upravljalnik 1. Odprite pokrovček na hrbtni strani daljinskega upravljalnika, kot je prikazano na sliki. 2. Vstavite dve bateriji AAA. ➣ Poskrbite, da sta pola “+” in “–” baterije usmerjena skladno s prikazom znotraj ležišča za baterije. 3. Pokrov namestite nazaj. ➣ Če daljinskega upravljalnika ne boste uporabljali dalj časa, odstranite baterije in jih shranite na hladnem in suhem mestu. Daljinski upravljalnik lahko uporabljate na razdalji do približno 7 m od televizorja.
Plug & Play Pri prvem vklopu televizorja se samodejno prikaže več osnovnih nastavitev. Na voljo so naslednje nastavitve. ➣ Vse funkcije, ki so povezane z digitalnim televizijskim signalom (DVB), delujejo samo v državah z digitalnim signalom DVB-T (MPEG2). Pri lokalnem trgovcu preverite, ali imate dostop do signala DVB-T. Čeprav televizor ustreza specifikaciji DVB-T, ne moremo zagotoviti združljivosti z naslednjimi generacijami tega standarda. Nekatere funkcije morda ne bodo na voljo v vseh državah.
Za ponastavitev te funkcije ... 1. Pritisnite gumb MENU (MENI), da prikažete meni. S pritiskom gumba ali izberite “Setup” (Nastavitev) in nato pritisnite gumb ENTER/OK (ENTER/V REDU). 2. Ponovno pritisnite gumb ENTER/OK (ENTER/V REDU), da izberete “Plug & Play”. 3. Prikaže se sporočilo “Start Plug & Play” (Zaženi Plug & Play). (Oglejte si strani 9.
Ročno shranjevanje kanalov Shranite lahko do 100 kanalov, vključno s tistimi, ki jih sprejemate prek kabelskih omrežij. Pri ročnem shranjevanju kanalov lahko izberete: Ali bi radi shranili posamezne najdene kanale. Številko programa vsakega shranjenega kanala, ki ga želite identificirati. 1. Pritisnite gumb MENU (MENI), da prikažete meni. S pritiskom gumba ali izberite “Channel” (Kanal), nato pritisnite gumb ENTER/OK (ENTER/V REDU). 2.
Nastavitev seznamov kanalov Nastavite kanale po vaši želji. Želeni kanal lahko enostavno izbrišete, dodate ali zaklenete. 1. Pritisnite gumb MENU (MENI), da prikažete meni. S pritiskom gumba ali izberite “Channel” (Kanal), nato pritisnite gumb ENTER/OK (ENTER/V REDU). 2. S pritiskom gumba ali izberite “Channel Manager” (Upravitelj kanalov), nato pritisnite gumb ENTER/OK (ENTER/V REDU). 3. Ponovno pritisnite gumb ENTER/OK (ENTER/V REDU), da izberete “Channel List” (Upravitelj kanalov). 4.
Razvrščanje shranjenih kanalov Številki dveh kanalov lahko zamenjate, da: TV Channel Spremenite številsko zaporedje, v katerem so bili kanali Country : Belgium Auto Store samodejno shranjeni. Manual Store Channel Manager Kanalom, ki jih najpogosteje gledate, dodelite številke, ki si Sort jih zlahka zapomnite. Name Fine Tune 1. Pritisnite gumb MENU (MENI), da prikažete meni.
Fina naravnava kanalov S fino naravnavo ročno prilagodite določeni kanal za optimalen sprejem. 1. S številskimi gumbi neposredno izberite kanal, ki ga želite fino naravnati. 2. Pritisnite gumb MENU (MENI), da prikažete meni. S pritiskom gumba ali izberite “Channel” (Kanal), nato pritisnite gumb ENTER/OK (ENTER/V REDU). 3. S pritiskom gumba ali izberite “Fine Tune” (Fina naravnava), nato pritisnite gumb ENTER/OK (ENTER/V REDU). 4. S pritiskom gumba ali prilagodite fino naravnavo.
Sprememba slikovnega standarda Izberete lahko vrsto slike, ki najbolj ustreza vašim zahtevam. 1. Pritisnite gumb MENU (MENI), da prikažete meni. S pritiskom gumba ENTER/OK (ENTER/V REDU) izberite “Picture” (Slika). 2. Ponovno pritisnite gumb ENTER/OK (ENTER/V REDU), da izberete “Mode” (Način). 3. S pritiskom gumba ali izberite želeni slikovni učinek. Pritisnite gumb ENTER/OK (ENTER/V REDU). 4. Pritisnite gumb EXIT (IZHOD) za izhod.
Sprememba barvnega tona Izberete lahko barvni ton, ki je najudobnejši za vaše oči. 1. Za izbiro želenega slikovnega učinka sledite navodilom pod “Sprememba slikovnega standarda” od 1 do 3. (Na strani 15.) 2. S pritiskom gumba ali izberite “Barvni ton”, nato pritisnite gumb ENTER/OK (ENTER/V REDU). 3. S pritiskom gumba ali izberite nastavitev želenega barvnega tona. Pritisnite gumb ENTER/OK (ENTER/V REDU). 4. Pritisnite gumb EXIT (IZHOD) za izhod.
Konfiguracija podrobnih nastavitev slike Izberete lahko barvni ton, ki je najudobnejši za vaše oči. TV Picture 1. Pritisnite gumb MENU (MENI), da prikažete meni. Mode : Movie Contrast 100 2. S pritiskom gumba ENTER/OK (ENTER/V REDU) izberite Brightness 50 Sharpness 75 “Picture” (Slika). Colour 55 3.
Sprememba velikosti slike Izberete lahko velikost slike, ki najbolj ustreza vašim zahtevam. 1. Pritisnite gumb MENU (MENI), da prikažete meni. S pritiskom gumba ENTER/OK (ENTER/V REDU) izberite “Picture” (Slika). 2. S pritiskom gumba ali izberite “Size” (Velikost), nato pritisnite gumb ENTER/OK (ENTER/V REDU). 3. S pritiskom gumba ali izberite želeno možnost. Pritisnite gumb ENTER/OK (ENTER/V REDU). 4. Pritisnite gumb EXIT (IZHOD) za izhod.
Zamrznitev trenutne slike Pritisnite gumb STILL (ZAUSTAVITEV), da gibljivo sliko zaustavite v mirujočo. Za preklic pritisnite ponovno. Izbira zaslonskega načina Ko velikost nastavite velikost slike “Auto Wide” na TV širokozaslonskem televizorju 16:9, lahko določite velikost rMore Size slike za sliko 4:3 WSS ali pa ne določite teh nastavitev. V Screen Mode posameznih evropskih državah so zahtevane različne velikosti Digital NR Active Colour slike, zato to funkcijo izbere uporabnik. DNle Reset 1.
Digitalno odpravljanje šumov/Aktivna barva/DNIe Če je sprejeti TV-signal šibak, lahko aktivirate funkcijo Digital TV Noise Reduction (Digitalno odpravljanje šumov) za zmanjšanje rMore Size statičnih motenj in odsevov na zaslonu. Screen Mode Digital NR 1. Pritisnite gumb MENU (MENI), da prikažete meni. Active Colour S pritiskom gumba ENTER/OK (ENTER/V REDU) izberite DNle Reset “Picture” (Slika). 2. S pritiskom gumba ali izberite želeno možnost, nato pritisnite gumb ENTER/OK (ENTER/V REDU).
Gledanje slike v sliki (PIP) V glavni sliki lahko prikažete podsliko TV-programa ali video Mode : Custom Setup TV Equalizer vhoda. Tako lahko gledate sliko TV-programa ali video vhoda iz More SRS TS XT : Off katere koli priključene opreme, medtem ko gledate glavno sliko. Auto Volume : Off Energy :: Off Internal Saving Mute Off 1. Pritisnite gumb MENU (MENI), da prikažete meni.
Raven črne HDMI Neposredno lahko na izberete raven črne na zaslonu, da prilagodite globino zaslona. 1. Pritisnite gumb MENU (MENI), da prikažete meni. S pritiskom gumba ali izberite “Setup” (Nastavitev), nato pritisnite gumb ENTER/OK (ENTER/V REDU). 2. S pritiskom gumba ali izberite “HDMI Black Level” (Raven črne HDMI), nato pritisnite gumb ENTER/OK (ENTER/V REDU). 3. S pritiskom gumba ali izberite “Normal” (Običajno) ali “Low” (Nizko), nato pritisnite gumb ENTER/OK. 4.
Prilagajanje zvočnih nastavitev Zvočne nastavitve lahko prilagodite popolnoma po vaši želji. 1. Pritisnite gumb MENU (MENI), da prikažete meni. S pritiskom gumba ali izberite “Sound” (Zvok), nato pritisnite gumb ENTER/OK (ENTER/V REDU). 2. S pritiskom gumba ali izberite “Equalizer” (Izenačevalnik), nato pritisnite gumb ENTER/OK (ENTER/V REDU). 3. S pritiskom gumba ali izberite določeni element. Pritisnite gumb ENTER/OK (ENTER/V REDU). 4. S pritiskom gumba ali dosezite želeno nastavitev.
Priključitev slušalk Da TV–program, ki ga gledate, ne bi motil ostalih oseb v prostoru, lahko na televizor priključite slušalke. ➣ Ko vtič slušalk vstavite v ustrezna vrata, lahko v meniju Sound (Zvok) uporabljate samo “SRS TS XT” in “Auto Volume” (Samodejna glasnost). ➣ Daljša uporaba slušalk pri večji glasnosti lahko poškoduje sluh. ➣ Ko na sistem priključite slušalke, zvok ne bo prihajal iz zvočnikov. ➣ Glasnost slušalk in glasnost TV se prilagajata različno.
Izbira funkcije izklopa zvoka notranjih zvočnikov Če želite slišati zvok iz ločenih zvočnikov, izklopite notranji ojačevalnik. 1. Pritisnite gumb MENU (MENI), da prikažete meni. S pritiskom gumba ali izberite “Sound” (Zvok), nato pritisnite gumb ENTER/OK (ENTER/V REDU). 2. S pritiskom gumba ali izberite “Internal Mute” (Izklop zvoka notranjih zvočnikov), nato pritisnite gumb ENTER/OK (ENTER/V REDU). 3. S pritiskom gumba ali izberite “On” (Vklop) ali “Off” (Izklop).
Ponastavitev zvočnih nastavitev na tovarniške vrednosti Če možnost Game Mode (Način igre) nastavite na On (Vklop), TV Sound se aktivira funkcija Reset Sound (Ponastavitev zvoka). Če po Mode : Custom Equalizer nastavitvi izenačevalnika izberete funkcijo Reset (Ponastavitev), SRS TS XT : Off se nastavitev izenečevalnika ponastavi na tovarniške vrednosti. Auto Volume : Off Internal Mute : Off 1. Pritisnite gumb MENU (MENI), da prikažete meni.
Nastavitev izklopnega časovnika Izberete lahko časovno obdobje od 30 do 180 minut, po katerem se televizor samodejno preklopi v stanje pripravljenosti. 1. Pritisnite gumb MENU (MENI), da prikažete meni. S pritiskom gumba ali izberite “Setup” (Nastavitev), nato pritisnite gumb ENTER/OK (ENTER/V REDU). 2. S pritiskom gumba or izberite “Time” (Čas), nato pritisnite gumb ENTER/OK (ENTER/V REDU). 3.
Izbira jezika Pri prvi uporabi televizorja izberite jezik, v katerem bodo prikazani meniji in njihove vrednosti. 1. Pritisnite gumb MENU (MENI), da prikažete meni na zaslonu. S pritiskom gumba ali izberite “Setup” (Nastavitev), nato pritisnite gumb ENTER/OK (ENTER/V REDU). 2. S pritiskom gumba ali izberite “Language” (Jezik), nato pritisnite gumb ENTER/OK (ENTER/V REDU). 3. S pritiskanjem gumba ali izberite želeni jezik. Pritisnite gumb ENTER/OK (ENTER/V REDU).
Nastavitev načina modrega zaslona/izbira melodije Blue Screen (Modri zaslon): Če ni signala ali je zelo šibak, se namesto motene slike samodejno prikaže modri zaslon. Če želite gledati sliko slabe kakovosti, način “Blue Screen” (Modri zaslon) nastavite na “Off” (Izklop). Melody (Melodija): Ob vklopu ali izklopu televizorja lahko zaslišite melodijo. 1. Pritisnite gumb MENU (MENI), da prikažete meni. S pritiskom gumba ali izberite “Setup” (Nastavitev), nato pritisnite gumb ENTER/OK (ENTER/V REDU). 2.
Uporaba funkcije Energy Saving (Varčevanje z energijo) Ta funkcija prilagodi svetlost TV tako, da se zmanjša poraba energije. Ko TV gledate ponoči, nastavite možnost načina “Energy Saving “ (Varčevanje z energijo) na “High” (Visoko), da zmanjšate utrujanje oči in tudi porabo energije. 1. Pritisnite gumb MENU (MENI), da prikažete meni na zaslonu. S pritiskom gumba ali izberite “Setup” (Nastavitev), nato pritisnite gumb ENTER/OK (ENTER/V REDU). 2.
Izbira vira Izbirate lahko med zunanjimi viri, ki so priključeni na vhodne vtičnice TV. 1. Pritisnite gumb MENU (MENI), da prikažete meni. S pritiskom gumba ▲ ali ▼ izberite “Input” (Vhod), nato pritisnite gumb ENTER/OK (ENTER/V REDU). 2. Ponovno pritisnite ENTER/OK (ENTER/V REDU), da izberete “Source List” (Seznam virov). ➣ Če na televizor ni priključena nobena zunanja naprava, so v “Source List” (Seznam virov) na voljo samo “TV”, “Ext.1” in “Ext.2”.
Predogled sistema menijev DTV ➣ Podjetje ne jamči normalnega delovanja menija DTV v drugih kot 6 podprtih državah (Združeno kraljestvo, Nemčija, Francija, Italija, Španija, Avstrija), saj so podprti samo standardi teh držav. Poleg tega v primeru, da se država oddajanja razlikuje od države, ki jo je izbral trenutni uporabnik, vrstica na traku s kanalom, možnosti Info (Informacije), Guide (Vodič), Channel Manager (Upravitelj kanalov) itd. morda niso pravilno prikazane. ➣ Na voljo v načinu DTV.
Samodejna posodobitev seznama kanalov Seznam kanalov lahko posodobite, če izdajatelj televizijskega Mode Auto: Custom Store Equalizer programa doda nove storitve ali če TV premaknete na novo SRS TS XT : Off lokacijo. Auto Volume : Off Scanning for digital services... Internal Mute : Off 1. Pritisnite gumb D.MENU (MENI DTV), da prikažete meni DTV. 35% Reset Services found: 24 Channel: 38 2.
Urejanje priljubljenih kanalov Priljubljene kanale lahko urejate s štirimi barvnimi gumbi. 1. Pritisnite gumb D.MENU (MENI DTV), da prikažete meni DTV. 2. S pritiskom gumba ali izberite “Channel” (Kanal), nato pritisnite gumb ENTER/OK (ENTER/V REDU). 3. S pritiskom gumba ali izberite “Edit Favourite Channels” (Urejanje priljubljenih kanalov), nato pritisnite gumb ENTER/OK (ENTER/V REDU). 4. Pritisnite rdeči gumb, da prikažete vse trenutno shranjene kanale. 5.
Premikanje 1. Pritisnite gumb D.MENU (MENI DTV), da prikažete meni DTV. 2. S pritiskom gumba ali izberite “Channel” (Kanal), nato pritisnite gumb ENTER/OK (ENTER/V REDU). 3. S pritiskom gumba ali izberite “Edit Favourite Channels” (Urejanje priljubljenih kanalov), nato pritisnite gumb ENTER/OK (ENTER/V REDU). 4. Z gumbom ali izberite želeni kanal. 5. Pritisnite zeleni gumb. ➣ Levo od imena kanala se prikaže ikona “ ”. 6.
Izbira seznama kanalov Izmed kanalov, ki ste jih pregledali, lahko izločite izbrane Channel List All Channels kanale. Ko pregledujete shranjene kanale, tisti, ki ste jih izbrali, Test Card M' v2.0 1/2 23 bid-up.tv 60 Television X 1 Test Card M' da naj bodo preskočeni, niso prikazani. Pri pregledovanju so 25 TCM 70 BBC Radio 1 3 Vida003b 26 UKTV Style 72 BBC Radio 2 4 Vida004b prikazani vsi kanali, ki jih niste izbrali, da naj bodo preskočeni.
Ogled informacij EPG (elektronski programski vodič) Informacije EPG (elektronski programski vodič) posredujejo izdajatelji televizijskega programa. Informacije o programu so lahko zastarele ali jih ni, kar je posledica oddajanja informacij določene televizijske postaje. Zaslon se bo dinamično posodobil takoj, ko bodo na voljo nove informacije.
Uporaba seznama načrtovanih programov Če ustvarite seznam programov, ki si jih želite ogledati, se kanal ob načrtovanem času samodejno preklopi na načrtovani program, tudi če gledate drugega. 1. Pritisnite gumb D.MENU (MENI DTV), da prikažete meni DTV. 2. S pritiskom gumba ENTER/OK (ENTER/V REDU) izberite “Guide” (Vodič). 3. S pritiskom gumba ali izberite “Scheduled List” (Seznam načrtovanih programov), nato pritisnite gumb ENTER/OK (ENTER/V REDU). 4. Pritisnite rdeči gumb.
Ogled vseh in priljubljenih kanalov V meniju EPG lahko prikažete vse ali priljubljene kanale. 1. Pritisnite gumb D.MENU (MENI DTV), da prikažete meni DTV. 2. S pritiskom gumba ENTER/OK (ENTER/V REDU) izberite “Guide” (Vodič). Now & Next Guide 13:28 Wed 16 Feb 3. S pritiskom gumba ali izberite želeni vodič (“Now & Next Extreme Machines: Armoured Cars Guide” (Vodič po zdajšnjem in naslednjem programu) ali “Full All Channels Information Guide” (Celotni vodič)). Now Next 4.
Prilagajanje prosojnosti menija Nastavite lahko prosojnost menija. Setup 1. Pritisnite gumb D.MENU (MENI DTV), da prikažete meni DTV. Menu Transparency : Medium High Parental Lock Medium 2. S pritiskom gumba ali izberite “Setup” (Nastavitev), nato Subtitle : On Low pritisnite gumb ENTER/OK (ENTER/V REDU). Subtitle Mode : Normal Opaque 3. S pritiskom gumba ali izberite “Menu Translucency” Audio Format ▼ (Prosojnost menija), nato pritisnite gumb ENTER/OK (ENTER/V REDU). 4.
Nastavitev podnaslovov Lahko aktivirate in deaktivirate podnaslove. 1. Pritisnite gumb D.MENU (MENI DTV), da prikažete meni DTV. 2. S pritiskom gumba ali izberite “Setup” (Nastavitev), nato pritisnite gumb ENTER/OK (ENTER/V REDU). 3. S pritiskom gumba ali izberite “Subtitle” (Podnaslovi), nato pritisnite gumb ENTER/OK (ENTER/V REDU). 4. S pritiskom gumba ali izberite “On” (Vklop). Pritisnite gumb ENTER/OK (ENTER/V REDU). 5. Pritisnite gumb EXIT (IZHOD) za izhod.
Izbira digitalnega besedila (samo Združeno kraljestvo) Ta funkcija je omogočena, če je program oddajan z digitalnim Setup besedilom. Digital Text : Enable 1. Pritisnite gumb D.MENU (MENI DTV), da prikažete meni DTV. Disable Time Zone Enable 2. S pritiskom gumba ali izberite “Setup” (Nastavitev), nato System pritisnite gumb ENTER/OK (ENTER/V REDU). 3. S pritiskom gumba ali izberite “Digital Text” (Digitalno besedilo), nato pritisnite gumb ENTER/OK (ENTER/V REDU). 4.
Preverjanje informacij o signalu Poiščete lahko informacije o stanju signala. 1. Pritisnite gumb D.MENU (MENI DTV), da prikažete meni DTV. 2. S pritiskom gumba ali izberite “Setup” (Nastavitev), nato pritisnite gumb ENTER/OK (ENTER/V REDU). 3. S pritiskom gumba ali izberite “System” (Sistem), nato pritisnite gumb ENTER/OK (ENTER/V REDU). 4. S pritiskom gumba ali izberite “Signal Information” (Informacije o signalu), nato pritisnite gumb ENTER/OK (ENTER/V REDU). 4.
Ogled splošnega vmesnika Prikaže informacije o CAM-u, ki je vstavljen v režo za splošni vmesnik. 1. Pritisnite gumb D.MENU (MENI DTV), da prikažete meni DTV. 2. S pritiskom gumba ali izberite “Setup” (Nastavitev), nato pritisnite gumb ENTER/OK (ENTER/V REDU). 3. S pritiskom gumba ali izberite “System” (Sistem), nato pritisnite gumb ENTER/OK (ENTER/V REDU). 4. S pritiskom gumba ali izberite “Common Interface” (Splošni vmesnik), nato pritisnite gumb ENTER/OK (ENTER/V REDU). 5.
Ponastavljanje Shranjene vrednosti lahko ponastavite na tovarniške. ➣ Operacija Reset (Ponastavitev) izbriše vse informacije o kanalih in nastavitve uporabnika in vse vrednosti vrne v privzeto stanje. 1. Pritisnite gumb D.MENU (MENI DTV), da prikažete meni DTV. 2. S pritiskom gumba ali izberite “Setup” (Nastavitev), nato pritisnite gumb ENTER/OK (ENTER/V REDU). 3. S pritiskom gumba ali izberite “System” (Sistem), nato pritisnite gumb ENTER/OK (ENTER/V REDU). 4.
Nastavitev Meni je sestavljen iz 6 podmenijev: Language Primary Subtitle Language (Primarni jezik podnaslovov), Audio Language Secondary Subtitle Language (Sekundarni jezik podnaslovov), Subtitle Language Primary Audio Language (Primarni jezik avdia), Secondary Teletext Language Audio Language (Sekundarni jezik avdia), Primary Teletext Preference Language (Primarni jezik teleteksta) in Secondary Teletext Language (Sekundarni jezik teleteksta).
Prikaz informacij teleteksta Informacije teleteksta lahko prikažete kadarkoli, če je sprejem signala dober. Sicer: Informacije lahko manjkajo. Nekatere strani morda ne bodo prikazane. Če želite aktivirati način teleteksta in prikazati stran z vsebino: 1. Z gumbom P ( ) ali P ( ) izberite kanal, ki omogoča storitev teleteksta. 2. Pritisnite gumb TEXT/MIX (TELETEKST/MEŠANO) ( ), da aktivirate način teleteksta. ➣ Prikaže se stran z vsebino.
Izbira strani teleteksta s sistemom Fastext Različne teme teleteksta so barvno označene in jih lahko izberete s pritiskom barvnih gumbov na daljinskem upravljalniku. 1. Za prikaz strani teleteksta z vsebino pritisnite gumb TEXT/MIX (TELETEKST/MEŠANO) ( ). 2. Pritisnite barvni gumb, ki je enake barve kot tema, ki jo želite izbrati (razpoložljive teme so navedene v vrstici z informacijami o stanju). 3. Če želite prikazati prejšnjo stran, pritisnite rdeči gumb.
Kode daljinskega upravljalnika VIDEOREKORDER Znamka SAMSUNG ADMIRAL AIWA AKAI AUDIO DYNAMICS BELL&HOWELL BROKSONIC CANDLE CANON CITIZEN COLORTYME CRAIG CURTIS MATHES DAEWOO DB DIMENSIA DYNATECH ELECTROHOME EMERSON FISHER FUNAI GENERAL ELECTRIC GO VIDEO HARMAN KARDON HITACHI INSTANT REPLAY JC PENNEY JCL JVC KENWOOD KLH KONIA LG(Goldstar) LIOYD LOGIK LXI MAGNAVOX MARANTZ MARTA MEI MEMOREX MGA MIDLAND MINOLTA MITSUBISHI Koda 000 001 002 003 004 005 077 078 079 020 025 004 027 032 007 026 018 022 002 003 006 0
KABELSKI SPREJEMNIK Znamka SAMSUNG GI HAMLIN HITACHI JERROLD MACOM MAGNAVOX OAK PANASONIC PHILIPS PIONEER RCA REGAL Koda 000 001 041 003 024 025 030 038 039 025 030 019 023 026 003 022 019 021 004 018 014 022 003 002 003 004 005 006 007 031 028 027 037 044 023 028 020 044 040 Znamka REGENCY SA SCIENTIFIC ATLAN SPRUCER STARGATE 2000 SYLVANIA TEXSCAN TOCOM UNIVERSAL VIEWSTAR WAMER AMEX ZENITH Koda 015 023 042 043 042 043 022 036 016 016 032 033 034 019 021 023 028 046 017 029 035 037 045 DVD-PREDVAJALNI
DVD-PREDVAJALNIK Znamka PANASONIC PHILIPS ROTEL RIO RCA RAITE ROWA SAMPO SONY SHERWOOD SVA SYLVANIA SHARP SANSUI SANYO SHINSONIC Koda 024 034 124 134 136 137 138 036 076 117 118 120 023 035 074 075 131 132 073 038 104 026 029 126 127 128 129 130 141 039 041 042 043 093 140 062 062 090 094 Znamka THOMSON TOSHIBA TECHNICS TVIEW TOKAI TEAC TECHWOOD TREDEX URBAN CONCEPTS VENTURER VOCOPRO YAMAHA YAMAKAWA XWAVE ZENITH Koda 145 028 062 076 139 072 073 096 097 098 099 101 076 075 102 032 063 040 073 103 076 121
Nastavitev programske opreme PC-ja (na osnovi Windows XP) Spodaj so prikazane nastavitve zaslona v OS Windows za tipični računalnik. Dejanski zasloni na PC-ju se lahko razlikujejo, odvisno od različice OS Windows in grafične kartice. Tudi če se dejanski zasloni razlikujejo, v večini primerov veljajo iste osnovne informacije o nastavitvi. (Sicer se obrnite na proizvajalca računalnika ali Samsungovega trgovca.) 1. Najprej kliknite na možnost “Kontrolna plošča” v meniju Start v OS Windows. 2.
Nastavitev PC-ja Groba in fina naravnava slike (zaklep slike): Mode : Custom TV Image Lock Namen nastavitve kakovosti slike je odstraniti ali zmanjšati Equalizer SRS TS XT : Off Coarse 50 šum slike. Auto Volume : Off Fine 50 Če šum ni odstranjen s fino naravnavo, nastavite frekvenco Internal Mute : Off čim bolje (grobo) in ponovno fino naravnajte. Reset Po zmanjšanju šumov ponovno nastavite sliko, tako da bo poravnana na sredini zaslona. 1.
Prilagoditev opreme za pritrditev na steno (LE40S8, LE46S8) (naprodaj posebej) Ko je oprema za pritrditev na steno nameščena, lahko enostavno prilagodite položaj TV-ja. 1. Pritisnite gumb MENU (MENI), da prikažete meni. S pritiskom gumba ▲ ali ▼ izberite «Setup» (Nastavitev), nato pritisnite gumb ENTER/OK. 2. S pritiskom gumba ▲ ali ▼ izberite “Wall-Mount Adjustment” (Prilagoditev opreme za pritrditev na steno), nato pritisnite gumb ENTER/OK. 3. Z gumbom ▲,▼,◄ ali ► prilagodite na želeni položaj. 4.
Uporaba ključavnice Kensington proti kraji Ključavnica Kensington je naprava, ki se uporablja za fizično pritrditev sistema pri uporabi na javnem mestu. Napravo za zaklep je treba kupiti posebej. Videz in način zaklepanja se lahko razlikujeta od slike, odvisno od proizvajalca. Za pravilno uporabo si oglejte priročnik, priložen ključavnici Kensington. 1. Napravo za zaklepanje vstavite v režo Kensington na LCD-TV Kabel (Slika 1) in jo obrnite v smeri zaklepanja (Slika 2). Slika 2 2.
Tehnični in okoljski podatki Ime modela Velikost zaslona (diagonala) Poraba energije Ločljivost PC-ja Zvok Izhod Dimenzije (Š x G x V) Osrednji del S stojalom Teža (s stojalom) Okoljksi vidiki Delovna temperatura Delovna vlažnost Temperatura shranjevanja Vlažnost pri shranjevanju Ime modela Velikost zaslona (diagonala) Poraba energije Ločljivost PC-ja Zvok Izhod Dimenzije (Š x G x V) Osrednji del S stojalom Teža (s stojalom) Okoljksi vidiki Delovna temperatura Delovna vlažnost Temperatura shranjevanja Vlažn
Ta stran je namerno puščena prazna. BN68-01182B-Sln-0312.
Correct Disposal of This Product (Waste Electrical & Electronic Equipment) (Applicable in the European Union and other European countries with separate collection systems) This marking shown on the product or its literature, indicates that it should not be disposed with other household wastes at the end of its working life.