
User Manual

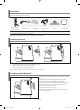
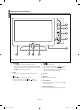
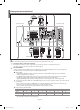
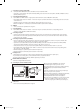

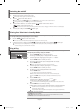
Table Of Contents
- Precautions When Displaying a Still Image
- Contents
- CONNECTING AND PREPARING YOUR TV
- SETTING THE CHANNELS
- SETTING THE PICTURE
- Changing the Picture Standard
- Adjusting the Custom Picture
- Changing the Colour Tone
- Adjusting the Color Tone with the Preferred Color Component
- Resetting the Picture Settings to the Factory Defaults
- Changing the Picture Size
- Changing the Auto Wide (4:3)
- Digital Noise Reduction
- DNIe Demo (Digital Natural Image engine)
- Changing the Colour Space
- Freezing the Current Picture
- Viewing the Picture In Picture (PIP)
- SETTING THE SOUND
- SETTING THE TIME
- SETTING THE OTHERS
- WISELINK
- USING THE DTV FEATURE
- Previewing the DTV Menu System
- Updating the Channel List Automatically
- Updating the Channel List Manually
- Editing Your Favourite Channels
- Selecting Channel Manager
- Displaying Programme Information
- Viewing the EPG (Electronic Programme Guide) Information
- Using the Scheduled List
- Setting the Default Guide
- Viewing All Channels and Favourite Channels
- Setting the Preferred Languages
- Choosing Your Language
- Adjusting the Translucency Level
- Setting up the Parental Lock
- Setting the Subtitle
- Selecting the Preferred Language (Subtitle or Audio)
- Setting the Digital Text
- Viewing Product Information
- Checking the Signal Information
- Upgrading the Software (Option)
- Viewing Common Interface
- Selecting the CI (Common Interface) Menu
- Resetting
- USING THE TELETEXT FEATURE
- SETTING THE PC
- RECOMMENDATIONS FOR USE
- Warning! Important Safety Instructions
- Wiring the Mains Power Supply Plug (UK Only)
- Warranty Card

English-8
Switching On and Off
Your set can be placed in standby mode in order to reduce the power consumption. The standby mode can be useful when you wish
to interrupt viewing temporarily (during a meal, for example).
1. Press the POWER
button on the remote control.
The screen is turned off and a Blue standby indicator appears on the front of your set.
2.
To switch your set back on, simply press the POWER , numeric buttons (0~9) or channel up/down ( / ) button again.
Do not leave your set in standby mode for long periods of time (when you are away on holiday, for example).
It is best to unplug the set from the mains and aerial.
Placing Your Television in Standby Mode
The mains lead is attached to the rear of your set.
1. Plug the mains lead into an appropriate socket.
The standby indicator lights up on the front of the set.
2. Press the button on the front of the set.
You also can press the POWER button or the TV/DTV button on the remote control to turn the TV on.
The programme that you were watching last is reselected automatically.
3. Press the numeric button (0~9) or channel up/down ( / ) button on the remote control or
button on the right side of the set.
When you switch the set on for the very first time, you will be asked to choose language in which the menus are to be displayed.
4. To switch your set off, press the POWER button again.
When the TV is initially powered on, several basic settings proceed automatically and
subsequently. The following settings are available.
1. Press the POWER button on the remote control.
The message “Start Plug & Play” is displayed with “OK” selected.
2. Select the appropriate language by pressing the or button.
Press the ENTER button to confirm your choice.
3. The message “Check antenna input.” is displayed with “OK” selected.
Press the ENTER button.
Please check that the antenna cable is connected correctly.
4. Select the appropriate country by pressing the or button.
Press the ENTER button to confirm your choice.
5. The “Auto Store” menu is displayed with the “Start” selected.
Press the ENTER button.
The channel search will start and end automatically.
After all the available channels are stored, the “Clock Set” menu appears.
Press the ENTER button at any time to interrupt the memorization process.
6. Press the ENTER button.
Select the “Hour” or “Minute” by pressing the
or
button.
Set the “Hour” or “Minute” by pressing the
or
button.
You can also set the hour and minute by pressing the number buttons on the remote control.
7. Press the ENTER button to confirm your setting.
The DTV channel scan menu appears and the DTV channel is automatically updated.
If the DTV channel is updated, the Source in the source list of the Input menu is
automatically changed to DTV.
For detailed descriptions about DTV channel update, refer to page 36 of this manual.
Plug & Play
Language: Select your language.
Country: Select your country.
Auto Store:
Automatically scans for and stores channels available in the local area.
Clock Set: Sets the current time for the TV clock.
BN68-01007T-01Eng.indd 8BN68-01007T-01Eng.indd 8 2006-09-07 9:39:462006-09-07 9:39:46