
User Manual

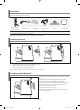
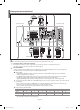

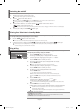
Table Of Contents
- Precautions When Displaying a Still Image
- Contents
- CONNECTING AND PREPARING YOUR TV
- SETTING THE CHANNELS
- SETTING THE PICTURE
- Changing the Picture Standard
- Adjusting the Custom Picture
- Changing the Colour Tone
- Adjusting the Color Tone with the Preferred Color Component
- Resetting the Picture Settings to the Factory Defaults
- Changing the Picture Size
- Changing the Auto Wide (4:3)
- Digital Noise Reduction
- DNIe Demo (Digital Natural Image engine)
- Changing the Colour Space
- Freezing the Current Picture
- Viewing the Picture In Picture (PIP)
- SETTING THE SOUND
- SETTING THE TIME
- SETTING THE OTHERS
- WISELINK
- USING THE DTV FEATURE
- Previewing the DTV Menu System
- Updating the Channel List Automatically
- Updating the Channel List Manually
- Editing Your Favourite Channels
- Selecting Channel Manager
- Displaying Programme Information
- Viewing the EPG (Electronic Programme Guide) Information
- Using the Scheduled List
- Setting the Default Guide
- Viewing All Channels and Favourite Channels
- Setting the Preferred Languages
- Choosing Your Language
- Adjusting the Translucency Level
- Setting up the Parental Lock
- Setting the Subtitle
- Selecting the Preferred Language (Subtitle or Audio)
- Setting the Digital Text
- Viewing Product Information
- Checking the Signal Information
- Upgrading the Software (Option)
- Viewing Common Interface
- Selecting the CI (Common Interface) Menu
- Resetting
- USING THE TELETEXT FEATURE
- SETTING THE PC
- RECOMMENDATIONS FOR USE
- Warning! Important Safety Instructions
- Wiring the Mains Power Supply Plug (UK Only)
- Warranty Card

English-3
List of Parts
Please make sure the following items are included with your LCD TV.
If any items are missing, contact your dealer.
Remote Control &
Batteries (AAA x 2)
Power Cord Cover-Bottom Stand Screw X 4 Stand Cleaning Cloth
Owner’s Instructions
Registration Cards
Wall mount items (sold separately) allow you to mount the TV on the
wall.
For detailed information on installing the wall mount, see the
instructions provided with the Wall Mount items. Contact a
technician for assistance when installing the wall mounted bracket.
Samsung Electronics is not responsible for any damage to the
product or injury to yourself or others
if you elect to install the TV on your own.
Remove the stand and cover the bottom hole with a cap and
fasten with two screws.
Installing the Wall Mount Kit
< 2 >< 3 >
1. Place the TV faced down on a soft cloth or cushion on a table.
2. Put the stand into the hole at the bottom of the TV.
3. Insert screw into the hole indicated and tighten.
The stand is installed for models with the screen size of 40 inch and above.
Installing the Stand
Registration Cards (Not available in all locations)
The stand and stand screw may not be included depending on the model.
M4 X L16
BN68-01007T-01Eng.indd 3BN68-01007T-01Eng.indd 3 2006-09-07 9:38:442006-09-07 9:38:44