
User Manual

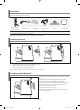
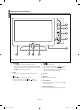
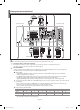

Table Of Contents
- Precautions When Displaying a Still Image
- Contents
- CONNECTING AND PREPARING YOUR TV
- SETTING THE CHANNELS
- SETTING THE PICTURE
- Changing the Picture Standard
- Adjusting the Custom Picture
- Changing the Colour Tone
- Adjusting the Color Tone with the Preferred Color Component
- Resetting the Picture Settings to the Factory Defaults
- Changing the Picture Size
- Changing the Auto Wide (4:3)
- Digital Noise Reduction
- DNIe Demo (Digital Natural Image engine)
- Changing the Colour Space
- Freezing the Current Picture
- Viewing the Picture In Picture (PIP)
- SETTING THE SOUND
- SETTING THE TIME
- SETTING THE OTHERS
- WISELINK
- USING THE DTV FEATURE
- Previewing the DTV Menu System
- Updating the Channel List Automatically
- Updating the Channel List Manually
- Editing Your Favourite Channels
- Selecting Channel Manager
- Displaying Programme Information
- Viewing the EPG (Electronic Programme Guide) Information
- Using the Scheduled List
- Setting the Default Guide
- Viewing All Channels and Favourite Channels
- Setting the Preferred Languages
- Choosing Your Language
- Adjusting the Translucency Level
- Setting up the Parental Lock
- Setting the Subtitle
- Selecting the Preferred Language (Subtitle or Audio)
- Setting the Digital Text
- Viewing Product Information
- Checking the Signal Information
- Upgrading the Software (Option)
- Viewing Common Interface
- Selecting the CI (Common Interface) Menu
- Resetting
- USING THE TELETEXT FEATURE
- SETTING THE PC
- RECOMMENDATIONS FOR USE
- Warning! Important Safety Instructions
- Wiring the Mains Power Supply Plug (UK Only)
- Warranty Card

English-5
Viewing the Connection Panel
Power Input
Whenever you connect an external device to your TV, make sure that power on the unit is turned off.
When connecting an external device, match the colour of the connection terminal to the cable.
[Side Panel Jacks][Rear Panel Jacks]
Connecting an Aerial or Cable Television Network
To view television channels correctly, a signal must be received by the set from one of the following sources:
- An outdoor aerial / A cable television network / A satellite network
Connecting HDMI/DVI
-
Supports connections between HDMI-connection-enabled AV devices (Set-Top Boxes, DVD players, AV receivers and digital TVs).
- No additional Audio connection is needed for an HDMI to HDMI connection.
What is HDMI?
- “High Definition Multimedia Interface” allows the transmission of high definition digital video data and multiple
channels of digital audio ( 5.1 channels).
- The HDMI/DVI terminal supports DVI connection to an extended device with the appropriate cable (not supplied).
The difference between HDMI and DVI is that the HDMI device is smaller in size, has the HDCP
(High Bandwidth Digital Copy Protection) coding feature installed, and supports multi - channel digital audio.
You should use the DVI-to-HDMI cable or DVI-HDMI Adapter for the connection, and the “R - AUDIO - L” terminal on DVI for
sound output.
- When connecting this product via HDMI or DVI to a Set Top Box, DVD Player or Games Console etc, make sure that
it has been set to a compatible video output mode as shown in the table below.
Failure to observe this may result in picture distortion, image breakup or no picture.
Supported modes for DVI or HDMI
- Do not attempt to connect the HDMI/DVI connector to a PC or Laptop Graphics Card.
(This will result in a blank screen being displayed)
50 Hz
60 Hz
Component
480i
X
X
O
480p
O
O
O
576i
X
X
O
576p
O
X
O
720p
O
O
O
1080i
O
O
O
BN68-01007T-01Eng.indd 5BN68-01007T-01Eng.indd 5 2006-09-07 9:39:022006-09-07 9:39:02