Country Armenia AUSTRIA Azerbaijan Belarus BELGIUM CZECH DENMARK ESTONIA FINLAND FRANCE GERMANY Georgia HUNGARY EIRE ITALIA KAZAKHSTAN KYRGYZSTAN LATVIA LITHUANIA LUXEMBURG Moldova NETHERLANDS NORWAY POLAND PORTUGAL RUSSIA SLOVAKIA SPAIN SWEDEN Switzerland TADJIKISTAN U.K UKRAINE UZBEKISTAN Customer Care Centre 0-800-05-555 0810 - SAMSUNG (7267864, € 0.07/min) 088-55-55-555 810-800-500-55-500 Web Site www.samsung.com/at www.samsung.com/be (Dutch) 02-201-24-18 www.samsung.
Figures and illustrations in this User Manual are provided for reference only and may differ from actual product appearance. Product design and specifications may be changed without notice. Digital TV notice Functionalities related to Digital TV (DVB) are only available in countries/areas where DVB-T (MPEG2 and MPEG4 AVC) digital terrestrial signals are broadcasted or where you are able to access to a compatible DVB-C (MPEG2 and MPEG4 AAC) cable-TV service.
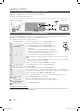
Contents Getting Started 4 4 4 5 6 6 Accessories Viewing the Control Panel Viewing the Remote Control Connecting to an Antenna Plug & Play (Initial Setup) Connections 7 8 9 Connecting to an AV Device Connecting to an Audio Device Changing the Input Source Basic Features 9 10 10 12 13 16 18 20 How to Navigate Menus Using the INFO button (Now & Next guide) Planning Your Viewing Channel Menu Picture Menu Sound Menu Setup Menu Support Menu Advanced Features 22 22 23 29 36 39 44 Connecting to a PC N
Getting Started Accessories ✎✎Please make sure the following items are included with your LCD TV. If any items are missing, contact your dealer. ✎✎The items’ colours and shapes may vary depending on the models. yy Remote Control & Batteries (AAA x 2) yy Owner’s Instructions yy Warranty Card / Safety Guide (Not available in some locations) yy Cleaning Cloth yy Power Cord (46 ~ 55 inch TVs) yy Blanking Bracket yy Cable tie yy Holder-Ring (4ea) See separate guide for installing the stand.
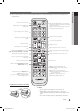
✎✎This is a special remote control for the visually impaired persons and has Braille points on the Power, Channel, and Volume buttons. Turns the TV on and off. (P. 6) When the ON/OFF light button is set to ON and a certain button is pressed, the remote control buttons will be lit for a moment. (Using the remote control with this button set to On will reduce the battery usage time.) Displays and selects the available video sources. (P.
Getting Started Connecting to an Antenna When the TV is initially powered on, basic settings proceed automatically. ✎✎Preset: Connecting the mains and antenna. VHF/UHF Antenna Cable or R-AUDIO-L ANT OUT PR PB Y Power Input Plug & Play (Initial Setup) When the TV is initially powered on, a sequence of on-screen prompts will assist in configuring basic settings. Press the POWERP button. Plug & Play is available only when the Input source is set to TV.
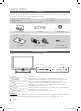
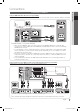
Connections 02 Connections Connecting to an AV Device Using an HDMI / DVI Cable: HD connection (up to 1080p) Available devices: DVD, Blu-ray player, HD cable box, HD STB (Set-Top-Box) satellite receiver, cable box, satellite receiver (STB) DVD W Y W R W R B G HDMI OUT Red White AUDIO OUT W PR R-AUDIO-L R ✎✎HDMI IN 1(DVI), 2, 3, 4 / PC/DVI AUDIO IN PR R-AUDIO-L PB PB PR R-AUDIO-L Y PB Y DVI OUT Y xx When using an HDMI/DVI cable connection, you must use the HDMI IN 1(DVI) jack.
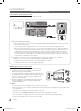
Connections Connecting to an Audio Device Using an Optical or Audio Cable Connection Available devices: digital audio system, amplifier, DVD home theatre OPTICAL Digital Audio System R-AUDIO-L PR PB Y Headphone ✎✎DIGITAL AUDIO OUT (OPTICAL) xx When a digital audio system is connected to the DIGITAL AUDIO OUT (OPTICAL) jack, decrease the volume of both the TV and the system. xx 5.1 CH (channel) audio is available when the TV is connected to an external device supporting 5.1 CH.
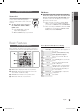
Edit Name ■■ VCR / DVD / Cable STB / Satellite STB / PVR STB / AV Receiver / Game / Camcorder / PC / DVI PC / DVI Devices / TV / IPTV / Blu-ray / HD DVD / DMA: Name the device connected to the input jacks to make your input source selection easier. Source List Use to select TV or other external input sources such as DVD / Blu-ray players / cable box / STB satellite receiver connected to the TV.
Basic Features Using the INFO button (Now & Next guide) The display identifies the current channel and the status of certain audio-video settings. The Now & Next guide shows daily TV programme information for each channel according to the broadcasting time. yy Scroll ◄, ► to view information for a desired programme while watching the current channel. yy Scroll ▲, ▼ to view information for other channels. If you want to move to the currently selected channel, press the ENTERE button.
¦¦ Using Favourite Channels delete or set favourites channels and use the programme guide for digital broadcasts. Select a channel in the Channels, My Channels or Scheduled screen. * My Channels c1 c2 Channels All Air TV 15 Radio Data/Other Analogue 3 23 33 32 5 4 27 Antena B Zoom (in Channel Manager) Shows all favourite channels. 1futech * 24ore.tv abc1 r BBC World bid-up.
Basic Features Channel Menu Manual Store Scans for a channel manually and stores in the TV. ¦¦ Retuning channels ✎✎If a channel is locked using the Child Lock function, Antenna (Air / Cable) t ■■ Digital Channel: When scanning has finished, channels are updated in the channel list. Before your television can begin memorizing the available channels, you must specify the type of signal source that is connected to the TV (i.e. an Air or a Cable system).
(in Channel Manager) Set each channel using the Channel Manager menu options (Lock / Unlock, Timer Viewing, Sort, Delete, Select All / Deselect All). Option menu items may differ depending on the channel status. 1. Select a channel and press the TOOLS button. Channel List Transfer Imports or exports the channel map. You should connect a USB storage to use this function. The PIN number input screen appears. Enter your 4 digit PIN number. ✎✎ ✎✎ The default PIN number of a new TV set is ‘0-0-0-0’. 2.
Basic Features ¦¦ Economical Solutions ECO Solution ■■ Energy Saving (Off / Low / Medium / High / Picture Off / Auto) t : Adjust the brightness of the TV in order to reduce power consumption. If you select Picture Off, the screen is turned off, but the sound remains on. Press any button except volume button to turn on the screen. ■■ ECO Sensor (Off / On): To enhance your power savings; the picture settings will automatically adapt to the light in the room.
xx Depending on the input source, the picture size ✎✎In PC mode, you can only make changes to the Colour xx The available items may differ depending on the Tone, Size, Digital Noise Filter and Auto Protection Time. : Normal Size : Auto Wide Screen Mode : 16:9 Digital Noise Filter : Auto MPEG Nosie Filter : Auto HDMI Black Level Film Mode : Normal : Off selected mode. xx In PC mode, only 16:9 and 4:3 modes can be adjusted. Picture Options Colour Tone options may vary.
Basic Features ¦¦ Setting up the TV with Your PC ¦¦ Adjusting sound settings Set the input source to PC. Auto Adjustment t Adjust frequency values/positions and fine tune the settings automatically. ✎✎Not available when connecting through HDMI/DVI cable. Screen Equalizer Adjusts the sound mode. ■■ Balance L/R: Adjusts the balance between the right and left speaker. ■■ 100Hz / 300Hz / 1kHz / 3kHz / 10kHz (Bandwidth Adjustment): Adjusts the level of specific bandwidth frequencies.
(not available in all locations) (digital channels only) This function handles the Audio Stream for the AD (Audio Description) which is sent along with the Main audio from the broadcaster. ■■ Audio Description (Off / On): Turn the audio description function on or off. ■■ Volume: Adjust the audio description volume. Auto Volume (Off / Normal / Night) To equalize the volume level on each channel, set to Normal.
Basic Features Setup Menu On Time / Off Time: Set the hour, minute, and activate / inactivate. (To activate timer with the setting you’ve chosen, set to Activate.) ¦¦ Setting the Time Volume: Set the desired volume level. Time ■■ Clock: Setting the clock is for using various timer features of the TV. OO The current time will appear every time you press the INFO button. ✎✎ If you disconnect the power cord, you have to set the clock again.
✎✎ If you forget the PIN code, press the remote control buttons in the following sequence, which resets the PIN to “0-0-0-0”: POWER (off) → MUTE → 8 → 2 → 4 → POWER (on). ¦¦ Other Features Language ■■ Menu Language: Set the menu language. ■■ Teletext Language: Set a desired language for teletext. ✎✎ English is the default in cases where the selected language is unavailable in the broadcast.
Basic Features ¦¦ Picture In Picture (PIP) ■■ Signal Information: (digital channels only) HDTV channel’s reception quality is either perfect or the channels are unavailable. Adjust your antenna to increase signal strength. PIP t Watches simultaneously the TV tuner and one external video source. PIP (Picture-in-Picture) does not function in the same mode. ✎✎NOTE xx If you turn the TV off while watching in PIP mode, the PIP window will disappear.
✎✎ First, configure your network. For detailed procedures on using the Network Setup, refer to the “Network Connection” instructions. ✎✎ If the internet connection doesn’t operate properly, the connection may be broken. Please retry downloading. If the problem persists, download by USB and upgrade. ■■ By Channel: Upgrade the software using the broadcasting signal. ✎✎ If the function is selected during the software transmission period, software will be automatically searched and downloaded.
Advanced Features Connecting to a PC Using an HDMI/DVI Cable / a D-sub Cable DVI OUT R-AUDIO-L PR PB AUDIO OUT AUDIO OUT PC OUT Y R-AUDIO-L PR PB Y R-AUDIO-L PR PB Y R-AUDIO-L PR PB Y Display Modes (D-Sub and HDMI/DVI Input) Optimal resolution is 1920 X 1080 @ 60 Hz Mode IBM MAC VESA CVT VESA DMT VESA GTF VESA DMT / DTV CEA Resolution 640 x 350 720 x 400 640 x 480 832 x 624 1152 x 870 720 x 576 1152 x 864 1280 x 720 1280 x 960 640 x 480 640 x 480 640 x 480 800 x 600 800 x 600 800 x 600
You can set up your TV so that it can access the Internet through your local area network (LAN) using a wired or wireless connection. ¦¦ Connecting to a Wired Network You can attach your TV to your LAN using cable in three ways: yy You can attach your TV to your LAN by connecting the LAN port on the back of your TV to an external modem using a Cat 5 cable. See the diagram below.
Advanced Features Network Setup (Auto) Network Setup (Manual) Use the Automatic Network Setup when connecting your TV to a network that supports DHCP. To set up your TV’s cable network connection automatically, follow these steps: Use the Manual Network Setup when connecting your TV to a network that requires a Static IP address. How to set up automatically To get the Network connection values on most Windows computers, follow these steps: 1.
To connect your TV to your network wirelessly, you need a wireless router or modem and a Samsung Wireless LAN Adapter (WIS09ABGN), which you connect to your TV’s back or side panel USB jack. See the illustration below. ✎✎To use the SWL(Samsung Wireless Link) function, connect to the USB 1 (HDD) port.
Advanced Features Network Setup (Samsung Auto Configuration) Network Setup (PBC (WPS)) This function is available in APs (Access Points) that support Samsung Auto Configuration. If there is no such AP, you can connect through PBC (WPS) or manually. If your router has a PBC (WPS) button, follow these steps: 1. Connect your TV to your LAN as described in the previous section. ✎✎This function is available when SWL(Samsung Wireless Link) set to Off.
4. In the list of networks, press the ▲ or ▼ button to select a network, and then press the ENTERE button. ✎✎ If the AP is set to Hidden (Invisible), you have to select Add Network and enter the correct Network Na me (SSID) and Security Key to establish the connection. 5. If the Security/PIN pop-up appears, go to Step 6. If the Network Connecting Screen appears, go to Step 10. 6. Press the ▲ or ▼ button to select Security or PIN. For most home networks, you would select Security (for Security Key).
Advanced Features How to set up manually How to connect Samsung Wireless link To enter the Network settings into your TV, follow these steps: 1. Follow Steps 1 through 6 in the “How to set up using PBC (WPS)”. (P. 26) For the procedures to establish a connection, refer to the following: 1. Follow Steps 1 through 5 in the “How to set up using PBC (WPS)”. (P. 26) 2. Press the ▼ button to select Internet Protocol Setup, and then press ENTERE button.
Enjoy photos, music and/or movie files saved on a USB Mass Storage Class (MSC) device and/or your PC. 04 Advanced Features Media Play MediaPlay Videos Change Device SUM View Devices E Enter R Return ¦¦ Connecting a USB Device 1. Turn on your TV. TV Side Panel 2. Connect a USB device containing photo, music and/or movie files to the USB 1 (HDD) or USB 2 jack on the side of the TV. 3. When USB is connected to the TV, popup window appears. Then you can select Media Play.
Advanced Features ✎✎Functions that are not supported when connecting to a PC through a network: xx The Background Music and Background Music Setting functions. xx Sorting files by preference in the Photo, Music, and Movie folders. xx The � (REW) or µ (FF) button while a movie is playing. ✎✎The Divx DRM, Multi-audio, embedded caption does not supported. ✎✎Samsung PC Share manager should be permitted by the firewall program on your PC.
Move to the file you desired using the up/down/right/left buttons and then press the ENTERE or � (Play) button. The file is played. ✎✎Supports the Device Mode and Contents Mode in Media Play homepage. Information : You can ascertain the selected file name and the number of files and page. Videos Movie 01.avi Movie 03.avi Movie 05.avi Sort List Section : Displays sorting standard. Jan.10.2010 Jan.10.2010 Jan.10.2010 Movie 07.avi Movie 02.avi Movie 04.avi Movie 06.avi Movie 09.avi SUM A Jan.10.
Advanced Features yy Supported Video Formats File Extention Video Codec Resolution Frame rate (fps) Bit rate (Mbsp) Divx 3.11 / 4.x / 5.1 / 6.0 1920 x 1080 6 ~ 30 8 XviD 1920 x 1080 6 ~ 30 8 H.264 BP / MP / HP 1920 x 1080 6 ~ 30 25 MPEG4 SP / ASP 1920 x 1080 6 ~ 30 8 Container *.avi *.mkv *.asf AVI MKV 800 x 600 6 ~ 30 8 1920 x 1080 6 ~ 30 8 XviD 1920 x 1080 6 ~ 30 8 H.
If you exit the playing Videos function, it can be played later from the point where it was stopped. ✎✎If you will press the ENTERE button during playing the file, you can explore scene divided into 5 chapters you want. 1. Select the movie file you want to play continuously by pressing the ◄ or ► button to select it from the file list section. 2. Press the � (Play) / ENTERE button. 00:04:03 / 00:07:38 1/1 Movie 01.avi 3. Select Play Continuously (Resume Play) by pressing the Blue button.
Advanced Features Photos Viewing a Photo (or Slide Show) 1. Press the ◄ or ► button to select Photos, then press the ENTERE button in the Media Play menu. 2. Press the ◄/►/▲/▼ button to select the desired photo in the file list. 3. Press the ENTERE button or � (Play) button. Normal Image1024.jpg 1024x768 2010/2/1 3/15 –– While a photo list is displayed, press the � (Play) / ENTERE button on the remote control to start slide show.
During playing a file, press the TOOLS button. Option menu Operations Videos Title You can move the other file directly. ✓ Repeat Mode Picture Size (Mode1 / Mode2 / Original) Picture Setting You can play movie and music files repeatedly. ✓ You can adjust the picture size for preference. ✓ You can adjust the picture setting. (P. 13, 14, 15, 16) ✓ Sound Setting You can adjust the sound setting. (P. 16, 17) you can play the video file with Subtitle.
Advanced Features Anynet+ What is Anynet+? t Anynet+ is a function that enables you to control all connected Samsung devices that support Anynet+ with your Samsung TV’s remote. The Anynet+ system can be used only with Samsung devices that have the Anynet+ feature. To be sure your Samsung device has this feature, check if there is an Anynet+ logo on it. To connect to Home Theatre TV Home Theatre Optical Cable Anynet+ Device 1 Anynet+ Device 2, 3, 4 HDMI 1.3 Cable HDMI 1.3 Cable 1.
04 Advanced Features ¦¦ Setting Up Anynet+ ■■ Setup Anynet+ (HDMI-CEC) (Off / On): To use the Anynet+ Function, Anynet+ (HDMI-CEC) must be set to On. + (HDMI-CEC) function is disabled, all the Anynet+ related operations are deactivated. ✎✎ When the Anynet Auto Turn Off (No / Yes): Setting an Anynet+ Device to turn off automatically when the TV is turned off. The active source on the TV must be set to TV to use the Anynet+ function. ✎✎ ✎✎ Even if an external device is still recording, it may turn off.
Advanced Features ¦¦ Listening through a Receiver You can listen to sound through a receiver (i.e Home Theatre) instead of the TV speaker. 1. Select Receiver and set to On. 2. Press the EXIT button to exit. ✎✎ If your receiver supports audio only, it may not appear in the device list. ✎✎ The receiver will work when you have properly connected the optical in jack of the receiver to the DIGITAL AUDIO OUT (OPTICAL) jack of the TV. ✎✎ When the receiver (i.
¦¦ Getting Started with Internet@TV Recommended Internet@TV brings useful and entertaining contents and services directly from the web to your TV. by Date 1/1 My Applications Samsung Apps 04 Advanced Features Internet@TV Settings A Login B Mark as Favorite D Sort by R Return ✎✎NOTE xx Configure the network settings before using Internet@TV. For more information, refer to “Network Connection” (P. 23). xx Unsupported fonts within the provider’s content will not display normally.
Advanced Features ■■ System Setup Account Login For a application with multiple categories, use ◄ and ► to access the different categories. on country. Ticker Autorun (Off / On): Enable/disable ticker autorun upon powering on the TV. Channel Bound Service (Off / On): Some channels support application as an Internet data service, allowing you to access the Internet service while watching TV. Only available if supported by the broadcaster.
Before create User account, you should download the application first on the Samsung Apps. 1. Using the ▲/▼/◄/► button, select Settings. Then press the ENTERE button. 2. Press the ▼ button to select Internet@TV ID, then press the ENTERE or ► button. 3. Select Create. The Keypad screen will appear. 4. The keypad OSD will be displayed on the screen.
Advanced Features ¦¦ Using the Internet@TV service Using the Samsung Apps by category Samsung Apps Samsung Apps is a store for downloading applications to be used on Samsung TV/AV equipment. Users can enjoy a variety of contents like videos, music, photos, games, useful information etc. using the downloaded applications. Additional applications will be available hereafter.
Problem Possible Solution Some application contents only have English. How can I change the language? The application content language may be different from widget user interface language. It depends on service provider. Some application services do not work. Check with that service provider. Refer to help website for widget service provider information. When a network error occurred, I can’t use other menus except setting menu. If network connection doesn’t work, your service might be limited.
Advanced Features AllShare Message / Media / ScreenShare ¦¦ About AllShare AllShare connects your TV and compatible Samsung mobile phones / devices through a network. On your TV, you can view call arrivals, SMS messages and schedules set on your mobile phones. In addition, you can play media contents including videos, photos and music saved on your mobile phones or the other devices (such as your PC) by controlling them on the TV via the network.
Using ScreenShare Function If a call arrives while you are watching TV, the alarm window appears. Using ScreenShare, you can browse various web contents provided by the mobile phone. For example, the image below displays an access page for contents on a mobile. You can read the mobile’s files and view the phone book and calendar on the TV. Also, in the phone book, you can make a call to another person, or send to SMS.
Other Information Analogue Channel Teletext Feature The index page of the Teletext service gives you information on how to use the service. For Teletext information to be displayed correctly, channel reception must be stable. Otherwise, information may be missing or some pages may not be displayed. ✎✎You can change Teletext pages by pressing the numeric buttons on the remote control. 1 2 / (Teletext on/mix): Activate the Teletext mode after selecting the channel providing the Teletext service.
05 Other Information Installing the Wall Mount ¦¦ Assembling the Blanking Bracket When installing the TV onto a wall, attach the Blanking Bracket into the part that connects to the stand as shown in the picture. Blanking bracket ¦¦ Preparing before installing Wall-Mount (46 ~ 55 inch TVs) To install a wall-mount from another manufacturer, use the Holder-Ring. ¦¦ Installing the Wall Mount Kit Wall mount items (sold separately) allow you to mount the TV on the wall.
Other Information ¦¦ Wall Mount Kit Specifications (VESA) ✎✎Wall mount kit is not supplied but sold separately. Install your wall mount on a solid wall perpendicular to the floor. When attaching to other building materials, please contact your nearest dealer. If installed on a ceiling or slanted wall, it may fall and result in severe personal injury.
The Kensington Lock is a device used to physically fix the system when using it in a public place. The appearance and locking method may differ from the illustration depending on the manufacturer. Refer to the manual provided with the Kensington Lock for proper use. 1 2 ✎✎Please find a “K” icon on the rear of the TV. A kensington slot is beside the “K” icon. 1. Insert the locking device into the Kensington slot on the LCD TV 1 and turn it in the locking direction 2.
Other Information Troubleshooting If you have any questions about the TV, first refer to this list. If none of these troubleshooting tips apply, please visit “www.samsung.com,” then click on Support, or contact the call centre listed on the back-cover of this manual. Issues Solutions and Explanations Picture Quality First of all, please perform the Picture Test and confirm that your TV is properly displaying test image. (go to MENU - Support - Self Diagnosis - Picture Test) (P.
Solutions and Explanations No Picture, No Video The TV won’t turn on. • • • Make sure the AC power cord is securely plugged in to the wall outlet and the TV. Make sure the wall outlet is working. Try pressing the POWER button on the TV to make sure the problem is not the remote. If the TV turns on, refer to “The remote control does not work” below. The TV turns off automatically. • • • • Ensure the Sleep Timer is set to Off in the Setup menu. (P.
Other Information Issues Solutions and Explanations Your settings are lost after 30 minutes or every time the TV is turned off. • If the TV is in the Store Demo mode, it will reset audio and picture settings every 30 minutes. Change the settings from Store Demo mode to Home Use mode in the Plug & Play (Initial setup) procedure. Press the SOURCE button to select TV mode, and go to MENU → Setup → Plug & Play (Initial setup) → ENTERE. You have intermittent loss of audio or video.
Panel native Environmental Considerations Operating Temperature Operating Humidity Storage Temperature Storage Humidity TV System 1920 x 1080 @ 60 Hz 10°C to 40°C (50°F to 104°F) 10% to 80%, non-condensing -20°C to 45°C (-4°F to 113°F) 5% to 95%, non-condensing Analogue : Depending on your country selection Digital : DVB-T/DVB-C Analogue: PAL, SECAM, NTSC-4.43, NTSC-3.58, PAL60 Digital: MPEG-2 MP@ML, MPEG-4, H.264/AVC MP@L3, MP@L4.0, HP@L4.0 BG. OK NICAM.
Other Information Index A F AllShare Amplify Antenna Anynet+ Audio Out Auto Adjustment Auto Volume 44 16 12 36 8, 36 16 17 B Background Music Balance L/R Basic View Batteries Black Tone Blanking Bracket Brightness 35 16 34 5 14 47 13 C Cable Tie 48 Change PIN 6, 19 Channel Manager 11 Clock 18 Colour Tone 15 Component 7 Connecting to a PC 22 Connecting to an Audio Device 8 D R 11 15 13 14 12 H HDMI Headphones Home Theatre 7, 36 8 8, 36 I Installation Space Internet@TV 2 39 L Language Licence Lo
This page is intentionally left blank. BN68-02558A.
Die Abbildungen und Illustrationen in diesem Handbuch dienen nur zur Information und können vom tatsächlichen Aussehen des Geräts abweichen. Änderungen an Ausführung und technischen Daten vorbehalten. Hinweis zu Digitalfernsehen 1. 2. 3. 4. 5. 6.
Inhalt Erste Schritte 4 4 4 5 6 6 Zubehör Bedienfeld Fernbedienung Verbinden mit einer Antenne Plug & Play (Anfangseinstellung) Anschlüsse 7 8 9 Anschließen an ein AV-Gerät Anschließen an ein Audiogerät Signalquellen wählen 7 9 Grundfunktionen 9 Navigieren in den Menüs 10 Verwenden der INFO-Taste (Elektronische Programmzeitschrift) 10 Fernsehplanung 12 Kanalmenü 13 Bildmenü 16 Tonmenü 18 Einstellungsmenü 20 Unterstützungsmenü Erweiterte Funktionen 22 22 23 29 36 39 44 Anschließen an einen PC Ne
Erste Schritte Zubehör ✎✎Überprüfen Sie die Verpackung Ihres LCD-Fernsehgeräts auf Vollständigkeit. Falls Komponenten fehlen sollten, setzen Sie sich bitte mit Ihrem Händler in Verbindung. ✎✎Die Farbe und die Form der Teile können sich je nach Modell unterscheiden.
✎✎Dies ist eine spezielle Fernbedienung für Personen mit eingeschränktem Sehvermögen. Die Netztaste sowie die Tasten zum Einstellen des Senders und der Lautstärke sind in Braille beschriftet. Ein- und Ausschalten des Fernsehgeräts. (Seite 6) Anzeigen und Auswählen aller verfügbaren Videosignalquellen. (Seite 9) Wenn die Beleuchtungstaste ON/OFF angeschaltet ist und Sie drücken eine Taste, leuchten alle Tasten auf der Fernbedienung für einen kurzen Moment auf.
Erste Schritte Verbinden mit einer Antenne Wenn das Fernsehgerät zum ersten Mal eingeschaltet wird, werden automatisch die Grundeinstellungen vorgenommen. ✎✎Voreinstellung: Anschließen ans Stromnetz und an die Fernsehantenne. VHF/UHF-Antenne Kabel oder R-AUDIO-L ANT OUT PR PB Y netzanschluss Plug & Play (Anfangseinstellung) Wenn das Fernsehgerät erstmals eingeschaltet wird, helfen eine Reihe aufeinanderfolgender Abfragen beim Durchführen der Grundeinstellungen. Drücken Sie die POWERP.
Anschlüsse 02 Anschlüsse Anschließen an ein AV-Gerät Mit Hilfe eines HDMI/DVI-Kabels: HD-Anschluss (max. 1080p) Verfügbare Geräte: DVD, Blu-ray-Player, HD-Kabelreceiver, HD-Satellitenreceiver, Kabelreceiver, Satellitenreceiver DVD W Y W R W R B G HDMI OUT Red White AUDIO OUT W PR R-AUDIO-L R ✎✎HDMI IN 1(DVI), 2, 3, 4 / PC/DVI AUDIO IN PR R-AUDIO-L PB PB PR R-AUDIO-L DVI OUT Y PB Y Y xx Eine Verbindung über HDMI/DVI-Kabel kann nur über HDMI IN 1(DVI) erfolgen.
Anschlüsse Anschließen an ein Audiogerät Mit Hilfe eines Glasfaserkabels oder eines Audiokabels Verfügbare Geräte: Digital-Audiosystem, Verstärker, DVD-Heimkino OPTICAL DigitalAudiosystem R-AUDIO-L PR PB Y Kopfhörer ✎✎DIGITAL AUDIO OUT (OPTICAL) xx Wenn ein Digital Audio-System mit dem DIGITAL AUDIO OUT (OPTICAL)-Anschluss verbunden ist, reduzieren Sie die Lautstärke von Fernsehgerät und System. xx 5.1-Kanalton ist möglich, wenn das Fernsehgerät an ein externes Gerät angeschlossen ist, das 5.
Name bearbeiten ■■ Videorekorder / DVD / Kabelreceiver / Satellitenreceiver / PVR-Receiver / AV-Receiver / Spiel / Camcorder / PC / DVI PC / DVI-Geräte / TV / IPTV / Blu-Ray / HD DVD / DMA: Vergeben Sie Namen für die an die Eingangsbuchsen angeschlossenen Geräte, um die Auswahl der Signalquelle zu vereinfachen. Quellen Hiermit wählen Sie, ob das Fernsehgerät mit einem Fernsehsignal versorgt wird oder an andere externe Signaleingänge wie z. B.
Grundfunktionen Verwenden der INFO-Taste (Elektronische Programmzeitschrift) Auf dem Bildschirm werden der aktuelle Kanal und bestimmte Audio/Video-Einstellungen angezeigt. Die elektronische Programmführer zeigt entsprechend der Sendezeit für jeden Kanal tagesaktuelle Fernsehprogramminformation an. yy Blättern Sie mit ◄, ►, um Informationen zu einem gewünschten Programm anzuzeigen, während Sie einen anderen Sender anzeigen. yy Blättern Sie mit ▲, ▼, um Informationen für andere Kanäle anzuzeigen.
¦¦ Verwenden von Favoriten Mit diesem Menü können Sie Favoriten löschen oder einstellen und den Programmführer für digitale Sendungen verwenden. Wählen Sie im Fenster Sender, Eigene Kanäle oder Vorgemerkt einen Sender. * Eigene Kanäle Sender Terrestrisch ■■ ■■ c1 c2 All 1futech * 24ore.tv TV 15 Radio Data/Other Analogue 3 23 33 32 5 4 27 TV-Empfang B Zoom abc1 r BBC World bid-up.
Grundfunktionen Kanalmenü ¦¦ Kanäle neu einstellen Antennentyp (Terrestrisch / Kabel) t Ehe Ihr Fernseher beginnen kann, die verfügbaren Kanäle zu speichern, müssen Sie die Art der Signalquelle angeben, die an das Fernsehgerät angeschlossen ist (z. B.: Terrestrisch oder Kabel). Manuelle Suche nach einem Kanal und Speichern im Fernsehgerät. ✎✎Wenn ein Kanal mit der Kindersicherung gesperrt wurde, wird das Eingabefenster für die PIN geöffnet.
■■ Sperren / Freigabe: Sie können einen Kanal sperren, sodass er nicht ausgewählt und angezeigt werden kann. ✎✎HINWEIS xx Diese Funktion ist nur verfügbar, wenn die Kindersicherung aktiviert ist Ein. xx Der Eingabefenster für die PIN wird geöffnet. Geben Sie die vierstellige Standard-PIN ein: „0-0-0-0“. Ändern Sie die PIN mit der Option PIN ändern. ■■ Timer-Wiedergabe: Sie können einen Kanal einstellen, der bei Erreichen einer bestimmten Zeit automatisch angezeigt wird.
Grundfunktionen ¦¦ Möglichkeiten zum Sparen ■■ Gamma: Einstellen der Intensität der Primärfarbe. Öko-Lösung ■■ Energiesparmod. (Aus / Gering / Mittel / Hoch / Bild aus / Auto) t: Mit dieser Funktion stellen Sie die Helligkeit des Fernsehgeräts ein, um den Stromverbrauch zu senken. Wenn Sie Bild aus wählen, wird der Bildschirm abgeschaltet, aber der Ton bleibt an. Drücken Sie eine beliebige Taste außer der Lautstärketaste, um den Bildschirm wieder anzuschalten.
xx Je nach Signalquelle können die Bildgrößenoptionen ✎✎Im PC-Modus können Sie nur Farbtemp., Größe und xx Die verfügbaren Elemente können in Abhängigkeit vom Aktivierung, Digit. Rauschfilter des Einbrennschutzes nach einstellen. : Normal Größe : Autom. Breit Bildschirmmodus : 16:9 Digit. Rauschfilter : Auto MPEG-Rauschfilter : Auto HDMI-Schwarzp.
Grundfunktionen ¦¦ Einstellen des Fernsehgeräts mithilfe Ihres PCs Stellen Sie die Signalquelle auf PC ein. ■■ Verstärken: Erhöht die Lautstärke hochfrequenter Töne, damit hörgeschädigte Personen den Ton besser verstehen können. Autom. Einstellung t ¦¦ Anpassen der Toneinstellungen Stellen Sie die Frequenzen/Positionen ein und lassen Sie die Feinstellung automatisch durchführen. Equalizer ✎✎Nicht verfügbar bei Anschluss mit einem HDMI/DVI-Kabel.
(nicht überall verfügbar) (nur Digitalkanäle) Diese Funktion verarbeitet den Audiostream für den Audiokommentar (Audio für Sehgeschädigte), der vom Sender zusammen mit dem Vordergrundton übertragen wird. ■■ Audio für Sehgeschädigte (Aus / Ein): Hiermit wird der Audiokommentar für Sehbehinderte ein- und ausgeschaltet. ■■ Lautstärke: Hiermit regeln Sie die Lautstärke des Audiokommentars für Sehgeschädigte.
Grundfunktionen Einstellungsmenü ¦¦ Einstellen der Uhrzeit Zeit ■■ Uhr: Die Uhr muss eingestellt werden, damit Sie die verschiedenen Timerfunktionen des Fernsehgeräts verwenden können. OO Jedes Mal, wenn Sie die Taste INFO drücken, wird die aktuelle Zeit angezeigt. ✎✎ Wenn Sie das Netzkabel ziehen, müssen Sie die Uhr erneut einstellen. Uhr-Modus (Auto / Manuell) ✎✎ Je nach Sendestation und Signal ist die automatisch eingestellte Zeit möglicherweise nicht korrekt.
✎✎ Wenn Sie den PIN-Code vergessen haben, drücken Sie die Fernbedienungstasten in der angegebenen Reihenfolge, um die PIN auf „0-0-00“ zurückzusetzen: Netztaste (Aus) → MUTE → 8 → 2 → 4 → Netztaste (Ein). ¦¦ Weitere Funktionen Sprache ■■ Menüsprache: Stellen Sie die Menüsprache ein. ■■ Teletextsprache: Einstellen der gewünschten Teletextsprache. Englisch ist der Standardwert in Fällen, wo die ausgewählte Sprache für die Sendung nicht verfügbar ist.
Grundfunktionen ¦¦ Bild-im-Bild (PIP) ■■ Signalinformation: (Nur digitale Kanäle nur) Die Empfangsqualität des HDTV-Kanals ist entweder perfekt, oder die Kanäle sind nicht verfügbar. Stellen Sie Ihre Antenne so ein, dass die Signalstärke zunimmt. PIP t Gleichzeitige Anzeige des Fernsehbilds und des Bilds von einer externen Videoquelle. PIP (Bild-im-Bild) funktioniert nicht, für zwei gleiche Signalquellen.
✎✎ ■■ Alternative Software (Backup): Anzeigen der Softwareversion, die mit Online heruntergeladen wurde. Wenn das Update im letzten Schritt unterbrochen wird, wird diese Funktion aktiviert. ✎✎ HD-Anschlussplan ■■ Über Sendesignal: Aktualisierung der Software über das Sendesignal. Wenn Sie diese Funktion während des Übertragungszeitraums für Software wählen, sucht die Funktion automatisch nach neuer Software und lädt sie herunter.
Erweiterte Funktionen Anschließen an einen PC Mit Hilfe eines HDMI/DVI-Kabels oder eines D-Sub-Kabels DVI OUT R-AUDIO-L PR PB AUDIO OUT AUDIO OUT PC OUT Y R-AUDIO-L PR PB Y R-AUDIO-L PR PB Y R-AUDIO-L PR PB Y Anzeigemodi (D-Sub- und HDMI/DVI-Eingang) Die optimale Auflösung beträgt 1920 X 1080 bei 60 Hz.
Sie können Ihr Fernsehgerät so einrichten, dass es über Ihr lokales Netzwerk (LAN) und eine Kabel- oder WLAN-Verbindung auf das Internet zugreifen kann. ¦¦ Verbindung mit einem Kabelnetzwerk herstellen Sie können Ihr Fernsehgerät auf dreierlei Weise an Ihr LAN anschließen: yy Sie können Ihr Fernsehgerät über den LAN-Anschluss auf der Rückseite des Geräts direkt über ein CAT5-Kabel an ein externes Modem und Ihr LAN anschließen. Siehe nachfolgende Abbildung.
Erweiterte Funktionen Netzwerkkonfiguration (Auto) Netzwerk einrichten (Manuell) Verwenden Sie Eingang einrichten - automatisch, wenn Sie Ihr Fernsehgerät an ein Netzwerk anschließen, das DHCP unterstützt. Um die Kabelnetzwerkverbindung Ihres Fernsehgeräts automatisch einzurichten, gehen Sie folgendermaßen vor: Verwenden Sie Eingang einrichten - manuell, wenn Sie Ihr Fernsehgerät an ein Netzwerk anschließen, das eine statische IP-Adresse erfordert. So konfigurieren Sie automatisch 1.
Um Ihr Fernsehgerät drahtlos an Ihr Netzwerk anzuschließen, benötigen Sie einen Funkrouter oder ein Funkmodem sowie einen Samsung WLAN-Adapter (WIS09ABGN), den Sie mit dem hinteren oder seitlichen USB-Anschluss verbinden. Siehe nachfolgende Abbildung. ✎✎Um die SWL-Funktion (Samsung Wireless Link) verwenden zu können, müssen Sie den Anschluss über den Anschluss USB 1 (HDD) herstellen.
Erweiterte Funktionen Netzwerkkonfiguration (Samsung Auto-Konfiguration) Diese Funktion steht für Zugangspunkte zur Verfügung, die Samsung Auto Configuration unterstützen. Wenn es einen solchen Zugangspunkt nicht gibt, können Sie die Verbindung über PBC (WPS) oder manuell herstellen. ✎✎Diese Funktion ist verfügbar, wenn SWL(Samsung Wireless Link) deaktiviert ist (Aus). ✎✎Sie können unter www.samsung.com nach Geräten suchen, die Samsung Auto Configuration unterstützen.
4. Wählen Sie Wählen Sie ein Netzwerk durch Drücken der Taste ▲, und drücken Sie dann die ENTERE. Die Netzwerk funktion sucht nach verfügbaren Funknetzwerken. Nach Abschluss der Suche wird eine Liste der verfügbaren Netzwerke angezeigt. Markieren Sie durch Drücken der Tasten ▲ oder ▼ ein Netzwerk in der Netzwerkliste, und drücken Sie dann die ENTERE.
Erweiterte Funktionen Manuelle Konfiguration Verbinden mit Samsung Wireless Link Um die Netzwerkeinstellungen in Ihr Fernsehgerät einzugeben, gehen Sie folgendermaßen vor: 1. Befolgen Sie die Anweisungen der Schritte 1 bis 6 im Abschnitt „Einrichten mit PBC (WPS)“. (Seite 26) Das Verfahren zum Aufbauen einer Verbindung ist nachfolgend beschrieben. 1. Befolgen Sie die Anweisungen der Schritte 1 bis 5 im Abschnitt „Einrichten mit PBC (WPS)“. (Seite 26) 2.
Mit dieser Funktion können Sie auf einem USB-Speichermedium (MSC) oder Ihrem PC gespeicherte Foto-, Musik und/oder Filmdateien anzeigen bzw. wiedergeben. MediaPlay Videos SUM Gerät wechseln Geräte anzeigen E Eingabe R Zurück 04 Erweiterte Funktionen Media Play ¦¦ Anschließen eines USB-Geräts 1. Schalten Sie den Fernseher ein. Rückseite des Fernsehgeräts 2. Schließen Sie ein USB-Gerät mit Foto-, Musik und/oder Filmdateien an die USB 1 (HDD)- oder USB 2-Buchse seitlich am Fernsehgerät an. 3.
Erweiterte Funktionen ✎✎Die folgenden Funktionen werden beim Anschluss an einen PC über das Netzwerk nicht unterstützt: xx Die Funktionen für die Hintergrundmusik und die Einstellungen für Hintergrundmusik. xx Benutzerdefinierte Sortierung von Dateien in den Ordnern Foto, Musik und Film. xx Die Tasten � (REW) oder µ (FF), während ein Film abgespielt wird. ✎✎Divx DRM, Multi-Audio und eingebettete Beschriftung werden nicht unterstützt.
Navigieren Sie mit den Pfeiltasten (Auf / Ab / Rechts / Links) zu der gewünschten Datei und drücken Sie dann die ENTERE oder die Taste � (Wiedergabe). Die Datei wird wiedergegeben. ✎✎ Unterstützt den Gerätemodus und den Inhaltsmodus auf der Startseite von Media Play. Informationen : Hier können Sie den Namen der gewählten Datei sowie die Anzahl der Dateien und Seiten überprüfen. Videos 1/1 Page /Movie 01.avi Movie 01.avi Jan.10.2010 Movie 03.avi Jan.10.2010 Movie 05.avi Jan.10.2010 Movie 07.
Erweiterte Funktionen yy Unterstützte Videoformate Dateinamenserweiterung *.avi *.mkv *.asf Container AVI MKV ASF *.wmv ASF *.mp4 MP4 *.3gp 3GPP *.vro VRO VOB *.mpg *.mpeg *.ts *.tp *.trp Video-Codec Auflösung Framerate (f/s) Bitrate (Mbit/s) Divx 3.11 / 4.x / 5.1 / 6.0 1920 x 1080 6 ~ 30 8 XviD 1920 x 1080 6 ~ 30 8 H.264 BP / MP / HP 1920 x 1080 6 ~ 30 25 MPEG4 SP / ASP 1920 x 1080 6 ~ 30 8 Motion JPEG 800 x 600 6 ~ 30 8 Divx 3.11 / 4.x / 5.1 / 6.
Wenn Sie die Filmwiedergabefunktion verlassen, kann der Film später von dem Punkt an abgespielt werden, an dem Sie unterbrochen haben. ✎✎Wenn Sie die ENTERE bei der Wiedergabe einer Datei drücken, können Sie eine Vorschau der Szene in 5 Kapiteln anzeigen. 1. 2. 3. Wählen Sie die Filmdatei, deren Wiedergabe Sie fortsetzen möchten. Drücken Sie dazu in der Dateiliste auf ▲ oder ▼. Drücken Sie auf �(Wiedergabetaste) / ENTERE.
Erweiterte Funktionen Fotos Anzeigen eines Fotos (oder einer Diashow) 1. 2. 3. Wählen Sie durch Drücken der Tasten ◄ oder ► die Option Foto, und drücken Sie dann im Media Play-Menü auf die ENTERE. Wählen Sie das gewünschte Foto mit den Tasten ◄ / ► / ▲ / ▼ aus der Dateiliste aus. Drücken Sie die ENTERE oder die Taste � (Wiedergabetaste). –– Drücken Sie auf der Fernbedienung die Taste � (Wiedergabe) / ENTERE, während die Fotoliste angezeigtwird, um die Diashow zu starten.
Drücken Sie während der Wiedergabe die Taste TOOLS. Kategorie Vorgang Videos Titel Sie können die andere Datei direkt verschieben. ✓ Wiederholungsmodus Sie können Film- und Musikdateien wiederholt abspielen. ✓ Bildformat (Modus1 / Modus2 / Original) Sie können Bildformat entsprechend Ihren Wünschen anpassen. Bildeinstellungen Sie können die Bildeinstellungen festlegen. (S. 13, 14, 15, 16) ✓ Toneinstellungen Sie können die Toneinstellungen festlegen. (S.
Erweiterte Funktionen Anynet+ Was ist Anynet+?t Bei Anynet+ handelt es sich um eine Funktion, mit der Sie alle angeschlossenen Samsung-Geräte, die Anynet+ unterstützen, mit der Fernbedienung für Ihr Samsung-Fernsehgerät steuern können. Das Anynet+-System unterstützt nur Anynet+-fähige Samsung-Geräte. Wenn Sie wissen möchten, ob Ihr Samsung-Gerät diese Funktion unterstützt, suchen Sie das Anynet+-Logo auf Ihrem Gerät.
■■ Setup Anynet+ (HDMI-CEC) (Aus / Ein): Damit Sie die Funktionen von Anynet+ nutzen können, muss Anynet+ (HDMI-CEC) aktiviert Ein sein. Wenn die Funktion “Anynet+ (HDMI-CEC)” deaktiviert wird, sind auch alle Vorgänge in Verbindung mit Anynet+ deaktiviert. ✎✎ Autom. Ausschalten (Nein / Ja): Automatisches Abschalten von Anynet+-Geräten durch Abschalten des Fernsehgeräts. Damit Sie Anynet+ verwenden können, muss die Geräteauswahl der Fernbedienung auf TV eingestellt sein.
Erweiterte Funktionen ¦¦ Tonwiedergabe mit einem Receiver Sie können die Tonwiedergabe über einen Receiver (d. h. Heimkinosystem) anstelle des TV-Lautsprechers laufen lassen. 1. Wählen Sie Receiver und aktivieren Sie ihn (Ein). 2. Zum Beenden drücken Sie die Taste EXIT. Wenn Ihr Receiver nur Audiosignale unterstützt, wird er in der Geräteliste möglicherweise nicht angezeigt.
¦¦ Erste Schritte mit Internet@TV Recommended Internet@TV bringt nützliche und unterhaltende Inhalte und Dienste direkt aus dem Internet auf Ihr Fernsehgerät. My Applications Samsung Apps by Date 1/1 04 Erweiterte Funktionen Internet@TV Settings A Login B Mark as Favorite D Sort by R Return ✎✎HINWEIS xx Konfigurieren Sie die Netzwerkeinstellungen, bevor Sie Internet@TV verwenden. Weitere Informationen finden Sie unter „Netzwerkverbindung“.
Erweiterte Funktionen Anmeldung beim Konto Bei einer Anwendung mit mehreren Konten verwenden Sie ◄ und ► für den Zugriff auf die verschiedenen Konten. adgjm A Move [0~9] Enter PIN R Cancel ✎✎Mehr Spaß mit Anwendungen ist möglich, wenn Sie sich bei Ihrem Konto anmelden. ✎✎Informationen zum Anlegen eines Kontos erhalten Sie unter 2. Setting up Internet@TV → Internet@TV ID → Create. Drücken Sie auf der Starteite von Internet@TV auf die rote Taste.
Ehe Sie ein User account anlegen, laden Sie die zuerst die Anwendung von Samsung Apps herunter. 1. Wählen Sie mit Hilfe der Taste ▲/▼/◄/► die Option Settings. Drücken Sie dann die Taste ENTERE. 2. Wählen Sie durch Drücken der Taste ▼ Internet@TV ID, und drücken Sie dann die Taste ENTERE oder ►. 3. Wählen Sie Create. Das Tastaturfenster wird angezeigt. 4. Das Bildschirmmenü für die Tastatur wird auf dem Bildschirm angezeigt.
Erweiterte Funktionen ¦¦ Verwenden des Internet@TV-Dienstes Samsung Apps Samsung Apps ist ein Speicher, aus dem Sie Anwendungen herunterladen können, die auf Ihren Samsung TV/AV-Geräten verwendet werden können. Mit Hilfe der heruntergeladenen Anwendungen können die Benutzer eine Vielzahl von Inhalten (z. B. Videos, Musik, Fotos, Spiele, nützliche Informationen usw.) nutzen. Zusätzlichen Anwendungen später dazukommen.
Problem Die Inhalte mancher Anwendungen liegen nur in englischer Sprache vor. Wie kann ich die Sprache ändern? Einige Anwendungsdienste funktionieren nicht. Nach einem Netzwerkfehler kann ich keine Menüs außer "Einstellungen" verwenden. Besteht die Möglichkeit, dass YouTubeInhalte für Erwachsene angezeigt werden? Mögliche Lösung Die Sprache der Widget-Inhalte kann von der Sprache der Benutzerschnittstelle abweichen. Das hängt vom jeweiligen Dienstanbieter ab.
Erweiterte Funktionen AllShare Nachricht / Medien / ScreenShare ¦¦ Informationen zu AllShare AllShare verbindet Ihr Fernsehgerät und Ihre SamsungMobiltelefone bzw. -Geräte über ein Netzwerk miteinander. Auf Ihrem Fernseher können Sie eingehende Aufrufe, SMS-Nachrichten und Zeitpläne anzeigen, die auf Ihren Mobiltelefonen gespeichert sind. Außerdem können Sie die auf Mobiltelefonen oder anderen Geräten (z. B.
Verwenden der ScreenShare-Funktion Wenn ein Anruf eingeht, während Sie fernsehen, wird das Alarmfenster geöffnet. Mit Hilfe von ScreenShare können Sie die verschiedenen von einem Mobiltelefon angebotene Inhalte durchsuchen. Zum Beispiel zeigt die nachfolgende Abbildung eine Zugriffsseite für den Inhalt auf einem Mobiltelefon. Sie können die Dateien des Mobiltelefons und das Telefonbuch und den Kalender auf dem Fernseher anzeigen. Auch können Sie andere vom Telefonbuch aus anrufen oder eine SMS senden.
Weitere Informationen Teletext für Analogkanäle Auf der Videotext-Indexseite finden Sie Verwendungshinweise zum Videotext. Für die korrekte Anzeige von Teletextinformationen muss der Senderempfang einwandfrei sein. Andernfalls können Informationen unvollständig sein oder einige Seiten nicht angezeigt werden. ✎✎Sie können die Videotextseiten durch Drücken der Zifferntasten auf der Fernbedienung wechseln.
05 Weitere Informationen Anbringen der Wandhalterung ¦¦ Montieren der Montagehalterung Wenn Sie das Fernsehgerät an der Wand anbringen, befestigen Sie die Montagehalterung an dem Teil, das (wie in der Abbildung gezeigt) mit dem Standfuß verbunden wird. Montagehalterung ¦¦ Vorbereiten für den Einbau der Wandhalterung (46 ~ 55 Zoll Fernsehgeräts) Beim Einbau einer Wandhalterung eines anderen Herstellers, verwenden Sie den Haltering.
Weitere Informationen ¦¦ Spezifikation (VESA) der Wandhalterung ✎✎Die Wandhalterung wird nicht mitgeliefert, ist aber gesondert erhältlich. Montieren Sie die Wandhalterung an einer soliden Wand, die senkrecht zum Boden steht. Bei Installation auf anderen Trägermaterialien wenden Sie sich bitte an Ihren Fachhändler. Bei Montage an einer Decke oder schrägen Wand kann es herunterfallen und zu Verletzungen kommen.
Ein Kensington-Schloss dient zur physischen Sicherung des Systems bei Verwendung in öffentlichen Bereichen. Je nach Hersteller können Aussehen und Verriegelungsverfahren von der Abbildung abweichen. Informationen zur richtigen Anwendung entnehmen Sie bitte der Bedienungsanleitung des Kensington-Schlosses. 1 2 ✎✎Suchen Sie das Symbol „K“ auf der Rückseite des Fernsehgeräts. 1. 2. 3. Neben diesem „K“-Symbol befindet sich der Steckplatz für das Kensington-Schloss.
Weitere Informationen Fehlerbehebung Bei Fragen zum Fernsehgerät schauen Sie zuerst in dieser Liste nach. Wenn keiner dieser Tipps zur Fehlerbehebung weiterhilft, öffnen Sie die Website „www.samsung.com“ und klicken Sie dort auf „Support“ oder wenden Sie sich an das in der Liste auf der letzten Seite angegebene Callcenter. Problem Lösungen und Erklärungen Bildqualität Führen Sie zu allererst den Bildtest durch, um zu bestätigen, dass Ihr Fernsehgerät das Testbild korrekt anzeigt.
Lösungen und Erklärungen Kein Bild, kein Video Der Fernseher kann nicht eingeschaltet werden. • Das Fernsehgerät schaltet sich automatisch aus. • • • • • • Kein Bild/Video. • • • • HF-Anschluss (Terrestrisch/Kabel) Das Fernsehgerät empfängt nicht alle Kanäle. Das Bild ist verzerrt: Macroblock-Fehler, Smallblock-Fehler, Punkte, Pixelfehler PC-Verbindung Meldung „Modus nicht unterstützt“ wird angezeigt. Der PC wird immer in der Liste der Signalquellen angezeigt, auch wenn keiner angeschlossen ist.
Weitere Informationen Problem Lösungen und Erklärungen Ihre Einstellungen gehen nach 30 Minuten oder bei jedem Abschalten des Fernsehers verloren. • Vorübergehender Ausfall von Bild oder Ton. • • Sie sehen kleine Partikel, wenn Sie den Rahmen um den Bildschirm herum genau betrachten. Das PIP-Menü ist nicht verfügbar. • Die Meldung „Verschlüsseltes Signal“ oder „Kein Signal/Schwaches Signal“ wird angezeigt.
Bildschirm (nativ) Umgebungsbedingungen Betriebstemperatur Luftfeuchtigkeit (bei Betrieb) Lagerungstemperatur Luftfeuchtigkeit (Lagerung) TV-System 1920 x 1080 bei 60 Hz 10° C bis 40° C 10% bis 80%, nicht kondensierend -20° C bis 45° C 5% bis 95%, nicht kondensierend Analog: Je nach eingestelltem Land. Digital: DVB-T/DVB-C Analog: PAL, SECAM, NTSC-4.43, NTSC-3.58, PAL60 Digital: MPEG-2 MP@ML, MPEG-4, H.264/AVC MP@L3, MP@L4.0, HP@L4.0 BG. OK NICAM.
Weitere Informationen Index A H Alle wählen 13 AllShare 44 Anschließen an ein Audiogerät 8 Anynet+ 36 Anschließen an einen PC 22 Audio Out 8, 36 Aufnehmen 37 Autom.
Diese Seite wurde absichtlich leer belassen. BN68-02558BE-Ger.
Les figures et illustrations contenues dans ce mode d’emploi sont fournies pour référence uniquement. Elles peuvent différer de l’aspect réel du produit. La conception et les spécifications du produit sont susceptibles d’être modifiées sans préavis.
Sommaire Mise en route 4 4 4 5 6 6 Accessoires Présentation du panneau de commande Présentation de la télécommande Raccordement à une antenne Plug & Play (configuration initiale) Connexions 7 8 9 Connexion à un périphérique AV Connexion à un système audio Changement de la source d’entrée Fonctions de base 9 10 10 12 13 16 18 20 Navigation dans les menus Utilisation du bouton INFO (Guide Now & Next) Planification des émissions à regarder Menus Chaîne Menu Image Menu Son Menu Configuration Menu Assis
Mise en route Accessories ✎✎Vérifiez que les éléments suivants sont inclus avec votre téléviseur LCD. S’il manque des éléments, contactez votre revendeur. ✎✎La couleur et la forme des éléments peuvent varier en fonction du modèle.
01 Mise en route Présentation de la télécommande ✎✎Ceci est une télécommande spéciale destinée aux malvoyants. Elle dispose de points Braille sur les boutons Power, Channel et Volume. Permet d’allumer et éteindre la télévision. (P. 6) Lorsque le bouton ON/OFF représentant une ampoule est en position ON et qu’un bouton est enfoncé, les boutons de la télécommande restent allumés pendant un certain temps. (Utiliser la télécommande lorsque ce bouton est réglé sur ON réduit la durée de vie de la pile.
Mise en route Raccordement à une antenne Lorsque vous allumez le téléviseur pour la première fois, des réglages de base s’effectuent de manière automatique. ✎✎Préréglage : connexion du câble d’alimentation et de l’antenne. Antenne VHF/UHF Câble ou R-AUDIO-L Prise D'alimentation ANT OUT PR PB Y Plug & Play (configuration initiale) Lorsque le téléviseur est allumé pour la première fois, plusieurs invites s’affichent pour vous aider à configurer les réglages de base. Appuyez sur le bouton POWERP.
Connexions 02 Connexions Connexion à un périphérique AV Utilisation d’un câble HDMI/DVI : connexion HD (jusqu’à 1080p) Périphériques disponibles : lecteur DVD, lecteur Blu-ray, décodeur câble HD, décodeur HD, récepteur satellite, décodeur câble, récepteur satellite (décodeur) DVD W Y W R W R B G HDMI OUT Rouge Blanc AUDIO OUT W R-AUDIO-L PR R-AUDIO-L PB PB PR DVI OUT R ✎✎HDMI IN 1(DVI), 2, 3, 4 / PC/DVI AUDIO IN PR R-AUDIO-L Y PB Y Y xx Lorsque vous utilisez une connexion avec câble
Connexions Connexion à un système audio Utilisation d’une connexion par câble audio ou optique Périphériques disponibles : système audio numérique, amplificateur, système home cinéma DVD OPTICAL Système audio numérique R-AUDIO-L PR PB Y Ecouteurs ✎✎DIGITAL AUDIO OUT (OPTICAL) xx Lorsqu’un système audio numérique est connecté à la prise DIGITAL AUDIO OUT (OPTICAL), diminuez le volume du téléviseur et du système. xx Le mode audio 5.
Modif. nom ■■ VCR / DVD / Décodeur Câble / Décodeur satellite / Décodeur PVR / Récepteur AV / Jeux / Caméscope / PC / DVI PC / DVI Devices / TV / IPTV / Blu-ray / HD DVD / DMA Nommez le périphérique connecté aux prises d’entrée pour faciliter la sélection de la source d’entrée. Liste Source Permet de sélectionner le téléviseur ou d’autres sources d’entrée externes (telles qu’un lecteur DVD, un lecteur Blu-ray, un décodeur câble ou un récepteur décodeur) connectées au téléviseur.
Fonctions de base Utilisation du bouton INFO (Guide Now & Next) L’affichage identifiePOWER la chaîne en cours et l’état de certains paramètres audio et vidéo. Le Guide Now & Next affiche des informations quotidiennes sur les programmes de télévision en fonction de l’heure de diffusion. yy Faites défiler à l’aide des boutons ◄, ► pour afficher des informations sur le programme de votre choix, tout en regardant la chaîne actuelle.
¦¦ Utilisation des chaînes favorites Supprimez ou définissez des chaînes favorites et utilisez le guide des programmes pour les émissions numériques. Sélectionnez une chaîne dans l’écran Chaînes, Mes chaînes ou Programmé. * Mes chaînes Chaînes Hertzien ■■ ■■ c1 c2 All TV 15 Radio Data/Other Analogue 3 23 33 32 5 4 27 Antenne B Zoom 1futech * 24ore.tv abc1 r BBC World bid-up.
Fonctions de base Menu Chaîne ¦¦ Nouvelle syntonisation des chaînes Antenne (Hertzien / Câble) t Avant que votre téléviseur ne puisse commencer à mémoriser les chaînes disponibles, vous devez spécifier le type de la source du signal reliée au téléviseur (c’est-à-dire : soit une antenne, soit le câble). Mémorisation Manuelle Recherche manuellement une chaîne et la mémorise dans le téléviseur.
(dans Gestion chaînes) Définissez chaque chaîne à l’aide des options du menu Gestion chaînes (Verrouiller / Déverrouiller, Rappel programme, Tri des canaux, Supprimer / Sélectionner tout / Désélectionner tout). Les options de menu peuvent varier selon l’état de la chaîne. 1. Sélectionnez une chaîne et appuyez sur le bouton TOOLS. 2. Sélectionnez une fonction et modifiez ses réglages.
Fonctions de base ¦¦ Solutions économiques ■■ Réglage Luminosité (-2~+2) : permet d’augmenter la luminosité des images sombres. Désactivé en mode PC. ✎✎ Solution Eco ■■ Mode éco. (Arrêt / Bas / Moyen / Elevé / Image désactivée / Auto.) t : permet de régler la luminosité du téléviseur afin de réduire la consommation d’énergie. Si vous sélectionnez Image désactivée, l’écran est éteint, mais le son reste actif. Appuyez sur n'importe quel bouton, excepté celui du volume, pour allumer l'écran.
xx En mode PC, seuls les modes 16:9 et 4:3 peuvent ✎✎En mode PC, vous pouvez uniquement apporter des xx Les paramètres peuvent être réglés et mémorisés modifications aux options Nuance Coul., Taille, Filtre Bruit num. et Temps Protection auto. Options d’image Nuance Coul. : Normal Taille : 16:9 Mode écran : 16:9 Auto Filtre Bruit num. : Auto. Filtre Bruit MPEG : Auto. Niv. noir HDMI Mode Film : Normal : Arrêt ► ▼ U Déplacer E Entrer R Retour ■■ Nuance Coul.
Fonctions de base ¦¦ Configuration du téléviseur avec le PC ■■ Voix claire : accentue les voix par rapport aux autres sons. Réglez le mode d’entrée sur PC. Réglage Automatique t ■■ Amplifier : augmente l’intensité du son aigu pour garantir une meilleure écoute aux personnes malentendantes. Cette option permet de régler les positions/valeurs de fréquence et d’affiner automatiquement les paramètres. ¦¦ Réglage des paramètres sonores ✎✎Non disponible en cas de connexion à l’aide d’un câble HDMI/DVI.
(non disponible dans tous les pays) (chaînes numériques uniquement) Cette fonction traite le flux audio relatif à la description audio (AD) lorsqu’il est envoyé avec le son principal par le radiodiffuseur. ■■ Description audio (Arrêt / Activé) : active ou désactive la fonction de description audio. ■■ Volume : permet de régler le volume de description audio. Volume auto (Arrêt / Normal / Nuit) Pour équilibrer le niveau de volume sur chaque canal, définissez cette option sur Normal.
Fonctions de base Menu Configuration Période d’activation / Période de désactivation : sélectionnez l’heure, les minutes et l’action Activer / Désactiver. (Pour activer le minuteur selon les réglages définis, choisissez Activer.) ¦¦ Réglage de l’heure Volume : sélectionnez le niveau de volume désiré. Heure ■■ Horloge : le réglage de l’heure est nécessaire pour utiliser différentes fonctions de minuterie du téléviseur. OO L’heure actuelle s’affiche à chaque fois que vous appuyez sur le bouton INFO.
POWER Autor. tout : déverrouille toutes les évaluations TV. ✎✎ Les options du menu Verrouillage parental diffèrent selon les pays. ■■ Modifier PIN : permet de modifier le code personnel demandé pour pouvoir configurer le téléviseur. ✎✎ Si vous avez oublié le code PIN, appuyez sur les boutons de la télécommande dans l’ordre suivant, ce qui a pour effet de le réinitialiser sur "0-0-0-0" : POWER (Arrêt) → MUTE → 8 → 2 → 4 → POWER (Marche).
Fonctions de base 1. Vous pouvez acheter un module CI CAM chez le revendeur le plus proche ou le commander par téléphone. 2. Insérez fermement la "CARTE CI ou CI+" dans le module CAM en suivant le sens de la flèche. 3. Insérez le module CAM avec la "CARTE CI ou CI+" dans la fente de l’interface commune (dans le sens de la flèche), de telle sorte qu’il soit aligné parallèlement à la fente. 4. Vérifiez si une image est visible sur une chaîne à signal brouillé.
✎✎ ✎✎ ■■ Canal : met à niveau le logiciel en utilisant le signal de télédiffusion. Si la fonction est sélectionnée pendant la période de transmission du logiciel, ce dernier est automatiquement recherché et téléchargé. Le temps nécessaire au téléchargement du logiciel dépend de l’état du signal. ✎✎ ✎✎ ■■ Mise à niveau en mode veille : une mise à niveau manuelle est automatiquement effectuée à l’heure indiquée.
Fonctions avancées Connexion à un ordinateur Utilisation d’un câble HDMI/DVI / D-Sub DVI OUT R-AUDIO-L PR PB AUDIO OUT AUDIO OUT PC OUT Y R-AUDIO-L PR PB Y R-AUDIO-L PR PB Y R-AUDIO-L PR PB Y Modes d’affichage (Entrées D-Sub et HDMI/DVI) La résolution optimale est de 1920 X 1080 à 60 Hz.
Vous pouvez configurer votre téléviseur de telle sorte qu'il puisse accéder à Internet par le biais de votre réseau local (LAN) à l'aide d'une connexion câblée ou sans fil. ¦¦ Connexion à un réseau câblé Vous pouvez connecter votre téléviseur au réseau local de trois manières différentes : yy En connectant le port LAN situé à l'arrière du téléviseur à un modem externe à l'aide d'un câble de catégorie 5. Voir le schéma ci-dessous.
Fonctions avancées Config. du réseau (Auto.) Config. du réseau (Manuel) Utilisez l'option Config. du réseau Auto. lors de la connexion du téléviseur à un réseau prenant en charge le protocole DHCP. Pour configurer automatiquement la connexion réseau par câble de votre téléviseur, procédez comme suit : Utilisez l'option Config. du réseau Manuel lors de la connexion du téléviseur à un réseau qui nécessite une adresse IP statique.
Pour établir une connexion sans fil entre le téléviseur et le réseau, vous avez besoin d'un routeur ou d'un modem et d'un adaptateur LAN sans fil Samsung (WIS09ABGN), que vous connectez à la prise USB située sur le panneau latéral ou arrière du téléviseur. Voir l'illustration ci-dessous. ✎✎Pour utiliser la fonction SWL(Samsung Wireless Link), connectez-la au port USB 1 (HDD).
Fonctions avancées Config. du réseau (Configuration automatique Samsung) PBC (WPS) Config. du réseau Cette fonction est disponible sur les points d'accès qui prennent en charge la configuration automatique. Si votre point d'accès ne prend pas en charge cette fonction, vous pouvez établir une connexion via PBC (WPS) ou manuellement. Si votre routeur est pourvu d'un bouton PBC (WPS), procédez comme suit : 1. Connectez votre téléviseur au réseau local en suivant la procédure décrite à la section précédente.
4. Appuyez sur le bouton ▲ pour accéder à l'option Sélectionnez un réseau, puis sur le bouton ENTERE. La fonction Réseau recherche les réseaux sans fil disponibles. Lorsque vous avez terminé, la liste des réseaux disponibles s'affiche. Dans la liste des réseaux, appuyez sur le bouton ▲ ou ▼ pour sélectionner un réseau, puis sur le bouton ENTERE.
Fonctions avancées Procédure de configuration manuelle Procédure de connexion de Samsung Wireless Link Pour régler les paramètres de configuration du réseau de votre téléviseur, procédez comme suit : 1. Suivez les étapes 1 à 6 de la section "Configuration à l'aide de la méthode PBC (WPS)" ci-dessus. (P. 26) Pour établir une connexion, procédez comme suit : 1. Suivez les étapes 1 à 5 de la section "Configuration à l'aide de la méthode PBC (WPS)" ci-dessus. (P. 26) 2.
04 Fonctions avancées Media Play MediaPlay Vous pouvez lire les photos, la musique et/ou les films enregistrés sur un périphérique USB de type MSC et/ou sur votre ordinateur. Videos SUM Changer disp. Afficher les app. E Entrer R Retour ¦¦ Connexion d’un périphérique USB 1. Allumez votre téléviseur. Panneau latéral du téléviseur 2. Connectez un périphérique USB contenant des fichiers photo, de la musique et/ou des films à la prise USB 1 (HDD) ou USB 2 située sur le côté du téléviseur. 3.
Fonctions avancées ✎✎Fonctions non prises en charge lors de la connexion à un ordinateur via un réseau : xx Fonctions Fond musical et Paramètres de musique de fond. xx Tri des fichiers par préférence dans les dossiers Photo, Musique et Cinéma. xx Bouton � (Retour arrière) ou µ (Avance rapide) pendant la lecture d’un film. ✎✎Les sous-titres intégrés multi-audio Divx DRM ne sont pas pris en charge. ✎✎Samsung PC Share Manager doit être autorisé par le pare-feu de l’ordinateur.
Accédez au fichier de votre choix à l’aide des boutons haut/bas/droite/gauche et appuyez ensuite sur le bouton ENTERE ou � (Lecture). La lecture du fichier commence. ✎✎Prise en charge de Mode Périphérique et Mode Contenu dans la page d’accueil Media Play. Informations : Vous pouvez vérifier le nom du fichier sélectionné, le nombre de fichiers, ainsi que la page. Videos Movie 01.avi Movie 03.avi Movie 05.avi Section Liste de tri : Affiche l’ordre de tri standard. 1/1 Page /Movie 01.avi Jan.10.
Fonctions avancées • Formats vidéo pris en charge Extension de fichier *.avi *.mkv Conteneur AVI MKV *.asf *.wmv *.mp4 ASF ASF MP4 *.3gp 3GPP *.vro VRO VOB *.mpg *.mpeg PS *.ts *.tp *.trp Codec vidéo Résolution Fréquence d'images (i/s) Débit binaire (Mbit/s) Divx 3.11 / 4.x / 5.1 / 6.0 1920 x 1080 6 ~ 30 8 XviD 1920 x 1080 6 ~ 30 8 H.264 BP / MP / HP 1920 x 1080 6 ~ 30 25 MPEG4 SP / ASP 1920 x 1080 6 ~ 30 8 Motion JPEG 800 x 600 6 ~ 30 8 Divx 3.11 / 4.x / 5.1 / 6.
Si vous quittez la fonction de lecture de vidéos ou de programmes, il est possible de reprendre la lecture ultérieurement, au point où vous l’avez arrêtée. ✎✎Si vous appuyez sur le bouton ENTERE pendant la lecture du fichier, vous pouvez le parcourir selon une division en 5 chapitres de votre choix. 1. Pour sélectionner le fichier film que vous souhaitez lire en continu, appuyez sur le bouton ◄ ou ► dans la section Liste des fichiers. 2. Appuyez sur le bouton �(Lecture) / ENTERE.
Fonctions avancées Photos Visualisation d’une photo (ou d’un diaporama) 1. 2. 3. Appuyez sur le bouton ◄ ou ► pour sélectionner Photo et appuyez ensuite sur ENTERE dans le menu Media Play. Appuyez sur le bouton ◄/►/▲/▼ pour sélectionner la photo de votre choix dans la liste des fichiers. Appuyez sur le bouton ENTERE ou � (Lecture). –– Lorsqu’une liste de photos est affichée, appuyez sur le bouton (Lecture) / ENTERE de la télécommande pour lancer le diaporama.
Pendant la lecture d’un fichier, appuyez sur le bouton TOOLS. Catégorie Operations (Opérations) Vidéos Musiqu Photos Titre Vous pouvez déplacer directement l'autre fichier. ✓ Mode de répétition Vous pouvez lire des fichiers musicaux, vidéo et en boucle. ✓ Format de l'image (Mode1 / Mode2 / Original) Vous pouvez régler le format de l'image suivant vos préférences. ✓ Réglage de l'image Vous pouvez régler les paramètres d'image. (p.
Fonctions avancées Anynet+ En quoi consiste Anynet+ ? t Anynet+ est une fonction qui vous permet de contrôler tous les appareils Samsung connectés compatibles Anynet+ à l’aide de votre télécommande Samsung. Le système Anynet+ peut être utilisé uniquement avec les appareils Samsung disposant de la fonction Anynet+. Pour être sûr que votre appareil Samsung dispose de cette fonction, vérifiez qu’il comporte le logo Anynet+.
■■ Configuration Anynet+ (HDMI-CEC) (Arrêt / Activé) : pour utiliser la fonction Anynet+, l’option Anynet+ (HDMI-CEC) doit être définie sur Activé. Lorsque la fonction Anynet+ (HDMI-CEC) est désactivée, toutes les activités qui y sont associées sont indisponibles. ✎✎ Arrêt automatique (Non / Oui) : configuration de l’arrêt automatique d’un appareil Anynet+ lorsque le téléviseur est mis hors tension. La source active sur le téléviseur doit être définie sur TV pour pouvoir utiliser la fonction Anynet+.
Fonctions avancées ¦¦ Ecoute via un récepteur Vous pouvez écouter du son via un récepteur (c’est-à-dire un système home cinéma) au lieu du haut-parleur du téléviseur. 1. Sélectionnez Récepteur et définissez l’option sur Activé. 2. Appuyez sur le bouton EXIT pour quitter le menu. Si votre récepteur ne prend en charge que l’audio, il se peut qu’il ne figure pas dans la liste d’appareils.
¦¦ Mise en route d’Internet@TV Recommended Internet@TV vous permet de disposer, sur votre téléviseur, de contenu utile et ludique en provenance directe du Web. by Date 1/1 My Applications Samsung Apps 04 Fonctions avancées Internet@TV Settings A Login B Mark as Favorite D Sort by R Return ✎✎REMARQUE xx Vous devez configurer les paramètres réseau avant d’utiliser Internet@TV. Pour plus d’informations, reportez-vous à la section "Connexion réseau" (P. 23).
Fonctions avancées Connexion au compte Si le widget contient plusieurs catégories, utilisez les boutons ◄ et ► pour y accéder. ■■ System Setup ✎✎ Ticker Autorun n’est pas prise en charge dans tous les pays. Ticker Autorun (Off / On) : active / désactive l’exécution automatique du message déroulant lors de la mise sous tension du téléviseur.
Avant la création du User account, vous devez d’abord télécharger l’application via Samsung Apps. 1. A l’aide des boutons ▲/▼/◄/►, sélectionnez Settings. Appuyez ensuite sur le bouton ENTERE. 2. Appuyez sur le bouton ▼ pour sélectionner Internet@TV ID, puis appuyez sur le bouton ENTERE ou ►. 3. Sélectionnez Create. L’écran Keypad apparaît. 4. Le clavier s’affiche à l’écran.
Fonctions avancées ¦¦ Utilisation du service Internet@TV Samsung Apps Samsung Apps est un site de téléchargement d'applications utilisables sur les appareils TV/AV de marque Samsung. Les utilisateurs peuvent bénéficier d'un large éventail de contenu, tel que des vidéos, de la musique, des photos, des jeux, des informations utiles, etc., à l'aide des applications téléchargées. D'autres applications seront disponibles ultérieurement.
Problème Le contenu de certaines applications est disponible uniquement en anglais. Comment puis-je en modifier la langue ? Certains services d’application ne fonctionnent pas. Lorsqu'une erreur réseau se produit, le menu des paramètres est le seul utilisable. Est-il possible que des films destinés à un public adulte soient diffusés via YouTube ? Solution possible La langue du contenu des applications peut être différente de celle des widgets de l’interface utilisateur.
Fonctions avancées AllShare Message / Média / ScreenShare ¦¦ A propos de la fonction AllShare AllShare connecte votre téléviseur et vos téléphones portables/appareils Samsung compatibles via un réseau. Vous pouvez ainsi être averti, sur l’écran de votre téléviseur, de la réception d’appels, lire des messages SMS ou encore afficher les programmes définis sur votre téléphone portable.
Utilisation de la fonction ScreenShare Si vous recevez un appel alors que vous regardez la télévision, la fenêtre d’alarme s’affiche. La fonction ScreenShare vous permet de naviguer dans les différents types de contenu du téléphone portable. Ainsi, l’image ci-dessous illustre une page d’accès au contenu d’un téléphone portable. Vous pouvez lire les fichiers stockés sur le téléphone portable, consulter le répertoire téléphonique ou encore afficher le calendrier sur le téléviseur.
Informations supplémentaires Fonction Télétexte de chaîne analogique La page d’index du télétexte contient des instructions sur l’utilisation du service. Pour que les informations du télétexte s’affichent correctement, la réception des chaînes doit être stable. Autrement, des informations pourraient manquer ou certaines pages ne pas s’afficher. ✎✎Vous pouvez changer de page de télétexte en appuyant sur les boutons numériques de la télécommande.
05 Informations supplémentaires Installation du support mural ¦¦ Assemblage du cache Lorsque vous installez le téléviseur en position murale, insérez le cache dans la partie qui se connecte au pied, comme illustré ci-contre. Cache ¦¦ Préparation avant l’installation d’un dispositif de fixation murale (Téléviseurs de 46 à 55 pouces) Pour installer un support mural d’un autre fabricant, utilisez l’anneau de support.
Informations supplémentaires ¦¦ Caractéristiques du kit de fixation murale (VESA) ✎✎Le kit de fixation murale est vendu séparément. Installez votre fixation murale sur un mur solide perpendiculaire au sol. Si vous souhaitez la fixer sur d’autres matériaux de construction, veuillez prendre contact avec votre revendeur le plus proche. Si vous l’installez au plafond ou sur un mur non droit, la fixation risque de tomber et de provoquer de graves blessures.
L’antivol Kensington est un dispositif utilisé pour fixer physiquement le système lorsqu’il est utilisé dans un endroit public. L’aspect et la méthode de verrouillage peuvent différer de l’illustration en fonction du fabricant. Consultez le manuel fourni avec le verrou Kensington pour obtenir des instructions d’utilisation. 1 2 ✎✎Une icône “K” est présente à l’arrière du téléviseur. Un verrou Kensington se trouve à côté de l’icône “K”. 1.
Informations supplémentaires Resolution des problemes Si vous avez des questions sur le téléviseur, commencez par consulter la liste ci-dessous. Si aucune de ces astuces de dépannage ne s’applique à votre problème, rendez-vous sur le site "www.samsung.com", puis cliquez sur Service ou contactez le centre d’appel dont les coordonnées figurent sur la couverture arrière du présent manuel.
Le téléviseur s'éteint automatiquement. Solutions et explications • • • • Aucune image / vidéo n’est affichée. • • • • Vérifiez que la fonction Veille est réglée sur Arrêt dans le menu Configuration. (P. 18) Si votre PC est connecté au téléviseur, vérifiez les paramètres d'alimentation de votre PC. Vérifiez que le cordon d'alimentation secteur est branché correctement sur la prise murale et sur le téléviseur.
Informations supplémentaires Problèmes Solutions et explications Perte intermittente du signal audio ou vidéo. • • Vérifiez le raccordement des câbles ; rebranchez-les au besoin. Une perte de l'image ou du son peut être provoquée par l'utilisation de câbles trop rigides ou épais. Veillez à ce que les câbles soient suffisamment souples pour une utilisation à long terme. En cas d'installation du téléviseur en position murale, nous vous recommandons d'utiliser des câbles avec des connecteurs de 90 °degrés.
Résolution native du panneau Conditions ambiantes Température en service Humidité en fonctionnement Température de stockage Humidité sur le lieu de stockage Système TV 1920 x 1080 à 60 Hz 10°C à 40°C (50°F à 104°F) 10% à 80%, sans condensation -20°C à 45°C (-4°F à 113°F) 5% à 95%, sans condensation Analogique : en fonction du pays sélectionné Numérique : DVB-T/DVB-C Analogique : PAL, SECAM, NTSC-4.43, NTSC-3.58, PAL60 Numérique : MPEG-2 MP@ML, MPEG-4, H.264/AVC MP@L3, MP@L4.0, HP@L4.0 B/G. D/K. I. L. A2.
Informations supplémentaires Index A G Aff. de base AllShare Amplifier Antenne Anynet+ Attache de câble Audio Out Arr.-plan Acc. 34 44 16 12 36 48 8, 36 35 B Balance G/D Balance blancs 16 14 C Cache 47 Capteur Eco 14 Caractéristiques techniques 53 Chaîne favorite 11 Chaude 15 Composant 7 Config.
Cette page est laissée intentionnellement vierge. BN68-02558ABE-PRFre.
Le figure e le illustrazioni presenti in questo Manuale dell’utente sono fornite unicamente a titolo di riferimento e possono differire da quelle del prodotto attuale. Le specifiche e il design del prodotto possono variare senza preavviso. Avviso relativo alla trasmissione TV digitale 1. 2. 3. 4. 5. 6.
Contenuti Per iniziare 4 4 4 5 6 6 Accessori Vista del Pannello di controllo Vista del telecomando Collegamento all’antenna Plug & Play (Impostazione iniziale) Collegamenti 7 8 9 Collegamento a un dispositivo AV Collegamento a un dispositivo audio Cambiare la sorgente di ingresso Funzioni base 9 10 10 12 13 16 18 20 Come scorrere i menu Uso del tasto INFO (Guida Now & Next) Pianificare la visione Menu Canale Menu Immagine Menu Suono Menu Impostazione Menu Supporto Funzioni avanzate 22 22 23 29 3
Per iniziare Accessori ✎✎Controllare che nella confezione del TV LCD siano contenuti i seguenti componenti. Se eventuali componenti risultassero mancanti, contattare il rivenditore. ✎✎La forma e il colore dei componenti possono variare in base al modello.
✎✎Questo speciale telecomando, progettato per aiutare chi ha problemi di vista, presenta punti in Braille sui tasti Power, Channel e Volume. Spegne e accendere il televisore. (P. 6) 01 Per iniziare Vista del telecomando Se il tasto di illuminazione ON/OFF è impostato su ON e si preme un tasto qualsiasi, i tasti del telecomando si illuminano per un istante. (L’uso del telecomando con questo tasto impostato su On riduce l’uso della batteria.) Visualizzazione e selezione delle sorgenti video disponibili.
Per iniziare Collegamento all’antenna Quando il televisore viene acceso per la prima volta, le impostazioni di base vengono visualizzate automaticamente. ✎✎Preimpostato: Collegare l’alimentazione e l’antenna. Antenna VHF/UHF Cavo o R-AUDIO-L ANT OUT PR PB Y Ingresso Alimentazione Plug & Play (Impostazione iniziale) Alla prima accensione del televisore, vengono visualizzate alcune schermate che aiutano l’utente a configurare le impostazioni di base. Premere il tasto POWERP.
Collegamenti 02 Collegamenti Collegare un dispositivo AV Usare un cavo HDMI / DVI: Connessione HD (fino a 1080p) Dispositivi disponibili: DVD, lettore Blu-ray, ricevitore via cavo HD, ricevitore satellitare HD STB (Set-Top-Box), ricevitore via cavo, ricevitore satellitare (STB) DVD W Y W R W R B G HDMI OUT Red White AUDIO OUT W PR R-AUDIO-L PB PB PR DVI OUT R ✎✎HDMI IN 1(DVI), 2, 3, 4 / PC / DVI AUDIO IN PR R-AUDIO-L R-AUDIO-L Y PB Y Y xx Quando si effettua una connessione mediante
Collegamenti Collegamento di un dispositivo audio Uso di una connessione Ottica o un cavo audio Dispositivi disponibili: sistema audio digitale, amplificatore, DVD home theatre OPTICAL Sistema Audio Digitale R-AUDIO-L PR PB Y Cuffie ✎✎DIGITAL AUDIO OUT (OPTICAL) xx Quando un sistema audio digitale è collegato alla porta DIGITAL AUDIO OUT (OPTICAL), ridurre il volume sia del televisore sia del sistema. xx L’audio 5.
Modifica Nome ■■ VCR / DVD / STB cavo / STB satellite / STB PVR / Ricevitore AV / Giochi / Videocamera / PC / DVI PC / Dispositivi DVI / TV / IPTV / Blu-ray / HD DVD / DMA: Assegnare un nome al dispositivo collegato alle porte di ingresso per semplificare la selezione della sorgente di ingresso.
Funzioni base Uso del tasto INFO (Guida Now & Next) Uso di Vista programmazione Il display identifica ilPOWER canale corrente e lo stato di determinate impostazioni audio e video. La guida Now & Next mostra le informazioni relative alla programmazione giornaliera di ogni canale in base all’orario di trasmissione. yy Scorrere ◄, ► per visualizzare le informazioni di un determinato programma durante la visione del canale corrente. yy Scorrere ▲, ▼ per visualizzare le informazioni relative ad altri canali.
¦¦ Uso dei Canali Preferiti Eliminare o impostare i canali preferiti e utilizzare la guida ai programmi per le trasmissioni digitali. Selezionare un canale nella schermata Canali, Miei canali o Programmato. * Miei canali Canali All Antenna ■■ ■■ c1 c2 TV 15 Radio Data/Other Analogue 3 23 33 32 5 4 27 Antena B Zoom Seleziona (in Gestione canali) Mostra tutti i canali preferiti. 1futech * 24ore.tv abc1 r BBC World bid-up.
Funzioni base Menu Canale ¦¦ Risintonizzazione dei canali Antenna (Antenna / Cavo) t Prima che il televisore inizi la memorizzazione dei canali disponibili, è necessario specificare il tipo di sorgente di segnale collegata al televisore (per es. un sistema via Antenna o Cavo). Nazione Viene visualizzata la finestra di immissione del PIN. Digitare il PIN a quattro cifre. ■■ Canale digitale: Cambiare la nazione per i canali digitali. ■■ Canale analogico: Cambiare la nazione per i canali analogici.
(in Gestione canali) Impostare ogni canale usando le opzioni del menu Gestione canali , Blocco / Sblocco, Timer Visione, Ordina, Elimina, Seleziona tutto / Deseleziona tutto). Gli elementi del menu Opzioni possono differire in base allo stato del canale. 1. Selezionare un canale e premere il tasto TOOLS. 2. Selezionare una funzione e cambiarne le impostazioni. ■■ Blocco / Sblocco: E’ possibile bloccare un canale in modo che non possa essere selezionato e visualizzato.
Funzioni base ¦¦ Soluzioni economiche ■■ Gamma: Per regolare l’intensità dei colori primari. Soluzione Eco ■■ Risp. energia (Off / Basso / Medio / Alto / Immagine Off / Auto)t: Questa funzione regola la luminosità del televisore in modo da ridurre il consumo di energia. Selezionando Immagine Off, lo schermo viene disattivato, ma l’audio rimane attivo. Per attivare lo schermo premere un tasto qualsiasi, eccetto il tasto di regolazione del volume.
xx A seconda del tipo di sorgente di ingresso, le opzioni ✎✎In modalità PC, è possibile modificare solo i parametri xx Le voci disponibili variano in base alla modalità Toni Colore Dimensioni, Filtr disturbo digit e Ora Protezione Auto.
Funzioni base Reset immagine (OK / Annulla) Ripristina la modalità corrente delle immagini ai valori predefiniti. ¦¦ Configurazione del televisore con il PC Impostare la sorgente di ingresso su PC. Regolazione auto t Per regolare i valori frequenza/posizioni e le impostazioni di sintonizzazione automaticamente. ✎✎Non disponibile quando il televisore è collegato mediante cavo HDMI/DVI. Schermo ■■ Grossa / Fine: Rimuove o riduce eventuali disturbi dalle immagini.
(non disponibile in tutti i paesi) (solo canali digitali) Questa funzione gestisce il flusso audio per l’opzione AD (Audio Description), quando è trasmesso insieme all’Audio principale dall’emittente. ■■ Descrizione audio (Off / On): Attiva e disattiva la funzione Descrizione audio. ■■ Volume: Regola il volume della descrizione audio. Volume auto (Off / Normale / Notte) Per equalizzare il volume di ogni canale, impostare su Normale.
Funzioni base Menu Impostazione ¦¦ Impostazione dell’orario Ora ■■ Orologio: L’impostazione dell’ora serve per utilizzare le funzioni timer del televisore. OO L’ora corrente appare ogni volta che si preme il tasto INFO. ✎✎ Se il cavo di alimentazione viene scollegato, è necessario impostare nuovamente l’orologio. Modalità orologio (Automatico / Manuale) ✎✎ In base all’emittente e al segnale trasmesso, l’impostazione automatica dell’orario potrebbe non essere corretta.
POWER P ✎✎ Qualora si sia dimenticato il codice PIN, premere i tasti del telecomando nella sequenza seguente per ripristinare il codice PIN predefinito “0-0-0-0” : POWER (off) → MUTE → 8 → 2 → 4 → POWER (on). ¦¦ Altre funzioni Lingua ■■ Lingua menu: Imposta la lingua dei menu. ■■ Lingua Teletext: Imposta la lingua desiderata per il servizio Teletext. ✎✎ La lingua predefinita è l’inglese, nel caso in cui la trasmissione non supporti la lingua selezionata.
Funzioni base ¦¦ PIP (Picture In Picture) ■■ Informazioni sul segnale: (solo canale digitali) La qualità di ricezione dei canali HDTV è perfetta o i canali non sono disponibili. Regolare l’antenna per aumentare la forza del segnale. PIP t Permette la visualizzazione contemporanea di un canale TV e di una sorgente video esterna. PIP (Picture-in-Picture) non funziona nella stessa modalità. ✎✎NOTA xx Spegnendo il televisore durante la visione in modalità PIP, la finestra PIP scomparirà.
✎✎ Per prima cosa, configurare la propria rete. ■■ Software alternativo (backup): Visualizza la versione software scaricata tramite l’opzione Online. Durante l’aggiornamento software, se la procedura viene interrotta, questa funzione verrà attivata. ✎✎ Se la connessione a Internet non funziona Guida alla connessione HD Per istruzioni dettagliate sull’uso dell’opzione Impostazione rete, vedere la sezione “Impostazione della rete”. correttamente, potrebbe interrompersi. Riprovare.
Funzioni avanzate Collegamento a un PC Uso di un Cavo HDMI/DVI / D-sub DVI OUT R-AUDIO-L PR PB AUDIO OUT AUDIO OUT PC OUT Y R-AUDIO-L PR PB Y R-AUDIO-L PR PB Y R-AUDIO-L PR PB Y Modalità di visualizzazione (ingresso D-Sub e HDMI/DVI) La risoluzione ottimale è 1920 X 1080 @ 60 Hz.
E’ possibile impostare il televisore in modo da poter accedere a Internet attraverso una LAN con un collegamento via cavo o wireless. ¦¦ Collegamento a una rete cablata Vi sono tre modi per collegare il televisore alla LAN via cavo: yy E’ possibile collegare il televisore alla LAN connettendo la porta LAN sul retro del televisore a un modem esterno mediante un cavo Cat 5. Vedere lo schema riportato sotto.
Funzioni avanzate Impostazione rete (Auto) Impostazione rete Manuale Durante la connessione del televisore a una rete che supporta il protocollo DHCP, configurare Impostazione rete su Auto. Per impostare automaticamente la connessione di rete via cavo del televisore, seguire questi passaggi: Configurare Impostazione rete su Manuale quando si collega il televisore a una rete che richiede un indirizzo IP statico.
Per collegare il televisore a una rete wireless, è necessario disporre di un router o di un modem wireless e di un adattatore LAN wireless Samsung (WIS09ABGN) da collegare al jack USB sul pannello posteriore o laterale del televisore. Vedere la figura riportata sotto. ✎✎Per utilizzare la funzione SWL (Samsung Wireless Link), collegarsi alla porta USB 1 (HDD).
Funzioni avanzate Impostazione rete (Configurazione automatica Samsung) Impostazione rete (PBC (WPS)) Questa funzione è disponibile negli AP (Access Point) che supportano la modalità Samsung Auto Configuration (Configurazione automatica Samsung). Se tali AP non sono disponibili, è possibile collegarsi mediante PBC (WPS) oppure manualmente. Se il router è dotato di un tasto PBC (WPS), seguire questi passaggi: 1. Collegare il televisore alla LAN come descritto nella sezione precedente.
4. Nell’elenco delle reti disponibili, premere il tasto ▲ o ▼ per selezionare le rete desiderata, quindi premere ENTERE. ✎✎ Se l’AP è impostato su Nascosto, sarà necessario selezionare Aggiungi rete e digitare Nome rete (SSID) e Chiave sicur per stabilire la connessione. 5. Se compare la finestra PIN/Sicurezza, andare al passaggio 6. Se compare la schermata di connessione rete, andare al passaggio 10. 6. Premere il tasto ▲ o ▼ per selezionare Sicurezza o PIN.
Funzioni avanzate Procedura per l’impostazione manuale Come collegare Samsung Wireless Link Per immettere le impostazioni di rete nel televisore, seguire questi passaggi: 1. Seguire i passaggi da 1 a 6 della “Procedura per l’impostazione mediante PBC (WPS)” descritta sopra. (P. 26) Per le procedure necessarie a stabilire una connessione, vedere le seguenti indicazioni: 1. Seguire i passaggi da 1 a 5 della “Procedura per l’impostazione mediante PBC (WPS)” descritta sopra. (P. 26) 2.
Godetevi le fotografie, la musica o i film salvati su un dispositivo USB Mass Storage Class (MSC) e/o sul PC. 04 Funzioni avanzate Media Play MediaPlay Videos Nome Dispisitivo SUM Visual dispositivi E Conferma R Ritorna ¦¦ Collegamento di un dispositivo USB 1. Accensione del televisore. Pannello laterale del televisore 2. Collegare un dispositivo USB contenente foto, musica e/o filmati alla porta USB 1 (HDD) o USB 2 sul pannello laterale del televisore. 3.
Funzioni avanzate ✎✎Funzioni non supportate quando si effettua il collegamento a un PC tramite rete: xx Funzioni Background Music (Musica di sottof) e Background Music Setting (Impostazione musica di sottofondo). xx Ordinamento dei file in base alle preferenze nelle cartelle Photo (Foto), Music (Musica) e Movie (Film). xx Premere i tasti � (REW) o µ (FF) durante la riproduzione di un film. ✎✎Le didascalie incorporate, Divx DRM, Multi-audio, non sono supportate.
04 Funzioni avanzate ¦¦ Visualizzazione a schermo Posizionarsi sul file desiderato usando i tasti su/giù/sinistra/destra, quindi premere ENTERE o � (Riproduci). Il file selezionato verrà visualizzato. ✎✎Supporta Mod. dispositivo e Mod. contenuti nella homepage Media Play. Informazioni: E’ possibile verificare il nome del file selezionato e il numero di file e di pagine. Videos Movie 01.avi Movie 03.avi Movie 05.avi Sezione Elenco ordinamento: Visualizza lo standard di ordinamento. Movie 02.avi Jan.
Funzioni avanzate yy Formati video supportati Estensione file Codec Video Risoluzione Frame rate (fps) Bit rate (Mbsp) Divx 3.11 / 4.x / 5.1 / 6.0 1920 x 1080 6 ~ 30 8 XviD 1920 x 1080 6 ~ 30 8 H.264 BP / MP / HP 1920 x 1080 6 ~ 30 25 MPEG4 SP / ASP 1920 x 1080 6 ~ 30 8 Contenitore *.avi *.mkv *.asf AVI MKV ASF *.wmv ASF *.mp4 MP4 *.3gp 3GPP *.vro VRO VOB *.mpg *.mpeg *.ts *.tp *.trp Motion JPEG 800 x 600 6 ~ 30 8 Divx 3.11 / 4.x / 5.1 / 6.
Se si interrompe la riproduzione video, la riproduzione può essere ripresa in seguito a partire dal punto in cui è stata interrotta. ✎✎Premendo il tasto ENTERE durante la riproduzione di un file, è possibile esplorare le scene divise in 5 capitoli. 1. Nella sezione elenco file, selezionare il filmato da riprodurre in modo continuo premendo il tasto ◄ o ►. 2. Premere il tasto � (Riproduci) / ENTERE 00:04:03 / 00:07:38 1/1 Movie 01.avi 3.
Funzioni avanzate Foto Visualizzazione di una foto (o di una proiezione di diapositive) 1. Premere il tasto ◄ o ► per selezionare Foto, quindi premere ENTERE nel menu Media Play. 2. Premere il tasto ◄/►/▲/▼ per selezionare la foto desiderata tra quelle riportate in elenco. 3. Premere ENTERE o il tasto � (Riproduci). –– Quando si visualizza un elenco di foto, per iniziare la proiezione di diapositive premere il tasto (Riproduci) / ENTERE sul telecomando.
Durante la riproduzione di un file, premere TOOLS. Categoria Operazioni Video Titolo E' possibile spostare l'altro file direttamente. ✓ Modalità Ripeti E’ possibile riprodurre ripetutamente i film o brani musicali. ✓ Formato immagine (Modalità 1 / Modalità 2 / Nativa) E' possibile regolare la dimensione dell'immagine in base alle proprie preferenze. ✓ Impostazioni immagine E' possibile regolare l'impostazione dell'immagine. (p.
Funzioni avanzate Anynet+ Che cos’è Anynet+? t Anynet+ è una funzione che permette di controllare mediante il telecomando del televisore Samsung tutti i dispositivi Samsung collegati che supportano Anynet+. Il sistema Anynet+ può essere usato solo con i dispositivi Samsung dotati della funzione Anynet+. Per controllare se il dispositivo Samsung in uso è dotato di questa funzione, verificare la presenza del logo Anynet+.
■■ Impostazione Anynet+ (HDMI-CEC) (Off / On): Per utilizzare la funzione Anynet+, Anynet+ (HDMI-CEC) deve essere impostata su On. + (HDMI-CEC) è disattivata, sono disattivate anche tutte le funzioni relative a Anynet+. ✎✎ Quando la funzione Anynet Spegnimento auto (No / Sì): Impostazione della disattivazione automatica di un dispositivo Anynet+ allo spegnimento del televisore. La sorgente attiva deve essere impostata sul telecomando in modo che il televisore utilizzi la funzione Anynet+.
Funzioni avanzate ¦¦ Ascolto tramite il ricevitore È possibile ascoltare l’audio tramite un ricevitore (per es. un Home Theatre) anzichè dagli altoparlanti del televisore. 1. Selezionare Ricevitore e impostarlo su On. 2. Premere EXIT per uscire. Se il ricevitore supporta solo l’audio, potrebbe non comparire nell’elenco dei dispositivi. Il ricevitore è operativo solo se è collegata in modo appropriato la porta Optical In del ricevitore alla porta DIGITAL AUDIO OUT (OPTICAL) del televisore.
¦¦ Guida introduttiva di Internet@TV Recommended Internet@TV fornisce alcuni utili e interessanti contenuti e servizi direttamente dal web al televisore. My Applications Samsung Apps by Date 1/1 04 Funzioni avanzate Internet@TV Settings A Login B Mark as Favorite D Sort by R Return ✎✎NOTA xx Configurare le impostazioni di rete prima di usare Internet@TV. Per maggiori informazioni vedere “Connessione di rete” (P. 23).
Funzioni avanzate ■■ System Setup Login account Per un applicazione dotato di più categorie, usare ◄ e ► per accedere alle varie categorie. nel paese di residenza. Ticker Autorun (Off / On): Abilita/Disabilita l’esecuzione automatica del ticker all’accensione del televisore. Channel Bound Service (Off / On): Alcuni canali supportano gli application come servizio dati internet, permettendo l’accesso al servizio Internet durante la visione del televisore. Disponibile solo se supportata dall’emittente.
Prima di creare un User account, scaricare l’applicazione su Samsung Apps. 1. Mediante i tasti ▲/▼/◄/► selezionare Impostaz. Quindi premere ENTERE 2. Premere ▼ per selezionare Internet@TV ID, quindi premere ENTERE o ► 3. Selezionare Create. Verrà visualizzata la schermata del tastierino. 4. L’OSD del tastierino verrà visualizzato a schermo.
Funzioni avanzate ¦¦ Uso del servizio Internet@TV Uso di Samsung Apps per categoria Samsung Apps Samsung Apps consente di scaricare applicazioni da utilizzare su dispositivi Samsung TV/AV. Gli utenti possono godere di una varietà di contenuti quali video, musica, foto, giochi, informazioni utili e molto altro ancora utilizzando le applicazioni scaricate. Ulteriori applicazioni saranno disponibili in seguito.
Problema Possibile soluzione Alcuni contenuti Applicazione sono solo in Inglese. Come posso cambiare la lingua? La lingua del contenuto del Applicazione può essere diversa dalla lingua di interfaccia utente del widget. Ciò può dipendere dal fornitore del servizio. Alcuni servizi Applicazione non funzionano. Verificare il servizio con il fornitore. Consultare il sito web di supporto per reperire informazioni sul provider del servizio widget.
Funzioni avanzate AllShare Messag / Media / ScreenShare ¦¦ Informazioni su AllShare AllShare collega il televisore e il cellulare Samsung / i dispositivi compatibili attraverso una rete. Sul televisore è possibile visualizzare le chiamate in arrivo, gli SMS e i promemoria impostati sul proprio cellulare. Inoltre, è possibile riprodurre contenuti multimediali compresi video, foto e musica memorizzati sul proprio cellulare o su altri dispositivi (per es il PC) e controllarli sul televisore mediante la rete.
Uso della funzione ScreenShare Se arriva una chiamata mentre si guarda il televisore, viene visualizzata la finestra degli allarmi. Mediante ScreenShare, è possibile ricercare vari contenuti web forniti attraverso il cellulare. Ad esempio, l’immagine sotto visualizza una pagina di accesso per i contenuti provenienti da un cellulare. E’ possibile leggere i vari file contenuti nel cellulare e visualizzare la rubrica e il calendario sul televisore.
Altre informazioni Funzione Teletext dei canali analogici La pagina dell’indice del servizio Teletext contiene informazioni sull’uso del servizio. Per visualizzare correttamente le informazioni del servizio Teletext, è necessario che la ricezione del canale sia stabile. In caso contrario, alcune informazioni potrebbero essere perse o alcune pagine potrebbero non essere visualizzate correttamente. ✎✎E’ possibile cambiare le pagine Teletext premendo i tasti numerici sul telecomando.
05 Altre informazioni Installazione del supporto a parete ¦¦ Montaggio della staffa preforata Durante l’installazione del televisore a parete, collegare la staffa alla parte che collega il piedistallo come mostrato nella figura. Staffa preforata ¦¦ Preparazione per l’installazione di un supporto a parete (per televisori da 46 ~ 55 pollici) Per installare un supporto a parete di un altra marca, utilizzare un anello di ritenuta.
Altre informazioni ¦¦ Specifiche del kit di montaggio a parete (VESA) ✎✎Il kit di montaggio a parete non è fornito in dotazione ma è venduto separatamente. Installare il supporto su una parete solida perpendicolare al pavimento. Se il supporto deve essere fissato ad altri tipi di materiale, consultare il rivenditore di zona. Una installazione a soffitto o su pareti inclinate può provocare la caduta dell’unità e lesioni personali.
Il blocco Kensington è un dispositivo usato per assicurare fisicamente il sistema quando viene utilizzato in un luogo pubblico. L’aspetto del dispositivo e il metodo di blocco possono variare in base alla marca del prodotto. Per informazioni sull’uso, consultare il manuale fornito insieme al blocco Kensington. 1 2 ✎✎Trovare l’icona “K” sul retro del televisore. L’alloggiamento del blocco 3 Kensington si trova di fianco all’icona “K”. 1.
Altre informazioni Risoluzione dei problemi In caso di domande sul funzionamento del televisore, consultare per prima cosa l’elenco sottostante. Se nessuno dei consigli sottoriportati si dimostra utile per risolvere il problema, visitare il sito ‘www.samsung.com’, quindi fare clic sulla voce Support (Assistenza), oppure chiamare il numero del Call Center riportato in ultima pagina.
Soluzioni e spiegazioni Nessuna immagine, video spento Il televisore non si accende. • • • Il televisore si spegne automaticamente. • • • • Nessuna immagine/video. • • • • Verificare che la spina del cavo di alimentazione CA sia correttamente collegata a una presa a muro e il televisore sia acceso. Accertarsi che la presa a muro sia funzionante. Provare a premere il tasto POWER sul televisore per verificare che il problema non sia il telecomando.
Altre informazioni Problemi Soluzioni e spiegazioni Le impostazioni andranno perse dopo 30 minuti o a ogni spegnimento del televisore. • Se il televisore è in modalità Demo Negozio, ogni 30 minuti verranno azzerate le impostazioni audio e immagine. Commutare la modalità Demo Negozio in Uso dom. secondo la procedura Plug & Play (Impostazione iniziale).
Pannello nativo Caratteristiche ambientali Temperatura di esercizio Umidità di esercizio Temperatura di stoccaggio Umidità di stoccaggio Sistema TV 1920 x 1080 @ 60 Hz 10°C a 40°C (50°F a 104°F) Da 10% a 80%, senza condensa -20°C a 45°C (-4°F a 113°F) Da 5% a 95%, senza condensa Analogico: In base al paese selezionato Digitale: DVB-T/DVB-C Analogico: PAL, SECAM, NTSC-4.43, NTSC-3.58, PAL60 Digitale: MPEG-2 MP@ML, MPEG-4, H.264/AVC MP@L3, MP@L4.0, HP@L4.0 BG. OK NICAM.
Altre informazioni Indice A G Aggiornamento software AllShare Altoparlante est Altoparlante TV Amplificazione Antenna Anynet+ Audio Out Auto diagnosi 20 44 17 17 16 12 36 8, 36 20 B Batterie Bilan bianco Bilanciamento Blocco 5 14 16 13 Gestione canali Guida Now & Next R 11 10 H HDMI Home Theater 7, 36 8, 36 I Impostazione rete Incarnato Indicatore di alimentazione Informazioni sul segnale Internet@TV 24, 26 14 4 20 39 L Licenza Luminosità C Caldo 15 Cambia PIN 6, 19 Canali preferiti 11 Collega
Questa pagina è stata lasciata intenzionalmente bianca. BN68-02558B-PRIta.