LN19A450C1D/LN19A451C1D/ LN22A450C1D/LN22A451C1D 1-800-SAMSUNG (7267864) Samsung Electronics America, Inc. 105 Challenger Road Ridgefield Park, NJ 07660-0511 Samsung Electronics Canada Inc., Customer Service 55 Standish Court Mississauga, Ontario L5R 4B2 Call center hours of operation (Mon-Sun 9AM-12AM EST). To register this product please visit www.samsung.com/global/register.
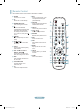
Remote Control See “Remote Control” in the owner’s instructions for details. 1 POWER Turns the TV on and off. 2 TV Selects the TV mode directly. 3 NUMERIC BUTTONS Press to change the channel. 4 Press to select additional channels(digital and analog) being broadcast by the same station. For example, to select channel “54-3”, press “54”, then press “ ” and “3”. 5 (MUTE) Press to temporarily cut off the sound. @ MTS Press to choose stereo, mono or Separate Audio Program (SAP broadcast).
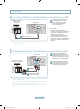
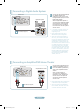
Connections Connecting a DVD Player or Cable Box/Satellite receiver (Set-Top Box) via HDMI DVD Player or Cable Box/ Satellite receiver (Set-Top Box) TV Rear Panel 1 Connect an HDMI Cable between the HDMI/DVI IN jack on the TV and the HDMI jack on the DVD Player or Cable Box/Satellite receiver (Set-Top Box). What is HDMI? • HDMI(High-Definition Multimedia Interface), is an interface that enables the transmission of digital audio and video signals using a single cable.
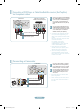
Connecting a DVD Player or Cable Box/Satellite receiver (Set-Top Box) via Component cables DVD Player or Cable Box / Satellite receiver (Set-Top Box) TV Rear Panel 1 Component Cable (Not supplied) 2 Audio Cable (Not supplied) 1 Connect a Component Cable between the COMPONENT IN [Y, PB, PR] jacks on the TV and the COMPONENT [Y, PB, PR] jacks on the DVD Player or Cable Box/Satellite receiver (Set-Top Box).
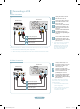
Connecting a VCR Video Connection TV Rear Panel VCR Rear Panel 1 Unplug the cable or antenna from the back of the TV. 2 Connect the cable or antenna to the ANT IN terminal on the back of the VCR. 3 4 5 Audio Cable (Not supplied) 4 Video Cable (Not supplied) 3 RF Cable (Not supplied) 5 Follow the instructions in “Viewing a VCR or Camcorder Tape” to view your VCR tape. ➣ Each VCR has a different back panel configuration.
Connecting a Digital Audio System 1 TV Rear Panel Digital Audio System 1 Connect an Optical Cable between the “DIGITAL AUDIO OUT (OPTICAL)” jacks on the TV and the Digital Audio Input jacks on the Digital Audio System. When a Digital Audio System is connected to the “DIGITAL AUDIO OUT (OPTICAL)” jack: Decrease the volume of the TV and adjust the volume level with the system’s volume control. ➣ 5.1CH audio is possible when the TV is connected to an external device supporting 5.1CH.
Connecting a PC Using the D-Sub Cable TV Rear Panel 1 Connect a D-Sub Cable between PC IN [PC] connector on the TV and the PC output connector on your computer. 2 Connect a PC Audio Cable between the PC IN [AUDIO] jack on the TV and the Audio Out jack of the sound card on your computer.
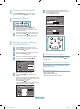
Turning the TV On and Off 5 Press the POWER button on the remote control. You can also use the POWER button on the TV. The TV begins memorizing all available stations. After all the available channels are stored, it start to remove scrambled channels. Press the EXIT button to exit. Auto PlugProgram & Play Auto Program in Progress. Viewing the Menus DTV Cable : -- Cable : 11 Cable 24 11 % Stop Enter Return Auto PlugProgram & Play 1 With the power on, press the MENU button.
Setting the Channel List Picture Mode Using this menu, you can Add/Delete or set Favorite channels and use the program guide for digital broadcasts. To use the Channel List function, first run “Auto Program”. 1 2 Press the MENU button. Press the ▲ or ▼ button to select “Channel”, then press the ENTER button. Press the ▲ or ▼ button to select “Channel List”, then press the ENTER button. Press the ENTER Customizing the Picture Settings button to select “All”.
To Select the Source TV Source List TV AV S-Video Component PC HDMI Move : ---: ---: ---: ---: ---- Enter Return Press the SOURCE button on the Remote Control You can select the TV mode or an input source connected to the TV set. Use this button to choose an input source that you would like to watch. ➣ Available signal sources: TV, AV, S-Video, Component, PC, HDMI. ➣ You can choose only those external devices that are connected to the TV. English-10 BN68-01396B-Eng.
Troubleshooting If the TV seems to have a problem, first try this list of possible problems and solutions. If none of these troubleshooting tips apply, call your nearest Samsung service center. Problem Possible Solution Poor picture Try another channel. / Adjust the antenna. / Check all wire connections. Poor sound quality. Try another channel. / Adjust the antenna. No picture or sound. Try another channel. / Press the SOURCE button. / Make sure the TV is plugged in. / Check the antenna connections.
Contact SAMSUNG WORLDWIDE If you have any questions or comments relating to Samsung products, please contact the SAMSUNG customer care center. Contacte con SAMSUNG WORLDWIDE Si tiene alguna pregunta o comentario referente a nuestros productos, por favor contacte con nuestro Servicio de Atención al Cliente. Country Customer Care Center Web Site CANADA 1-800-SAMSUNG(726-7864) www.samsung.com/ca U.S.A 1-800-SAMSUNG(726-7864) www.samsung.com Address Samsung Electronics Canada Inc.