Contact SAMSUNG WORLDWIDE If you have any questions or comments relating to Samsung products, please contact the SAMSUNG customer care center. Contacte con SAMSUNG WORLDWIDE Si tiene alguna pregunta o comentario referente a nuestros productos, por favor contacte con nuestro Servicio de Atención al Cliente. Country CANADA U.S.A Customer Care Center 1-800-SAMSUNG(726-7864) 1-800-SAMSUNG(726-7864) Web Site www.samsung.com/ca www.samsung.com Address Samsung Electronics Canada Inc.
Important Warranty Information Regarding Television Format Viewing Wide screen format LCD Displays (16:9, the aspect ratio of the screen width to height) are primarily designed to view wide screen format full-motion video. The images displayed on them should primarily be in the wide screen 16:9 ratio format, or expanded to fill the screen if your model offers this feature and the images are constantly moving.
English Contents General Information ■ ■ ■ ■ ■ ■ Channel Control List of Features.............................................................................. 2 Accessories................................................................................... 2 Viewing the Control Panel ............................................................ 3 Viewing the Connection Panel ..................................................... 4 Remote Control..............................................................
General Information List of Features Adjustable picture settings that can be stored in the TV’s memory. Automatic timer to turn the TV on and off. A special sleep timer. Excellent Digital Interface & Networking : With a built-in HD digital tuner, non-subscription HD broadcasts can be viewed with no Cable Box/Satellite receiver (Set-Top Box) needed. HDMI/DVI connection of your PC to this TV. Excellent Picture Quality SRS TruSurround XT - SRS TruSurround XT provides a virtual surround system.
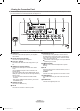
Viewing the Control Panel Buttons on the Lower-Right Part of the Panel The buttons on the lower-right panel control your TV’s basic features, including the on-screen menu. To use the more advanced features, you must use the remote control. 1 2 3 4 5 6 8 7 8 Front Panel buttons Touch each button to operate. The product color and shape may vary depending on the model. 1 SOURCE 5 POWER INDICATOR Toggles between all the available input sources (TV, AV, S-Video, Component, PC, HDMI).
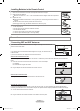
Viewing the Connection Panel Use the connection panel jacks to connect A/V components that will be connected continuously, such as DVD players or a VCR. For more information on connecting equipment, see pages 6~12. The product color and shape may vary depending on the model. 1 AUDIO OUT Connects to the audio input jacks on your Amplifier/ Home theater. 2 DIGITAL AUDIO OUT (OPTICAL) Connects to a Digital Audio component. 3 PC IN [PC] / [AUDIO] Connects to the video and audio output jacks on your PC.
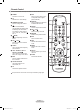
Remote Control You can use the remote control up to a distance of about 23 feet from the TV. 1 POWER Turns the TV on and off. 2 TV Selects the TV mode directly. 3 NUMERIC BUTTONS Press to change the channel. 4 Press to select additional channels(digital and analog) being broadcast by the same station. For example, to select channel “54-3”, press “54”, then press “ ” and “3”. 5 (MUTE) Press to temporarily cut off the sound. @ MTS Press to choose stereo, mono or Separate Audio Program (SAP broadcast).
Installing Batteries in the Remote Control 1. Lift the cover at the back of the remote control upward as shown in the figure. 2. Install two AAA size batteries. Make sure to match the "+" and "–" ends of the batteries with the diagram inside the compartment. 3. Replace the cover. Remove the batteries and store them in a cool, dry place if you won’t be using the remote control for a long time. The remote control can be used up to about 23 feet from the TV.
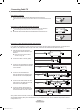
Connecting Cable TV To connect to a cable TV system, follow the instructions below. Cable without a Cable Box 1. Plug the incoming cable into the ANT IN terminal on the back of the TV. ANT IN Because this TV is cable-ready, you do not need a cable box to view unscrambled cable channels. Connecting to a Cable Box that Descrambles All Channels 1. Find the cable that is connected to the ANT OUT terminal on your cable box. ANT IN This terminal might be labeled "ANT OUT", "VHF OUT" or simply, "OUT".
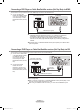
Connecting a DVD Player or Cable Box/Satellite receiver (Set-Top Box) via HDMI This connection can only be made if there is an HDMI Output connector on the external device. 1. C onnect an HDMI Cable between the HDMI/DVI IN jack on the TV and the HDMI jack on the DVD Player or Cable Box/Satellite receiver (Set-Top Box).
Connecting a DVD Player or Cable Box/Satellite receiver (Set-Top Box) via Component cables The rear panel jacks on your TV make it easy to connect a DVD Player or Cable Box/Satellite receiver (Set-Top Box) to your TV. 1. C onnect a Component Cable TV Rear Panel between the COMPONENT DVD Player or Cable Box / IN [Y, PB, PR] jacks on the TV Satellite receiver (Set-Top Box) and the COMPONENT [Y, PB, PR] jacks on the DVD Player or Cable Box/Satellite receiver (Set-Top Box). 2.
Connecting a VCR Video Connection These instructions assume that you have already connected your TV to an antenna or a cable TV system (according to the instructions on pages 6~7). Skip step 1 if you have not yet connected to an antenna or a cable system. 1. Unplug the cable or antenna from the back of the TV. ANT IN 2. Connect the cable or antenna to the ANT IN terminal on the back of the VCR. 3. Connect an RF Cable between the ANT OUT terminal on the VCR and the ANT IN terminal on the TV. 4.
Connecting a Digital Audio System The rear panel jacks on your TV make it easy to connect a Digital Audio System (Home theater/Receiver) to your TV. 1. C onnect an Optical Cable between the “DIGITAL AUDIO OUT (OPTICAL)” jacks on the TV and the Digital Audio Input jacks on the Digital Audio System. When a Digital Audio System is connected to the “DIGITAL AUDIO OUT (OPTICAL)” jack: Decrease the volume of the TV and adjust the volume level with the system’s volume control.
Connecting a PC Using the D-Sub Cable 1. C onnect a D-Sub Cable between PC IN [PC] connector on the TV and the PC output connector on your computer. 2. C onnect a PC Audio Cable between the PC IN [AUDIO] jack on the TV and the Audio Out jack of the sound card on your computer. TV Rear Panel PC 2 PC Audio Cable (Not supplied) 1 D-Sub Cable (Not supplied) Using the HDMI/DVI Cable 1. C onnect a HDMI/DVI cable between the HDMI/DVI IN jack on the TV and the PC output jack on your computer. 2.
Operation Turning the TV On and Off Press the POWER button on the remote control. You can also use the POWER button on the TV. Plug & Play Feature Plug & Play When the TV is initially powered on, basic settings proceed automatically and subsequently. Menu Language, Store Demo, Channels and Time will be set. 1. Press the POWER button on the remote control. The message “Menu Language, Store Demo, Channels and Time will be set.” is displayed.
Auto PlugProgram & Play Auto Program is completed. 75 Channels are memorized. DTV Air : 24 Air : 1 DTV Cable : 17 Cable : 33 OK 6. Press the ENTER button. Press the ▲ or ▼ button to select “Auto”, then Press the ENTER The message “Set to daylight saving time.” is displayed. Enter button. Set the Clock Mode. Clock Mode If you select “Manual”, “Enter the current date and time.” is displayed. (See page 37) : Auto Manual Move 7.
Using the The Button button is used to select stations that broadcast a digital signal. 1. F or example, for Channel 7-1, press 7, then , then 1. H D indicates the TV is receiving a Digital High Definition signal. SD indicates the TV is receiving a Standard Definition signal. F or quick channel change, press the number buttons, then press the ENTER button. Using the PRE-CH Button to select the Previous Channel 1. Press the PRE-CH button. The TV will switch to the last channel viewed.
Using the TOOLS Button You can use the TOOLS button to select your frequently used functions quickly and easily. The “Tools” menu changes depending on which external input mode you are viewing. 1. P ress the TOOLS button. The “Tools” menu will appear. Tools 2. Press the ▲ or ▼ button to select a menu. Picture Mode Sound Mode Sleep Timer Add to Favorite Switch to Air 3. P ress the ▲/▼/◄/►/ENTER buttons to display, change, or use the selected items.
Storing Channels in Memory (Automatic Method) 1. Press the MENU button to display the menu. Press the ▲ or ▼ button to select “Channel”, then press the ENTER button. 2. Press the ▲ or ▼ button to select "Auto Program", then press the ENTER TV Channel Antenna : Air Auto Program Clear Scrambled Channel Channel List Name Fine Tune Signal Strength button. Move 3. P ress the ▲ or ▼ button to select the antenna connection, then press the ENTER button.
To Select the Source Use to select TV or other external input sources such as DVD players or Cable Box/ Satellite receivers (Set-Top Box) connected to the TV. Use to select the input source of your choice. 1. Press the MENU button to display the menu. Press the▲ or ▼ button to select “Input”, then press the ENTER Input Source List : TV ► Edit Name ► button. 2. Press the ENTER button to select "Source List".
Picture Control Changing the Picture Standard You can activate either Dynamic, Standard, Movie by making a selection from the menu. 1. Press the MENU button to display the menu. Press the ENTER button, to select “Picture”. TV Picture Mode Backlight Contrast Brightness Sharpness Color Tint G 50 ▼ More : Standard Move 2. Press the ENTER button to select "Mode". Press the ▲ or ▼ button to select the “Dynamic”, “Standard” or “Movie”.
Configuring Picture Options Activating Picture Options 1. Press the MENU button to display the menu. Press the ENTER button, to select “Picture”. 2. Press the ▲ or ▼ button to select "Picture Options", then press the ENTER button. TV Picture ▲ More Picture Options Reset : OK ress the ▲ or ▼ button to select a particular item. Press the ENTER P button. When you are satisfied with your setting, press the ENTER button.
➣ Temporary image retention may occur when viewing a static image on the set for more than two hours. TV Size Wide 16 : 9 Zoom1 Zoom2 Wide Fit 4:3 Just Scan ➣ After selecting “Zoom1”, “Zoom2” or “Wide Fit”: Press the ◄ or ► button to select “Position”, then press the ENTER button. Press the ▲ or ▼ button to move the picture up and down. Reset: Press the ◄ or ► button to select “Reset”, then press the ENTER button. You can initialize the setting.
Setting the Digital Noise Reduction If the broadcast signal received by your TV is weak, you can activate the Digital Noise Reduction feature to help reduce any static and ghosting that may appear on the screen. TV 1. Follow the “Activating Picture Options” instructions numbers 1 and 2. (Refer to page 20) 2. Press the ▲ or ▼ button to select "Digital NR", then press the ENTER Picture Options Color Tone : Normal Size : Wide Digital NR : Auto HDMI Black Level : Normal Film Mode : Off button. 3.
Resetting the Picture Settings to the Factory Defaults 1. Press the MENU button to display the menu. Press the ENTER button, to select “Picture”. TV 2. Press the ▲ or ▼ button to select "Reset", then press the ENTER button. Press the ▲ or ▼ button to select “OK” or “Cancel” then press the ENTER button. Picture ▲ More Picture Options Reset : OK OK Cancel Press the EXIT button to exit. Each mode can be reset. Move Enter Return English - 23 BN68-01541A.
Sound Control Changing the Sound Standard You can select the sound mode to best suit the programming you’re watching. 1. Press the MENU button to display the menu. Press the ▲ or ▼ button to select "Sound", then press the ENTER button. 2. Press the ENTER button to select "Mode". Press the ▲ or ▼ button to select “Standard”, “Music”, “Movie”, “Speech”, or “Custom” sound setting, then press the ENTER button.
Setting the TruSurround XT TruSurround XT is a patented SRS technology that solves the problem of playing 5.1 multichannel content over two speakers. TruSurround delivers a compelling, virtual surround sound experience through any two-speaker playback system, including internal television speakers. It is fully compatible with all multichannel formats. 1. Press the MENU button to display the menu. TV Sound Press the ▲ or ▼ button to select "Sound", then press the ENTER button.
Choosing a Multi-Channel Sound (MTS) track - Analog Multi-Track Sound TV 1. Press the MENU button to display the menu. Press the ▲ or ▼ button to select "Sound", then press the ENTER Multi-Track Options Preferred Language Multi-Track Sound button. : English : Stereo ► ► 2. Press the ▲ or ▼ button to select "Multi-Track Options", then press the ENTER button. Enter 3. P ress the ▲ or ▼ button to select “Multi-Track Sound”, then press the ENTER button.
Setting the TV Speakers On/Off Sound output from the TV speakers is muted. 1. Press the MENU button to display the menu. Press the ▲ or ▼ button to select "Sound", then press the ENTER TV button. 2. Press the ▲ or ▼ button to select "TV Speaker", then press the ENTER Sound Mode : Custom Equalizer SRS TruSurround XT : Off Multi-Track Options Auto Volume : Off TV Speaker : On button. Move TV 3. Press the ▲ or ▼ button to select “Off”, then press the ENTER button.
Channel Control Clearing Scrambled Channels - Digital The Clear Scrambled Channel function is used to filter out scrambled channels after Auto Program is completed. This process may take up to 20~30 minutes. 1. Press the MENU button to display the menu. Press the ▲ or ▼ button to select "Channel", then press the ENTER button. TV 2. Press the ▲ or ▼ button to select "Clear Scrambled Channel", then press the ENTER button. It searches scrambled channels, which are to be removed from the list.
Adding and Erasing Channels Using this menu, you can Add/Delete or set Favorite channels and use the program guide for digital broadcasts. To use the Channel List function, first run “Auto Program” (see page 17). 1. Press the MENU button to display the menu. Press the ▲ or ▼ button to select "Channel", then press the ENTER TV Channel button. Antenna : Cable Auto Program Clear Scrambled Channel Channel List Name Fine Tune Signal Strength 2.
To Set-Up Your Favorite Channels You can set channels you watch frequently as favorites. 1. Press the MENU button to display the menu. Press the ▲ or ▼ button to select "Channel", then press the ENTER button. TV Channel Antenna : Cable Auto Program Clear Scrambled Channel Channel List Name Fine Tune Signal Strength 2. P ress the ▲ or ▼ button to select "Channel List", then press the ENTER button. Move 3. Press the ▲ or ▼ button to select "All" or "Added", then press the ENTER button.
Viewing the Channel Lists You can display a list of all channels, added channels or your favorite channels. 1. Press the MENU button to display the menu. Press the ▲ or ▼ button to select "Channel", then press the ENTER TV Channel Antenna : Cable Auto Program Clear Scrambled Channel Channel List Name Fine Tune Signal Strength button. 2. Press the ▲ or ▼ button to select "Channel List", then press the ENTER button. Move TV 3.
Labeling Channels Channels can be labeled ��������������������������������������������������������������������������� s������������������������������������������������������������������ o that their call letters appear whenever the channel is selected. 1. Press the MENU button to display the menu. Press the ▲ or ▼ button to select “Channel”, then press the ENTER button. Press the ▲ or ▼ button to select “Name”, then press the ENTER button.
Fine Tuning Analog Channels Use fine tuning to manually adjust a particular channel for optimal reception. 1. Press the MENU button to display the menu. Press the ▲ or ▼ button to select "Channel", then press the ENTER 2. Press the ▲ or ▼ button to select "Fine Tune", then press the ENTER button. TV Channel Antenna : Air Auto Program Clear Scrambled Channel Channel List Name Fine Tune Signal Strength button. Move 3. Press the ◄ or ► button to adjust the fine tuning.
PC Display Using Your TV as a Computer (PC) Display Setting Up Your PC Software (Based on Windows XP) The Windows display-settings for a typical computer are shown below. The actual screens on your PC will probably be different, depending upon your particular version of Windows and your particular video card. However, even if your actual screens look different, the same basic set-up information will apply in almost all cases. (If not, contact your computer manufacturer or Samsung Dealer.) 1.
Setting up the TV with your PC How to Auto Adjust Use the Auto Adjust function to have the TV set automatically adjust the video signals it receives. The function also automatically fine-tunes the settings and adjusts the frequency values and positions. This function does not work in DVI-Digital mode. Preset: Press the SOURCE button to select PC mode. 1. P ress the MENU button to display the menu.
Changing the Screen Position Adjust the PC’s screen positioning if it does not fit the TV screen. Preset: Press the SOURCE button to select PC mode. 1. Press the MENU button to display the menu. Press the ▲ or ▼ button to select "Picture", then press the ENTER Press the ▲ or ▼ button to select "Screen", then press the ENTER 2. Press the ▲ or ▼ button to select "Position", then press the ENTER PC Screen Image Lock ► Position ► Image Reset Resolution : 1360x768 @60Hz button. button.
Time Setting Setting the Clock Setting the clock is necessary in order to use the various timer features of the TV. Also, you can check the time while watching the TV. (Just press the INFO button.) Option 1: Setting the Clock Manually 1. Press the MENU button to display the menu. Press the ▲ or ▼ button to select "Setup", then press the ENTER Press the ▲ or ▼ button to select "Time", then press the ENTER button. button.
Option 2: Setting the Clock Automatically The Clock can be set automatically if you are receiving a digital signal. 1. Press the MENU button to display the menu. Press the ▲ or ▼ button to select "Setup", then press the ENTER Press the ▲ or ▼ button to select "Time", then press the ENTER TV button. button. Setup Plug & Play Language : English ► ► Time ► V-Chip ► Caption Melody : Medium ► ► Energy Saving : Off SW Upgrade ► ► Move 2.
Setting the Sleep Timer The sleep timer automatically shuts off the TV after a preset time (30, 60, 90, 120, 150 and 180 minutes). 1. Press the MENU button to display the menu. Press the ▲ or ▼ button to select "Setup", then press the ENTER Press the ▲ or ▼ button to select "Time", then press the ENTER button. button. 2. Press the ▲ or ▼ button to select "Sleep Timer", then press the ENTER 3.
Setting the On/Off Timer 1. Press the MENU button to display the menu. Press the ▲ or ▼ button to select "Setup", then press the ENTER Press the ▲ or ▼ button to select "Time", then press the ENTER button. button. TV Time 1/ 1/2008 12 : 00 am 2. Three different On/Off Timer Settings can be made. Press the ▲ or ▼ button to select “Timer 1”, “Timer 2” or “Timer 3”, then press the ENTER button.
Using the V-Chip The V-Chip feature automatically locks out programs that are deemed inappropriate for children. The user must enter a PIN (personal ID number) before any of the V-Chip restrictions are set up or changed. “V-Chip” function is not available in HDMI, component or PC mode. Setting Up Your Personal ID Number (PIN) 1. Press the MENU button to display the menu. Press the ▲ or ▼ button to select "Setup", then press the ENTER 2.
How to Enable/Disable the V-Chip 1. Press the MENU button to display the menu. Press the ▲ or ▼ button to select "Setup", then press the ENTER 2. Press the ▲ or ▼ button to select “V-Chip”, then press the ENTER The message “Enter PIN” will appear. Enter your 4 digit PIN number. button. TV button.
3. The “V-Chip” screen will appear. Press the ▲ or ▼ button to select “TV Parental Guidelines”, then press the ENTER button. TV V-Chip V-Chip Lock • • • • • • MPAA Rating ► Canadian English Canadian French ► ► Downloadable U.S. Rating Change PIN ► ► TV TV ALL FV V S Move 5. At this point, one of the TV-Ratings is selected. Press the ENTER button. Depending on your existing setup, the “ ” symbol will be selected.
How to Set up Restrictions Using the MPAA Ratings: G, PG, PG-13, R, NC-17, X, NR The MPAA rating system uses the Motion Picture Association of America (MPAA) system and its main application is for movies. When the V-Chip lock is on, the TV will automatically block any programs that are coded with objectionable ratings (either MPAA or TV-Ratings). 1. Press the MENU button to display the menu. Press the ▲ or ▼ button to select “Setup”, then press the ENTER 2.
How to Set up Restrictions Using the ‘Canadian English’ 1. Press the MENU button to display the menu. Press the ▲ or ▼ button to select “Setup”, then press the ENTER 2. Press the ▲ or ▼ button to select “V-Chip”, then press the ENTER The message “Enter PIN” will appear. Enter your 4 digit PIN number. button. TV button.
How to Set up Restrictions Using the ‘Canadian French’ 1. Press the MENU button to display the menu. Press the ▲ or ▼ button to select “Setup”, then press the ENTER 2. Press the ▲ or ▼ button to select “V-Chip”, then press the ENTER The message “Enter PIN” will appear. Enter your 4 digit PIN number. button. TV button.
Using the V-Chip for Digital channels Parental restriction information can be used while watching DTV channels. 1. Press the MENU button to display the menu. Press the ▲ or ▼ button to select “Setup”, then press the ENTER 2. Press the ▲ or ▼ button to select “V-Chip”, then press the ENTER The message “Enter PIN” will appear. Enter your 4 digit PIN number. TV button. button.
Viewing Closed Captions (On-Screen Text Messages) - Analog The Analog Caption function operates in either analog TV channel mode or when a signal is supplied from an external device to TV. (Depending on the broadcasting signal, the Analog Caption function may operate on digital channels.) 1. Press the MENU button to display the menu. Press the ▲ or ▼ button to select “Setup”, then press the ENTER button. 2. Press the ▲ or ▼ button to select “Caption”, then press the ENTER 3.
Viewing Closed Captions (On-Screen Text Messages) - Digital The Digital Captions function operates on digital channels. 1. Press the MENU button to display the menu. Press the ▲ or ▼ button to select “Setup”, then press the ENTER button. 2. Press the ▲ or ▼ button to select “Caption”, then press the ENTER 3. Press the ENTER button to select “Caption”. Press the ▲ or ▼ button to select “On”, then press the ENTER TV button.
Adjusting the TV On/Off Melody Sound A melody sound can be set to come on when the TV is powered On or Off. 1. Press the MENU button to display the menu. Press the ▲ or ▼ button to select "Setup", then press the ENTER button. 2. Press the ▲ or ▼ button to select "Melody", then press the ENTER TV button. Setup Plug & Play ► Language : English ► Time ► V-Chip Caption ► ► Melody Energy Saving ► ► : Medium : Off SW Upgrade ► Move Enter Return 3.
Upgrading the Software Samsung may offer upgrades for TV's firmware in the future. Please contact the Samsung call center at 1-800-SAMSUNG (726-7864) to receive information about downloading upgrades and using a USB drive. Upgrades will be possible by connecting a USB drive to the USB port located on your TV. 1. Insert a USB drive containing the firmware upgrade into the SERVICE port on the rear of the TV. TV Rear Panel USB Drive 2. Press the MENU button to display the menu.
Appendix Troubleshooting If the TV seems to have a problem, first try this list of possible problems and solutions. If none of these troubleshooting tips apply, call your nearest Samsung service center. Problem Possible Solution Poor picture Try another channel. Adjust the antenna. Check all wire connections. Poor sound quality. Try another channel. Adjust the antenna. No picture or sound. Try another channel. Press the SOURCE button. Make sure the TV is plugged in. Check the antenna connections.
Problem Possible Solution Horizontal bars appear to flicker, jitter or shimmer on the image. Adjust the Coarse tuning and then adjust the Fine tuning. Vertical bars appear to flicker, jitter or shimmer on the image. Adjust the Coarse tuning and then adjust the Fine tuning. Screen is black and power indicator light blinks steadily. On your computer check: Power, Signal Cable. The TV is using its power management system. Move the computer's mouse or press any key on the keyboard.
How to Adjust the Stand (LN19A650A1D) 1. P lace the front of the TV onto a soft cloth or cushion on a table as in Figure (1). - Align the TV bottom along the table edge. 2. P ress on the center of the TV back. Adjust the stand as in Figure (2) while pressing the button on the back of the stand. 3. P lace the TV on the table so that the TV sits safely on the table. Button (1) (2) How to Adjust the Angle of the TV (LN19A650A1D) ( 1 ) Angle adjustment when using the TV on its stand.
Installing the Stand 2 1 1. Connect your LCD TV and the stand. ➣ Two or more people should carry the TV. ➣ Make sure to distinguish between the front and back of the stand when assembling them. ➣ To make sure the TV is installed on the stand at a proper level, do not apply excess downward pressure to the upper left of right sides of the TV. 2. Fasten two screws at position 1 and then fasten two screw at position 2. ➣ Stand the product up and fasten the screws.
Wall Mount Kit Specifications (VESA) Install your wall mount on a solid wall perpendicular to the floor. When attaching to other building materials, please contact your nearest dealer. If installed on a ceiling or slanted wall, it may fall and result in severe personal injury. Product Family LCD-TV PDP-TV inches VESA Spec.
Using the Anti-Theft Kensington Lock The Kensington Lock is a device used to physically fix the system when using it in a public place. The locking device has to be purchased separately. The appearance and locking method may differ from the illustration depending on the manufacturer. Refer to the manual provided with the Kensington Lock for proper use. The locking device has to be purchased separately.
Specifications Model Name Screen Size (Diagonal) PC Resolution Sound Output Dimensions (WxDxH) Body With stand Weight With Stand Without stand Environmental Considerations Operating Temperature Operating Humidity Storage Temperature Storage Humidity Stand Swivel (Left / Right) LN19A650A1D LN22A650A1D 19 inches (18.9 inches measured diagonally) 22 inches (21.9 inches measured diagonally) 1440 x 900 @ 60 Hz 1680 x 1050 @ 60 Hz 3W x 2 3W x 2 18.9 X 2.3 X 14.0 inches (480.0 X 59.5 X 355.0 mm) 18.9 X 7.
This page is intentionally left blank. BN68-01541A.
Información importante sobre la garantía relativa al formato de visualización del televisor Las pantallas LCD con formato de pantalla panorámica (16:9, la relación de aspecto ancho:alto de la pantalla) están diseñadas principalmente para visualizar vídeos de movimiento de formato panorámico. Las imágenes deben estar principalmente en el formato panorámico de relación 16:9, o ampliadas para llenar la pantalla si el modelo tiene esta opción, y las imágenes están en movimiento constante.
Contenido Información General ■ ■ ■ ■ ■ ■ Listado de características................................................................ 2 Accesorios....................................................................................... 2 Aspecto general del panel de control............................................... 3 Aspecto general del panel de conexiones....................................... 4 Mando a distancia . .........................................................................
Información General Listado de características • • • • Valores ajustables de la imagen que se pueden almacenar en la memoria del televisor. emporizador automático para encender o apagar el televisor. T Temporizador de desconexión especial. Excelente interfaz digital y capacidad de trabajo en red: El sintonizador digital HD incorporado permite ver las emisiones HD que no exigen una suscripción sin que sea necesario disponer de un receptor de televisión por cable/satélite (decodificador).
Aspecto general del panel de control Botónes de la parte inferior derecha del panel Los botónes del panel inferior derecho controlan las funciones básicas del televisor, incluido el menú en pantalla. Para usar las funciones más avanzadas, debe usar el mando a distancia. 1 2 3 4 5 6 8 7 8 Botones del panel frontal Toque cada botón para activar la función. El color y la forma del producto pueden variar según el modelo.
Aspecto general del panel de conexiones Use los terminales del panel de conexión para conectar componentes de A/V que estarán disponibles permanentemente, como un vídeo o un reproductor de DVD. Si precisa información sobre la conexión de equipos, consulte las páginas 6 a 12. El color y la forma del producto pueden variar según el modelo. 1 AUDIO OUT Permite conectar las tomas de la entrada de audio del amplificador/sistema de Home Cinema.
Mando a distancia Puede utilizar el mando a una distancia de hasta 7 metros del televisor. 1 POWER Enciende o apaga el TV. 2 TV Selecciona directamente el modo TV. 3 BOTONES NUMÉRICOS Pulsar para cambiar el canal. 4 Pulse este botón para seleccionar canales adicionales (digitales y analógicos) emitidos por la misma emisora. Por ejemplo, para eleccionar el canal “54-3” pulse “54”, “ ” y “3”. 5 (MUTE) Pulse para desactivar momentáneamente el sonido.
Instalación de las pilas en el mando a distancia 1. Levante la tapa de la parte posterior del mando a distancia, como se muestra en la ilustración. 2. Coloque dos pilas de tamaño AAA. Compruebe que los extremos “+” y “-” de las pilas concuerdan con el diagrama del interior del compartimiento. 3. Vuelva a colocar la tapa. Si no va a usar el mando a distancia durante un largo período de tiempo, extraiga las pilas y guárdelas en un lugar fresco y seco.
Conexión de TV por cable Para conectar a un sistema de TV por cable, siga estas instrucciones. TV por cable sin decodificador 1. ANT IN Conecte el cable de entrada en el terminal de la antena ANT IN de la parte posterior del TV. ado que el TV está preparado para la televisión por cable, no se necesita un decodificador para ver D canales de cable no codificados. Conexión al decodificador que decodifica todos los canales 1. ANT IN Busque el cable conectado al terminal ANT OUT del decodificador.
Conexión de un reproductor de DVD o receptores de televisión por cable/satélite (decodificadores) a través de HDMI Solo es aplicable si hay un conector de salida de HDMI en el dispositivo externo. 1. onecte un cable HDMI C entre la toma HDMI/DVI IN del televisor y la toma HDMI del reproductor de DVD o receptor de televisión por cable/satélite (decodificador).
Conexión de un reproductor de DVD o receptores de televisión por cable/satélite (decodificadores) a través de los cables de componentes Las tomas del panel posterior del televisor facilitan la conexión de un reproductor de DVD o un receptor de televisión por cable/ satélite (decodificador) al TV. 1. Conecte un cable de componentes entre las tomas COMPONENT IN [Y, PB, PR] del televisor y las tomas COMPONENT [Y, PB, PR] del reproductor de DVD o receptor de televisión por cable/satélite (decodificador).
Conexión de un reproductor de vídeo Conexión de vídeo Estas instrucciones presuponen que ya ha conectado el TV a una antena o sistema de TV por cable (siguiendo las instrucciones de las páginas 6 a 7). Si aún no ha conectado el TV a una antena o un sistema de cable, sáltese el paso 1. 1. D esconecte el cable o la antena de la parte posterior del TV. ANT IN 2. C onecte el cable o la antena en el terminal ANT IN de la parte posterior del reproductor de vídeo. 3.
Conexión de un sistema de audio digital Las tomas del panel posterior del televisor facilitan la conexión de un sistema de audio digital (Home Cinema/Receptor) al televisor. 1. onecte un cable óptico C entre las tomas “DIGITAL AUDIO OUT (OPTICAL)” Salida de audio digital, óptica del televisor y las tomas Digital Audio Input Entrada de audio digital del sistema de audio digital.
Conexión a un PC Uso del cable D-Sub Panel posterior del TV 1. Conecte un cable D-Sub entre el conector PC IN [PC] del televisor y el conector de salida de PC del ordenador. 2. Conecte un cable de audio PC entre la toma PC IN [AUDIO] del televisor y la toma de salida de audio de la tarjeta de sonido del ordenador. PC 2 Cable de Audio de PC (No incluido) 1 Cable de D-Sub (No incluido) Uso del cable HDMI/DVI 1.
Funcionamiento Encendido o apagado del TV Pulse el botón POWER del mando a distancia. También puede usar el botón POWER del televisor. Función Plug & Play Plug & Play Cuando se enciende el televisor por primera vez, se configuran seguidos y automáticamente dos ajustes básicos del usuario. 1. Menu Language, Store Demo, Channels and Time will be set. ulse el botón POWER en el mando a distancia. P Aparece el mensaje “Menu Language, Store Demo, Channels and Time will be set.”.
Guardado automático Plug & Play La programmación automática ha finalizado. Se han memorizado 75 canales. DTV Aire : 24 Aire : 1 DTV Cable : 17 Cable : 33 Aceptar 6. ulse el botón ENTER . P Pulse los botón ▲ o ▼ para seleccionar “Auto” después, pulse el botón ENTER . Se muestra el mensaje “Configurar la hora de verano.”. Ingresar Omitir Plug & Play Configure el modo de Reloj. Modo Reloj : Si selecciona “Manual”, se muestra “Escriba la fecha y la hora.”.
Uso del botón “ El botón “ ” ” se utiliza para seleccionar emisoras que emitan con señal digital. 1. Por ejemplo, para seleccionar el canal 7-1, pulse 7, y 1. D indica que el televisor está recibiendo una señal digital de alta definición. SD H indica que el televisor está recibiendo una señal digital de definición estándar. ulse los botones numéricos y después el botón ENTER P rápidamente de canal. para cambiar Utilización del botón PRE-CH para seleccionar el canal anterior 1.
Uso del botón TOOLS Se puede usar el botón TOOLS para seleccionar rápida y fácilmente las funciones que se usan con más frecuencia. El menú “Herramientas” cambia según el modo de entrada externo que se está viendo. 1. Pulse el botón TOOLS. Aparece el menú “Herramientas”. 2. Pulse los botones ▲ o ▼ para seleccionar un menú. 3. Pulse los botones ▲/▼/◄/►/ENTER para ver, cambiar o usar las opciones seleccionadas. Para ver una descripción más detallada de cada función, consulte la página correspondiente.
Almacenamiento de los canales en la memoria (método automático) 1. ulse el botón MENU para visualizar el menú. P Pulse los botón ▲ o ▼ para seleccionar “Canal” y, después, pulse el botón ENTER . TV Canal Antenna : Aire Prog. Auto Borrar canal encriptado Lista de canales Nombre Sintonia Fina Intensidad señal 2. Pulse los botón ▲ o ▼ para seleccionar “Prog. Auto” y, después, pulse el botón ENTER . Mover 3.
Para seleccionar la fuente Úselo para seleccionar TV u otras fuentes de entrada externas como reproductores de DVD o receptores de cable y satélite (decodificadores), conectados al televisor. Permite seleccionar la fuente de entrada que se prefiera. 1. ulse el botón MENU para ver el menú en pantalla. P Pulse los botón ▲ o ▼ para seleccionar “Entrada” y, después, pulse el botón ENTER . 2. ulse el botón ENTER P para seleccionar “Lista de Origen”.
Control de la Imagen Cambio del formato de la imagen Puede seleccionar el tipo de imagen que mejor cumpla sus requisitos de visualización. TV Imagen 1. Pulse el botón MENU para ver el menú en pantalla. Pulse el botón ENTER para seleccionar “Imagen”. Modo Luz de fondo Contraste Brillo Definición Color Tinte V 50 ▼ Más Mover 2. ulse el botón ENTER P para seleccionar “Modo”. Pulse los botones ▲ o ▼ para seleccionar “Dinámico”, “Normal” o “Película”.
Activación de las opciones de la imagen Activación de las opciones de la imagen 1. Pulse el botón MENU para ver el menú en pantalla. Pulse el botón ENTER para seleccionar “Imagen”. 2. Pulse los botón ▲ o ▼ para seleccionar “Opciones de imagen” y, a continuación, pulse el botón ENTER . TV ➣ Pulse los botones ▲ o ▼ para seleccionar una opción concreta. Pulse el botón ENTER . ➣ Cuando esté satisfecho con los ajustes, pulse el botón ENTER Imagen ▲ Más Opciones de imagen Reiniciar : Aceptar ► ► .
➣ Puede producirse una retención temporal de imagen cuando se ve una imagen estática durante más de dos horas. TV Tamaño Ancho 16 : 9 Zoom1 Posición Zoom2 Ajuste ancho 4:3 Sólo buscar ➣ Después de seleccionar “Zoom1”, “Zoom2” o “Ajuste ancho”: Pulse los botones ◄ o ► para seleccionar “Posición” y, a continuación, pulse el botón ENTER . Utilice los botones ▲ o ▼ para desplazar la imagen hacia arriba o hacia abajo.
Configuración de la reducción digital de ruido Si la señal de emisión que recibe el televisor es débil, puede activarse la función de reducción digital del ruido (Digital Noise Reduction) para reducir la estática y las imágenes superpuestas que pueden aparecer en la pantalla. TV 1. Sigas las instrucciones 1 y 2 de “Activación de las opciones de la imagen”. (Consulte la página 20) 2. Pulse los botón ▲ o ▼ para seleccionar "Digital NR" y, a continuación, pulse el botón ENTER . 3.
Reajuste de valores de la imagen a los valores predefinidos de fábrica 1. Pulse el botón MENU para ver el menú en pantalla. Pulse el botón ENTER para seleccionar “Imagen”. 2. ulse los botón ▲ o ▼ para seleccionar “Reiniciar” y, después, pulse el botón P ENTER . Pulse los botón ▲ o ▼ para seleccionar “Aceptar” o “Cancelar”. Pulse el botón ENTER . TV Imagen ▲ Más Opciones de imagen Reiniciar : Aceptar Aceptar Cancelar Pulse el botón EXIT para salir. Se puede restaurar cada modo.
Control de Sonido Cambio del estándar de sonido Puede seleccionar el modo de sonido que mejor se ajuste al programa que está viendo. 1. P ulse el botón MENU para ver el menú en pantalla. Pulse los botón ▲ o ▼ para seleccionar “Sonido” y, después, pulse el botón ENTER . TV Sonido Modo : Favorito Ecualizador Trusurround SRS XT : Apagado Opc. Multi-track Vol.Auto : Apagado Altavoz TV : Encendido Mover 2. P ulse el botón ENTER para seleccionar “Modo”.
Configuración del TruSurround XT (SRS TS XT) TruSurround XT es una tecnología SRS patentada que solventa el problema de reproducir contenido multicanal 5.1 en dos altavoces. Trusurround proporciona una experiencia de sonido virtual convincente a través de cualquier sistema de reproducción con dos altavoces. Es totalmente compatible con todos los formatos multicanal. TV Sonido 1. Pulse el botón MENU para ver el menú en pantalla.
Selección de una pista de sonido multicanal (MTS) - Analógico Sonido multi-track 1. ulse el botón MENU para ver el menú en pantalla. P Pulse los botón ▲ o ▼ para seleccionar “Sonido” y, después, pulse el botón ENTER . 2. ulse los botón ▲ o ▼ para seleccionar “Opc. Multi-track” y, después, pulse el P botón ENTER . 3. ulse los botón ▲ o ▼ para seleccionar “Sonido Multi-track” y, después, pulse el P botón ENTER . TV Opc.
Encendido/apagado del altavoz del televisor Se silencia la salida de sonido desde los altavoces del televisor. 1. Pulse el botón MENU para ver el menú en pantalla. Pulse los botón ▲ o ▼ para seleccionar “Sonido” y, después, pulse el botón ENTER . 2. TV Sonido Modo : Favorito Ecualizador Trusurround SRS XT : Apagado Opc. Multi-track Vol.Auto : Apagado Altavoz TV : Encendido ulse los botón ▲ o ▼ para seleccionar “Altavoz TV” y, después, pulse el botón P ENTER . Mover 3.
Control de los Canales Supresión de los canales codificados digitales La función Borrar canales codificados se usa para filtrar los canales codificados después de realizar una búsqueda automática. Puede tardar de 20 a 30 minutos. 1. Pulse el botón MENU para ver el menú. Pulse los botón ▲ o ▼ para seleccionar “Canal” y pulse el botón ENTER TV . 2. Pulse los botón ▲ o ▼ para seleccionar “Borrar canal encriptado” y pulse el botón ENTER . Busca los canales codificados para borrarlos de la lista.
Adición y supresión de canales Con este menú puede agregar y borrar los canales o configurarlos como favoritos y usar la guía de programas de las emisoras digitales. Para usar la función Lista de canales, primero debe ejecutar "Prog. Auto" (Consulte la página 17). 1. 2. ulse el botón MENU para ver el menú en pantalla. P Pulse los botón ▲ o ▼ para seleccionar “Canal” y, después, pulse el botón ENTER . TV Canal Antenna : Cable Prog.
Para configurar los canales favoritos Puede configurar como favoritos los canales que vea con más frecuencia. TV 1. Pulse el botón MENU para ver el menú en pantalla. Pulse los botón ▲ o ▼ para seleccionar “Canal” y, después, pulse el botón ENTER . Canal Antenna : Cable Prog. Auto Borrar canal encriptado Lista de canales Nombre Sintonia Fina Intensidad señal 2. Pulse los botón ▲ o ▼ para seleccionar “Lista de canales” y, después, pulse el botón ENTER . Mover 3.
Visualización de la lista de canales Puede mostrar una lista de todos los canales, de los agregados o favoritos. 1. Pulse el botón MENU para ver el menú en pantalla. Pulse los botón ▲ o ▼ para seleccionar “Canal” y, después, pulse el botón ENTER . TV Canal Antenna : Cable Prog. Auto Borrar canal encriptado Lista de canales Nombre Sintonia Fina Intensidad señal 2. Pulse los botón ▲ o ▼ para seleccionar “Lista de canales” y, después, pulse el botón ENTER . Mover TV 3.
Etiquetado de canales Los canales se pueden etiquetar con el propósito de que cuando éstos se seleccionan se pueda ver su nombre. 1. ulse el botón MENU para ver el menú en pantalla. P Pulse los botón ▲ o ▼ para seleccionar “Canal” y, después, pulse el botón ENTER . Pulse los botón ▲ o ▼ para seleccionar “Nombre” y, después, pulse el botón ENTER . TV Canal Antenna : Air Prog. Auto Borrar canal encriptado Lista de canales Nombre Sintonia Fina Intensidad señal Mover 2.
Sintonización fina de los canales analógicos Utilice la sintonización fina para ajustar manualmente un determinado canal a fin de que la recepción sea óptima. 1. 2. ulse el botón MENU para ver el menú en pantalla. P Pulse los botón ▲ o ▼ para seleccionar “Canal” y, después, pulse el botón ENTER . TV Canal Antenna : Aire Prog.
Pantalla de PC Uso del TV como pantalla de ordenador (PC) Instalación del software en el equipo (según Windows XP) A continuación se muestra una pantalla de configuración normal en un ordenador con Windows. No obstante, las pantallas reales en su PC probablemente serán diferentes, en función de su versión concreta de Windows y de su tarjeta de vídeo. Pero aunque las pantallas reales tengan un aspecto diferente, se aplicarán los mismos ajustes básicos e información en la mayoría de los casos.
Ajuste del televisor con el ordenador Cómo realizar el Ajuste automático Mediante la función Ajuste Automático se puede establecer que el televisor se ajuste automáticamente de acuerdo con las señales de vídeo que reciba. La función también ajusta automáticamente con más configuración y ajusta los valores y las posiciones de la frecuencia. Esta función no está disponible en el modo DVI-Digital. Preselección: Pulse el botón SOURCE para seleccionar el modo PC. TV 1. 2.
Cambio de la posición de la pantalla Ajuste la posición de la pantalla del PC si no se acopla a la pantalla del TV. Preselección: Pulse el botón SOURCE para seleccionar el modo PC. 1. PC Pantalla Reiniciar Imagen ► Posición ► Reiniciar Imagen Resolución : 1360x768 @60Hz ulse el botón MENU para ver el menú en pantalla. P Pulse los botón ▲ o ▼ para seleccionar “Imagen” y, después, pulse el botón ENTER . Pulse los botón ▲ o ▼ para seleccionar “Pantalla” y, después, pulse el botón ENTER .
Ajuste de la Hora Configuración del Reloj Establecer el reloj es necesario para usar las distintas características de temporizador del TV. Además, puede comprobar la hora mientras está viendo el TV. (Simplemente pulse INFO.) Opción 1: Ajuste manual del reloj 1. P ulse el botón MENU para ver el menú en pantalla. Pulse los botón ▲ o ▼ para seleccionar “Configuración” y, después, pulse el botón ENTER . Pulse los botón ▲ o ▼ para seleccionar “Tiempo” y, después, pulse el botón ENTER .
Opción 2: Ajuste automático del reloj El reloj puede ajustarse automáticamente cuando se recibe una señal digital. 1. P ulse el botón MENU para ver el menú en pantalla. Pulse los botón ▲ o ▼ para seleccionar “Configuración” y, después, pulse el botón ENTER . Pulse los botón ▲ o ▼ para seleccionar “Tiempo” y, después, pulse el botón ENTER .
Configuración del Temporizador de sueño El temporizador de desconexión apaga automáticamente el televisor después de un período prefijado (entre 30, 60, 90, 120, 150 y 180 minutos). 1. ulse el botón MENU para ver el menú en pantalla. P Pulse los botón ▲ o ▼ para seleccionar “Configuración” y, después, pulse el botón ENTER . Pulse los botón ▲ o ▼ para seleccionar “Tiempo” y, después, pulse el botón ENTER . 2. ulse los botón ▲ o ▼ para seleccionar “Temporizador” y, después, pulse el botón P ENTER . 3.
Activación y desactivación del temporizador 1. 2. ulse el botón MENU para ver el menú en pantalla. P Pulse los botón ▲ o ▼ para seleccionar “Configuración” y, después, pulse el botón ENTER . Pulse los botón ▲ o ▼ para seleccionar “Tiempo” y, después, pulse el botón ENTER . a activación y desactivación del temporizador se puede configurar de tres L maneras.
Uso de V-Chip La función V-Chip bloquea automáticamente la programación que se considera inadecuada para los niños. El usuario debe introducir primero un código PIN (número de identificación personal) antes de establecer o cambiar las restricciones de V-Chip. La función “V-Chip” no está disponible en los modos HDMI, componente o PC. Ajuste del número de identificación personal (código PIN) 1. P ulse el botón MENU para ver el menú en pantalla.
Cómo activar/desactivar V-Chip 1. P ulse el botón MENU para ver el menú en pantalla. Pulse los botón ▲ o ▼ para seleccionar “Configuración” y, después, pulse el botón ENTER . TV 2. P ulse los botón ▲ o ▼ para seleccionar “V-Chip” y, después, pulse el botón ENTER . Aparecerá el mensaje “Ingresar Código”. Escriba su código PIN de 4 dígitos.
3. A parecerá la pantalla “V-Chip”. Pulse los botón ▲ o ▼ para seleccionar “Guías para el control paterno de TV” y, después, pulse el botón ENTER . TV V-Chip Bloqueo V-Chip : Encendido Guías para el control paterno de TV ► ► Clas. MPAA ► Inglés Canadiense ► Francés Canadiense Clasificación U.S. Descargable ► ► Cambiar Código ► Mover 4. A parecerá la pantalla “Guías para el control paterno de TV”.
Configuración de las restricciones mediante las clasificaciones MPAA: G, PG, PG-13, R, NC-17, X, NR El sistema de clasificación MPAA utiliza el sistema de la MPAA (Motion Picture Association of America, Asociación americana de cinematografía) que se aplica principalmente en las películas. Si el bloqueo de V-Chip está activado, el televisor bloqueará automáticamente programas que estén codificados con clasificaciones rechazables (de la MPAA o de televisión). 1.
Cómo configurar las restricciones en el idioma ‘Inglés Canadiense’ 1. P ulse el botón MENU para ver el menú en pantalla. Pulse los botón ▲ o ▼ para seleccionar “Configuración” y, después, pulse el botón ENTER . TV 2. P ulse los botón ▲ o ▼ para seleccionar “V-Chip” y, después, pulse el botón ENTER . Aparecerá el mensaje “Ingresar Código”. Escriba su código PIN de 4 dígitos.
Cómo configurar las restricciones en el idioma ‘Francés Canadiense’ 1. P ulse el botón MENU para ver el menú en pantalla. Pulse los botón ▲ o ▼ para seleccionar “Configuración” y, después, pulse el botón ENTER . TV 2. P ulse los botón ▲ o ▼ para seleccionar “V-Chip” y, después, pulse el botón ENTER . Aparecerá el mensaje “Ingresar Código”. Escriba su código PIN de 4 dígitos.
Uso de V-Chip con los canales digitales La información de la restricción de bloqueo se puede usar mientras se ven los canales DTV. 1. P ulse el botón MENU para ver el menú en pantalla. Pulse los botón ▲ o ▼ para seleccionar “Configuración” y, después, pulse el botón ENTER . TV 2. P ulse los botón ▲ o ▼ para seleccionar “V-Chip” y, después, pulse el botón ENTER . Aparecerá el mensaje “Ingresar Código”. Escriba su código PIN de 4 dígitos.
Visión de subtítulos (mensajes de texto en pantalla) - Analógico La función de subtítulo analógico funciona tanto en el modo de canal de televisión analógica como cuando el televisor recibe una señal de un dispositivo externo. (Dependiendo de la señal de transmisión, puede funcionar en canales digitales.) 1. 2. 3. ulse el botón MENU para ver el menú en pantalla. P Pulse los botón ▲ o ▼ para seleccionar “Configuración” y, después, pulse el botón ENTER .
Visión de subtítulos (mensajes de texto en pantalla) - Digital La función Subtítulo digital funciona en canales digitales. 1. ulse el botón MENU para ver el menú en pantalla. P Pulse los botón ▲ o ▼ para seleccionar “Configuración” y, después, pulse el botón ENTER . 2. ulse los botón ▲ o ▼ para seleccionar “Subtítulo” y, después, pulse el botón P ENTER . 3. ulse el botón ENTER P para seleccionar “Subtítulo”. Pulse los botón ▲ o ▼ para seleccionar “Encendido” y, después, pulse el botón ENTER . 4.
Ajuste de la melodía de encendido y apagado del televisor Puede definirse un sonido de melodía para que suene cuando se encienda o se apague el TV. TV 1. Pulse el botón MENU para ver el menú en pantalla. Pulse los botón ▲ o ▼ para seleccionar “Configuración” y, a continuación, pulse el botón ENTER . 2. Pulse los botón ▲ o ▼ para seleccionar “Melody” y, a continuación, pulse el botón ENTER . 3.
Guía de actualización del software Samsung puede ofrecer actualizaciones para el firmware del televisor en el futuro. Póngase en contacto con el centro de llamadas de Samsung en 1-800-SAMSUNG(726-7864) para recibir información acerca de la descarga de las actualizaciones y del uso de un controlador USB. Las actualizaciones se pueden realizar conectando una unidad USB al puerto USB situado en el televisor. 1.
Apéndice Identificación de problemas Si parece que el TV no funciona correctamente, en primer lugar compruebe esta lista de posibles problemas y soluciones. Si no funciona ninguno de estos consejos, llame al centro de servicio más cercano. Problema Posible Solución Imagen deficiente. Intente sintonizar otro canal. Ajuste la antena. Compruebe las conexiones de todos los cables. Calidad de sonido deficiente. Intente sintonizar otro canal. Ajuste la antena. No hay imagen o sonido.
Problema Posible Solución Unas barras horizontales parpadean, tiemblan u oscilan en la imagen. Ajuste la función Grueso y después ajuste la función Fino. Unas barras verticales parpadean, tiemblan u oscilan en la imagen. Ajuste la función Grueso y después ajuste la función Fino. La pantalla está negra y el indicador luminoso de alimentación parpadea constantemente. Compruebe lo siguiente en el equipo: Alimentación, Cable de señal. El TV utiliza su sistema de gestión de energía.
Cómo ajustar el soporte (LN19A650A1D) Botón (1) (2) 1. C oloque el frontal del televisor sobre un paño suave o una almohadilla encima de una mesa tal como se muestra en la figura (1). - Alinee la parte inferior del televisor con el borde de la mesa. 2. P resione el centro de la parte posterior del televisor. Ajuste el soporte como se indica en la figura (2) mientras pulsa el botón que se encuentra en la parte posterior del soporte. 3.
Instalación del soporte 2 1 1. Acople el TV LCD al soporte. ➣ El televisor lo deben transportar dos o más personas. ➣ Cuando monte el soporte debe distinguir entre la parte frontal y la posterior del soporte. ➣ Para asegurarse de que instala el televisor en el soporte al nivel adecuado, no aplique una presión excesiva en la parte superior izquierda y derecha del televisor. 2. Apriete dos tornillos en la posición 1 y, a continuación, apriete dos en la posición 2.
Especificaciones del equipo de montaje en la pared (VESA) Instale el montaje mural en una pared sólida, perpendicular al suelo. Para colocarlo en otros materiales de construcción, póngase en contacto con el distribuidor más cercano. Si se instala en el techo o en una pared inclinada, puede caerse y causar graves lesiones personales.
Uso del cierre antirrobo kensington El bloqueo Kensington es un dispositivo que se usa para fijar físicamente el sistema cuando se usa en un lugar público. El dispositivo de bloqueo debe adquirirse por separado. La apariencia y el método de bloqueo pueden diferir de la ilustración según los fabricantes. Consulte el manual que acompaña al bloqueo Kensington para utilizarlo correctamente. El dispositivo de bloqueo debe adquirirse por separado.
Especificaciones Nombre del Modelo LN19A650A1D LN22A650A1D Tamaño de pantalla (Diagonal) 19 pulgadas (18,9 pulgadas medidas diagonalmente) 22 pulgadas (21,9 pulgadas medidas diagonalmente) 1440 x 900 @ 60 Hz 1680 x 1050 @ 60 Hz 3W x 2 3W x 2 18.9 X 2.3 X 14.0 pulgadas (480.0 X 59.5 X 355.0 mm) 18.9 X 7.1 X 15.6 pulgadas (480.0 X 180.2 X 396.0 mm) 22.1 X 2.7 X 15.9 pulgadas (562.4 X 68.5 X 402.6 mm) 22.1 X 8.5 X 16.7 pulgadas (562.4 X 216.0 X 425.2 mm) 12.3lbs (5.6 kg) 11.2lbs (5.1 kg) 15.
Esta pagina se ha dejado en blanco expresamente. BN68-01541A.