Quick Setup Guide STOP LN1 B 0/LN B 0 Please do not return this unit If you are having problems operating this TV, Please call; 1- 00-SAMSUNG (1- 00- - ) For web support please visit www.samsung.com/support 1-800-SAMSUNG (7267864) Samsung Electronics America, Inc. 105 Challenger Road Ridgefield Park, NJ 07660-0511 Samsung Electronics Canada Inc., Customer Service 55 Standish Court Mississauga, Ontario L5R 4B2 Call center hours of operation (Mon-Sun 9AM-12AM EST).
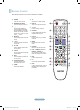
Remote Control See “Remote Control” in the owner’s instructions for details. 1 POWER Turns the TV on and off. ! TV Selects the TV mode directly. 2 NUMERIC BUTTONS Press to change the channel. @ PRE.CH Tunes to the previous channel. 3 _ Press to select additional channels (digital and analog) being broadcast by the same station. For example, to select channel ‘54-3’, press ‘54’, then press ‘_’ and ‘3’. # z Press to change channels. 4 MUTE M Press to temporarily cut off the sound. % FAV.
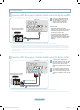
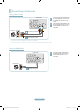
Connections Connecting a DVD / Blu-ray player / Cable Box / Satellite receiver (Set-Top Box) via HDMI TV Rear Panel 1 Connect an HDMI Cable between the HDMI (DVI) IN jack on the TV and the HDMI jack on the DVD / Blu-ray Player or Cable Box / Satellite receiver (Set-Top Box). What is HDMI? • HDMI(High-Definition Multimedia Interface), is an interface that enables the transmission of digital audio and video signals using a single cable.
Connecting a DVD / Blu-ray player / Cable Box / Satellite receiver (Set-Top Box) via Component cables TV Rear Panel DVD / Blu-ray player / Cable Box / Satellite receiver (Set-Top Box) 1 Component Cable (Not supplied) 2 Audio Cable (Not supplied) 1 Connect a Component Cable between the COMPONENT IN [Y, PB, PR] jacks on the TV and the COMPONENT [Y, PB, PR] jacks on the DVD / Blu-ray player / Cable Box / Satellite receiver (Set-Top Box).
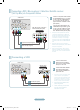
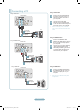
Connecting a Digital Audio System 1 TV Rear Panel Digital Audio System 1 Connect an Optical Cable between the DIGITAL AUDIO OUT (OPTICAL) jacks on the TV and the Digital Audio Input jacks on the Digital Audio System. Optical Cable (Not supplied) ➣ When a Digital Audio System is connected to the DIGITAL AUDIO OUT (OPTICAL) jack: Decrease the volume of the TV and adjust the volume level with the system’s volume control. ➣ 5.
Connecting a Camcorder Using a Video Cable TV Side Panel Camcorder 2 Audio Cable (Not supplied) 1 Video Cable (Not supplied 1 Connect a Video Cable between the AV IN [VIDEO] jack on the TV and the VIDEO OUT jack on the camcorder. 2 Connect Audio Cables between the AV IN [R-AUDIO-L] jacks on the TV and the AUDIO OUT jacks on the camcorder. ➣ Each Camcorder has a different back panel configuration. ➣ When connecting a Camcorder, match the color of the connection terminal to the cable.
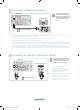
Connecting a PC Using a D-Sub Cable Using a D-Sub Cable TV Rear Panel 1 2 D-Sub Cable (Not supplied) 1 Connect a D-Sub Cable between PC IN [PC] connector on the TV and the PC output connector on your computer. 2 Connect a PC Audio Cable between the PC IN [AUDIO] jack on the TV and the Audio Out jack of the sound card on your computer. ➣ When connecting a PC, match the color of the connection terminal to the cable.
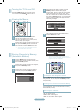
Turning the TV On and Off 4 Press the POWER button on the remote control. You can also use the POWER button on the TV. Viewing the Menus When selecting the Cable TV system: Press the ENTERE button to start the auto program. Press the ▲,▼, ◄ or ► to select the correct analog signal cable system source among “STD”, “HRC”, and “IRC”. Press the ▲ or ▼ button to select “Start”, then press the ENTERE button. If you have Digital cable TV, select the cable system signal source for both Analog and Digital.
Setting the Channel List Changing the Picture Standard You can delete or add a channel to display the channels you want. You can select the type of picture which best corresponds to your viewing requirements. Press the MENU button. Press the ▲ or ▼ button to select “Channel”, then press the ENTERE button. Press the ▲ or ▼ button to select “Channel List”, then press the ENTERE button. 2 Press the ◄ button to select “Added Channels”. Press the ▲ or ▼ button to select “All Channels”.
Customizing the Picture Settings Setting the Screen Size Your television has several setting options that allow you to control the picture quality. Occasionally, you may want to change the size of the image on your screen. Your TV comes with six screen size options, each designed to work best with specific types of video input. Your cable box or satellite receiver may have its own set of screen sizes as well. In general, though, you should view the TV in 16:9 mode as much as possible.
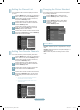
To Select the Source TV AV ---- Component ---- PC ---- HDMI/DVI ---- T Tools Press the SOURCE button on the Remote Control You can select the TV mode or an input source connected to the TV set. Use this button to choose an input source that you would like to watch. ➣ Available signal sources: TV / AV / Component / PC / HDMI/DVI ➣ You can choose only those external devices that are connected to the TV. In the “Source List”, connected inputs will be highlighted and sorted to the top.
Troubleshooting If the TV seems to have a problem, first try this list of possible problems and solutions. If none of these troubleshooting tips apply, please visit Samsung.com or contact the Samsung call center at 1-800-SAMSUNG (726-7864). Problem Possible Solution Poor picture Try another channel. / Adjust the antenna. / Check all wire connections. Poor sound quality. Try another channel. / Adjust the antenna. No picture or sound. Try another channel. / Press the SOURCE button.
Guide d'installation rapide STOP LN1 B 0/LN B 0 Veuillez SVP ne pas retourner cet appareil. En cas de problèmes de fonctionnement, veuillez composer le numéro suivant : 1- 00-SAMSUNG (1- 00- - ) Pour obtenir de l’assistance en ligne, allez au lien suivant : www.samsung.com/support 1-800-SAMSUNG (7267864) Samsung Electronics America, Inc. 105 Challenger Road Ridgefield Park, NJ 07660-0511 Samsung Electronics Canada Inc.
Télécommande Reportez-vous à la section "Télécommande" du guide de l’utilisateur pour plus de détails. 1 POWER Permet de mettre le téléviseur sous tension et hors tension. @ PRE.CH Permet de revenir au canal écouté précédemment. 2 TOUCHES NUMÉRIQUES Ces touches servent à changer de canal. # z Appuyez sur cette touche pour changer de canal.
Conexions Branchement d’un lecteur DVD / Blu-ray / câblosélecteur ou récepteur satellite (boîtier décodeur) via HDMI Panneau arrière du téléviseur 1 Branchez un câble HDMI entre la prise HDMI (DVI) IN du téléviseur et la prise HDMI du lecteur DVD / Blu-ray / câblosélecteur ou récepteur satellite (boîtier décodeur). Qu'est-ce que le mode HDMI? • HDMI ou (High-Definition Multimedia Interface) est une interface permettant la transmission de signaux numériques audio et vidéo à l'aide d'un seul câble.
Branchement d’un lecteur DVD / Blu-ray / câblosélecteur ou récepteur satellite (boîtier décodeur) via les câbles de composantes Panneau arrière du téléviseur Panneau arrière d’un lecteur DVD/Blu-ray, câblosélecteur ou récepteur satellite (boîtier décodeur) 1 Câble de composante (non fourni) 2 Câble audio (non fourni) 1 Branchez un câble de composant entre les prises COMPONENT IN [Y, PB, PR] du téléviseur et les prises COMPONENT [Y, PB, PR] du lecteur DVD / Blu-ray / câblosélecteur ou récepteur satell
Connexion d'une chaîne audio numérique 1 TV Rear Panel Chaîne audio numérique 1 Branchez un câble optique entre les prises DIGITAL AUDIO OUT (OPTICAL) du téléviseur et les prises d'entrée audio numérique de la chaîne. Câble optique (non fourni) ➣ Lorsqu’une chaîne audionumérique est branchée à la prise DIGITAL AUDIO OUT (OPTICAL) : baissez le volume du téléviseur, puis réglez le volume à l'aide de la commande de volume de la chaîne. ➣ La diffusion audio en 5.
Connexion d'un caméscope Utilisation d’un câble vidéo Panneau arrière du téléviseur Caméscope 2 Câble audio (non fourni) 1 Câble vidéo (non fourni) 1 Branchez un câble vidéo entre la prise AV IN [VIDEO] du téléviseur et la prise VIDEO OUT du caméscope. 2 Branchez les câbles audio entre les prises AV IN [R-AUDIO-L] du téléviseur et les prises AUDIO OUT du caméscope. ➣ La configuration arrière de chaque caméscope est différente suivant les appareils.
Connexion d'un PC Utilisation d’un câble secondaire D Utilisation d’un câble secondaire D Panneau arrière du téléviseur 1 2 Câble secondaire D (non fourni) 1 Branchez un câble secondaire D entre le connecteur PC IN [PC] du téléviseur et le connecteur de sortie PC de votre ordinateur. 2 Branchez un câble audio PC entre la prise PC IN [AUDIO] du téléviseur et la prise de sortie audio de la carte son de l'ordinateur.
Mise en marche et arrêt de la télévision Appuyez sur le bouton POWERP de la télécommande. Il est aussi possible d’utiliser la touche POWERP du téléviseur. 4 Au moment de la sélection du système de télévision par Câble : Appuyez sur ENTERE pour amorcer la mémorisation automatique. Appuyer sur les touches ▲,▼, ◄ ou ► pour choisir la source du signal analogique appropriée “STD”, “HRC”, ou “IRC”. Appuyer sur la touche ▲ ou ▼ pour sélectionner “Démarrer”, puis sur ENTERE.
Réglage de la liste de canaux Changement du format normal de l’image Il est possible d’ajouter ou de supprimer un canal pour afficher seulement les canaux désirés. Il est possible de choisir le type d’image qui correspond le plus à ses exigences. 1 Appuyez sur le bouton MENU. Appuyez sur les bouton ▲ ou ▼ pour sélectionner “Chaîne”, puis appuyez sur le bouton ENTERE. Appuyez sur les bouton ▲ ou ▼ pour sélectionner “Liste des canaux”, puis appuyez sur le bouton ENTERE.
Personnalisation des réglages de l’image Réglage du format de l’image Le téléviseur offre plusieurs options de réglage de la qualité de l’image. Vous pouvez parfois modifier la taille de l’image sur votre écran. Six tailles d’écran différentes sont disponibles pour votre téléviseur, chacune conçue pour fonctionner au mieux avec des types d’entrées vidéo spécifiques. Votre décodeur Câble ou votre récepteur satellite peut également disposer de ses propres tailles d’écran.
Pour sélectionner la source TV AV ---- Composante ---- PC ---- HDMI1/DVI ---- Rafraîchir T Outils Appuyez sur la touche SOURCE de la télécommande. Vous pouvez sélectionner le mode TV ou une source d’entrée branchée au téléviseur. Cette touche permet de choisir la source d’entrée désirée. ➣ Sources de signal accessibles : TV / AV / Composante / PC / HDMI/DVI ➣ Vous pouvez sélectionner uniquement les appareils externes déjà branchés sur le téléviseur.
Identification des problèmes Le tableau ci-dessous dresse la liste des problèmes courants et suggère des solutions. Si aucun de ces conseils ne permet de corriger le problème, communiquer avec le service à la clientèle de Samsung en composant le 1-800-SAMSUNG. Problème Solution possible Image de qualité médiocre. Essayez une autre canal. / Réglez l’antenne. / Vérifiez tous les branchements. Son de qualité médiocre. Essayez une autre canal. / Réglez l’antenne. Aucune image ou aucun son.
Cette page est laissée intentionnellement en blanc. QSG_650_BN68-02150A_00L02.
Contact SAMSUNG WORLDWIDE If you have any questions or comments relating to Samsung products, please contact the SAMSUNG customer care center. Comment contacter Samsung dans le monde Si vous avez des suggestions ou des questions concernant les produits Samsung, veuillez contacter le Service Consommateurs Samsung. Country Customer Care Center Web Site CANADA 1-800-SAMSUNG(726-7864) www.samsung.com/ca U.S.A 1-800-SAMSUNG(726-7864) www.samsung.com Address Samsung Electronics Canada Inc.