Contact SAMSUNG WORLDWIDE If you have any questions or comments relating to Samsung products, please contact the SAMSUNG customer care center. Comuníquese con SAMSUNG WORLDWIDE Si desea formular alguna pregunta o comentario en relación con los productos de Samsung, comuníquese con el centro de atención al cliente de SAMSUNG. Country CANADA U.S.A Customer Care Center 1-800-SAMSUNG(726-7864) 1-800-SAMSUNG(726-7864) Web Site www.samsung.com/ca www.samsung.
❑ Important Warranty Information Regarding Television Format Viewing N See the warranty card for more information on warranty terms. Wide screen format LCD Displays (16:9, the aspect ratio of the screen width to height) are primarily designed to view wide screen format full-motion video. The images displayed on them should primarily be in the wide screen 16:9 ratio format, or expanded to fill the screen if your model offers this feature and the images are constantly moving.
English Contents General Information Channel Control ■ List of Features......................................................................2 ■ Accessories...........................................................................2 ■ Viewing the Control Panel.....................................................3 ■ Viewing the Connection Panel...............................................4 ■ Remote Control.....................................................................
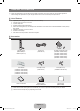
General Information N Figures and illustrations in this User Manual are provided for reference only and may differ from actual product appearance. Product design and specifications may be changed without notice in order to enhance product performance. ¦ List of Features ● ● ● ● ● Adjustable picture settings that can be stored in the TV’s memory. Automatic timer to turn the TV on and off. A special sleep timer.
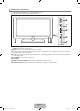
¦ Viewing the Control Panel N The product color and shape may vary depending on the model. N You can use a button by pressing the side panel buttons. 1 2 3 4 5 6 8 76 1 SOURCEE: Toggles between all the available input sources. In the on-screen menu, use this button as you use the ENTERE button on the remote control. 2 MENU: Press to see an on-screen menu of your TV’s features. 3 y: Press to increase or decrease the volume.
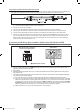
¦ Viewing the Connection Panel LN52B530 [TV Rear Panel] [TV Side Panel] 1 1 # # 1 1 3 34 45 ! ! 0 65 6 7 7 0 9 9 8 8 8 8 LN32B530, LN37B530, LN40B530, LN46B530 [TV Rear Panel] 0 0 @ 2 4 2 @ 54 $ 3 $ 9 56 7 3 9 6 7 N The product color and shape may vary depending on the model. English - BN68-01883A-01Eng.
1 HDMI IN 1, 2, 3 / DVI IN(HDMI1) [R-AUDIO-L] (LN52B530) – Connects to the HDMI jack of a device with an HDMI output. N No sound connection is needed for an HDMI to HDMI connection. N Use the HDMI IN 1 jack for DVI connection to an external device. Use a DVI to HDMI cable or DVI-HDMI adapter (DVI to HDMI) for video connection and the DVI IN (HDMI1) [R-AUDIO-L] jacks for audio. N When using an HDMI/DVI cable connection, you must use the HDMI IN 1 jack. N You can also use the ports to connect to a PC.
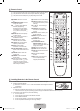
¦ Remote Control N You can use the remote control up to a distance of about 23 feet from the TV. N The performance of the remote control may be affected by bright light. N The product color and shape may vary depending on the model. 1 POWER: Turns the TV on and off. 2 NUMERIC BUTTONS: Press to change the channel. 3 _: Press to select additional channels (digital) being broadcast by the same station. For example, to select channel ‘54-3’, press ‘54’, then press _ and ‘3’.
Connections (LN32B530, LN37B530, LN40B530, LN46B530) ¦ Connecting VHF and UHF Antennas If your antenna has a set of leads that look like the diagram to the right, see ‘Antennas with 300 Ω Flat Twin Leads’ below. If your antenna has one lead that looks like the diagram to the right, see ‘Antennas with 75 Ω Round Leads’. If you have two antennas, see ‘Separate VHF and UHF Antennas’.
Connecting to a Cable Box that Descrambles Some Channels If your cable box descrambles only some channels (such as premium channels), follow the instructions below. You will need a twoway splitter, an RF (A/B) switch and four lengths of RF cable. (These items are available at most electronics stores.) ANT IN Incoming cable TV Rear Splitter RF (A/B) Switch Cable Box 1. Find and disconnect the cable that is connected to the ANT IN terminal on your cable box.
¦ Connecting a DVD / Blu-ray player / Cable Box / Satellite receiver (Set-Top Box) via DVI This connection can only be made if there is a DVI Output connector on the external device. TV Rear Panel DVD / Blu-ray player / Cable Box / Satellite receiver (Set-Top Box) 2 Audio Cable (Not supplied) 1 DVI to HDMI Cable (Not supplied) 1.
¦ Connecting a VCR TV Rear Panel VCR Rear Panel 2 Audio Cable (Not supplied) 1 Video Cable (Not supplied) 1. Connect a Video Cable between the AV IN [VIDEO] jack on the TV and the VIDEO OUT jack on the VCR. 2. Connect Audio Cables between the AV IN [R-AUDIO-L] jacks on the TV and the AUDIO OUT jacks on the VCR. N If you have a ‘mono’ (non-stereo) VCR, use a Y-connector (not supplied) to connect to the right and left audio input jacks of the TV. Alternatively, connect the cable to the ‘R’ jack.
¦ Connecting an Amplifier / DVD Home Theater TV Rear Panel Amplifier/DVD Home Theater 1 Audio Cable (Not supplied) 1. Connect Audio Cables between the AUDIO OUT [R-AUDIO-L] jacks on the TV and Audio Input jacks on the Amplifier / DVD Home Theater. N When an audio amplifier is connected to the AUDIO OUT [R-AUDIO-L] jacks: Decrease the volume of the TV and adjust the volume level with the Amplifier’s volume control. N Each Amplifier/DVD Home Theater has a different back panel configuration.
¦ Connecting a Camcorder Using a Video Cable TV Rear Panel Camcorder 2 Audio Cable (Not supplied) 1 Video Cable (Not supplied) 1. Connect a Video Cable between the AV IN [VIDEO] jack on the TV and the VIDEO OUT jack on the camcorder. 2. Connect Audio Cables between the AV IN [R-AUDIO-L] jacks on the TV and the AUDIO OUT jacks on the camcorder. N Each Camcorder has a different back panel configuration. N When connecting a Camcorder, match the color of the connection terminal to the cable.
¦ Connecting a PC Using a D-Sub Cable TV Rear Panel PC 1 D-Sub Cable (Not supplied) 2 PC Audio Cable (Not supplied) 1. Connect a D-Sub Cable between PC IN [PC] connector on the TV and the PC output connector on your computer. 2. Connect a PC Audio Cable between the PC IN [AUDIO] jack on the TV and the Audio Out jack of the sound card on your computer. N When connecting a PC, match the color of the connection terminal to the cable. Using an HDMI/DVI Cable TV Rear Panel PC 2 3.
Connections (LN52B530) ¦ Connecting VHF and UHF Antennas If your antenna has a set of leads that look like the diagram to the right, see ‘Antennas with 300 Ω Flat Twin Leads’ below. If your antenna has one lead that looks like the diagram to the right, see ‘Antennas with 75 Ω Round Leads’. If you have two antennas, see ‘Separate VHF and UHF Antennas’.
Connecting to a Cable Box that Descrambles Some Channels If your cable box descrambles only some channels (such as premium channels), follow the instructions below. You will need a twoway splitter, an RF (A/B) switch and four lengths of RF cable. (These items are available at most electronics stores.) ANT IN Incoming cable TV Rear Splitter RF (A/B) Switch Cable Box 1. Find and disconnect the cable that is connected to the ANT IN terminal on your cable box.
¦ Connecting a DVD / Blu-ray player / Cable Box / Satellite receiver (Set-Top Box) via DVI This connection can only be made if there is a DVI Output connector on the external device. TV Rear Panel DVD / Blu-ray player / Cable Box / Satellite receiver (Set-Top Box) 2 Audio Cable (Not supplied) 1 DVI to HDMI Cable (Not supplied) 1.
¦ Connecting a VCR TV Rear Panel TV Side Panel 3 VCR Rear Panel 2 Audio Cable (Not supplied) 1 Video Cable (Not supplied) 1. Connect a Video Cable between the AV IN 1 [Y/VIDEO] or AV IN 2 [VIDEO] jack on the TV and the VIDEO OUT jack on the VCR. 2. Connect Audio Cables between the AV IN 1 (or AV IN 2) [R-AUDIO-L] jacks on the TV and the AUDIO OUT jacks on the VCR. N If you have a ‘mono’ (non-stereo) VCR, use a Y-connector (not supplied) to connect to the right and left audio input jacks of the TV.
¦ Connecting an Amplifier / DVD Home Theater TV Rear Panel Amplifier/DVD Home Theater 1 Audio Cable (Not supplied) 1. Connect Audio Cables between the AUDIO OUT [R-AUDIO-L] jacks on the TV and Audio Input jacks on the Amplifier / DVD Home Theater. N When an audio amplifier is connected to the AUDIO OUT [R-AUDIO-L] jacks: Decrease the volume of the TV and adjust the volume level with the Amplifier’s volume control. N Each Amplifier / DVD Home Theater has a different back panel configuration.
¦ Connecting a Camcorder The side panel jacks on your TV make it easy to connect a camcorder to your TV. Using a Video Cable TV Side Panel 3 Camcorder 1 Video Cable (Not supplied) 3 2 Audio Cable (Not supplied) 1. Connect a Video Cable between the AV IN 2 [VIDEO] jack on the TV and the VIDEO OUT jack on the camcorder. 2. Connect Audio Cables between the AV IN 2 [R-AUDIO-L] jacks on the TV and the AUDIO OUT jacks on the camcorder. N Each Camcorder has a different back panel configuration.
¦ Connecting a PC Using a D-Sub Cable TV Rear Panel PC 1 D-Sub Cable (Not supplied) 2 PC Audio Cable (Not supplied) 1. Connect a D-Sub Cable between PC IN [PC] connector on the TV and the PC output connector on your computer. 2. Connect a PC Audio Cable between the PC IN [AUDIO] jack on the TV and the Audio Out jack of the sound card on your computer. N When connecting a PC, match the color of the connection terminal to the cable. Using an HDMI/DVI Cable TV Rear Panel PC 2 3.
Operation ¦ Viewing the menus Button MENU m RETURN R EXIT e Operations Display the main on-screen menu. Return to the previous menu. Exit the on-screen menu. Button ▲/▼/◄/►/ ENTERE Picture Before using the TV, follow the steps below to learn how to navigate the menu in order to select and adjust different functions. 1. Press the MENU button. The main menu is displayed on the screen. Its left side has the following icons: Picture, Sound, Channel, Setup, Input, Application, Support. 2.
¦ Plug & Play Feature When the TV is initially powered on, basic settings proceed automatically and subsequently. Plug & Play Menu Language, Store Demo, Channels, and Time will be set. 1. Press the POWER P button on the remote control. N You can also use the POWER P button on the TV. Start N The message Menu Language, Store Demo, Channels, and Time will be set. is E Enter displayed. 2. Press the ENTERE button, then Sets the menu language. menu is automatically displayed. 3.
Channel Control ¦ Configuring the Channel Menu ❑ Antenna → Air / Cable Channel Before your television can begin memorizing the available channels, you must specify the type of signal source that is connected to the TV (i.e. an Air or a Cable system). T Press the TOOLS button to display the Tools menu. You can also set the Antenna by selecting Tools → Switch to Cable (or Switch to Air).
Programmed Shows all current reserved Programs. N Select a channel in the All Channels, Added Channels or Favorite screen by pressing the ▲ / ▼ buttons, and pressing the ENTERE button. Then you can watch the selected channel. N Using the Color buttons with the Channel List – Green (Zoom): Enlarges or shrinks a channel number. – Yellow (Select): Selects multiple channel lists. You can perform the add / delete or add to Favorite / delete from Favorite function for multiple channels at the same time.
Channel List Option Menu (in Programmed) 1 / 1 / 2009 Programmed You can view, modify or delete a reservation. N Press the TOOLS button to use the option menu. Change Info Select to change a viewing reservation. 9:08 am 5 Info TV3Change The 3:15 pm 2 TV3 5:50 pm 2 TV3 Zoom Select Cancel Schedules Cancel Schedules The Equalizer Information McMillan & Wife Select All Select to cancel a viewing reservation. Information Air T Tools E Information Select to view a viewing reservation.
Dynamic Contrast → Off / Low / Medium / High You can adjust the screen contrast so that the optimal contrast is provided. Gamma You can adjust the primary color (red, green, blue) Intensity. (-3 ~ +3) Color Space Color space is a color matrix composed of red, green and blue colors. Select your favorite color space to experience the most natural color. ● Native: Native Color Space offers deep and rich color tone.
N Temporary image retention may occur when viewing a static image on the set for more than two hours. N After selecting Zoom1, Zoom2 or Wide Fit: Press the ◄ or ► button to select Position, then press the ENTERE button. Press the ▲ or ▼ button to move the picture up and down. N After selecting Screen Fit in HDMI (1080i/1080p) or Component (1080i/1080p) mode, you made need to center the picture: Press the ◄ or ► button to select Position, then press the ENTERE button.
Display Modes If the signal from the system equals the standard signal mode, the screen is adjusted automatically. If the signal from the system doesn’t equal the standard signal mode, adjust the mode by referring to your videocard user guide; otherwise there may be no video. For the display modes listed below, the screen image has been optimized during manufacturing.
Sound Control ¦ Configuring the Sound Menu ❑ Mode → Standard / Music / Movie / Clear Voice / Custom ❑ Equalizer The sound settings can be adjusted to suit your personal preference. Mode Selects the sound mode among the predefined settings. Sound You can select a sound mode to suit your personal preferences. O Press the S.MODE button on the remote control repeatedly to select one of the sound settings.
❑ Speaker Select When you watch TV with it connecting to a Home theater, turn the TV speakers off so you can listen to sound from the Home theater’s (external) speakers. External Speaker: Used to listen to the sound of the External (Home Theater) Speakers. TV Speaker: Used to listen to the sound of the TV Speakers. N If you select External Speaker in the Speaker Select menu, the sound settings will be limited.
Timer 1 / Timer 2 / Timer 3 Three different on / off timer settings can be made. You must set the clock first. ● On Time: Set the hour, minute, am/pm, and activate/inactivate. (To activate the timer with the setting you’ve chosen, set to Activate.) ● Off Time: Set the hour, minute, am/pm, and activate/inactivate. (To activate the timer with the setting you’ve chosen, set to Activate.) ● Volume: Set the desired volume level. ● Antenna: View antenna type.
Canadian English ● ● ● ● ● ● N C: Programming intended for children under age 8. C8+: Programming generally considered acceptable for children 8 years and over to watch on their own. G: General programming, suitable for all audiences. PG: Parental Guidance. 14+: Programming contains themes or content which may not be suitable for viewers under the age of 14. 18+: Adult programming. The V-Chip will automatically block any category that is ‘More restrictive’.
Caption Mode You can select the desired caption mode. N The availability of captions depends on the program being broadcast. ● Default / CC1~CC4 / Text1~Text4 (analog channels only) The Analog Caption function operates in either analog TV channel mode or when a signal is supplied from an external device to TV. (Depending on the broadcasting signal, the Analog Caption function may operate on digital channels.
Input / Support ¦ Configuring the Input Menu ❑ Source List Input Use to select TV or other external input sources such as DVD / Blu-ray players / Cable Box / Satellite receivers (Set-Top Box) connected to the TV. Use to select the input source of your choice. O Press the SOURCE button on the remote control to view an external signal source.
❑ Software Upgrade Samsung may offer upgrades for TV’s firmware in the future. Please visit Samsung.com or contact the Samsung call center at 1-800-SAMSUNG (726-7864) to receive information about downloading upgrades and using a USB drive. Upgrades will be possible by connecting a USB drive to the SERVICE port located on your TV. USB drive N Insert a USB drive containing the firmware upgrade into the SERVICE port on the side of the TV.
To connect to Home Theater TV Anynet+ Device 1 HDMI 1.3 Cable Anynet+ Device 2 HDMI 1.3 Cable Anynet+ Device 3 Home Theater Optical Cable HDMI 1.3 Cable HDMI 1.3 Cable 1. Connect the HDMI IN (1, 2 or 3) jack on the TV and the HDMI OUT jack of the corresponding Anynet+ device using an HDMI cable. 2. Connect the HDMI IN jack of the home theater and the HDMI OUT jack of the corresponding Anynet+ device using an HDMI cable.
¦ Switching between Anynet+ Devices 1. Press the TOOLS button. Press the ENTERE button to select Anynet+ (HDMI-CEC). View TV 2. Press the ▲ or ▼ button to select Device List, then press the ENTERE button. Device List N Anynet+ devices connected to the TV are listed. Record : DVDR DVDR Menu N If you cannot find a device you want, press the red button to scan for devices. DVDR Operation 3. Press the ▲ or ▼ button to select a particular device and press the ENTERE button.
¦ Recording You can make a recording of a TV program using a Samsung recorder. View TV 1. Press the TOOLS button. Press the ENTERE button to select Anynet+ (HDMI-CEC). Device List 2. Press the ▲ or ▼ button to select Recording Immediately and press the ENTERE Record : DVDR button. Recording begins. DVDR Menu DVDR Operation N When there is more than one recording device Setup When multiple recording devices are connected, the recording devices are listed.
¦ Troubleshooting for Anynet+ Problem Anynet+ does not work. Possible Solution ● Check if the device is an Anynet+ device. The Anynet+ system supports Anynet+ devices only. ● Connect only one receiver (home theater). ● Check if the Anynet+ device power cord is properly connected. ● Check the Anynet+ device’s Video/Audio/HDMI 1.3 cable connections. ● Check whether Anynet+ (HDMI-CEC) is set to On in the Anynet+ setup menu. ● Check whether the TV remote control is in TV mode.
Appendix ¦ Troubleshooting If the TV seems to have a problem, first try this list of possible problems and solutions. If none of these troubleshooting tips apply, please visit Samsung.com or contact the Samsung call center at 1-800-SAMSUNG (726-7864). Problem Possible Solution Poor picture. Try another channel. / Adjust the antenna. / Check all wire connections. Poor sound quality. Try another channel. / Adjust the antenna. No picture or sound. Try another channel. / Press the SOURCE button.
Problem Possible Solution The picture appears distorted in the corner of the screen. If Screen Fit is selected with some external devices, the picture may appear distorted in the corner of the screen. This symptom is caused by the external devices, not TV. The ‘Resets all settings to the default values.’ message appears. This appears when you press and hold the EXIT button for a while. The product settings are reset to the factory defaults.
¦ Wall Mount Kit Specifications (VESA) Install your wall mount on a solid wall perpendicular to the floor. When attaching to other building materials, please contact your nearest dealer. If installed on a ceiling or slanted wall, it may fall and result in severe personal injury. N Standard dimensions for wall mount kits are shown in the table above. N When purchasing our wall mount kit, a detailed installation manual and all parts necessary for assembly are provided.
¦ Securing the TV to the Wall Caution: Pulling, pushing, or climbing on the TV may cause the TV to fall. In particular, ensure your children do not hang over or destabilize the TV; doing so may cause the TV to tip over, causing serious injuries or death. Follow all safety precautions provided on the included Safety Flyer. For added stability, install the anti-fall device for safety purposes, as follows. N Applicable to models LN32B530, LN37B530, LN40B530, LN46B530 and LN52B530 only.
¦ Specifications Model Name LN32B530 LN37B530 LN40B530 Screen Size (Diagonal) 32 inches (31.5 inches measured diagonally) 37 inches (37.0 inches measured diagonally) 40 inches (39.9 inches measured diagonally) PC Resolution (Optimum) 1920 X 1080 @ 60 Hz 1920 X 1080 @ 60 Hz 1920 X 1080 @ 60 Hz 10W X 2 10W X 2 10W X 2 31.5 X 3.0 X 20.4 inches (801.0 X 76.8 X 518.1 mm) 31.5 X 8.7 X 22.1 inches (801.0 X 220.2 X 562.5 mm) 36.1 X 3.0 X 23.5 inches (918.0 X 77.3 X 597.3 mm) 36.1 X 9.2 X 25.
¦ Dimensions LN32B530 TOP VIEW JACK PANEL DETAIL 3.7"H X 6.6"W 3.0 31.5 27.5 20.4 15.5 22.1 17.6 8.7 FRONT VIEW / SIDE VIEW 7.9 (200 mm) 7.9 (200 mm) REAR VIEW NOTE: All drawings are not necessarily to scale. Some dimensions are subject to change without prior notice. Refer to the dimensions prior to performing installation of your TV. Not responsible for typographical or printed errors. © 2009 Samsung Electronics America, Inc English - 45 BN68-01883A-01Eng.
LN37B530 TOP VIEW JACK PANEL DETAIL 3.7"H X 6.6"W 3.0 36.1 32.4 23.5 18.3 25.6 22.8 9.2 FRONT VIEW / SIDE VIEW 7.9 (200 mm) 7.9 (200 mm) REAR VIEW NOTE: All drawings are not necessarily to scale. Some dimensions are subject to change without prior notice. Refer to the dimensions prior to performing installation of your TV. Not responsible for typographical or printed errors. © 2009 Samsung Electronics America, Inc English - 46 BN68-01883A-01Eng.
LN40B530 TOP VIEW JACK PANEL DETAIL 3.7"H X 6.6"W 3.1 39.3 34.9 24.4 19.7 27.0 24.4 9.4 FRONT VIEW / SIDE VIEW 7.9 (200 mm) 7.9 (200 mm) REAR VIEW NOTE: All drawings are not necessarily to scale. Some dimensions are subject to change without prior notice. Refer to the dimensions prior to performing installation of your TV. Not responsible for typographical or printed errors. © 2009 Samsung Electronics America, Inc English - 47 BN68-01883A-01Eng.
LN46B530 TOP VIEW JACK PANEL DETAIL 3.7"H X 6.6"W 3.1 44.4 40.2 28.0 22.6 30.2 24.4 10.2 FRONT VIEW / SIDE VIEW 15.7 (400 mm) 15.7 (400 mm) REAR VIEW NOTE: All drawings are not necessarily to scale. Some dimensions are subject to change without prior notice. Refer to the dimensions prior to performing installation of your TV. Not responsible for typographical or printed errors. © 2009 Samsung Electronics America, Inc English - 48 BN68-01883A-01Eng.
LN52B530 TOP VIEW JACK PANEL DETAIL 5.2"H X 6.6"W 3.1 50.0 45.6 31.5 25.7 34.4 24.4 10.2 FRONT VIEW / SIDE VIEW 15.7 (400 mm) 15.7 (400 mm) REAR VIEW NOTE: All drawings are not necessarily to scale. Some dimensions are subject to change without prior notice. Refer to the dimensions prior to performing installation of your TV. Not responsible for typographical or printed errors. © 2009 Samsung Electronics America, Inc English - 49 BN68-01883A-01Eng.
❑ Información importante sobre la garantía relativa al formato de visualización del televisor N Para obtener más información sobre los términos de la garantía, consulte la tarjeta de garantía. Las pantallas LCD con formato de pantalla panorámica (16:9, la relación de aspecto ancho:alto de la pantalla) están diseñadas principalmente para visualizar vídeos de movimiento de formato panorámico.
Contenido Información General Control de los canales ■ Listado de características........................................................... 2 ■ Accesorios................................................................................... 2 ■ Aspecto general del panel de control.......................................... 3 ■ Aspecto general del panel de conexiones.................................. 4 ■ Mando a distancia.......................................................................
Información General N Las ilustraciones de este manual se proporcionan sólo como referencia y pueden ser diferentes del producto real. El diseño y las especificaciones del producto se pueden cambiar sin previo aviso para mejorar el rendimiento del producto. ¦ Listado de características ● ● ● ● ● Valores ajustables de la imagen que se pueden almacenar en la memoria del televisor. Temporizador automático para encender o apagar el televisor. Temporizador de desconexión especial.
¦ Aspecto general del panel de control N El color y la forma del producto pueden variar según el modelo. N Puede utilizar un botón pulsando los botones del panel lateral. 1 2 3 4 5 6 8 76 1 SOURCEE: Cambia entre todas las fuentes de entrada disponibles. En el menú de la pantalla, utilice este botón del mismo modo que el botón ENTERE del mando a distancia. 2 MENU: Pulse para ver en pantalla un menú con las características del TV. 3 y: Púlselos para subir o bajar el volumen.
¦ Aspecto general del panel de conexiones LN52B530 [Panel posterior del TV] [Panel lateral del TV] 1 1 # # 1 1 3 34 45 ! ! 0 65 6 7 7 0 9 9 8 8 8 8 LN32B530, LN37B530, LN40B530, LN46B530 [Panel posterior del TV] 0 0 @ 2 2 4 @ 54 $ 3 $ 9 56 7 3 9 6 7 N El color y la forma del producto pueden variar según el modelo. Español - BN68-01883A-01Eng.
1 HDMI IN 1, 2, 3 / DVI IN(HDMI1) [R-AUDIO-L] (LN52B530) – Permite conectar al terminal HDMI un dispositivo que tenga salida HDMI. N No se necesita ninguna conexión de sonido para una conexión de HDMI a HDMI. N Use el terminal HDMI IN 1 para conectar el DVI a un dispositivo externo. Use un cable de DVI a HDMI o un adaptador de DVI-HDMI (DVI a HDMI) para la conexión del vídeo y los terminales DVI IN (HDMI1) [R-AUDIO-L] para el audio.
¦ Mando a distancia N Puede utilizar el mando a una distancia del televisor de hasta 7 metros. N El exceso de luz puede influir en el rendimiento del mando a distancia. N El color y la forma del producto pueden variar según el modelo. 1 POWER: Enciende o apaga el TV. 2 BOTONES NUMÉRICOS: Permiten cambiar de canal. 3 _: Pulse este botón para seleccionar canales adicionales (digitales) emitidos por la misma emisora. Por ejemplo, para seleccionar el canal ‘54-3’, pulse ‘54’, _ y ‘3’.
Conexiones (LN32B530, LN37B530, LN40B530, LN46B530) ¦ Conexión de antenas de VHF y UHF Si su antena tiene un conjunto de cables con este aspecto, consulte ‘Antenas de par de cables planos de 300 Ω’ a continuación. Si la antena tiene un cable como el que se muestra en el diagrama de la derecha, consulte ‘Antenas con cables coaxiales de 75 ohmios’. Si dispone de dos antenas, consulte ‘Antenas de VHF y UHF independientes’.
Conexión a un decodificador que decodifica algunos canales Si su decodificador sólo decodifica algunos canales (como los canales de pago), siga las instrucciones siguientes. Necesitará un divisor de dos vías, un conmutador de RF (A/B) y cuatro largos de cable RF. (Estas opciones se encuentran en la mayoría de tiendas de electrónica.) ANT IN Cable de entrada Parte posterior Divisor Conmutador RF (A/B) del televisor Servicio de cable 1.
¦ Conexión de un reproductor de DVD / Blu-ray / receptor por cable / satélite (decodificador) a través de DVI Solo es aplicable si hay un conector de salida de DVI en el dispositivo externo. Panel posterior del TV Reproductor DVD / Blu-ray / receptor por cable/ satélite (decodificador) 2 Cable de audio (no incluido) 1 Cable DVI a HDMI (no incluido) 1.
¦ Conexión de un reproductor de vídeo Panel posterior del TV Panel posterior del VCR 2 Cable de audio (no incluido) 1 Cable de vídeo (no incluido) 1. Conecte un cable de vídeo entre el terminal AV IN [VIDEO] del televisor y el terminal VIDEO OUT del aparato de vídeo. 2. Conecte los cables de audio entre los terminales AV IN [R-AUDIO-L] del televisor y los terminales AUDIO OUT del aparato de vídeo.
¦ Conexión de un amplificador / DVD para Home Cinema Panel posterior del TV Amplificador / DVD de Home Cinema 1 Cable de audio (no incluido) 1. Conecte los cables de audio entre los terminales AUDIO OUT [R-AUDIO-L] del televisor y los terminales de entrada de audio del amplificador / DVD para Home Cinema. N Cuando un amplificador de audio se conecta a los terminales AUDIO OUT [R-AUDIO-L]: Reduzca la ganancia (volumen) del TV, y ajuste el volumen con el control del amplificador.
¦ Conexión de una videocámara Uso de un cable de vídeo Panel posterior del TV Videocámara 2 Cable de audio (no incluido) 1 Cable de vídeo (no incluido) 1. Conecte un cable de vídeo entre el terminal AV IN [VIDEO] del televisor y el terminal VIDEO OUT de la videocámara. 2. Conecte los cables de audio entre los terminales AV IN [R-AUDIO-L] del televisor y los terminales AUDIO OUT de la videocámara. N Cada videocámara tiene una configuración distinta en el panel posterior.
¦ Conexión a un PC Uso de un cable D-Sub Panel posterior del TV PC 1 Cable D-Sub (no incluido) 2 Cable de audio de PC (no incluido) 1. Conecte un cable D-Sub entre el conector PC IN [PC] del televisor y el conector de salida de PC del ordenador. 2. Conecte un cable de audio PC entre el terminal PC IN [AUDIO] del televisor y el terminal de salida de audio de la tarjeta de sonido del ordenador. N Cuando conecte un PC, debe hacer coincidir los colores del terminal de conexión y del cable.
Conexiones (LN52B530) ¦ Conexión de antenas de VHF y UHF Si su antena tiene un conjunto de cables con este aspecto, consulte ‘Antenas de par de cables planos de 300 Ω’ a continuación. Si la antena tiene un cable como el que se muestra en el diagrama de la derecha, consulte "Antenas con cables coaxiales de 75 ohmios". Si dispone de dos antenas, consulte "Antenas de VHF y UHF independientes".
Conexión a un decodificador que decodifica algunos canales Si su decodificador sólo decodifica algunos canales (como los canales de pago), siga las instrucciones siguientes. Necesitará un divisor de dos vías, un conmutador de RF (A/B) y cuatro largos de cable RF. (Estas opciones se encuentran en la mayoría de tiendas de electrónica.) ANT IN Cable de entrada Parte posterior Divisor Conmutador RF (A/B) del televisor Servicio de cable 1.
¦ Conexión de un reproductor de DVD / Blu-ray/receptor por cable / satélite (decodificador) a través de DVI Solo es aplicable si hay un conector de salida de DVI en el dispositivo externo. Panel posterior del TV Reproductor DVD / Blu-ray / receptor por cable / satélite (decodificador) 2 Cable de audio (no incluido) 1 Cable DVI a HDMI (no incluido) 1.
¦ Conexión de un reproductor de vídeo Panel posterior del TV Panel lateral del TV 3 Panel posterior del VCR 2 Cable de audio (no incluido) 1 Cable de vídeo (no incluido) 1. Conecte un cable de vídeo entre los terminales AV IN 1 [Y/VIDEO] o AV IN 2 [VIDEO] del televisor y el terminal VIDEO OUT del aparato de vídeo. 2. Conecte los cables de audio entre los terminales AV IN 1 (o AV IN 2) [R-AUDIO-L] del televisor y los terminales AUDIO OUT del aparato de vídeo.
¦ Conexión de un amplificador/DVD para Home Cinema Panel posterior del TV Amplificador/DVD de Home Cinema 1 Cable de audio (no incluido) 1. Conecte los cables de audio entre los terminales AUDIO OUT [R-AUDIO-L] del televisor y los terminales de entrada de audio del amplificador / DVD para Home Cinema. N Cuando un amplificador de audio se conecta a los terminales AUDIO OUT [R-AUDIO-L]: Reduzca el volumen del TV y ajuste el volumen con el control del amplificador.
¦ Conexión de una videocámara Las tomas del panel lateral del televisor facilitan la conexión de la videocámara. Uso de un cable de vídeo Panel lateral del TV 3 Videocámara 1 Cable de vídeo (no incluido) 3 2 Cable de audio (no incluido) 1. Conecte un cable de vídeo entre el terminal AV IN 2 [VIDEO] del televisor y el terminal VIDEO OUT de la videocámara. 2. Conecte los cables de audio entre los terminales AV IN 2 [R-AUDIO-L] del televisor y los terminales AUDIO OUT de la videocámara.
¦ Conexión a un PC Uso de un cable D-Sub Panel posterior del TV PC 1 Cable D-Sub (no incluido) 2 Cable de audio de PC (no incluido) 1. Conecte un cable D-Sub entre el conector PC IN [PC] del televisor y el conector de salida de PC del ordenador. 2. Conecte un cable de audio PC entre el terminal PC IN [AUDIO] del televisor y el terminal de salida de audio de la tarjeta de sonido del ordenador. N Cuando conecte un PC, debe hacer coincidir los colores del terminal de conexión y del cable.
Funcionamiento ¦ Visualización de los menús Botón MENU m RETURN R EXIT e Función Muestra el menú de pantalla principal. Volver al menú anterior. Salir del menú en pantalla. Botón ▲/▼/◄/►/ ENTERE Imagen Antes de usar el televisor, siga los pasos detallados a continuación para saber cómo desplazarse por los menús para seleccionar y ajustar las funciones. 1. Pulse el botón MENU. En la pantalla aparece el menú principal.
¦ Función Plug & Play Cuando se enciende el televisor por primera vez, se configuran seguidos y automáticamente dos Plug & Play ajustes básicos del usuario. Menu Language, Store Demo, Channels, and Time will be set. 1. Pulse el botón POWER P del mando a distancia. N También puede usar el botón POWERP del televisor. Start E Enter N Aparece el mensaje Menu Language, Store Demo, Channels and Time will be set.. 2. Pulse el botón ENTERE y aparecerá automáticamente el menú Define el idioma del menú.. 3.
Control de los canales ¦ Configuración del menú de canales ❑ Antena → Aire / Cable Canal Antes de empezar a memorizar los canales disponibles, debe indicar el tipo de origen de la señal conectada al TV (es decir, antena o sistema de cable). T Pulse el botón TOOLS para ver el menú Herramientas. También puede configurar la antena con Herramientas → Cambiar a Cable (o Cambiar a Aereos). Antena : Aire ► Prog. Auto Borrar canal encriptado Lista de canales ❑ Prog.
Grabación con temporizador Muestra todos los programas actualmente reservados. N Seleccione un canal en la pantalla Todos los canales, Canales agregados o Favoritos pulsando los botones ▲/▼ y pulse el botón ENTERE. A continuación puede ver el canal seleccionado. N Uso de los botones de colores en la lista de canales – Verde (Zoom): Amplía o disminuye el número del canal. – Amarillo (Selección): Selecciona varias listas de canales.
Menús de opciones de la lista de canales (en Grabación con temporizador) Cambiar información Selecciónelo para cambiar la reserva de visualización. Cancelar programaciones 1 / 1 / 2009 Grabación con temporizador Se puede ver, cambiar o borrar una reserva. N Pulse el botón TOOLS para usar el menú de opciones.
Contraste Dinám. → Apagado / Bajo / Medio / Alto Se puede ajustar el contraste de la pantalla para conseguir un contraste óptimo. Gamma Se puede ajustar la intensidad de los colores primarios (rojo, verde y azul). (-3 ~ +3) Espacio de color El espacio de color es una matriz compuesta por los colores rojo, verde y azul. Seleccione su espacio de color favorito y disfrute de unos colores auténticamente naturales. ● Nativo: El espacio de color nativo proporciona tonos de color profundos y ricos.
N Puede producirse una retención temporal de imagen cuando se ve una imagen estática durante más de dos horas. N Después de seleccionar Zoom1, Zoom2 o Ajuste ancho: Pulse el botón ◄ o ► para seleccionar Posición y, a continuación, pulse el botón ENTERE. Pulse los botones ▲ o ▼ para desplazar la imagen hacia arriba o hacia abajo.
Modos de pantalla Si la señal del sistema es igual al modo de señal estándar, la pantalla se ajusta automáticamente. Si la señal del sistema no es igual al modo de señal estándar, ajuste el modo consultando la guía del usuario de la tarjeta de vídeo; de lo contrario, puede no haber señal de vídeo. La imagen de pantalla se ha optimizado durante la fabricación para los modos de visualización enumerados a continuación.
Control de sonido ¦ Configuración del menú de sonido ❑ Modo → Normal / Música / Cine / Voz clara / Favorito ❑ Ecualizador Es posible ajustar los parámetros del sonido según sus preferencias personales. Modo Selecciona el modo de sonido entre los valores predefinidos. Sonido Puede seleccionar el modo de sonido que se ajuste a sus preferencias personales. O Pulse varias veces el botón S.MODE del mando a distancia para seleccionar uno de los parámetros del sonido.
❑ Seleccionar altavoz Cuando se ve el televisor conectado a un sistema Home Cinema, se debe apagar el altavoz del televisor para que la salida de audio del televisor utilice los altavoces del Home Cinema (externos). Altavoz externo: Utiliza los altavoces externos (Home Cinema) para la salida del sonido. Altavoz de TV: Utiliza los altavoces del TV para la salida del sonido. N Si selecciona Altavoz externo en el menú Seleccionar altavoz, se limita la configuración del sonido.
Temporizador 1 / Temporizador 2 / Temporizador 3 La activación y desactivación del temporizador se puede configurar de tres maneras. Debe ajustar el reloj en primer lugar. ● Hora de encendido: Ajuste la hora, los minutos, am/pm y activar/desactivar. (Para activar el temporizador con la configuración deseada, establézcalo en Activar.) ● Hora de apagado: Ajuste la hora, los minutos, am/pm y activar/desactivar. (Para activar el temporizador con la configuración deseada, establézcalo en Activar.
Inglés Canadiense ● ● ● ● ● ● N C: Programación para niños menores de 8 años. C8+: Programación generalmente considerada aceptable para niños mayores de 8 años sin acompañamiento de adultos. G: Programación general, ideal para todas las audiencias. PG: Supervisión paterna. 14+: La programación contiene temas y contenidos que puede que no sean adecuados para menores de 14 años. 18+: Programación para adultos. El V-Chip bloqueará automáticamente cualquier categoría que sea ‘más restrictiva’.
dos los cación Modo de Subtítulo Puede seleccionar el modo de subtítulo deseado. N La disponibilidad de los subtítulos depende del programa que se esté emitiendo. ● Programado / CC1~CC4 / Texto1~Texto4 (sólo canales analógicos) La función de subtítulos analógicos funciona tanto en el modo de canal de televisión analógica como cuando la señal proviene de un dispositivo externo. (Dependiendo de la señal de transmisión, puede funcionar en canales digitales.
Entrada/Soporte técnico ¦ Configuración del menú de entrada ❑ Lista de Entradas Entrada Utilice este menú para seleccionar TV u otras fuentes de entrada externas como reproductores de DVD/Blu-ray/receptores de cable y satélite (decodificadores), conectados al televisor. Permite seleccionar la fuente de entrada que se prefiera. O Pulse el botón SOURCE del mando a distancia para ver una fuente de señal externa.
❑ Actualización del software Samsung puede ofrecer actualizaciones para el firmware del televisor en el futuro. Póngase en contacto con el centro de llamadas de Samsung en 1-800-SAMSUNG(726-7864) para recibir información acerca de la descarga de las actualizaciones y del uso de un controlador USB. Las actualizaciones se pueden realizar conectando una unidad USB al puerto SERVICE situado en el Unidad USB televisor.
Para conectar al sistema Home Cinema TV Dispositivo 1 Anynet+ Dispositivo 2 Anynet+ Cable HDMI 1.3 Cable HDMI 1.3 Dispositivo 3 Anynet+ Home Cinema Cable óptico Cable HDMI 1.3 Cable HDMI 1.3 1. Conecte los terminales HDMI IN (1, 2 o 3) del televisor y el terminal HDMI OUT del dispositivo Anynet+ correspondiente mediante un cable HDMI. 2. Conecte el terminal HDMI IN del sistema Home Cinema y el terminal HDMI OUT del dispositivo Anynet+ correspondiente mediante un cable HDMI.
¦ Conmutación entre dispositivos Anynet+ 1. Pulse el botón TOOLS. Pulse el botón ENTERE para seleccionar Anynet+ (HDMI-CEC). Ver TV 2. Pulse el botón ▲ o ▼ para seleccionar Lista Disp. y, a continuación, pulse el botón Lista Disp. ENTERE . Grabar : DVDR + N Anynet conectados al televisor. DVDR Menú DVDR Funcionamiento N Si no encuentra el dispositivo que desea, pulse el botón rojo para buscar los dispositivos. Configuración 3.
¦ Grabación La grabadora de Samsung permite efectuar una grabación de un programa de televisión. Ver TV 1. Pulse el botón TOOLS. Pulse el botón ENTERE para seleccionar Anynet+ (HDMI-CEC). Lista Disp. 2. Pulse el botón ▲ o ▼ para seleccionar la grabación inmediata y, a continuación, pulse el botón Grabar : DVDR ENTERE. Comienza la grabación.
¦ Solución de problemas de Anynet+ Problema Anynet+ no funciona. Deseo iniciar Anynet+. Deseo salir de Anynet+. En la pantalla aparece el mensaje Connecting to Anynet+ device... El dispositivo Anynet+ no funciona. El dispositivo conectado no se muestra. El programa de televisión no se puede grabar. El sonido del televisor no sale a través del receptor. Posible Solución ● Compruebe si el dispositivo es un dispositivo Anynet+. El sistema Anynet+ sólo admite dispositivos Anynet+.
Apéndice ¦ Identificación de problemas Si cree que el televisor tiene un problema, compruebe primero esta lista de posibles problemas y soluciones. Si ninguno de los consejos funciona, póngase en contacto con el centro de atención al cliente de Samsung o llame al 1-800-SAMSUNG (726-7864). Problema Posible Solución Imagen deficiente. Intente sintonizar otro canal. / Ajuste la antena. / Compruebe todas las conexiones de cable. Calidad de sonido deficiente. Intente sintonizar otro canal.
Problema Posible Solución La imagen no está centrada en la pantalla. Ajuste la posición horizontal y vertical. La posición de la pantalla se debe ajustar respecto a la fuente de salida (por ejemplo, STB) con una señal digital. La imagen aparece distorsionada en la esquina de la pantalla. Si Ajuste a pantalla está seleccionado en algún dispositivo externo, la imagen puede aparecer distorsionada en la esquina de la pantalla. Este síntoma se origina en los dispositivos externos, no en el televisor.
¦ Especificaciones del equipo de montaje en la pared (VESA) Instale el montaje mural en una pared sólida, perpendicular al suelo. Para colocarlo en otros materiales de construcción, póngase en contacto con el distribuidor más cercano. Si se instala en el techo o en una pared inclinada, puede caerse y causar graves lesiones personales. N Las dimensiones estándar de los equipos de montaje mural se muestran en la tabla anterior.
¦ Fijación del televisor a la pared Precaución: Tirar del televisor, empujarlo o colgarse de él puede provocar su caída. En especial, procure que los niños no se cuelguen del televisor ni lo desestabilicen; éste podría caerse sobre ellos y causarles lesiones graves o incluso la muerte. Siga las precauciones de seguridad del folleto de seguridad incluido con el producto. Para mejorar la estabilidad instale un dispositivo antivuelco, como se explica a continuación.
¦ Especificaciones Nombre del modelo LN32B530 LN37B530 LN40B530 Tamaño de pantalla (Diagonal) 32 pulg (31.5 pulgadas medidas diagonalmente) 37 pulg (37 pulgadas medidas diagonalmente) 40 pulg (39.9 pulgadas medidas diagonalmente) 1920 X 1080 a 60 Hz 1920 X 1080 a 60 Hz 1920 X 1080 a 60 Hz 10 W X 2 10 W X 2 10 W X 2 31.5 X 3.0 X 20.4 pulg (801.0 X 76.8 X 518.1 mm) 31.5 X 8.7 X 22.1 pulg (801.0 X 220.2 X 562.5 mm) 36.1 X 3.0 X 23.5 pulg (918.0 X 77.3 X 597.3 mm) 36.1 X 9.2 X 25.6 pulg (918.
¦ Dimensiones LN32B530 VISTA SUPERIOR DETALLE DEL PANEL DE TERMINALES 3.7"H X 6.6"W 3.0 31.5 27.5 20.4 15.5 22.1 17.6 8.7 VISTA FRONTAL/VISTA LATERAL 7.9 (200 mm) 7.9 (200 mm) VISTA POSTERIOR NOTA: No todos los dibujos están necesariamente a escala. Algunas dimensiones están sujetas a cambio sin previo aviso. Consulte las dimensiones antes de efectuar la instalación del televisor. La empresa no se responsabiliza de los errores tipográficos o de impresión. © 2009 Samsung Electronics America, Inc.
LN37B530 VISTA SUPERIOR DETALLE DEL PANEL DE TERMINALES 3.7"H X 6.6"W 3.0 36.1 32.4 23.5 18.3 25.6 22.8 9.2 VISTA FRONTAL/VISTA LATERAL 7.9 (200 mm) 7.9 (200 mm) VISTA POSTERIOR NOTA: No todos los dibujos están necesariamente a escala. Algunas dimensiones están sujetas a cambio sin previo aviso. Consulte las dimensiones antes de efectuar la instalación del televisor. La empresa no se responsabiliza de los errores tipográficos o de impresión. © 2009 Samsung Electronics America, Inc.
LN40B530 VISTA SUPERIOR DETALLE DEL PANEL DE TERMINALES 3.7"H X 6.6"W 3.1 39.3 34.9 24.4 19.7 27.0 24.4 9.4 VISTA FRONTAL/VISTA LATERAL 7.9 (200 mm) 7.9 (200 mm) VISTA POSTERIOR NOTA: No todos los dibujos están necesariamente a escala. Algunas dimensiones están sujetas a cambio sin previo aviso. Consulte las dimensiones antes de efectuar la instalación del televisor. La empresa no se responsabiliza de los errores tipográficos o de impresión. © 2009 Samsung Electronics America, Inc.
LN46B530 VISTA SUPERIOR DETALLE DEL PANEL DE TERMINALES 3.7"H X 6.6"W 3.1 44.4 40.2 22.6 28.0 30.2 24.4 10.2 VISTA FRONTAL/VISTA LATERAL 15.7 (400 mm) 15.7 (400 mm) VISTA POSTERIOR NOTA: No todos los dibujos están necesariamente a escala. Algunas dimensiones están sujetas a cambio sin previo aviso. Consulte las dimensiones antes de efectuar la instalación del televisor. La empresa no se responsabiliza de los errores tipográficos o de impresión. © 2009 Samsung Electronics America, Inc.
LN52B530 VISTA SUPERIOR DETALLE DEL PANEL DE TERMINALES 5.2"H X 6.6"W 3.1 50.0 45.6 25.7 31.5 34.4 24.4 10.2 VISTA FRONTAL/VISTA LATERAL 15.7 (400 mm) 15.7 (400 mm) VISTA POSTERIOR NOTA: No todos los dibujos están necesariamente a escala. Algunas dimensiones están sujetas a cambio sin previo aviso. Consulte las dimensiones antes de efectuar la instalación del televisor. La empresa no se responsabiliza de los errores tipográficos o de impresión. © 2009 Samsung Electronics America, Inc.